前言
本文记录了博主第一次接触蓝牙,到使用 App 同周边蓝牙设备通信的过程。只讨论 App 作为中心设备的情况,不包含 App 作为周边设备的情形。
iOS 中使用 Core Bluetooth 框架实现蓝牙通信。Core Bluetooth 是基于蓝牙 4.0 的低功耗模式实现的。
蓝牙的连接类似于 Client/Server 构架模型。中心设备作为客户端,周边设备作为服务端,扫描并建立连接进行数据交换。
在开始编码前,先熟悉 iOS 在蓝牙通信中涉及到的几个类,搬砖费不费力。
准备
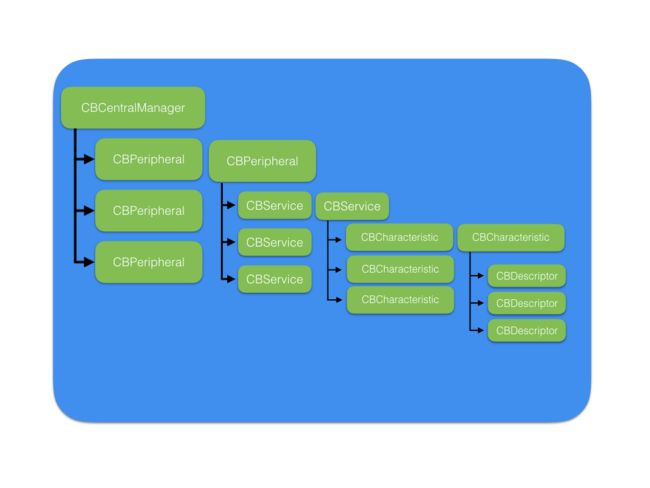
蓝牙相关的类图:
- CBCentralManager 类表示中心设备,扫描发现周边蓝牙设备,周边蓝牙设备用 CBPeripheral 类表示。
- 一个蓝牙设备可能存在多种用途,每一种用途对应一个服务,使用 CBService 表示,比如心率传感器有心率监测服务。
- 一个服务可以细分为多种特征,使用 CBCharacteristic 表示,比如心率监测服务中,含有心率的测量值、地理位置的定位等 Characteristic。
- 一个特征可以有多种描述,用 CBDescriptor 表示。
以上涉及到的 CBService,CBCharacteristic,CBDescriptor 类都继承自 CBAttribute,它们有一个共同的属性 CBUUID,用来作为唯一的标识。
Peripheral 作为 Server 端, Central 作为 Client, Peripheral 广播自己的 Services 和 Characteristics, Central 可以选择订阅某一个具体的 Service, 也可以一次性订阅全部的 Server(不建议这么做)。获取到某个 Service 之后,同样需要继续发现这个服务下的 Characteristics。Peripheral 和 Central 之间通过 Characteristic 建立一个双向的数据通道。
注意一定要用真机测试。
编码
在 iOS 10 之后需要在 Info.plist 文件里面设置 NSBluetoothPeripheralUsageDescription 字段,添加访问蓝牙权限的描述,否则强行访问蓝牙功能会造成 Crash。
开始,初始化一个中心设备:
    CBCentralManager *centralManager = [[CBCentralManager alloc] initWithDelegate:self queue:nil options:nil];
    _centralManager = centralManager;
这里有一个注意点,CBCentralManager 的创建是异步的,如果初始化完成之后没有被当前创建它的类所持有,就会在下一次 RunLoop 迭代的时候释放。当然 CBCentralManager 实例如果不是在 ViewController 中创建的,那么持有 CBCentralManager 的这个类在初始化之后也必须被 ViewController 持有,否则控制台会有如下的错误输出:
[CoreBluetooth] XPC connection invalid
如果成功初始化,就会回调 CBCentralManagerDelegate:
// 在 cetral 的状态变为 CBManagerStatePoweredOn 的时候开始扫描
- (void)centralManagerDidUpdateState:(CBCentralManager *)central {
    if (central.state == CBManagerStatePoweredOn) {
        [_centralManager scanForPeripheralsWithServices:nil options:nil];
    }
}
中心设备处于 PowerOn 状态的时候开始扫描周边设备,可以使用指定的 UUID 发现特定的 Service,也可以传入 nil,表示发现所有周边的蓝牙设备,不过还是建议只发现自己需要服务的设备。发现之后会回调如下方法:
- (void)centralManager:(CBCentralManager *)central
 didDiscoverPeripheral:(CBPeripheral *)peripheral
     advertisementData:(NSDictionary *)advertisementData RSSI:(NSNumber *)RSSI {

    if (!peripheral.name) return; // Ingore name is nil peripheral.
    if (![_peripheralsList containsObject:peripheral]) {
        [_peripheralsList addObject:peripheral];
        _peripherals = _peripheralsList.copy;
    }
}
成功发现设备后选择一个 peripheral 建立连接,在建立连接之后停止发现:
[_centralManager connectPeripheral:peripheral options:nil];
连接成功后会继续回调 CBCentralManagerDelegate 中的方法:
- (void)centralManager:(CBCentralManager *)central didConnectPeripheral:(CBPeripheral *)peripheral {
    peripheral.delegate = self;

    // Client to do discover services method...
    CBUUID *seriveUUID = [CBUUID UUIDWithString:@"d2009d00-6000-1000-8000-XXXX"];

    // `nil` 代表发现所有服务。
    [peripheral discoverServices:@[seriveUUID]];
}
连接成功该周边设备之后,再发现需要使用该设备的具体服务。
接下来就是响应 CBPeripheralDelegate 代理方法了。
成功发现周边设备的某个服务之后响应方法:
// 发现服务
- (void)peripheral:(CBPeripheral *)peripheral didDiscoverServices:(nullable NSError *)error {
    NSArray *services = peripheral.services;
    if (services) {
        CBService *service = services[0];
        CBUUID *writeUUID = [CBUUID UUIDWithString: TRANSFER_SERVICE_UUID];
        CBUUID *notifyUUID = [CBUUID UUIDWithString: TRANSFER_SERVICE_UUID];
        [peripheral discoverCharacteristics:@[writeUUID, notifyUUID] forService:service]; // 发现服务
    }
}
发现服务(CBService)之后,还需要发现该服务下的特征(Characteristic)。这里通常会有两中特征:写特征和通知特征。
发现特征之后一定要打开通知特性,否者写入数据之后,不会收到回复数据。
// 发现特征
- (void)peripheral:(CBPeripheral *)peripheral didDiscoverCharacteristicsForService:(CBService *)service error:(nullable NSError *)error {
    if (!error) {
            NSArray *characteristicArray = service.characteristics;
            if(characteristicArray.count > 1) {

            CBCharacteristic *writeCharacteristic = characteristicArray[0];
            CBCharacteristic *notifyCharacteristic = characteristicArray[1];

            // 通知使能, `YES` enable notification only, `NO` disable notifications and indications
            [peripheral setNotifyValue:YES forCharacteristic:notifyCharacteristic];
        }
    } else {
        NSLog(@"Discover Charactertics Error : %@", error);
    }
}
使用 writeCharactersitc 写入数据:
[peripheral writeValue:writeData.copy forCharacteristic:writeCharactersitc type:CBCharacteristicWriteWithResponse];
写入数据之后,在需要回复的前提下会回调如下两个代理方法:
// 写入成功
- (void)peripheral:(CBPeripheral *)peripheral didWriteValueForCharacteristic:(CBCharacteristic *)characteristic error:(nullable NSError *)error {
    if (!error) {
        NSLog(@"Write Success");
    } else {
        NSLog(@"WriteVale Error = %@", error);
    }
}

// 写入成功后的应答
- (void)peripheral:(CBPeripheral *)peripheral didUpdateValueForCharacteristic:(CBCharacteristic *)characteristic error:(NSError *)error {
    if (error) {
        NSLog(@"update value error: %@", error);
    } else {
        NSData *responseData = characteristic.value;
    }
}
至此,一次完整的蓝牙通信就完成了。
蓝牙数据包的载荷比较小,在应答的过程中,经常需要进行拆包、组合。包的第一个字节代表包的序列号。
Demo 地址
参考
Core Bluetooth Overview
iOS开发之玩转蓝牙CoreBluetooth
