睿智的目标检测15——Keras 利用mtcnn+facenet搭建人脸识别平台
睿智的目标检测15——Keras 利用mtcnn+facenet搭建人脸识别平台
- 学习前言
- 什么是mtcnn和facenet
-
- 1、mtcnn
- 2、facenet
- 整体实现代码
- 实现流程
-
- 一、数据库的初始化
- 二、实时图片的处理
-
- 1、人脸的截取与对齐
- 2、利用facenet对矫正后的人脸进行编码
- 3、将实时图片中的人脸特征与数据库中的进行比对
- 4、实时处理图片整体代码
- 全部代码:
学习前言
我又死了我又死了我又死了!
![]()
什么是mtcnn和facenet
1、mtcnn
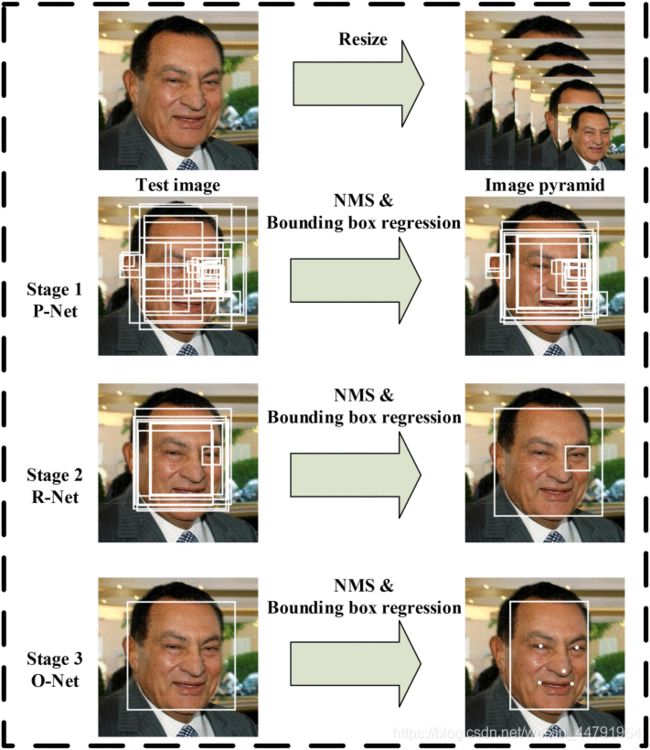
MTCNN,英文全称是Multi-task convolutional neural network,中文全称是多任务卷积神经网络,该神经网络将人脸区域检测与人脸关键点检测放在了一起。总体可分为P-Net、R-Net、和O-Net三层网络结构。

2、facenet
谷歌人脸检测算法,发表于 CVPR 2015,利用相同人脸在不同角度等姿态的照片下有高内聚性,不同人脸有低耦合性,提出使用 cnn + triplet mining 方法,在 LFW 数据集上准确度达到 99.63%。
通过 CNN 将人脸映射到欧式空间的特征向量上,实质上:不同图片人脸特征的距离较大;通过相同个体的人脸的距离,总是小于不同个体的人脸这一先验知识训练网络。
测试时只需要计算人脸特征EMBEDDING,然后计算距离使用阈值即可判定两张人脸照片是否属于相同的个体。
![]()
简单来讲,在使用阶段,facenet即是:
1、输入一张人脸图片
2、通过深度学习网络提取特征
3、L2标准化
4、得到128维特征向量。
整体实现代码
https://github.com/bubbliiiing/keras-face-recognition
mtcnn原理和facenet原理可以参考我的另外两篇博客。
睿智的目标检测13——Keras搭建mtcnn人脸检测平台
神经网络学习小记录32——facenet详解及其keras实现
实现流程
一、数据库的初始化

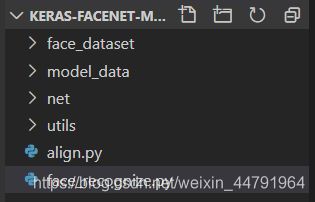
face_dataset里面装的是想要识别的人脸,比如说obama.jpg指的就是奥巴马。
数据库中每一张图片对应一个人的人脸,图片名字就是这个人的名字。
数据库初始化指的是人脸数据库的初始化。
想要实现人脸识别,首先要知道自己需要识别哪些人脸。
这就是数据库的一个功能,将想要检测到的人脸放入数据库中,并进行编码。
数据库的初始化具体执行的过程就是:
1、遍历数据库中所有的图片。
2、检测每个图片中的人脸位置。
3、利用mtcnn将人脸截取下载。
4、将获取到的人脸进行对齐。
5、利用facenet将人脸进行编码。
6、将所有人脸编码的结果放在一个列表中。
第6步得到的列表就是已知的所有人脸的特征列表,在之后获得的实时图片中的人脸都需要与已知人脸进行比对,这样我们才能知道谁是谁。
实现代码如下:
class face_rec():
    def __init__(self):
        # 创建mtcnn对象
        # 检测图片中的人脸
        self.mtcnn_model = mtcnn()
        # 门限函数
        self.threshold = [0.5,0.8,0.9]

        # 载入facenet
        # 将检测到的人脸转化为128维的向量
        self.facenet_model = InceptionResNetV1()
        # model.summary()
        model_path = './model_data/facenet_keras.h5'
        self.facenet_model.load_weights(model_path)

        #-----------------------------------------------#
        #   对数据库中的人脸进行编码
        #   known_face_encodings中存储的是编码后的人脸
        #   known_face_names为人脸的名字
        #-----------------------------------------------#
        face_list = os.listdir("face_dataset")

        self.known_face_encodings=[]

        self.known_face_names=[]

        for face in face_list:
            name = face.split(".")[0]

            img = cv2.imread("./face_dataset/"+face)
            img = cv2.cvtColor(img,cv2.COLOR_BGR2RGB)

            # 检测人脸
            rectangles = self.mtcnn_model.detectFace(img, self.threshold)

            # 转化成正方形
            rectangles = utils.rect2square(np.array(rectangles))
            # facenet要传入一个160x160的图片
            rectangle = rectangles[0]
            # 记下他们的landmark
            landmark = (np.reshape(rectangle[5:15],(5,2)) - np.array([int(rectangle[0]),int(rectangle[1])]))/(rectangle[3]-rectangle[1])*160

            crop_img = img[int(rectangle[1]):int(rectangle[3]), int(rectangle[0]):int(rectangle[2])]
            crop_img = cv2.resize(crop_img,(160,160))

            new_img,_ = utils.Alignment_1(crop_img,landmark)

            new_img = np.expand_dims(new_img,0)
            # 将检测到的人脸传入到facenet的模型中,实现128维特征向量的提取
            face_encoding = utils.calc_128_vec(self.facenet_model,new_img)

            self.known_face_encodings.append(face_encoding)
            self.known_face_names.append(name)
二、实时图片的处理
1、人脸的截取与对齐
利用mtcnn我们可以获得一张图片中人脸的位置,但是我们截取下来的人脸是这样的:
![]()
我们可以很明显的看出来人脸是歪着的,我们如果人脸可以正过来,那么将对人脸的特征提取非常有好处。
![]()
下面这张图看着就正多了。
常见的对齐方法有
1、通过双眼坐标进行旋正
2、通过矩阵运算求解仿射矩阵进行旋正
这里简单讲讲通过双眼坐标进行旋正。
利用双眼坐标进行旋正需要用到两个参数,如图所示分别是:
1、眼睛连线相对于水平线的倾斜角。
2、图片的中心。
![]()
利用这两个参数我们可以知道需要图片需要旋转的角度是多少,图片旋转的中心是什么。
代码实现如下,其中landmark是五个人脸特征点的位置:
#-------------------------------------#
#   人脸对齐
#-------------------------------------#
def Alignment_1(img,landmark):

    if landmark.shape[0]==68:
        x = landmark[36,0] - landmark[45,0]
        y = landmark[36,1] - landmark[45,1]
    elif landmark.shape[0]==5:
        x = landmark[0,0] - landmark[1,0]
        y = landmark[0,1] - landmark[1,1]
    # 眼睛连线相对于水平线的倾斜角
    if x==0:
        angle = 0
    else:
        # 计算它的弧度制
        angle = math.atan(y/x)*180/math.pi

    center = (img.shape[1]//2, img.shape[0]//2)

    RotationMatrix = cv2.getRotationMatrix2D(center, angle, 1)
    # 仿射函数
    new_img = cv2.warpAffine(img,RotationMatrix,(img.shape[1],img.shape[0]))

    RotationMatrix = np.array(RotationMatrix)
    new_landmark = []
    for i in range(landmark.shape[0]):
        pts = []
        pts.append(RotationMatrix[0,0]*landmark[i,0]+RotationMatrix[0,1]*landmark[i,1]+RotationMatrix[0,2])
        pts.append(RotationMatrix[1,0]*landmark[i,0]+RotationMatrix[1,1]*landmark[i,1]+RotationMatrix[1,2])
        new_landmark.append(pts)

    new_landmark = np.array(new_landmark)

    return new_img, new_landmark
2、利用facenet对矫正后的人脸进行编码
facenet是一个人脸特征获取的模型,将第1步获得的对齐人脸传入facenet模型就可以得到每个人脸的特征向量。
将所有特征向量保存在一个列表中,在第3步进行比对。
height,width,_ = np.shape(draw)
draw_rgb = cv2.cvtColor(draw,cv2.COLOR_BGR2RGB)

# 检测人脸
rectangles = self.mtcnn_model.detectFace(draw_rgb, self.threshold)
print(np.shape(rectangles))
if len(rectangles)==0:
    return

# 转化成正方形
rectangles = utils.rect2square(np.array(rectangles,dtype=np.int32))
rectangles[:,0] = np.clip(rectangles[:,0],0,width)
rectangles[:,1] = np.clip(rectangles[:,1],0,height)
rectangles[:,2] = np.clip(rectangles[:,2],0,width)
rectangles[:,3] = np.clip(rectangles[:,3],0,height)
#-----------------------------------------------#
#   对检测到的人脸进行编码
#-----------------------------------------------#
face_encodings = []
for rectangle in rectangles:
    # 获取landmark在小图中的坐标
    landmark = (np.reshape(rectangle[5:15],(5,2)) - np.array([int(rectangle[0]),int(rectangle[1])]))/(rectangle[3]-rectangle[1])*160
    # 截取图像
    crop_img = draw_rgb[int(rectangle[1]):int(rectangle[3]), int(rectangle[0]):int(rectangle[2])]
    crop_img = cv2.resize(crop_img,(160,160))
    # 对齐
    new_img,_ = utils.Alignment_1(crop_img,landmark)
    new_img = np.expand_dims(new_img,0)
    # 利用facenet_model计算128维特征向量
    face_encoding = utils.calc_128_vec(self.facenet_model,new_img)
    face_encodings.append(face_encoding)
3、将实时图片中的人脸特征与数据库中的进行比对
这个比对过程是这样的:
1、获取实时图片中的每一张人脸特征。
2、将每一张人脸特征和数据库中所有的人脸进行比较,计算距离。如果距离小于门限值,则认为其具有一定的相似度。
3、获得每一张人脸在数据库中最相似的人脸的序号。
4、判断这个序号对应的人脸距离是否小于门限,是则认为人脸识别成功,他就是这个人。
实现代码如下:
face_names = []
for face_encoding in face_encodings:
    # 取出一张脸并与数据库中所有的人脸进行对比,计算得分
    matches = utils.compare_faces(self.known_face_encodings, face_encoding, tolerance = 0.9)
    name = "Unknown"
    # 找出距离最近的人脸
    face_distances = utils.face_distance(self.known_face_encodings, face_encoding)
    # 取出这个最近人脸的评分
    best_match_index = np.argmin(face_distances)
    if matches[best_match_index]:
        name = self.known_face_names[best_match_index]
    face_names.append(name)
4、实时处理图片整体代码
class face_rec():
    def recognize(self,draw):
        #-----------------------------------------------#
        #   人脸识别
        #   先定位,再进行数据库匹配
        #-----------------------------------------------#
        height,width,_ = np.shape(draw)
        draw_rgb = cv2.cvtColor(draw,cv2.COLOR_BGR2RGB)

        # 检测人脸
        rectangles = self.mtcnn_model.detectFace(draw_rgb, self.threshold)
        print(np.shape(rectangles))
        if len(rectangles)==0:
            return

        # 转化成正方形
        rectangles = utils.rect2square(np.array(rectangles,dtype=np.int32))
        rectangles[:,0] = np.clip(rectangles[:,0],0,width)
        rectangles[:,1] = np.clip(rectangles[:,1],0,height)
        rectangles[:,2] = np.clip(rectangles[:,2],0,width)
        rectangles[:,3] = np.clip(rectangles[:,3],0,height)
        #-----------------------------------------------#
        #   对检测到的人脸进行编码
        #-----------------------------------------------#
        face_encodings = []
        for rectangle in rectangles:
            # 获取landmark在小图中的坐标
            landmark = (np.reshape(rectangle[5:15],(5,2)) - np.array([int(rectangle[0]),int(rectangle[1])]))/(rectangle[3]-rectangle[1])*160
            # 截取图像
            crop_img = draw_rgb[int(rectangle[1]):int(rectangle[3]), int(rectangle[0]):int(rectangle[2])]
            crop_img = cv2.resize(crop_img,(160,160))
            # 对齐
            new_img,_ = utils.Alignment_1(crop_img,landmark)
            new_img = np.expand_dims(new_img,0)
            # 利用facenet_model计算128维特征向量
            face_encoding = utils.calc_128_vec(self.facenet_model,new_img)
            face_encodings.append(face_encoding)

        face_names = []
        for face_encoding in face_encodings:
            # 取出一张脸并与数据库中所有的人脸进行对比,计算得分
            matches = utils.compare_faces(self.known_face_encodings, face_encoding, tolerance = 0.9)
            name = "Unknown"
            # 找出距离最近的人脸
            face_distances = utils.face_distance(self.known_face_encodings, face_encoding)
            # 取出这个最近人脸的评分
            best_match_index = np.argmin(face_distances)
            if matches[best_match_index]:
                name = self.known_face_names[best_match_index]
            face_names.append(name)

        rectangles = rectangles[:,0:4]
        #-----------------------------------------------#
        #   画框~!~
        #-----------------------------------------------#
        for (left, top, right, bottom), name in zip(rectangles, face_names):
            cv2.rectangle(draw, (left, top), (right, bottom), (0, 0, 255), 2)

            font = cv2.FONT_HERSHEY_SIMPLEX
            cv2.putText(draw, name, (left , bottom - 15), font, 0.75, (255, 255, 255), 2)
        return draw
全部代码:
这里只放出主文件的全部代码,需要的可以去github下载:
import cv2
import os
import numpy as np
from net.mtcnn import mtcnn
import utils.utils as utils
from net.inception import InceptionResNetV1

class face_rec():
    def __init__(self):
        # 创建mtcnn对象
        # 检测图片中的人脸
        self.mtcnn_model = mtcnn()
        # 门限函数
        self.threshold = [0.5,0.8,0.9]

        # 载入facenet
        # 将检测到的人脸转化为128维的向量
        self.facenet_model = InceptionResNetV1()
        # model.summary()
        model_path = './model_data/facenet_keras.h5'
        self.facenet_model.load_weights(model_path)

        #-----------------------------------------------#
        #   对数据库中的人脸进行编码
        #   known_face_encodings中存储的是编码后的人脸
        #   known_face_names为人脸的名字
        #-----------------------------------------------#
        face_list = os.listdir("face_dataset")

        self.known_face_encodings=[]

        self.known_face_names=[]

        for face in face_list:
            name = face.split(".")[0]

            img = cv2.imread("./face_dataset/"+face)
            img = cv2.cvtColor(img,cv2.COLOR_BGR2RGB)

            # 检测人脸
            rectangles = self.mtcnn_model.detectFace(img, self.threshold)

            # 转化成正方形
            rectangles = utils.rect2square(np.array(rectangles))
            # facenet要传入一个160x160的图片
            rectangle = rectangles[0]
            # 记下他们的landmark
            landmark = (np.reshape(rectangle[5:15],(5,2)) - np.array([int(rectangle[0]),int(rectangle[1])]))/(rectangle[3]-rectangle[1])*160

            crop_img = img[int(rectangle[1]):int(rectangle[3]), int(rectangle[0]):int(rectangle[2])]
            crop_img = cv2.resize(crop_img,(160,160))

            new_img,_ = utils.Alignment_1(crop_img,landmark)

            new_img = np.expand_dims(new_img,0)
            # 将检测到的人脸传入到facenet的模型中,实现128维特征向量的提取
            face_encoding = utils.calc_128_vec(self.facenet_model,new_img)

            self.known_face_encodings.append(face_encoding)
            self.known_face_names.append(name)

    def recognize(self,draw):
        #-----------------------------------------------#
        #   人脸识别
        #   先定位,再进行数据库匹配
        #-----------------------------------------------#
        height,width,_ = np.shape(draw)
        draw_rgb = cv2.cvtColor(draw,cv2.COLOR_BGR2RGB)

        # 检测人脸
        rectangles = self.mtcnn_model.detectFace(draw_rgb, self.threshold)
        print(np.shape(rectangles))
        if len(rectangles)==0:
            return

        # 转化成正方形
        rectangles = utils.rect2square(np.array(rectangles,dtype=np.int32))
        rectangles[:,0] = np.clip(rectangles[:,0],0,width)
        rectangles[:,1] = np.clip(rectangles[:,1],0,height)
        rectangles[:,2] = np.clip(rectangles[:,2],0,width)
        rectangles[:,3] = np.clip(rectangles[:,3],0,height)
        #-----------------------------------------------#
        #   对检测到的人脸进行编码
        #-----------------------------------------------#
        face_encodings = []
        for rectangle in rectangles:
            # 获取landmark在小图中的坐标
            landmark = (np.reshape(rectangle[5:15],(5,2)) - np.array([int(rectangle[0]),int(rectangle[1])]))/(rectangle[3]-rectangle[1])*160
            # 截取图像
            crop_img = draw_rgb[int(rectangle[1]):int(rectangle[3]), int(rectangle[0]):int(rectangle[2])]
            crop_img = cv2.resize(crop_img,(160,160))
            # 对齐
            new_img,_ = utils.Alignment_1(crop_img,landmark)
            new_img = np.expand_dims(new_img,0)
            # 利用facenet_model计算128维特征向量
            face_encoding = utils.calc_128_vec(self.facenet_model,new_img)
            face_encodings.append(face_encoding)

        face_names = []
        for face_encoding in face_encodings:
            # 取出一张脸并与数据库中所有的人脸进行对比,计算得分
            matches = utils.compare_faces(self.known_face_encodings, face_encoding, tolerance = 0.9)
            name = "Unknown"
            # 找出距离最近的人脸
            face_distances = utils.face_distance(self.known_face_encodings, face_encoding)
            # 取出这个最近人脸的评分
            best_match_index = np.argmin(face_distances)
            if matches[best_match_index]:
                name = self.known_face_names[best_match_index]
            face_names.append(name)

        rectangles = rectangles[:,0:4]
        #-----------------------------------------------#
        #   画框~!~
        #-----------------------------------------------#
        for (left, top, right, bottom), name in zip(rectangles, face_names):
            cv2.rectangle(draw, (left, top), (right, bottom), (0, 0, 255), 2)

            font = cv2.FONT_HERSHEY_SIMPLEX
            cv2.putText(draw, name, (left , bottom - 15), font, 0.75, (255, 255, 255), 2)
        return draw

if __name__ == "__main__":

    dududu = face_rec()
    video_capture = cv2.VideoCapture(1)

    while True:
        ret, draw = video_capture.read()
        dududu.recognize(draw)
        cv2.imshow('Video', draw)
        if cv2.waitKey(20) & 0xFF == ord('q'):
            break

    video_capture.release()
    cv2.destroyAllWindows()
