缺失值识别-->缺失值处理-->归一化,标准化-->独热编码-->L1和L2正则化-->基于L1正则化特征选择-->序列特征选择-->RF特征重要性度量
数据预处理
from IPython.display import Image
%matplotlib inline
处理缺失值
识别表格中的缺失值
import pandas as pd
from io import StringIO
import sys

csv_data = \
'''A,B,C,D
1.0,2.0,3.0,4.0
5.0,6.0,,8.0
10.0,11.0,12.0,'''


if (sys.version_info < (3, 0)):
    csv_data = unicode(csv_data)

df = pd.read_csv(StringIO(csv_data))
df
| A | B | C | D | |
|---|---|---|---|---|
| 0 | 1.0 | 2.0 | 3.0 | 4.0 |
| 1 | 5.0 | 6.0 | NaN | 8.0 |
| 2 | 10.0 | 11.0 | 12.0 | NaN |
# 各行缺失值统计
df.isnull().sum()
A    0
B    0
C    1
D    1
dtype: int64
df.columns
Index(['A', 'B', 'C', 'D'], dtype='object')
# 通过values属性获取潜在的numpy array
df.values
array([[ 1.,  2.,  3.,  4.],
       [ 5.,  6., nan,  8.],
       [10., 11., 12., nan]])
删除具有缺失值的训练样本或特征
# 删除具有缺失值的行

df.dropna(axis=0)
| A | B | C | D | |
|---|---|---|---|---|
| 0 | 1.0 | 2.0 | 3.0 | 4.0 |
# 删除具有缺失值的列

df.dropna(axis=1)
| A | B | |
|---|---|---|
| 0 | 1.0 | 2.0 |
| 1 | 5.0 | 6.0 |
| 2 | 10.0 | 11.0 |
# 删除全部都是nan的行/列,通过指定axis进行控制

df.dropna(how='all')
| A | B | C | D | |
|---|---|---|---|---|
| 0 | 1.0 | 2.0 | 3.0 | 4.0 |
| 1 | 5.0 | 6.0 | NaN | 8.0 |
| 2 | 10.0 | 11.0 | 12.0 | NaN |
# 设定阈值为4,数据中实值个数少于4的行都被删除,这里默认axis=0

df.dropna(thresh=4)
| A | B | C | D | |
|---|---|---|---|---|
| 0 | 1.0 | 2.0 | 3.0 | 4.0 |
# 指定目标列,当该列出现nan,则对应的行被删除

df.dropna(subset=['C'])
| A | B | C | D | |
|---|---|---|---|---|
| 0 | 1.0 | 2.0 | 3.0 | 4.0 |
| 2 | 10.0 | 11.0 | 12.0 | NaN |
直接将数据中的缺失值进行删除,方法简便,但可能会造成很多重要信息的丢失
缺失值填充
# 原始数组
df.values
array([[ 1.,  2.,  3.,  4.],
       [ 5.,  6., nan,  8.],
       [10., 11., 12., nan]])
# 使用列的均值进行缺失值填充

from sklearn.impute import SimpleImputer
import numpy as np

imr = SimpleImputer(missing_values=np.nan, strategy='mean')
# 可选的填充策略,均值、中位数、众数(这里适用于分类型特征或数值型特征)、某一常数
"""
 - If "mean", then replace missing values using the mean along
      each column. Can only be used with numeric data.
    - If "median", then replace missing values using the median along
      each column. Can only be used with numeric data.
    - If "most_frequent", then replace missing using the most frequent
      value along each column. Can be used with strings or numeric data.
    - If "constant", then replace missing values with fill_value. Can be
      used with strings or numeric data.
"""
imr = imr.fit(df.values)
imputed_data = imr.transform(df.values)
imputed_data
array([[ 1. ,  2. ,  3. ,  4. ],
       [ 5. ,  6. ,  7.5,  8. ],
       [10. , 11. , 12. ,  6. ]])
更加简便的插值方式,使用fillna(),其中将插值策略作为参数传入
df.fillna(df.mean())
| A | B | C | D | |
|---|---|---|---|---|
| 0 | 1.0 | 2.0 | 3.0 | 4.0 |
| 1 | 5.0 | 6.0 | 7.5 | 8.0 |
| 2 | 10.0 | 11.0 | 12.0 | 6.0 |
这里的计算方法是:
m e a n = s u m − v a l u e − n o t − n a n n u m − v a l u e − n o t − n a n mean = \cfrac{sum-value-not-nan}{num-value-not-nan} mean=num−value−not−nansum−value−not−nan
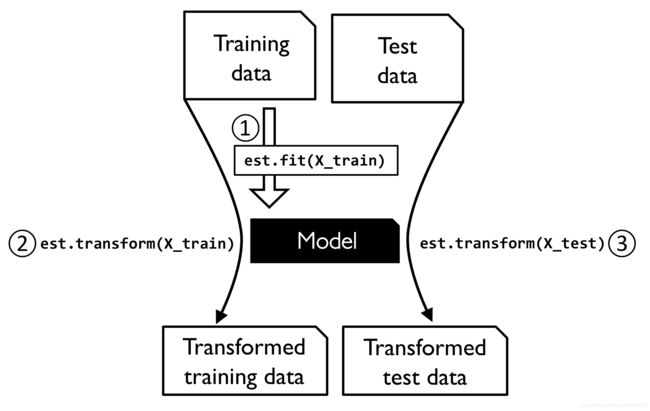
了解scikit-learn相关API
Image(filename='images/04_01.png', width=400)
Image(filename='images/04_02.png', width=300)
处理类别型数据
连续型和标称型特征
import pandas as pd

df = pd.DataFrame([['green', 'M', 10.1, 'class2'],
                   ['red', 'L', 13.5, 'class1'],
                   ['blue', 'XL', 15.3, 'class2']])

# 通过df.columns属性指定DataFrame的列名
df.columns = ['color', 'size', 'price', 'classlabel']
df
| color | size | price | classlabel | |
|---|---|---|---|---|
| 0 | green | M | 10.1 | class2 |
| 1 | red | L | 13.5 | class1 |
| 2 | blue | XL | 15.3 | class2 |
连续型特征编码映射
该特征虽然像是类别型特征,但其本质上具有大小关系
size_mapping = {
     'XL': 3,
                'L': 2,
                'M': 1}

df['size'] = df['size'].map(size_mapping)
df
| color | size | price | classlabel | |
|---|---|---|---|---|
| 0 | green | 1 | 10.1 | class2 |
| 1 | red | 2 | 13.5 | class1 |
| 2 | blue | 3 | 15.3 | class2 |
inv_size_mapping = {
     v: k for k, v in size_mapping.items()}
df['size'].map(inv_size_mapping)
0     M
1     L
2    XL
Name: size, dtype: object
类别标签编码
这里需要注意,类别标签不存在序号关系,所以将特定字符串编码为哪一个具体整数值并不重要,因此这里可以使用枚举方法
import numpy as np

# 创建一个映射字典
# 实现将类别标签从字符串映射到整数值
class_mapping = {
     label: idx for idx, label in enumerate(np.unique(df['classlabel']))}
class_mapping
{'class1': 0, 'class2': 1}
# 编码结果查看
df['classlabel'] = df['classlabel'].map(class_mapping)
df
| color | size | price | classlabel | |
|---|---|---|---|---|
| 0 | green | 1 | 10.1 | 1 |
| 1 | red | 2 | 13.5 | 0 |
| 2 | blue | 3 | 15.3 | 1 |
# 上述操作的逆过程
inv_class_mapping = {
     v: k for k, v in class_mapping.items()}
df['classlabel'] = df['classlabel'].map(inv_class_mapping)
df
| color | size | price | classlabel | |
|---|---|---|---|---|
| 0 | green | 1 | 10.1 | class2 |
| 1 | red | 2 | 13.5 | class1 |
| 2 | blue | 3 | 15.3 | class2 |
# 使用sklearn提供的LabelEncoder进行编码,编码结果为0到n-1,其中n为类别的个数
from sklearn.preprocessing import LabelEncoder

class_le = LabelEncoder()
y = class_le.fit_transform(df['classlabel'].values)
y
array([1, 0, 1])
# 删除操作的逆过程
class_le.inverse_transform(y)
array(['class2', 'class1', 'class2'], dtype=object)
对标称型特征进行独热编码
可以直接使用LabelEncoder对类别型的特征进行编码映射,且该方法没有考虑特征值之间大小关系
但是,使用该方法的结果是,数值型的编码结果会依然被算法视为有序的
所以可以采用独热编码,处理无序特征
X = df[['color', 'size', 'price']].values
color_le = LabelEncoder()
X[:, 0] = color_le.fit_transform(X[:, 0])
X
array([[1, 1, 10.1],
       [2, 2, 13.5],
       [0, 3, 15.3]], dtype=object)
为标称型特征列中的每个值建立一个虚拟特征,当前值为1,其一为0
from sklearn.preprocessing import OneHotEncoder

X = df[['color', 'size', 'price']].values
color_ohe = OneHotEncoder()
color_ohe.fit_transform(X[:, 0].reshape(-1, 1)).toarray()
array([[0., 1., 0.],
       [0., 0., 1.],
       [1., 0., 0.]])
OneHotEncoder一次仅针对单个列,要实现同时操纵多个列,可以使用ColumnTransformer
from sklearn.compose import ColumnTransformer

X = df[['color', 'size', 'price']].values
c_transf = ColumnTransformer([ ('onehot', OneHotEncoder(), [0]),
                               ('nothing', 'passthrough', [1, 2])])
c_transf.fit_transform(X).astype(float)
array([[ 0. ,  1. ,  0. ,  1. , 10.1],
       [ 0. ,  0. ,  1. ,  2. , 13.5],
       [ 1. ,  0. ,  0. ,  3. , 15.3]])
pandas中另一种高效通过OneHot编码处理标称型特征的方法是get_dummies,其仅仅处理字符串型特征
# 使用get_dummies处理类别型特征

pd.get_dummies(df[['price', 'color', 'size']])
| price | size | color_blue | color_green | color_red | |
|---|---|---|---|---|---|
| 0 | 10.1 | 1 | 0 | 1 | 0 |
| 1 | 13.5 | 2 | 0 | 0 | 1 |
| 2 | 15.3 | 3 | 1 | 0 | 0 |
在使用OneHot独热编码处理特征时,可能会引入多重共线性。
为了降低特征变量之间的相关性,可以简单的从独热编码数组中删除一个特征列,而该列的删除不会造成信息丢失
# get_dummies中的多重共线警告
# 产出OneHot数组中的第一列

pd.get_dummies(df[['price', 'color', 'size']], drop_first=True)
| price | size | color_green | color_red | |
|---|---|---|---|---|
| 0 | 10.1 | 1 | 1 | 0 |
| 1 | 13.5 | 2 | 0 | 1 |
| 2 | 15.3 | 3 | 0 | 0 |
# 通过独热编码删除重复列,设置categories='auto'和drop='first'
# multicollinearity guard for the OneHotEncoder

color_ohe = OneHotEncoder(categories='auto', drop='first')
c_transf = ColumnTransformer([ ('onehot', color_ohe, [0]),
                               ('nothing', 'passthrough', [1, 2])])
c_transf.fit_transform(X).astype(float)
array([[ 1. ,  0. ,  1. , 10.1],
       [ 0. ,  1. ,  2. , 13.5],
       [ 0. ,  0. ,  3. , 15.3]])
附:编码具有大小依赖关系的顺序特征
例如,对于前面数据中的size属性
df = pd.DataFrame([['green', 'M', 10.1, 'class2'],
                   ['red', 'L', 13.5, 'class1'],
                   ['blue', 'XL', 15.3, 'class2']])

df.columns = ['color', 'size', 'price', 'classlabel']
df
| color | size | price | classlabel | |
|---|---|---|---|---|
| 0 | green | M | 10.1 | class2 |
| 1 | red | L | 13.5 | class1 |
| 2 | blue | XL | 15.3 | class2 |
df['x > M'] = df['size'].apply(lambda x: 1 if x in {
     'L', 'XL'} else 0)
df['x > L'] = df['size'].apply(lambda x: 1 if x == 'XL' else 0)

del df['size']
df
| color | price | classlabel | x > M | x > L | |
|---|---|---|---|---|---|
| 0 | green | 10.1 | class2 | 0 | 0 |
| 1 | red | 13.5 | class1 | 1 | 0 |
| 2 | blue | 15.3 | class2 | 1 | 1 |
划分训练集和测试集
# 在线获取红酒数据集,178个样本,13个特征
df_wine = pd.read_csv('https://archive.ics.uci.edu/'
                      'ml/machine-learning-databases/wine/wine.data',
                      header=None)
# 或者从本地目录加载数据

# df_wine = pd.read_csv('wine.data', header=None)


df_wine.columns = ['Class label', 'Alcohol', 'Malic acid', 'Ash',
                   'Alcalinity of ash', 'Magnesium', 'Total phenols',
                   'Flavanoids', 'Nonflavanoid phenols', 'Proanthocyanins',
                   'Color intensity', 'Hue', 'OD280/OD315 of diluted wines',
                   'Proline']

print('Class labels', np.unique(df_wine['Class label']))
df_wine.head()
Class labels [1 2 3]
| Class label | Alcohol | Malic acid | Ash | Alcalinity of ash | Magnesium | Total phenols | Flavanoids | Nonflavanoid phenols | Proanthocyanins | Color intensity | Hue | OD280/OD315 of diluted wines | Proline | |
|---|---|---|---|---|---|---|---|---|---|---|---|---|---|---|
| 0 | 1 | 14.23 | 1.71 | 2.43 | 15.6 | 127 | 2.80 | 3.06 | 0.28 | 2.29 | 5.64 | 1.04 | 3.92 | 1065 |
| 1 | 1 | 13.20 | 1.78 | 2.14 | 11.2 | 100 | 2.65 | 2.76 | 0.26 | 1.28 | 4.38 | 1.05 | 3.40 | 1050 |
| 2 | 1 | 13.16 | 2.36 | 2.67 | 18.6 | 101 | 2.80 | 3.24 | 0.30 | 2.81 | 5.68 | 1.03 | 3.17 | 1185 |
| 3 | 1 | 14.37 | 1.95 | 2.50 | 16.8 | 113 | 3.85 | 3.49 | 0.24 | 2.18 | 7.80 | 0.86 | 3.45 | 1480 |
| 4 | 1 | 13.24 | 2.59 | 2.87 | 21.0 | 118 | 2.80 | 2.69 | 0.39 | 1.82 | 4.32 | 1.04 | 2.93 | 735 |
df_wine.shape
(178, 14)
df_wine.info()
RangeIndex: 178 entries, 0 to 177
Data columns (total 14 columns):
 #   Column                        Non-Null Count  Dtype
---  ------                        --------------  -----
 0   Class label                   178 non-null    int64
 1   Alcohol                       178 non-null    float64
 2   Malic acid                    178 non-null    float64
 3   Ash                           178 non-null    float64
 4   Alcalinity of ash             178 non-null    float64
 5   Magnesium                     178 non-null    int64
 6   Total phenols                 178 non-null    float64
 7   Flavanoids                    178 non-null    float64
 8   Nonflavanoid phenols          178 non-null    float64
 9   Proanthocyanins               178 non-null    float64
 10  Color intensity               178 non-null    float64
 11  Hue                           178 non-null    float64
 12  OD280/OD315 of diluted wines  178 non-null    float64
 13  Proline                       178 non-null    int64
dtypes: float64(11), int64(3)
memory usage: 19.6 KB
# 这里的stratify参数的作用是:保证拆分的训练集和测试集中相应类别的比例和原始数据集中的比例相同
from sklearn.model_selection import train_test_split

X, y = df_wine.iloc[:, 1:].values, df_wine.iloc[:, 0].values

X_train, X_test, y_train, y_test =\
    train_test_split(X, y,
                     test_size=0.3,
                     random_state=0,
                     stratify=y)
将特征缩放到相同比例
特征缩放实际上在很多算法或者优化过程中非常重要,比如逻辑回归和梯度下降;
但是有一些模型对尺度不敏感,比如决策树模型和随机森林模型,归一化操作之后不改变信息增益等指标
from sklearn.preprocessing import MinMaxScaler

mms = MinMaxScaler()
X_train_norm = mms.fit_transform(X_train)
X_test_norm = mms.transform(X_test)
归一化和标准化
线性函数归一化:
x norm ( i ) = x ( i ) − x min x max − x min x_{\text {norm }}^{(i)}=\frac{x^{(i)}-x_{\min }}{x_{\max }-x_{\min }} xnorm (i)=xmax−xminx(i)−xmin
这里的 x ( i ) x^{(i)} x(i)代表的是某一个样本, x m i n x_{min} xmin和 x m a x x_{max} xmax分别代表的是最小值和最大值。
标准化:
标准化对于一些算法或者优化过程,比如梯度下降,会更加适用
原因是:很多的线性模型,比如逻辑回归,SVM,都是把权值初始化为0或者接近于0的值。
适用标准化,可以将特征标准化到均值为0且标准差为1的位置,以便于特征具有与正太分布相同的参数,这使得权重的学习更加容易
此外,标准化保留了有关离群值的有用信息,使得算法对离群值不那么敏感,
标准化:
x s t d ( i ) = x ( i ) − μ x σ x x_{s t d}^{(i)}=\frac{x^{(i)}-\mu_{x}}{\sigma_{x}} xstd(i)=σxx(i)−μx
这里的 μ x \mu_{x} μx代表的是均值, σ x \sigma_{x} σx代表的是标准差。
from sklearn.preprocessing import StandardScaler

stdsc = StandardScaler()
X_train_std = stdsc.fit_transform(X_train)
X_test_std = stdsc.transform(X_test)
A visual example:
ex = np.array([0, 1, 2, 3, 4, 5])

print('standardized:', (ex - ex.mean()) / ex.std())

# Please note that pandas uses ddof=1 (sample standard deviation)   样本标准偏差
# by default, whereas NumPy's std method and the StandardScaler
# uses ddof=0 (population standard deviation)  总体标准偏差

# normalize
print('normalized:', (ex - ex.min()) / (ex.max() - ex.min()))
standardized: [-1.46385011 -0.87831007 -0.29277002  0.29277002  0.87831007  1.46385011]
normalized: [0.  0.2 0.4 0.6 0.8 1. ]
在处理小数据集,且数据集包含较多的离群点的时候,使用RobustScaler
在模型有可能遭遇过拟合的情况下,RobustScaler独立操纵每个特征列,移除中值,同时根据数据集的1/4和3/4分位数缩放数据集,
从而使得更多的极端值和离群值变得没那么“突出”
选择有意义的特征
如果模型在训练集上的表现明显好于测试集上的表现,则该模型可能遭遇了过拟合,这是过拟合的一个明显指标
过拟合代表模型对训练数据集中的特定观察数据有着过度紧密的拟合,但没有很好地泛化到新的数据中,这就是模型具有高方差
模型过拟合的常见解决办法:
1.收集到更多的数据
2.通过正则项对模型施加惩罚,从而控制模型的复杂度
3.选择一个具有更少参数的简单模型
4.降低数据维度,特征选择或者特征提取,实现降维
实际上正则化和降维两种手段,就是实现了对模型复杂度的控制,因为其直接导致了模型需要以更少的参数去拟合数据。
使用L1和L2正则项作为惩罚,从而控制模型复杂度
L2正则化:
定义权重向量 w \boldsymbol{w} w的 L 2 L2 L2范数的平方:
L2: ∥ w ∥ 2 2 = ∑ j = 1 m w j 2 \text { L2: } \quad\|w\|_{2}^{2}=\sum_{j=1}^{m} w_{j}^{2} L2: ∥w∥22=j=1∑mwj2
L1正则化:
L1: ∥ w ∥ 1 = ∑ j = 1 m ∣ w j ∣ \text { L1: } \quad\|w\|_{1}=\sum_{j=1}^{m}\left|w_{j}\right| L1: ∥w∥1=j=1∑m∣wj∣
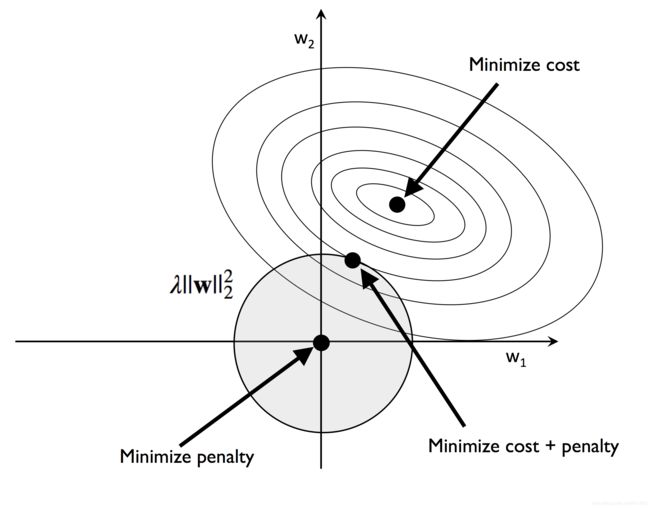
L2正则化的图形解释
Image(filename='images/04_04.png', width=500)
可以把正则化视为损失函数中的一个惩罚项,惩罚大的权重值,因此通过增加正则项参数 λ \lambda λ实现将权值缩小到零
从而降低模型对于训练数据的依赖,
Image(filename='images/04_05.png', width=500)
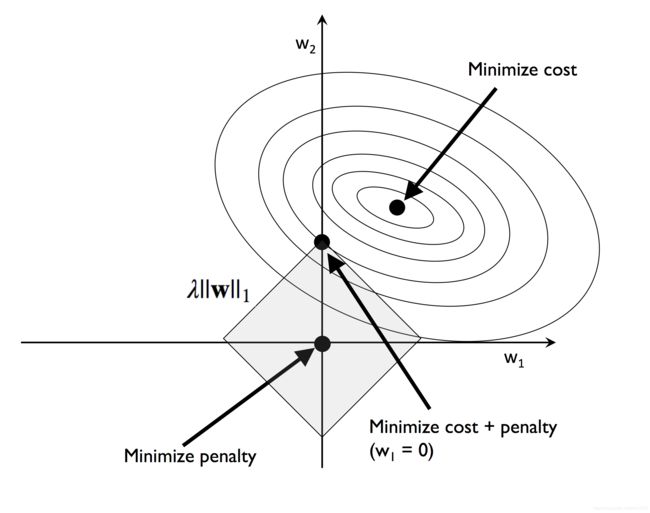
L1正则化以及稀疏解的可视化
L1正则化通常产生稀疏的特征向量,且大多数的值为零
尤其在当训练数据维度很高且包含很多不相关维度的情况下,L1正则化可以作为一种特征选择方法
Image(filename='images/04_06.png', width=500)
对于Sklearn中支持L1正则化的模型,可以显示地通过参数penalty='l1’施加L1正则化从而产生稀疏解。
from sklearn.linear_model import LogisticRegression
LogisticRegression(penalty='l1', solver='liblinear', multi_class='ovr')
LogisticRegression(multi_class='ovr', penalty='l1', solver='liblinear')
在上文提到的红酒数据上使用L1正则化,这里设置正则项参数 λ \lambda λ的逆,即 C C C的值为1.0
from sklearn.linear_model import LogisticRegression

lr = LogisticRegression(penalty='l1', C=1.0, solver='liblinear', multi_class='ovr') # c=1.0为默认值

lr.fit(X_train_std, y_train)
print('Training accuracy:', lr.score(X_train_std, y_train))
print('Test accuracy:', lr.score(X_test_std, y_test))
Training accuracy: 1.0
Test accuracy: 1.0
# 或缺截距像系数
lr.intercept_
array([-1.26320655, -1.21602017, -2.36988584])
np.set_printoptions(8)
lr.coef_[lr.coef_!=0].shape
(23,)
# 获取权重数组
lr.coef_
array([[ 1.24617608,  0.18077361,  0.74237846, -1.16009333,  0.        ,
         0.        ,  1.17476297,  0.        ,  0.        ,  0.        ,
         0.        ,  0.541792  ,  2.51101145],
       [-1.53748154, -0.38720996, -0.99543899,  0.36494783, -0.05943027,
         0.        ,  0.6679335 ,  0.        ,  0.        , -1.93396413,
         1.23410614,  0.        , -2.23188136],
       [ 0.13461747,  0.16990718,  0.35778994,  0.        ,  0.        ,
         0.        , -2.43251317,  0.        ,  0.        ,  1.56304806,
        -0.81899322, -0.49630265,  0.        ]])
每一行包含十三个权重,计算过程如下:
每个权重分别乘以特征值,得到净输入:
z = w 0 x 0 + ⋯ + w m x m = ∑ j = 0 m x j w j = w T x z=w_{0} x_{0}+\cdots+w_{m} x_{m}=\sum_{j=0}^{m} x_{j} w_{j}=w^{T} x z=w0x0+⋯+wmxm=j=0∑mxjwj=wTx
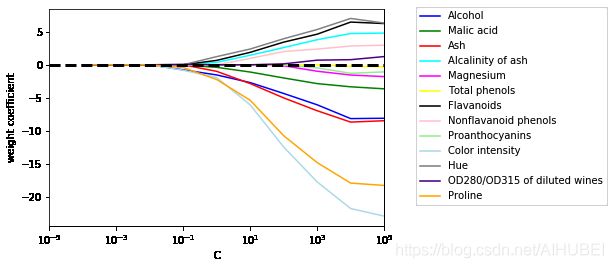
L1正则化特征选择结果可视化
import matplotlib.pyplot as plt

fig = plt.figure()
ax = plt.subplot(111)

colors = ['blue', 'green', 'red', 'cyan',
          'magenta', 'yellow', 'black',
          'pink', 'lightgreen', 'lightblue',
          'gray', 'indigo', 'orange']

weights, params = [], []
for c in np.arange(-4., 6.):
    lr = LogisticRegression(penalty='l1', C=10.**c, solver='liblinear',
                            multi_class='ovr', random_state=0)
    lr.fit(X_train_std, y_train)
    weights.append(lr.coef_[1])
    params.append(10**c)

weights = np.array(weights)

for column, color in zip(range(weights.shape[1]), colors):
    plt.plot(params, weights[:, column],
             label=df_wine.columns[column + 1],
             color=color)
plt.axhline(0, color='black', linestyle='--', linewidth=3)
plt.xlim([10**(-5), 10**5])
plt.ylabel('weight coefficient')
plt.xlabel('C')
plt.xscale('log')
plt.legend(loc='upper left')
ax.legend(loc='upper center',
          bbox_to_anchor=(1.38, 1.03),
          ncol=1, fancybox=True)
#plt.savefig('images/04_07.png', dpi=300,
#            bbox_inches='tight', pad_inches=0.2)
plt.show()
可以看出,当正则项系数越来越大,所有的特征权重都将趋于零。
序列特征选择算法实现
降低模型复杂度的另一种方法是通过特征选择降低数据维度,这对于不支持正则化的模型非常奏效
降维主要有两种途径:特征选择和特征提取
特征选择:选取原始特征子集中的一个子集
特征提取:通过从特征集合中提取信息来实现将原始特征空间映射到一个新的特征子空间中去
序列特征选择是一系列的贪婪搜索算法,用于将初始 d d d维特征空间缩减到 K K K维空间中,其中 k < d k
序列反向选择算法,目的是以最小的分类器性能衰减来降低初始特征空间的维数,提高计算效率,有时候此方法也可以用于提升模型预测能力,缓解过拟合
from sklearn.base import clone
from itertools import combinations
import numpy as np
from sklearn.metrics import accuracy_score
from sklearn.model_selection import train_test_split


class SBS():
    def __init__(self, estimator, k_features, scoring=accuracy_score,
                 test_size=0.25, random_state=1):
        self.scoring = scoring
        self.estimator = clone(estimator)
        self.k_features = k_features
        self.test_size = test_size
        self.random_state = random_state

    def fit(self, X, y):

        X_train, X_test, y_train, y_test = \
            train_test_split(X, y, test_size=self.test_size,
                             random_state=self.random_state)

        dim = X_train.shape[1]
        self.indices_ = tuple(range(dim))
        self.subsets_ = [self.indices_]
        score = self._calc_score(X_train, y_train,
                                 X_test, y_test, self.indices_)
        self.scores_ = [score]

        while dim > self.k_features:
            scores = []
            subsets = []

            for p in combinations(self.indices_, r=dim - 1):
                score = self._calc_score(X_train, y_train,
                                         X_test, y_test, p)
                scores.append(score)
                subsets.append(p)

            best = np.argmax(scores)
            self.indices_ = subsets[best]
            self.subsets_.append(self.indices_)
            dim -= 1

            self.scores_.append(scores[best])
        self.k_score_ = self.scores_[-1]

        return self

    def transform(self, X):
        return X[:, self.indices_]

    def _calc_score(self, X_train, y_train, X_test, y_test, indices):
        self.estimator.fit(X_train[:, indices], y_train)
        y_pred = self.estimator.predict(X_test[:, indices])
        score = self.scoring(y_test, y_pred)
        return score
序列反向选择算法有序地从整个特征子集中移除特征,在每个阶段,该特征的移除最分类器造成的性能损失最小。
import matplotlib.pyplot as plt
from sklearn.neighbors import KNeighborsClassifier

# 这里选择一个基模型,用于反映模型性能变化
# 本文数据维数不大,在高维度数据场景中,不适合选用KNN,可以使用树模型
knn = KNeighborsClassifier(n_neighbors=5)

# selecting features
sbs = SBS(knn, k_features=1)
sbs.fit(X_train_std, y_train)

# plotting performance of feature subsets
k_feat = [len(k) for k in sbs.subsets_]

plt.plot(k_feat, sbs.scores_, marker='o')
plt.ylim([0.7, 1.02])
plt.ylabel('Accuracy')
plt.xlabel('Number of features')
plt.grid()
plt.tight_layout()
# plt.savefig('images/04_08.png', dpi=300)
plt.show()
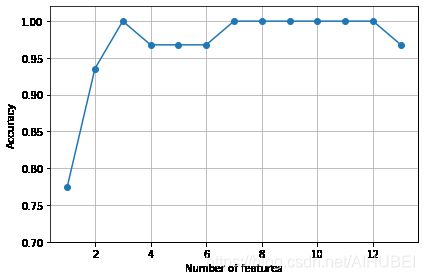
可以看出,当特征个数分别为3,7,8,9,10,11,12的时候,模型预测准确率都已经达到了100%,
k3 = list(sbs.subsets_[10])
print(df_wine.columns[1:][k3])
Index(['Alcohol', 'Malic acid', 'OD280/OD315 of diluted wines'], dtype='object')
knn.fit(X_train_std, y_train)
print('Training accuracy:', knn.score(X_train_std, y_train))
print('Test accuracy:', knn.score(X_test_std, y_test))
Training accuracy: 0.967741935483871
Test accuracy: 0.9629629629629629
knn.fit(X_train_std[:, k3], y_train)
print('Training accuracy:', knn.score(X_train_std[:, k3], y_train))
print('Test accuracy:', knn.score(X_test_std[:, k3], y_test))
Training accuracy: 0.9516129032258065
Test accuracy: 0.9259259259259259
通过随机森林模型获取特征重要性
from sklearn.ensemble import RandomForestClassifier

feat_labels = df_wine.columns[1:]

forest = RandomForestClassifier(n_estimators=500,
                                random_state=1)

forest.fit(X_train, y_train)
importances = forest.feature_importances_

indices = np.argsort(importances)[::-1]

for f in range(X_train.shape[1]):
    print("%2d) %-*s %f" % (f + 1, 30,
                            feat_labels[indices[f]],
                            importances[indices[f]]))

plt.title('Feature Importance')
plt.bar(range(X_train.shape[1]),
        importances[indices],
        align='center')

plt.xticks(range(X_train.shape[1]),
           feat_labels[indices], rotation=90)
plt.xlim([-1, X_train.shape[1]])
plt.tight_layout()
#plt.savefig('images/04_09.png', dpi=300)
plt.show()
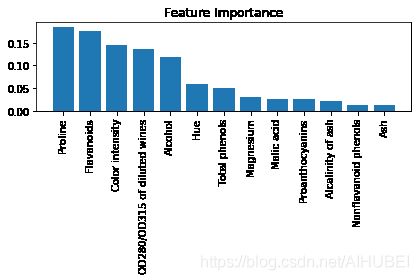
 1) Proline                        0.185453
 2) Flavanoids                     0.174751
 3) Color intensity                0.143920
 4) OD280/OD315 of diluted wines   0.136162
 5) Alcohol                        0.118529
 6) Hue                            0.058739
 7) Total phenols                  0.050872
 8) Magnesium                      0.031357
 9) Malic acid                     0.025648
10) Proanthocyanins                0.025570
11) Alcalinity of ash              0.022366
12) Nonflavanoid phenols           0.013354
13) Ash                            0.013279
from sklearn.feature_selection import SelectFromModel

sfm = SelectFromModel(forest, threshold=0.1, prefit=True)
X_selected = sfm.transform(X_train)
print('Number of features that meet this threshold criterion:',
      X_selected.shape[1])
Number of features that meet this threshold criterion: 5
for f in range(X_selected.shape[1]):
    print("%2d) %-*s %f" % (f + 1, 30,
                            feat_labels[indices[f]],
                            importances[indices[f]]))
 1) Proline                        0.185453
 2) Flavanoids                     0.174751
 3) Color intensity                0.143920
 4) OD280/OD315 of diluted wines   0.136162
 5) Alcohol                        0.118529
