(一)背景资料
“工欲善其事,必先利其器。”
为帮助我们更好的理解华为HCNA/HCNP认证课程的知识,更好的掌握华为ICT相关产品的配置与管理,华为提供了一款免费的,界面友好,操作简单,具备极高仿真度的设备模拟器——eNSP,不仅可以模拟单台设备的特性操作,还能够组网进行实战演练。
eNSP(Enterprise Network Simulation Platform)是图形化网络仿真平台,该平台通过对真实网络设备的仿真模拟,帮助广大ICT从业者和客户快速熟悉华为数通系列产品,了解并掌握相关产品的操作和配置、提升对企业ICT网络的规划、建设、运维能力,从而帮助企业构建更高效,更优质的企业ICT网络。
本次实验使用华为eNSP的版本是V100R002C00B510,实验内容参考华为认证课程HCNP-Security CISN的实验手册。
(二)实验目的
- 掌握IPS地址文件编制;
- 掌握sftp server配置,上传ISP文件;
- 掌握防火墙使用多个IPS地址实现智能选路的配置。
(三)实验条件
- 一台CPU支持VT技术,内存4GB以上的计算机;
- 安装eNSP模拟器B510版,导入USG6000V镜像;
- 终端工具:SecuretyCRT,Putty,Psftp,XShell等。
(四)网络拓朴图
打开ENSP软件,按如下拓朴图创建实验环境,设置地址:
- Ctrl地址:192.168.0.0/24;
- LAN地址:192.168.10.0/24;
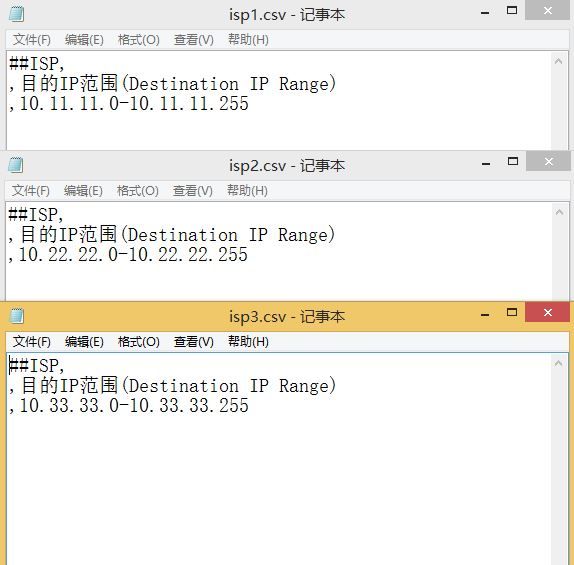
- ISP1地址:10.11.11.0/24;
- ISP2地址:10.22.22.0/24;
- ISP3地址:10.33.33.0/24;

(五)配置思路
- 使用文本编辑器编制IPS地址文件;
- 设置sftp服务,上传IPS地址文件;
- 配置智能选路;
- 配置防火墙的接口地址,安全域;
- 设置服务器、PC、交换机等设备的IP地址;
(六)配置步骤
(1) 编写ISP地址文件
使用文本编辑器编写每个IPS所使用的地址文件,以CVS文件保存:
CSV,Comma-Separated Values,逗号分隔值,有时也称为字符分隔值,因为分隔字符也可以不是逗号,其文件以纯文本形式存储表格数据(数字和文本)。
(2)配置防火墙SFTP服务
以下为创建帐户sshadmin,密码为 admin@123 ,并配置可以sftp登录的过程
system view          //进入系统配置视图
Enter system view, return user view with Ctrl+Z.
[USG6000V1]sysname FW1          //修改防火墙的名称为FW1
[FW1]undo info-center enable    //关闭信息提示
Info: Information center is disabled.
[FW1]aaa    //进入AAA视图
[FW1-aaa]manager-user sshadmin //创建用户sshadmin
[FW1-aaa-manager-user-sshadmin]service-type ssh //配置用户服务类型
[FW1-aaa-manager-user-sshadmin]password cipher admin@123    //配置用户密码
Info: You are advised to config on man-machine mode.
[FW1-aaa-manager-user-sshadmin]level 3  //配置用户等级
[FW1-aaa-manager-user-sshadmin]quit //退出用户配置视图,返回AAA视图
[FW1-aaa]quit   //退出AAA视图,返回系统视图
[FW1]
[FW1]ssh user sshadmin      //新建SSH用户
Info: Succeeded in adding a new SSH user.
[FW1]ssh user sshadmin authentication-type password         //配置SSH用户的认证方式
[FW1]ssh user sshadmin authorization-cmd aaa        //配置SSH用户按命令行授权
Info: Please make sure that the command line authorization method has been set for the user.
[FW1]ssh user sshadmin sftp-directory hda1:     //配置SSH用户的SFTP服务授权目录
[FW1]ssh user sshadmin service-type all     //配置SSH用户的服务方式
[FW1]
配置sftp服务可用状态
[FW1]sftp server enable
  Info: The SFTP server is already started.
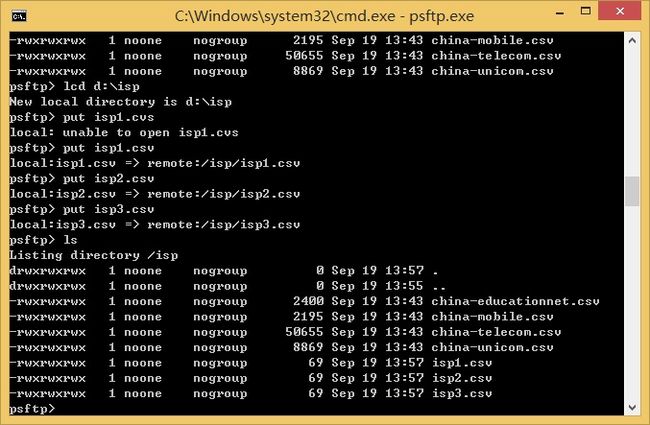
(3)上传ISP地址文件到防火墙
通过SFTP,上传IPS地址文件到防火墙内的ISP目录下,为下一步的智能选路做准备。
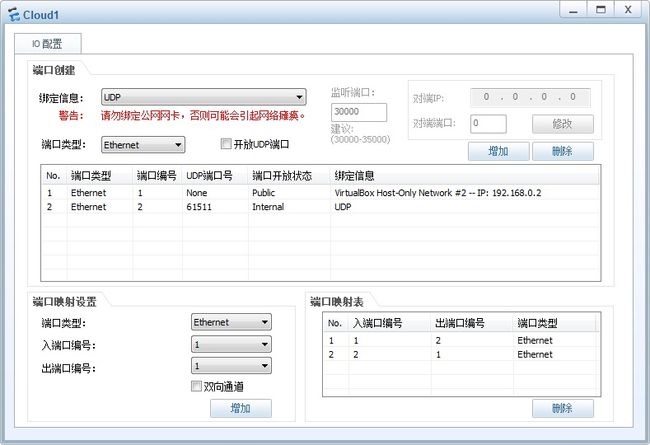
以下为Cloud1的配置,用于连接sftp服务:
下载sftp客户端程序psftp.exe,并在命令行状态下打开。
D:\Downloads>psftp.exe              //在命令行状态下运行psftp.exe
psftp: no hostname specified; use "open host.name" to connect
psftp> open 192.168.0.1         //打开防火墙IP
login as: sshadmin                      //输入用户
SSH server: User Authentication
Using keyboard-interactive authentication.
Password:                           //输入密码
Remote working directory is /
psftp>                              //成功登录sftp服务器

psftp> cd isp                       //进入服务器ISP目录
Remote directory is now /isp
psftp> lcd d:                       //进入客户机D盘根目录
New local directory is d:\
psftp> put isp1.csv                 //上传自定义的ISP1地址文件
local:isp1.csv => remote:/isp/isp1.csv
psftp> put isp2.csv                 //上传自定义的ISP2地址文件
local:isp2.csv => remote:/isp/isp2.csv
psftp> put isp3.csv                 //上传自定义的ISP3地址文件
local:isp3.csv => remote:/isp/isp3.csv
psftp>
操作完成后,使用ls(或dir)查看上传结果
(4)配置ISP智能选路、接口地址、安全域
分别创建运营商名称isp1,isp2,isp3并关联对应的ISP地址文件
[FW1]
[FW1]isp name isp1                          //创建ISP1
[FW1]isp name isp1 set filename isp1.csv    //设置ISP1关联地址文件isp1.csv
[FW1]isp name isp2                          //创建ISP2
[FW1]isp name isp2 set filename isp2.csv    //设置ISP2关联地址文件isp2.csv
[FW1]isp name isp3                          //创建ISP3
[FW1]isp name isp3 set filename isp3.csv    //设置ISP3关联地址文件isp3.csv
[FW1]
分别为运营商创建健康检查规则
[FW1]
[FW1]healthcheck name isp1_health   //创建名为isp1_health检查规则
[FW1-healthcheck-isp1_health]destination 10.11.11.2 interface GigabitEthernet 1/0/1 protocol tcp-simple destination-port 10001
//定义服务器地址,接口,协议,端口
[FW1-healthcheck-isp1_health]quit
[FW1]
[FW1]healthcheck name isp2_health   //创建名为isp2_health检查规则
[FW1-healthcheck-isp2_health]destination 10.22.22.2 interface GigabitEthernet 1/0/2 protocol tcp-simple destination-port 10002
//定义服务器地址,接口,协议,端口
[FW1-healthcheck-isp2_health]quit
[FW1]
[FW1]healthcheck name isp3_health   //创建名为isp3_health检查规则
[FW1-healthcheck-isp3_health]destination 10.33.33.2 interface GigabitEthernet 1/0/3 protocol tcp-simple destination-port 10003
//定义服务器地址,接口,协议,端口
[FW1-healthcheck-isp3_health]quit
[FW1]
以下为配置防火墙的接口地址,健康检查规则,安全域:
[FW1]interface GigabitEthernet 1/0/0    //进入接口配置视图
[FW1-GigabitEthernet1/0/0]ip address 192.168.10.1 24    //配置接口地址
[FW1-GigabitEthernet1/0/0]quit  //退出接口配置视图,返回系统视图
[FW1]firewall zone trust        //进入安全域配置视图
[FW1-zone-trust]add interface GigabitEthernet 1/0/0     //把接口加入到安全域
[FW1-zone-trust]quit        //退出安全域配置视图,返回系统视图
[FW1]ip route-static 192.168.10.0 255.255.255.0 192.168.10.254  //配置到Lan的静态路由
[FW1]interface GigabitEthernet 1/0/1    //进入接口配置视图
[FW1-GigabitEthernet1/0/1]ip address 10.11.11.1 24  //配置接口地址
[FW1-GigabitEthernet1/0/1]gateway 10.11.11.254      //配置接口网关
[FW1-GigabitEthernet1/0/1]healthcheck isp1_health       //启用健康检查规则isp1_health
[FW1-GigabitEthernet1/0/1]service-manage ping permit    //允许ping
[FW1-GigabitEthernet1/0/1]quit          //退出接口配置视图,返回系统视图
[FW1]interface GigabitEthernet 1/0/2    //进入接口配置视图
[FW1-GigabitEthernet1/0/2]ip address 10.22.22.1 24  //配置接口地址
[FW1-GigabitEthernet1/0/2]gateway 10.22.22.254      //配置接口网关
[FW1-GigabitEthernet1/0/2]healthcheck isp2_health       //启用健康检查规则isp2_health
[FW1-GigabitEthernet1/0/2]service-manage ping permit    //允许ping
[FW1-GigabitEthernet1/0/2]quit          //退出接口配置视图,返回系统视图
[FW1]interface GigabitEthernet 1/0/3    //进入接口配置视图
[FW1-GigabitEthernet1/0/3]ip address 10.33.33.1 24  //配置接口地址
[FW1-GigabitEthernet1/0/3]gateway 10.33.33.254      //配置接口网关
[FW1-GigabitEthernet1/0/3]healthcheck isp3_health       //启用健康检查规则isp3_health
[FW1-GigabitEthernet1/0/3]service-manage ping permit    //允许ping
[FW1-GigabitEthernet1/0/3]quit      //退出接口配置视图,返回系统视图
[FW1]firewall zone untrust          //进入安全域配置视图
[FW1-zone-untrust]add interface GigabitEthernet 1/0/1   //把接口加入到安全域
[FW1-zone-untrust]add interface GigabitEthernet 1/0/2   //把接口加入到安全域
[FW1-zone-untrust]add interface GigabitEthernet 1/0/3   //把接口加入到安全域
[FW1-zone-untrust]quit  //退出安全域配置视图,返回系统视图
[FW1]
[FW1]security-policy    //进入安全策略配置视图
[FW1-policy-security]rule name lan_wan  //创建名为lan_wan的规则
[FW1-policy-security-rule-lan_wan]source-zone trust     //设置源安全域
[FW1-policy-security-rule-lan_wan]destination-zone untrust  //设置目标安全域
[FW1-policy-security-rule-lan_wan]action permit     //策略允许
[FW1-policy-security-rule-lan_wan]quit  //退出规则配置视图,返回安全策略配置视图
[FW1-policy-security]quit   //退出安全策略配置视图,返回系统视图
[FW1]
(5)配置ISP1、ISP2、ISP3、LAN网络
为更加清晰的显示网络链路的路径选择,同时也减轻防火墙的配置复杂度,所有网络以交换机为网关。
以下为ISP1所在的交换机LSW1的配置,以及Server1的配置:
The device is running!

system-view     //进入系统配置视图
Enter system view, return user view with Ctrl+Z.
[Huawei]sysname LSW1    //修改交换机名为LSW1
[LSW1]
[LSW1]undo info-center enable   //关闭信息提示
Info: Information center is disabled.
[LSW1]interface Vlanif 1    //进入vlan接口配置视图
[LSW1-Vlanif1]ip address 10.11.11.254 24    //配置vlan的IP地址
[LSW1-Vlanif1]quit      //退出vlan接口配置,返回系统配置视图
[LSW1]
[LSW1]ip route-static 0.0.0.0 0.0.0.0 10.11.11.1    //配置交换机的默认路由
[LSW1]quit      //退出系统配置视图,返回用户视图
save      //保存配置
The current configuration will be written to the device.
Are you sure to continue?[Y/N]y
Info: Please input the file name ( *.cfg, *.zip ) [vrpcfg.zip]:
Now saving the current configuration to the slot 0.
Save the configuration successfully.

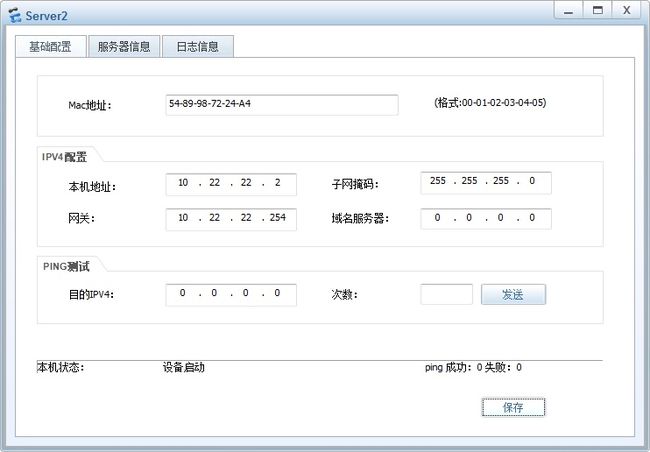
以下为ISP2所在的交换机LSW1的配置,以及Server2的配置:
The device is running!

system-view     //进入系统配置视图
Enter system view, return user view with Ctrl+Z.
[Huawei]sysname LSW2    //修改交换机名为LSW2
[LSW2]
[LSW2]undo info-center enable   //关闭信息提示
Info: Information center is disabled.
[LSW2]interface Vlanif 1    //进入vlan接口配置视图
[LSW2-Vlanif1]ip address 10.22.22.254 24    //配置vlan的IP地址
[LSW2-Vlanif1]quit      //退出vlan接口配置,返回系统配置视图
[LSW2]
[LSW2]ip route-static 0.0.0.0 0.0.0.0 10.22.22.1    //配置交换机的默认路由
[LSW2]quit      //退出系统配置视图,返回用户视图
save      //保存配置
The current configuration will be written to the device.
Are you sure to continue?[Y/N]y
Info: Please input the file name ( *.cfg, *.zip ) [vrpcfg.zip]:
Now saving the current configuration to the slot 0.
Save the configuration successfully.
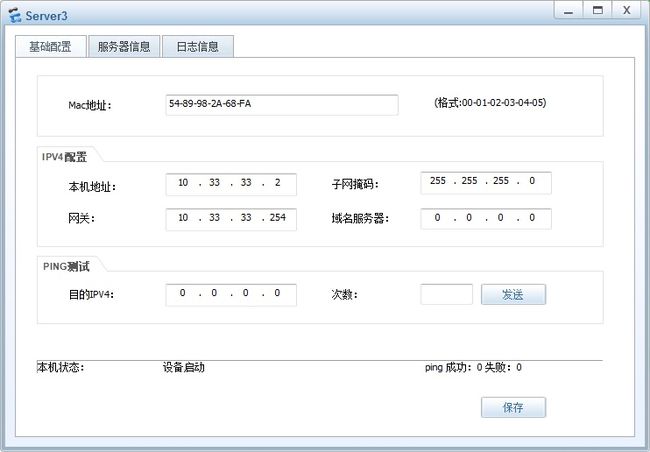
以下为ISP3所在的交换机LSW3的配置,以及Server3的配置:
The device is running!

system-view     //进入系统配置视图
Enter system view, return user view with Ctrl+Z.
[Huawei]sysname LSW3    //修改交换机名为LSW3
[LSW3]
[LSW3]undo info-center enable   //关闭信息提示
Info: Information center is disabled.
[LSW3]interface Vlanif 1    //进入vlan接口配置视图
[LSW3-Vlanif1]ip address 10.33.33.254 24    //配置vlan的IP地址
[LSW3-Vlanif1]quit      //退出vlan接口配置,返回系统配置视图
[LSW3]
[LSW3]ip route-static 0.0.0.0 0.0.0.0 10.33.33.1    //配置交换机的默认路由
[LSW3]quit      //退出系统配置视图,返回用户视图
save      //保存配置
The current configuration will be written to the device.
Are you sure to continue?[Y/N]y
Info: Please input the file name ( *.cfg, *.zip ) [vrpcfg.zip]:
Now saving the current configuration to the slot 0.
Save the configuration successfully.
以下为LAN所在的交换机LSW4的配置,以及PC1的配置:
The device is running!

system-view     //进入系统配置视图
Enter system view, return user view with Ctrl+Z.
[Huawei]sysname LSW4    //修改交换机名为LSW4
[LSW4]
[LSW4]undo info-center enable   //关闭信息提示
Info: Information center is disabled.
[LSW4]interface Vlanif 1    //进入vlan接口配置视图
[LSW4-Vlanif1]ip address 192.168.10.254 24  //配置vlan的IP地址
[LSW4-Vlanif1]quit      //退出vlan接口配置,返回系统配置视图
[LSW4]
[LSW4]ip route-static 0.0.0.0 0.0.0.0 192.168.10.1  //配置交换机的默认路由
[LSW4]quit      //退出系统配置视图,返回用户视图
save      //保存配置
The current configuration will be written to the device.
Are you sure to continue?[Y/N]y
Info: Please input the file name ( *.cfg, *.zip ) [vrpcfg.zip]:
Now saving the current configuration to the slot 0.
Save the configuration successfully.

(6)通过抓包工具进行选路测试
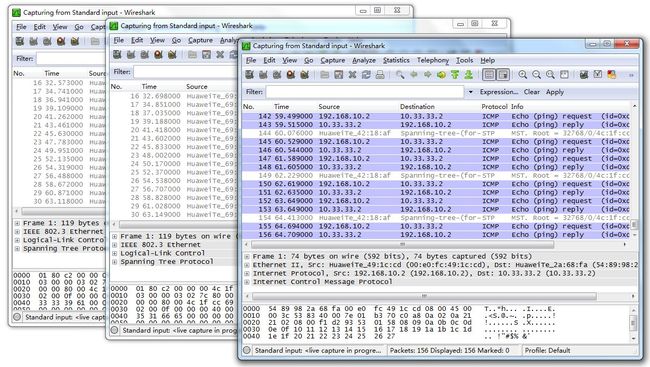
通过ENSP自带的抓包工具,对防火墙的GE1/0/1,GE1/0/2,GE1/0/3进行抓包测试

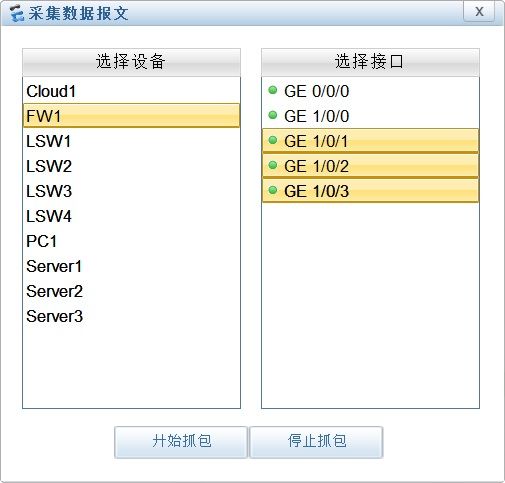
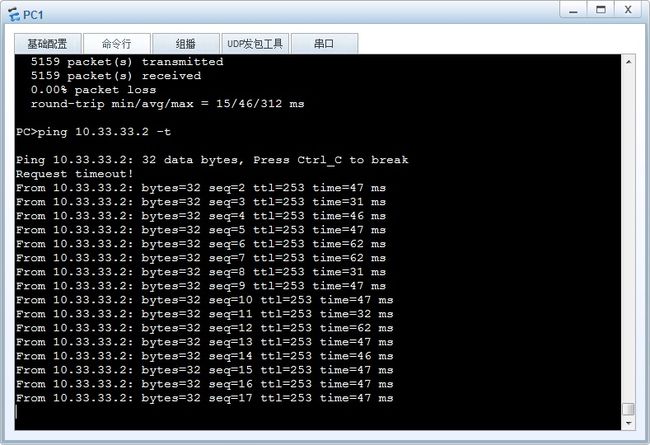
用PC1 ping ISP3的服务器Server3地址10.33.33.2时,从FW1的GE1/0/1,GE1/0/2接口没有抓取到ICMP包,说明没有PING数据从GE1/0/1,GE1/0/2通过,PING数据从GE1/0/3接口通过。
(七)参考资料
华为模拟器eNSP软件,
华为模拟器eNSP社区,
HCNA-Security 华为认证网络安全工程师,
HCNP-Security 华为认证网络安全资深工程师,
HUAWEI USG6000V V500R001C10SPC100 典型配置案例,
HUAWEI USG6000V V500R001C10SPC100 管理员指南,
HUAWEI USG6000V V500R001C10SPC100 命令参考 ,
华为ICT相关的英文简称 。
PS:
文档由炖冬瓜用Markdown语言编写,输出PDF或HTML。
炖冬瓜 一枚混迹挨踢江湖十载有余的吃货,好吃懒做,成功的从丝瓜进阶为冬瓜。