一念起,万水千山。一念灭,沧海桑田。
许久不曾召幸React Native爱妃,未曾想一见竟让寡人目瞪口呆。啥~~~你就说你买包包的速度能跟上你版本迭代更新的速度么。

小可爱.jpg
打开终端运行之前的项目,无意间发现React的版本又更新到了0.49.2。这又意味着某些群体面临的踩坑时节的到来。(啊哈哈哈!!想想就觉得特别开心)
如此便来抢先看看RN爱妃这次又描的是哪处眉。

结构图.png
首先是结构方面,这次RN版本做出了很大调整。在目录中已经找不到iOS和Android.js的身影,取而代之的是将它们合并在一起的index.js文件。并且初始代码是编写在App.js文件中。
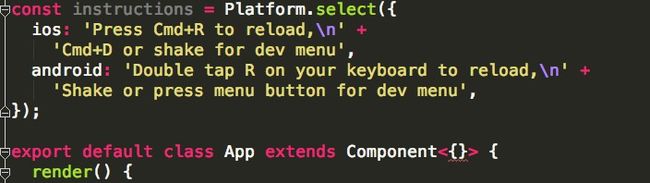
APP.js文件图.png
在内容上依然默认采用ES6的写法。只是多了介绍这一栏。并且在Component<>默认加了{}。
ok,言归正传。一般来说,主角都是压轴出场。来瞧瞧本文的主题react-native-swiper。
用手动去计算偏移量并且下载定时器的方法去封装轮播图功能显得太过繁琐。正所谓他山之石可以攻玉。显然,引用已经封装好的三方开源组件能让我们在编写代码时事半功倍。而react-native-swiper正是一个能用于做轮播效果的三方组件。
1、github上的实例:
https://github.com/leecade/react-native-swiper
2、基本命令
- 安装:npm i react-native-swiper --save
- 查看:npm view react-native-swiper
- 删除:npm rm react-native-swiper --save
3、属性
所有ScrollView组件拥有的属性react-native-swiper都拥有。
- Basic
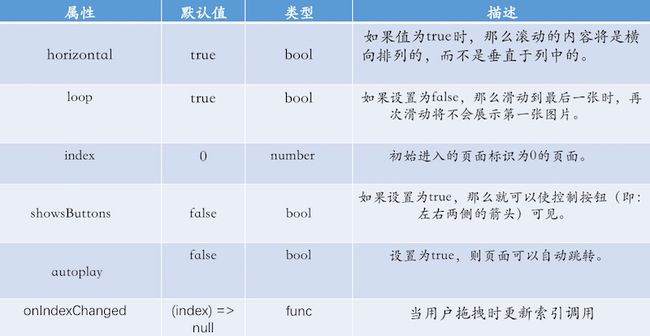
Basic.jpg
-
Custom basic style & content
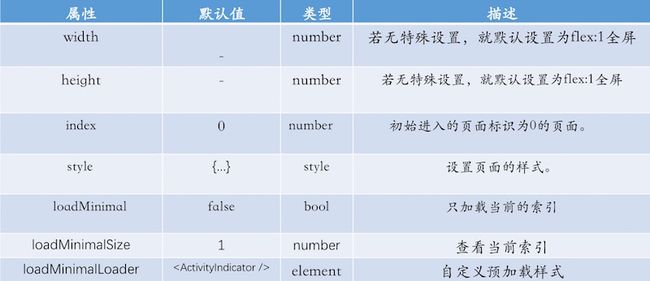 costom.jpg
 - Pagination
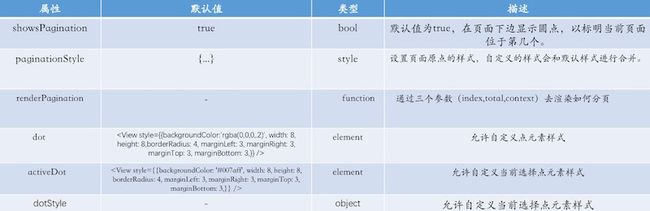
page.jpeg
- Autoplay

autoplay.png
4、基本案例(引导图)

引导图.gif
- 引入外部组件
import Swiper from 'react-native-swiper';
- 在render方法中返回swiper组件
showsButtons代表向左向右滑的指示按钮
                Hello Swiper


                Beautiful


                And simple
- 设置样式
设置每个view全屏显示。view里面的内容居中。
 wrapper: {
    },
    slide1: {
        flex: 1,
        justifyContent: 'center',
        alignItems: 'center',
        backgroundColor: '#9DD6EB'
    },
    slide2: {
        flex: 1,
        justifyContent: 'center',
        alignItems: 'center',
        backgroundColor: '#97CAE5'
    },
    slide3: {
        flex: 1,
        justifyContent: 'center',
        alignItems: 'center',
        backgroundColor: '#92BBD9'
    },
    text: {
        color: '#fff',
        fontSize: 30,
        fontWeight: 'bold'
    }
如此一来,一个APP的引导图就做好了。
5、播放案例
swiper.gif
- 导入外部组件、通过Dimension获取屏幕宽度。{width}代表ES6语法的解构赋值
import {
  Platform,
  StyleSheet,
  Text,
  View,
  Image,
  Dimensions
} from 'react-native';
import Swiper from 'react-native-swiper';
const {width} = Dimensions.get('window');  //解构赋值 获取屏幕宽度
- 在render方法中返回一个顶级组件View。里面装载两个swiper
第一个轮播图设置为竖向滚动,第二个轮播图设置为横向滚动。同时设置他们自动播放。
export default class App extends Component<{}> {
render() {
return (
{/*设置horizontal为竖向排列 autoplay为自动播放*/}
Hello Swiper
Beautiful
And simple
console.log('index:', state.index)}
dot={
Aussie tourist dies at Bali hotel
Big lie behind Nine’s new show
Why Stone split from Garfield
Learn from Kim K to land that job
);
}
}
- 设置样式
const styles = StyleSheet.create({
    container: {
        flex: 1
    },

    wrapper: {
    },

    slide: {
        flex: 1,
        justifyContent: 'center',
        backgroundColor: 'transparent'
    },

    slide1: {
        flex: 1,
        justifyContent: 'center',
        alignItems: 'center',
        backgroundColor: '#9DD6EB'
    },

    text: {
        color: '#fff',
        fontSize: 30,
        fontWeight: 'bold'
    },

    image: {
        width:width,
        flex: 1
    }
});