springboot整合RabbitMQ
- 安装rabbitmq
- 进入cmd进入D:\RabbitMQ Server\rabbitmq_server-3.6.10\sbin
- 执行rabbitmq-plugins enable rabbitmq_management
- 打开浏览器并访问:http://localhost:15672/
- 默认账户密码都为guest
创建项目
依赖
    org.springframework.boot
    spring-boot-starter-parent
    1.5.4.RELEASE


        org.springframework.boot
        spring-boot-starter-amqp


        org.springframework.boot
        spring-boot-starter-test
        test
配置文件
spring.application.name=rabbitmq-demo
spring.rabbitmq.host=localhost
spring.rabbitmq.port=5672
spring.rabbitmq.username=admin
spring.rabbitmq.password=123456
消息生产者
@Component
public class Sender {
    @Autowired
    private AmqpTemplate rabbitTemplate;
    public void send() {
        String context = "hello " + new Date();
        System.out.println("Sender : " + context);
        this.rabbitTemplate.convertAndSend("hello", context);
    }
}
消息消费者
@Component
@RabbitListener(queues = "hello")
public class Receiver {
    @RabbitHandler
    public void process(String hello) {
        System.out.println("Receiver : " + hello);
    }
}
rabbit配置
@Configuration
public class RabbitConfig {
    @Bean
    public Queue helloQueue() {
        return new Queue("hello");
    }
}
Application
@SpringBootApplication
public class HelloApplication {
    public static void main(String[] args) {
        SpringApplication.run(HelloApplication.class, args);
    }
}
测试类
@RunWith(SpringRunner.class)
@SpringBootTest(classes = Application.class)
public class ApplicationTest {
    @Autowired
    private Sender sender;
    @Test
    public void hello() throws Exception {
        sender.send();
    }
}
springcloud整合RabbitMQ使用消息总线更新配置文件
添加依赖
    org.springframework.cloud
    spring-cloud-starter-bus-amqp
配置文件添加
spring.rabbitmq.host=localhost
spring.rabbitmq.port=5672
spring.rabbitmq.username=admin
spring.rabbitmq.password=123456
发送post请求到localhost:2001/bus/refresh便可以刷新所有服务的配置
原理分析
我们通过使用Spring Cloud Bus与Spring Cloud Config的整合,并以RabbitMQ作为消息代理,实现了应用配置的动态更新。
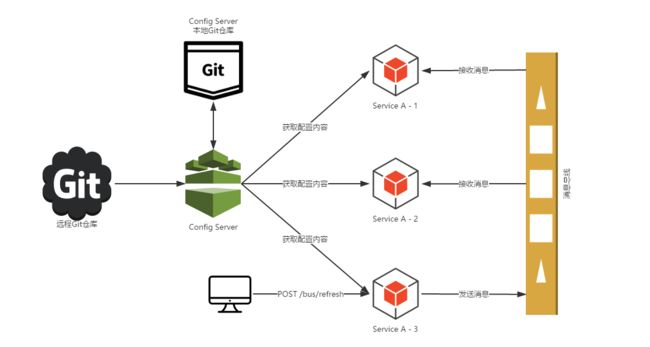
整个方案的架构如上图所示,其中包含了Git仓库、Config Server、以及微服务“Service A”的三个实例,这三个实例中都引入了Spring Cloud Bus,所以他们都连接到了RabbitMQ的消息总线上。
当我们将系统启动起来之后,“Service A”的三个实例会请求Config Server以获取配置信息,Config Server根据应用配置的规则从Git仓库中获取配置信息并返回。
此时,若我们需要修改“Service A”的属性。首先,通过Git管理工具去仓库中修改对应的属性值,但是这个修改并不会触发“Service A”实例的属性更新。我们向“Service A”的实例3发送POST请求,访问/bus/refresh接口。此时,“Service A”的实例3就会将刷新请求发送到消息总线中,该消息事件会被“Service A”的实例1和实例2从总线中获取到,并重新从Config Server中获取他们的配置信息,从而实现配置信息的动态更新。
而从Git仓库中配置的修改到发起/bus/refresh的POST请求这一步可以通过Git仓库的Web Hook来自动触发。由于所有连接到消息总线上的应用都会接受到更新请求,所以在Web Hook中就不需要维护所有节点内容来进行更新,从而解决了通过Web Hook来逐个进行刷新的问题。
指定刷新范围
上面的例子中,我们通过向服务实例请求Spring Cloud Bus的/bus/refresh接口,从而触发总线上其他服务实例的/refresh。但是有些特殊场景下(比如:灰度发布),我们希望可以刷新微服务中某个具体实例的配置。
Spring Cloud Bus对这种场景也有很好的支持:/bus/refresh接口还提供了destination参数,用来定位具体要刷新的应用程序。比如,我们可以请求/bus/refresh?destination=customers:9000,此时总线上的各应用实例会根据destination属性的值来判断是否为自己的实例名,若符合才进行配置刷新,若不符合就忽略该消息。
destination参数除了可以定位具体的实例之外,还可以用来定位具体的服务。定位服务的原理是通过使用Spring的PathMatecher(路径匹配)来实现,比如:/bus/refresh?destination=customers:**,该请求会触发customers服务的所有实例进行刷新。
架构优化
既然Spring Cloud Bus的/bus/refresh接口提供了针对服务和实例进行配置更新的参数,那么我们的架构也相应的可以做出一些调整。在之前的架构中,服务的配置更新需要通过向具体服务中的某个实例发送请求,再触发对整个服务集群的配置更新。虽然能实现功能,但是这样的结果是,我们指定的应用实例就会不同于集群中的其他应用实例,这样会增加集群内部的复杂度,不利于将来的运维工作,比如:我们需要对服务实例进行迁移,那么我们不得不修改Web Hook中的配置等。所以我们要尽可能的让服务集群中的各个节点是对等的。
因此,我们将之前的架构做了一些调整,如下图所示:
我们主要做了这些改动:
- 在Config Server中也引入Spring Cloud Bus,将配置服务端也加入到消息总线中来。
- /bus/refresh请求不在发送到具体服务实例上,而是发送给Config Server,并通过destination参数来指定需要更新配置的服务或实例。
通过上面的改动,我们的服务实例就不需要再承担触发配置更新的职责。同时,对于Git的触发等配置都只需要针对Config Server即可,从而简化了集群上的一些维护工作。

