iOS支持两套图形API族:Core Graphics/QuartZ 2D 和OpenGL ES。OpenGL ES是跨平台的图形API,属于OpenGL的一个简化版本。QuartZ 2D是苹果公司开发的一套API,它是Core Graphics Framework的一部分,是一套基于C的API框架,使用了Quartz作为绘图引擎。它提供了低级别、轻量级、高保真度的2D渲染。该框架可以用于基于路径的绘图、变换、颜色管理、脱屏渲染,模板、渐变、遮蔽、图像数据管理、图像的创建、遮罩以及PDF文档的创建、显示和分析。
OpenGL ES是应用程序编程接口,该接口描述了方法、结构、函数应具有的行为以及应该如何被使用的语义。也就是说它只定义了一套规范,具体的实现由设备制造商根据规范去做。因为制造商可以自由的实现Open GL ES,所以不同系统实现的OpenGL ES也存在着巨大的性能差异。
Core Graphics API所有的操作都在一个上下文中进行。所以在绘图之前需要获取该上下文并传入执行渲染的函数中。如果你正在渲染一副在内存中的图片,此时就需要传入图片所属的上下文。获得一个图形上下文是我们完成绘图任务的第一步,你可以将图形上下文理解为一块画布。如果你没有得到这块画布,那么你就无法完成任何绘图操作。
UIKit和Core Graphics
UIImage、NSString(绘制文本)、UIBezierPath(绘制形状)、UIColor知道如何绘制自己。这些类提供了功能有限但使用方便的方法来让我们完成绘图任务。使用UiKit,你只能在当前上下文中绘图,所以如果你当前处于UIGraphicsBeginImageContextWithOptions函数或drawRect:方法中,你就可以直接使用UIKit提供的方法进行绘图。如果你持有一个context:参数,那么使用UIKit提供的方法之前,必须将该上下文参数转化为当前上下文。调用UIGraphicsPushContext 函数可以方便的将context:参数转化为当前上下文,最后调用UIGraphicsPopContext函数恢复上下文环境。Core Graphics是一个绘图专用的API族,它经常被称为QuartZ或QuartZ 2D。Core Graphics是iOS上所有绘图功能的基石,包括UIKit。
Core Graphics的图形上下文
使用Core Graphics之前需要指定一个用于绘图的图形上下文(CGContextRef),这个图形上下文会在每个绘图函数中都会被用到。如果你持有一个图形上下文context:参数,那么你等同于有了一个图形上下文,这个上下文也许就是你需要用来绘图的那个。三种获得图形上下文的方法(drawRect:、drawRect: inContext:、UIGraphicsBeginImageContextWithOptions)。
第一种方法就是创建一个图片类型的上下文。调用UIGraphicsBeginImageContextWithOptions函数就可获得用来处理图片的图形上下文。利用该上下文,你就可以在其上进行绘图,并生成图片。调用UIGraphicsGetImageFromCurrentImageContext函数可从当前上下文中获取一个UIImage对象。记住在你所有的绘图操作后别忘了调用UIGraphicsEndImageContext函数关闭图形上下文。
第二种方法是利用cocoa为你生成的图形上下文。当你子类化了一个UIView并实现了自己的drawRect:方法后,一旦drawRect:方法被调用,Cocoa就会为你创建一个图形上下文,此时你对图形上下文的所有绘图操作都会显示在UIView上。如果当前处于UIGraphicsBeginImageContextWithOptions函数或drawRect:方法中,并没有引用一个上下文。为了使用Core Graphics,你可以调用UIGraphicsGetCurrentContext函数获得当前的图形上下文。
判断一个上下文是否为当前图形上下文需要注意的几点:
1.UIGraphicsBeginImageContextWithOptions函数不仅仅是创建了一个适用于图形操作的上下文,并且该上下文也属于当前上下文。
2.当drawRect方法被调用时,UIView的绘图上下文属于当前图形上下文。
3.回调方法所持有的context:参数并不会让任何上下文成为当前图形上下文。此参数仅仅是对一个图形上下文的引用罢了。
UIKit绘图
第一种绘图形式:
在UIView的子类方法drawRect:中绘制一个蓝色圆,使用UIKit在Cocoa为我们提供的当前上下文中完成绘图任务。
- (void) drawRect: (CGRect) rect {

UIBezierPath* p = [UIBezierPathbezierPathWithOvalInRect:CGRectMake(0,0,100,100)];

[[UIColor blueColor] setFill];

[p fill];

}
第二种绘图形式:
我将在UIView子类的drawLayer:inContext:方法中实现绘图任务。drawLayer:inContext:方法是一个绘制图层内容的代理方法。为了能够调用drawLayer:inContext:方法,我们需要设定图层的代理对象。但要注意,不应该将UIView对象设置为显示层的委托对象,这是因为UIView对象已经是隐式层的代理对象,再将它设置为另一个层的委托对象就会出问题。轻量级的做法是:编写负责绘图形的代理类。在MyView.h文件中声明如下代码:
@interface MyLayerDelegate : NSObject

@end
然后MyView.m文件中实现接口代码:
@implementation MyLayerDelegate

- (void)drawLayer:(CALayer*)layer inContext:(CGContextRef)ctx {

UIGraphicsPushContext(ctx);

UIBezierPath* p = [UIBezierPath bezierPathWithOvalInRect:CGRectMake(0,0,100,100)];

  [[UIColor blueColor] setFill];

[p fill];

UIGraphicsPopContext();

}

@end
直接将代理类的实现代码放在MyView.m文件的#import代码的下面,这样感觉好像在使用私有类完成绘图任务(虽然这不是私有类)。需要注意的是,我们所引用的上下文并不是当前上下文,所以为了能够使用UIKit,我们需要将引用的上下文转变成当前上下文。
因为图层的代理是assign内存管理策略,那么这里就不能以局部变量的形式创建MyLayerDelegate实例对象赋值给图层代理。这里选择在MyView.m中增加一个实例变量,因为实例变量默认是strong:
@interface MyView () {

MyLayerDelegate* _layerDeleagete;

}

@end
使用该图层代理:
MyView *myView = [[MyView alloc] initWithFrame: CGRectMake(0, 0, 320, 480)];

CALayer *myLayer = [CALayer layer];

_layerDelegate = [[MyLayerDelegate alloc] init];

myLayer.delegate = _layerDelegate;

[myView.layer addSublayer:myLayer];

[myView setNeedsDisplay]; // 调用此方法,drawLayer: inContext:方法才会被调用。
第三种绘图形式:
使用UIKit实现:
UIGraphicsBeginImageContextWithOptions(CGSizeMake(100,100), NO, 0);

UIBezierPath* p = [UIBezierPath bezierPathWithOvalInRect:CGRectMake(0,0,100,100)];

[[UIColor blueColor] setFill];

[p fill];

UIImage* im = UIGraphicsGetImageFromCurrentImageContext();

UIGraphicsEndImageContext();
UIGraphicsBeginImageContextWithOptions从上下文中生成一个UIImage对象。生成UIImage对象的代码并不需要等待某些方法被调用后或在UIView的子类中才能去做。
UIGraphicsBeginImageContextWithOptions函数参数的含义:第一个参数表示所要创建的图片的尺寸;第二个参数用来指定所生成图片的背景是否为不透明,如上我们使用YES而不是NO,则我们得到的图片背景将会是黑色,显然这不是我想要的;第三个参数指定生成图片的缩放因子,这个缩放因子与UIImage的scale属性所指的含义是一致的。传入0则表示让图片的缩放因子根据屏幕的分辨率而变化,所以我们得到的图片不管是在单分辨率还是视网膜屏上看起来都会很好。
Core Graphics绘图
第一种绘图形式:
使用Core Graphics实现绘制蓝色圆。
- (void) drawRect: (CGRect) rect {

CGContextRef con = UIGraphicsGetCurrentContext();

CGContextAddEllipseInRect(con, CGRectMake(0,0,100,100));

CGContextSetFillColorWithColor(con, [UIColor blueColor].CGColor);

CGContextFillPath(con);

}
第二种绘图形式:
使用Core Graphics在drawLayer:inContext:方法中实现同样操作,代码如下:
- (void)drawLayer:(CALayer*)lay inContext:(CGContextRef)con {

CGContextAddEllipseInRect(con, CGRectMake(0,0,100,100));

CGContextSetFillColorWithColor(con, [UIColor blueColor].CGColor);

CGContextFillPath(con);

}
第三种绘图形式:
使用Core Graphics实现:
UIGraphicsBeginImageContextWithOptions(CGSizeMake(100,100), NO, 0);

CGContextRef con = UIGraphicsGetCurrentContext();

CGContextAddEllipseInRect(con, CGRectMake(0,0,100,100));

CGContextSetFillColorWithColor(con, [UIColor blueColor].CGColor);

CGContextFillPath(con);

UIImage* im = UIGraphicsGetImageFromCurrentImageContext();

UIGraphicsEndImageContext();
UIKit和Core Graphics可以在相同的图形上下文中混合使用。在iOS 4.0之前,使用UIKit和UIGraphicsGetCurrentContext被认为是线程不安全的。而在iOS4.0以后苹果让绘图操作在第二个线程中执行解决了此问题。
OpenGL ES绘图
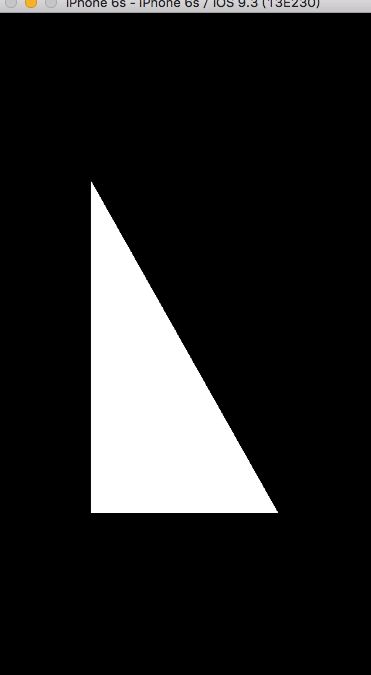
图元是构成复杂物体的基本绘图要素。在OpenGL ES中,你可以使用的图元有点,线,三角形。当我们绘制一个三角形的时候,我们需要告诉OpenGL在3d空间中的三角形的3系坐标,OpenGL将非常顺利的渲染这个三角形。
.h文件
#import
@interface OpenGLES_Ch2_1ViewController : GLKViewController
{
GLuint vertexBufferID;
}

@property (strong, nonatomic) GLKBaseEffect *baseEffect;

@end
.m文件
#import "OpenGLES_Ch2_1ViewController.h"

@implementation OpenGLES_Ch2_1ViewController

@synthesize baseEffect;

/////////////////////////////////////////////////////////////////
// This data type is used to store information for each vertex
typedef struct {
GLKVector3  positionCoords;
}
SceneVertex;

/////////////////////////////////////////////////////////////////
// Define vertex data for a triangle to use in example
static const SceneVertex vertices[] =
{
{{-0.5f, -0.5f, 0.0}}, // lower left corner
{{ 0.5f, -0.5f, 0.0}}, // lower right corner
{{-0.5f,  0.5f, 0.0}}  // upper left corner
};

/////////////////////////////////////////////////////////////////
// Called when the view controller's view is loaded
// Perform initialization before the view is asked to draw
- (void)viewDidLoad
{
[super viewDidLoad];

// Verify the type of view created automatically by the
// Interface Builder storyboard
GLKView *view = (GLKView *)self.view;
NSAssert([view isKindOfClass:[GLKView class]],
  @"View controller's view is not a GLKView");

// Create an OpenGL ES 2.0 context and provide it to the
// view
view.context = [[EAGLContext alloc]
  initWithAPI:kEAGLRenderingAPIOpenGLES2];

// Make the new context current
[EAGLContext setCurrentContext:view.context];

// Create a base effect that provides standard OpenGL ES 2.0
// Shading Language programs and set constants to be used for
// all subsequent rendering
self.baseEffect = [[GLKBaseEffect alloc] init];
self.baseEffect.useConstantColor = GL_TRUE;
self.baseEffect.constantColor = GLKVector4Make(
  1.0f, // Red
  1.0f, // Green
  1.0f, // Blue
  1.0f);// Alpha

// Set the background color stored in the current context
glClearColor(0.0f, 0.0f, 0.0f, 1.0f); // background color

// Generate, bind, and initialize contents of a buffer to be
// stored in GPU memory
glGenBuffers(1,                // STEP 1
  &vertexBufferID);
glBindBuffer(GL_ARRAY_BUFFER,  // STEP 2
  vertexBufferID);
glBufferData(                  // STEP 3
  GL_ARRAY_BUFFER,  // Initialize buffer contents
  sizeof(vertices), // Number of bytes to copy
  vertices,         // Address of bytes to copy
  GL_STATIC_DRAW);  // Hint: cache in GPU memory
}


/////////////////////////////////////////////////////////////////
// GLKView delegate method: Called by the view controller's view
// whenever Cocoa Touch asks the view controller's view to
// draw itself. (In this case, render into a frame buffer that
// shares memory with a Core Animation Layer)
- (void)glkView:(GLKView *)view drawInRect:(CGRect)rect
{
[self.baseEffect prepareToDraw];

// Clear Frame Buffer (erase previous drawing)
glClear(GL_COLOR_BUFFER_BIT);

// Enable use of positions from bound vertex buffer
glEnableVertexAttribArray(      // STEP 4
  GLKVertexAttribPosition);

glVertexAttribPointer(          // STEP 5
  GLKVertexAttribPosition,
  3,                   // three components per vertex
  GL_FLOAT,            // data is floating point
  GL_FALSE,            // no fixed point scaling
  sizeof(SceneVertex), // no gaps in data
  NULL);               // NULL tells GPU to start at
                       // beginning of bound buffer

// Draw triangles using the first three vertices in the
// currently bound vertex buffer
glDrawArrays(GL_TRIANGLES,      // STEP 6
  0,  // Start with first vertex in currently bound buffer
  3); // Use three vertices from currently bound buffer
}


/////////////////////////////////////////////////////////////////
// Called when the view controller's view has been unloaded
// Perform clean-up that is possible when you know the view
// controller's view won't be asked to draw again soon.
- (void)viewDidUnload
{
[super viewDidUnload];

// Make the view's context current
GLKView *view = (GLKView *)self.view;
[EAGLContext setCurrentContext:view.context];

// Delete buffers that aren't needed when view is unloaded
if (0 != vertexBufferID)
{
  glDeleteBuffers (1,          // STEP 7
                   &vertexBufferID);
  vertexBufferID = 0;
}

// Stop using the context created in -viewDidLoad
((GLKView *)self.view).context = nil;
[EAGLContext setCurrentContext:nil];
}

@end
