1 dp,sp,px
- 名词解释
- px:像素,就是屏幕上的点,如图片的像素大小为32*32,这就是指的像素
- dpi:每英寸点数,即每英寸包括的像素个数,用对角线上像素点数/对角线长度。
- dp:设备独立像素,与像素密度密切相关。在dpi=160的设备上,1dp=1px.
- sp:相当于dp,常用于文字修饰
- dip:=dp
- 使用
- 常用尺寸大小dp
- 文字尺寸用sp
- 在屏幕上画一个分割线可以用px,比如1px
- m,h,xh,xxh,xxxh.1.5倍的等比
2 LayoutInflater
将xml文件解析为视图
- 获得LayoutInflater实例的三种方法
LayoutInflater m1 = getLayoutInflater()LayoutInflater layoutInflater = getSystemService(LATOU_INFLATER_SERVICE)LayoutInflater layoutInflater = LayoutInflater.from(Context)- 从源码来看,三种方法其实都是一种,就是第二种
    /**
     * Obtains the LayoutInflater from the given context.
     */
    public static LayoutInflater from(Context context) {
        LayoutInflater LayoutInflater =
                (LayoutInflater) context.getSystemService(Context.LAYOUT_INFLATER_SERVICE);
        if (LayoutInflater == null) {
            throw new AssertionError("LayoutInflater not found.");
        }
        return LayoutInflater;
    }
从上面from()的源码来看,方法里就调用了getSystemService(),所以殊途同归。
tips:getLayoutInflater()还没找到
3 提取布局属性:theme&style
当控件的很多属性有重合的时候,可以把它们相同的属性提取出来,这样可以减少代码的冗余度。
也可用parent继承已有的style,在代码中是这样引用的
4 如何自定义属性
深入理解android的自定义属性,写的更加易懂,以下参考了这篇博客。
- 创建属性
- value下新建资源文件,命名attrs_+类名
-
public static final class attr{
    public static final int backgroundColor=0x7f0100b3;
}
public static final class styleable {

    public static final int[] RedTextButton = {
            0x7f0100b3, 0x7f0100b4
        };
    public static final int RedTextButton_backgroundColor = 0;
    public static final int RedTextButton_textSize = 1;
}
所以有了这个标签,我们就可以只去关注这些属性的编写了,更加高效。
-
- 然后在CustomView代码中获取这些属性
    public void init(Context context, AttributeSet attrs){

        this.setOnClickListener(this);

        TypedArray typedArray = context.obtainStyledAttributes(
                attrs,R.styleable.RedTextButton);
        mBackGroundColor = typedArray.getColor(
                R.styleable.RedTextButton_backgroundColor, Color.BLUE);
                   mText = typedArray.getString(R.styleable.RedTextButton_text);
        typedArray.recycle();
               //
        mTextSize = typedArray.getInteger(R.styleable.RedTextButton_textSize, 18);
    }
AttributeSet:参数的集合,其实可以通过getAttributeName()和getAttributeValue()获得所有属性的key和value。但是为什么还要使用TypeArray呢?因为如果value是引用类型如"@string/app_name",那么它获得的value将是@+一串数字,如果要把这些数字解析出来,则还需要写代码完成这项工作,而TypeArray是简化了我们的工作。参考TextView获取属性的代码,可见系统也是这样做的
        /*
         * Look the appearance up without checking first if it exists because
         * almost every TextView has one and it greatly simplifies the logic
         * to be able to parse the appearance first and then let specific tags
         * for this View override it.
         */
        TypedArray a = theme.obtainStyledAttributes(attrs,
                com.android.internal.R.styleable.TextViewAppearance, defStyleAttr, defStyleRes);
        TypedArray appearance = null;
        int ap = a.getResourceId(
                com.android.internal.R.styleable.TextViewAppearance_textAppearance, -1);
        a.recycle();
        ....
- 如果直接使用系统的属性,则直接在attrs.xml中声明
5 自定义控件的步骤
步骤如下:
- 自定义属性
- 在customView中获取这些属性
- 重写onMesure。老师没有说,但是不写好像有一丢丢的问题
- 重写onDraw。绘制
既然步骤知道了,那就开始。自定义属性和获取属性上面已经介绍一遍了,接下来就是重写一系列方法
- 重写draw方法
      /**
     *
     * @param canvas 绘图工具
     */
    @Override
    protected void onDraw(Canvas canvas) {
        super.onDraw(canvas);

        mPanit.setTextSize(mTextSize);
        //获取文字四周的矩形,文字,开始的位置,结束的位置,把文字的四周边距计算出来放在mRect中
        mPanit.getTextBounds(mText, 0, mText.length(), mRect);

        float textWidth = mRect.width();
        float textHeight = mRect.height();

        mPanit.setColor(mBackGroundColor);
        canvas.drawRect(0f, 0f, getMeasuredWidth(),getMeasuredHeight() ,mPanit);

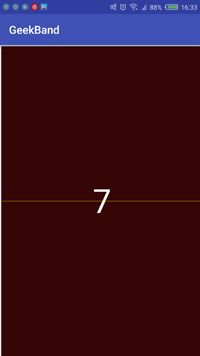
        //中间一个白色的数字
        mPanit.setColor(Color.WHITE);
        canvas.drawText(mText, getWidth() / 2 - textWidth / 2, getHeight() / 2 + textHeight / 2, mPanit);

        mPanit.setColor(Color.YELLOW);
        canvas.drawLine(0, getHeight() / 2, getWidth(), getHeight() / 2, mPanit);

    }
布局文件
显示如下
如果把宽高改成wrapcontent,则会变成(数字我设置了点击事件所以变了)。不符合
所以需要重写onMesure方法
重写之前了解 MeasureSpec 的 specMode,一共分为三种类型:
EXACTLY:一般表示设置了 明确值,或者 match_parent ;
AT_MOST:表示子控件限制在一个最大值内,一般为 wrap_content;
UNSPECIFIED:表示子控件像多大就多大,很少使用
@Override
    protected void onMeasure(int widthMeasureSpec, int heightMeasureSpec) {
        int widthMode = MeasureSpec.getMode(widthMeasureSpec);
        int widthSize = MeasureSpec.getSize(widthMeasureSpec);
        int heightMode = MeasureSpec.getMode(heightMeasureSpec);
        int heightSize = MeasureSpec.getSize(heightMeasureSpec);

        int width;
        int height;

        if (widthMode == MeasureSpec.EXACTLY){
            width = widthSize;
        }else {

            mPanit.setTextSize(mTextSize);
            //获取文字四周的矩形,文字,开始的位置,结束的位置,把文字的四周边距计算出来放在mRecr中
            mPanit.getTextBounds(mText, 0, mText.length(), mRect);
            int desired = getPaddingLeft() + getPaddingRight() + mRect.width();
            width = desired;
        }

        if (heightMode == MeasureSpec.EXACTLY)
        {
            height = heightSize;
        } else
        {

            mPanit.setTextSize(mTextSize);
            //获取文字四周的矩形,文字,开始的位置,结束的位置,把文字的四周边距计算出来放在mRecr中
            mPanit.getTextBounds(mText, 0, mText.length(), mRect);
            int desired = (getPaddingTop()  + getPaddingBottom() + mRect.height());
            height = desired;
        }
       setMeasuredDimension(width, height);
    }
然后wrapcontent就会变成
但是还有一个问题就是文字看上去不是那么居中,这篇博客关于文字居中写得特别的详细 怎么绘制居中文字,码着学习。
最后给view添加一个点击事件,点击一下数字会减少
    @Override
    public void onClick(View view) {

        int mNumber = Integer.parseInt(mText);
        if (mNumber > 0){
            mNumber--;

        }else {
            mNumber = 10;
        }
        mText=String.valueOf(mNumber);
        invalidate();
    }
tips:
自定义控件水太深
我现在有点饿


