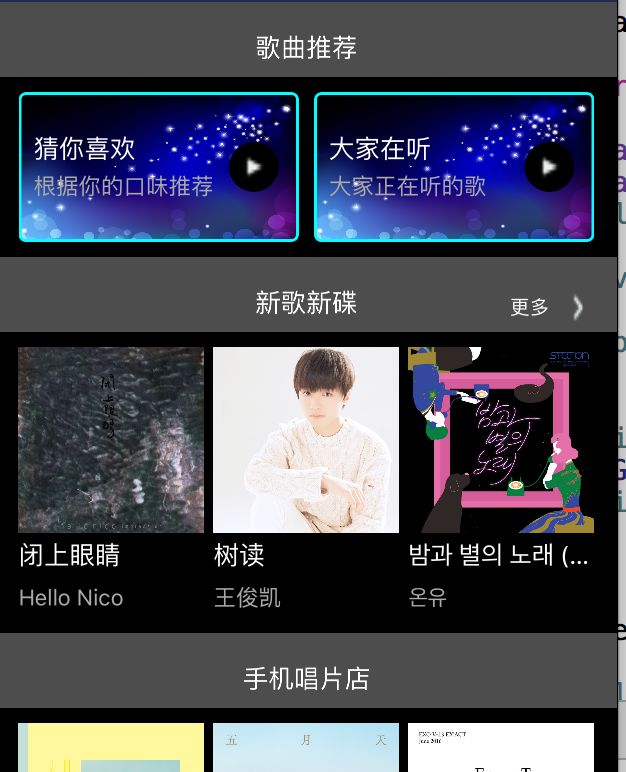
tableView在项目的开发中使用频率很高, 所以它的一些代理方法也要很熟悉, 接下来就讲讲tableView的分区头视图, 系统给的头视图中只有很少的属性, 而且一般不能满足我们的需求, 所以我们需要自定义, 虽然tableView有返回View的方法
- (UIView *)tableView:(UITableView *)tableView viewForHeaderInSection:(NSInteger)section {

}
但需要注意的是tableView如果要自定义就要继承于UITableViewHeaderFooterView
- 创建一个类继承于UITableViewHeaderFooterView
- 重写
- (instancetype)initWithReuseIdentifier:(NSString *)reuseIdentifier {
    self = [super initWithReuseIdentifier:reuseIdentifier];
    if (self) {
        // 在这里可以创建自定义View中子视图,
        [self createSubViews];
    }
    return self;
}
- 注意子控件的frame要在layoutSubViews中写(注意父类的调用)
- (void)layoutSubviews {
    [super layoutSubviews];

// 写子控件的frame值
}
- 在VC中调用实现以下方法
- (UIView *)tableView:(UITableView *)tableView viewForHeaderInSection:(NSInteger)section {
// 这里创建的自定义View在上面tableView要先注册
}
看一下效果
看一下具体实现代码:
其中Model是一个数据模型
自定义的MyView.h
#import
@class Model;
@interface MyView : UITableViewHeaderFooterView
@property (nonatomic, strong) Model *model;
@end
自定义的MyView.m
#import "MyView.h"
#import "Model.h"
@interface MyView ()
@property (nonatomic, strong) UILabel *label;
@property (nonatomic, strong) UIView *viewOfBottom;
@property (nonatomic, strong) UIButton *button;
@property (nonatomic, strong) UIImageView *imageViewOfMore;
@end
@implementation MyView
// init
- (instancetype)initWithReuseIdentifier:(NSString *)reuseIdentifier {
    self = [super initWithReuseIdentifier:reuseIdentifier];
    if (self) {
        [self createSubViews];
    }
    return self;
}
// 创建子视图
- (void)createSubViews {

    self.label = [[UILabel alloc] initWithFrame:CGRectZero];
    [self.contentView addSubview:_label];
    self.label.textColor = [UIColor whiteColor];
    self.label.textAlignment = NSTextAlignmentCenter;
//    _label.backgroundColor = [UIColor redColor];
    self.viewOfBottom = [[UIView alloc] initWithFrame:CGRectZero];
    [self.contentView addSubview:_viewOfBottom];

    self.button = [UIButton buttonWithType:UIButtonTypeCustom];
    [self.viewOfBottom addSubview:_button];
//    _button.backgroundColor = [UIColor whiteColor];
    self.button.tintColor = [UIColor lightGrayColor];
    self.button.titleLabel.font = [UIFont systemFontOfSize:13];
    self.button.titleLabel.textAlignment = NSTextAlignmentRight;

    self.imageViewOfMore = [[UIImageView alloc] initWithFrame:CGRectZero];
    [self.viewOfBottom addSubview:_imageViewOfMore];
//    _imageViewOfMore.backgroundColor = [UIColor yellowColor];
}
// Layout布局
- (void)layoutSubviews {
    [super layoutSubviews];

    CGFloat width = CGRectGetWidth(self.contentView.bounds);
    CGFloat height = CGRectGetHeight(self.contentView.bounds);
    self.label.frame = CGRectMake(width / 4, 10, width / 2, height - 10);

    self.viewOfBottom.frame = CGRectMake(width - 80, height / 3, 65, height * 2 / 3);

    self.button.frame = CGRectMake(0, 0, CGRectGetWidth(self.viewOfBottom.bounds) * 2 / 3, CGRectGetHeight(self.viewOfBottom.bounds));

    self.imageViewOfMore.frame = CGRectMake(CGRectGetWidth(self.button.bounds), 0, CGRectGetWidth(self.viewOfBottom.bounds) / 3, CGRectGetHeight(self.viewOfBottom.bounds));
}
// 模型赋值
- (void)setModel:(Model *)model {
    _model = model;

    self.label.text = model.name;

    if (model.number != 0) {

        [self.button setTitle:@"更多" forState:UIControlStateNormal];
        self.imageViewOfMore.image = [UIImage imageNamed:@"more"];
    }
}

@end
VC.m中创建tableVIew的时候注册
[_tableView registerClass:[MyView class] forHeaderFooterViewReuseIdentifier:@"header"];
/** 区头视图 */
- (UIView *)tableView:(UITableView *)tableView viewForHeaderInSection:(NSInteger)section {
    MyView *header = [tableView initWithReuseIdentifier:@"header"];
    header.model = self.mArrOfModel[section + 2];
    return header;
}
这样就可以了
