axios入门使用笔记
目录:
-
- 一.JOSN Server使用:
-
-
-
- 1.安装,在终端输入:
- 2. 创建db.josn:
- 3.启动服务,终端输入:
- 4.得到以下信息:
-
-
- 二.初识 axios 与配置:
-
-
-
- 1. 安装:
-
-
- 三.axios基本使用:
-
-
-
- 1.基本get请求:
- 2.基本post请求:
- 3.基本put请求:
- 4.基本delete请求:
-
-
- 四.axios其它方式发送请求:
-
-
-
- 1.get请求:
- 2.post请求:
-
-
- 五.axios的默认配置:
- 六.axios创建实例对象发送请求:
- 七.axios拦截器:
-
-
-
- 1.基本操作:
- 2.失败情况:
-
-
- 八.取消请求:
- 九. axios源码分析:
-
-
-
- 1.目录文件结构说明:
- 2.模拟axios对象创建过程 :
-
-
- 十.总结
一.JOSN Server使用:
JsonServer主要的作用就是搭建本地的数据接口,创建json文件,便于调试调用。
官方文档
1.安装,在终端输入:
npm install -g json-server
2. 创建db.josn:
建立一个名为db.josn的文件夹,写入下面内容:
{

  "posts": [
    {
      "id": 1, "title": "json-server", "author": "typicode" }
  ],
  "comments": [
    {
      "id": 1, "body": "some comment", "postId": 1 }
  ],
  "profile": {
      "name": "typicode" }
}
3.启动服务,终端输入:
json-server --watch db.json
4.得到以下信息:
\{
     ^_^}/ hi!

  Loading db.json
  Done

  Resources
  http://localhost:3000/posts
  http://localhost:3000/comments
  http://localhost:3000/profile

  Home
  http://localhost:3000

  Type s + enter at any time to create a snapshot of the database
  Watching...
二.初识 axios 与配置:
Axios 是一个基于 promise 的 HTTP 库,可以用在浏览器和 node.js 中。
axios中文文档
1. 安装:
使用 npm:
$ npm install axios
使用cdn在页面直接引用:
<script src="https://unpkg.com/axios/dist/axios.min.js"></script>
三.axios基本使用:
axios返回的是一个Promise结果。
1.基本get请求:
       axios({

                //请求类型
                method:'get',
                //地址,用建好的 JSON Server地址
                url: 'http://localhost:3000/posts/1',
            }).then(response=>{

                console.log(response);
            })
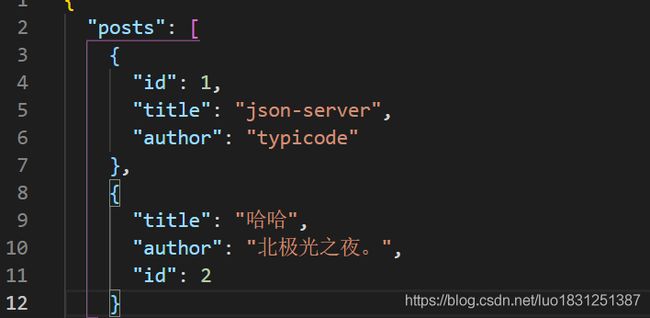
2.基本post请求:
添加一篇文章:
      axios({

                //请求类型
                method:'post',
                //地址,用建好的 JSON Server
                url: 'http://localhost:3000/posts',
                //请求体
                data:{

                   title:"哈哈",
                   author:"北极光之夜。"
                }
            }).then(response=>{

                console.log(response);
            })
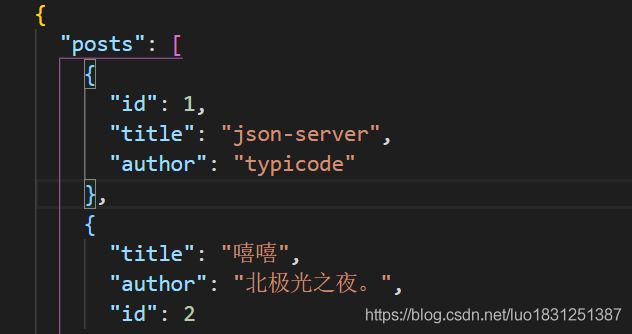
3.基本put请求:
更新上面那篇文章,id是2:
axios({

                //请求类型
                method:'PUT',
                //地址,用建好的 JSON Server
                url: 'http://localhost:3000/posts/2',
                //请求体
                data:{

                   title:"嘻嘻",
                   author:"北极光之夜。"
                }
            }).then(response=>{

                console.log(response);
            })
4.基本delete请求:
删除上面那篇文章:
btns[3].addEventListener('click',()=>{

            axios({

                //请求类型
                method:'delete',
                //地址,用建好的 JSON Server
                url: 'http://localhost:3000/posts/2',
            }).then(response=>{

                console.log(response);
            })
        })
四.axios其它方式发送请求:
有这么多:
axios.request(config)
axios.get(url[, config])
axios.delete(url[, config])
axios.head(url[, config])
axios.options(url[, config])
axios.post(url[, data[, config]])
axios.put(url[, data[, config]])
axios.patch(url[, data[, config]])
来两个例子:
1.get请求:
axios.request({

               method:"get",
               url:"http://localhost:3000/posts"
          }).then(response=>{

              console.log(response);
          })
2.post请求:
axios.post('http://localhost:3000/posts',
          {

            "title": "嘿嘿嘿",
            "author": "北极光之夜。"
          }).then(res=>{

              console.log(res);
          })
五.axios的默认配置:
可以指定将被用在各个请求的配置默认值。
原来:
  btns[0].addEventListener('click',()=>{


          axios({

              method: 'GET',
              url: 'http://localhost:3000/posts'
          }).then(res=>{

              console.log(res);
          })

        })
相当于:
        //设置默认配置
        axios.defaults.method = 'GET'; //默认请求为 get
        axios.defaults.baseURL = 'http://localhost:3000'; //设置基础地址

        btns[0].addEventListener('click',()=>{


          axios({

              url: '/posts'
          }).then(res=>{

              console.log(res);
          })

        })
不止上面的,其它什么header,params等等配置都可以设置默认然后全局调用。
六.axios创建实例对象发送请求:
当有多个服务器需要发送请求时,这种方式比默认配置更方便。
// 创建实例对象minyan,它的默认配置如下(用一个开源接口)
        const minyan = axios.create({

            baseURL: 'http://poetry.apiopen.top',
            timeout: 2000
        })
        // 调用minyan,返回一句名言
        minyan({

            url:'/sentences'
        }).then(res=>{

            console.log(res.data);
        })
        // 创建实例对象shuju,它的默认配置如下
        const shiju = axios.create({

            baseURL: 'http://localhost:3000',
            timeout: 2000
        })
        // 调用shiju,返回自定义的json数据
        shiju({

            url:'/posts'
        }).then(res=>{

            console.log(res.data);
        })
这里实例对象的功能跟直接axios差不多一样。
timeout: 2000指请求超时则中断。
结果:

七.axios拦截器:
在请求或响应被 then 或 catch 处理前拦截它们。
就像一道道关卡,满足要求放行,不满足就拦截。
跟promise很像的。
1.基本操作:
其中config就是配置对象,可以进行更改的。
// 添加请求拦截器
    axios.interceptors.request.use(function (config) {

        // 在发送请求之前做些什么
        console.log('请求成功喽!');
        return config;
    }, function (error) {

        // 对请求错误做些什么
        console.log('请求失败了~');
        return Promise.reject(error);
    });

    // 添加响应拦截器
    axios.interceptors.response.use(function (response) {

        // 对响应数据做点什么
        console.log('响应成功啦!');
        return response;
    }, function (error) {

        // 对响应错误做点什么
        console.log('响应失败阿~');
        return Promise.reject(error);
    });
   //发送一个请求看看
    axios({

              method: 'GET',
              url: 'http://localhost:3000/posts'
          }).then(res=>{

              console.log(res.data);
          })
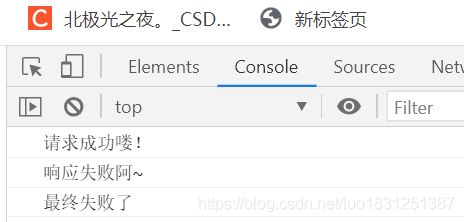
2.失败情况:
// 添加请求拦截器
    axios.interceptors.request.use(function (config) {

        // 在发送请求之前做些什么
        console.log('请求成功喽!');
        // 抛错
        throw '参数有问题啊!';
    }, function (error) {

        // 对请求错误做些什么
        console.log('请求失败了~');
        return Promise.reject(error);
    });

    // 添加响应拦截器
    axios.interceptors.response.use(function (response) {

        // 对响应数据做点什么
        console.log('响应成功啦!');
        return response;
    }, function (error) {

        // 对响应错误做点什么
        console.log('响应失败阿~');
        return Promise.reject(error);
    });
   //请求
    axios({

              method: 'GET',
              url: 'http://localhost:3000/posts'
          }).then(res=>{

              console.log(res.data);
          }).catch(reason=>{

              console.log('最终失败了');
          })
八.取消请求:
因为在json-server本地调用速度太快,不利于查看效果,所以给json-server一个2秒的延迟执行。
重新启动,设置2秒延迟:
json-server --watch db.json -d 2000
基本用法:
//2.声明全局变量
    let cancel = null;
    //点击按钮发送请求事件
    btns[4].onclick = function(){

        if(cancel!==null){

            //取消上一次请求
            cancel();
        }
        axios({

            method: 'GET',
            url: 'http://localhost:3000/posts',
            //1.添加配置对象属性
            cancelToken: new axios.CancelToken(function(c){

                //3.将c值赋值给cancel
                cancel = c;
            })
        }).then(res => {

            console.log(res.data);
        })
    }
    //点击按钮取消请求事件
        btns[5].onclick = function () {

            //4.直接调用这个函数就会取消请求了
            cancel();
            //重新初始化
            cancel = null;
        }
九. axios源码分析:
1.目录文件结构说明:
2.模拟axios对象创建过程 :
 //构造函数
        function Axios(config){

            //初始化
            this.defaults = config;
            this.intercepters = {

               request:{
     },
               response:{
     }
            }
        }
        //原型添加相关方法
        Axios.prototype.request = function(config){

            console.log("发送ajax请求,类型为:"+config.method);
        }
        Axios.prototype.get = function(config){

            return this.request({
     method:'GET'});
        }
        Axios.prototype.post = function(config){

            return this.request({
     method:'POST'});
        }
        //声明函数
        function createInstance(config){

            //实例化一个对象
            let context = new Axios(config);//可以context.get(),context.post(),但是不能当函数用,context()
            //创建请求函数
            let instance = Axios.prototype.request.bind(context);//instance是一个函数,可以instance({}),但不能instance.get().
            //将Axios.prototype对象中方法添加到instance函数对象中
            Object.keys(Axios.prototype).forEach(key=>{

                instance[key]=Axios.prototype[key].bind(context);
            });
            //为instance函数对象添加属性default与intercept
            Object.keys(context).forEach(key=>{

                instance[key]=context[key];
            });
            return instance;
        }
       //测试
        let axios = createInstance();
        axios({
     method:'post'});
bind() 方法创建一个新的函数,在 bind() 被调用时,这个新函数的 this 被指定为 bind() 的第一个参数,而其余参数将作为新函数的参数,供调用时使用。
Object.keys()方法会返回一个由一个给定对象的自身可枚举属性组成的数组,数组中属性名的排列顺序和正常循环遍历该对象时返回的顺序一致 。
十.总结

其它文章:
JS数据结构与算法学习笔记大全 (温故而知新,可以为师矣。)
Ajax简单总结笔记
前端Promise总结笔记
进我主页查看更多~


