paddlenlp text_classification(文本分类项目使用一)
开发环境
paddlepaddle python3.7 win64
官方github链接地址
效果展示
目的:官方用的数据集是进行中文文本的情感分类任务,我这里博客将制作自定义的数据集,利用百度paddlenlp下的text_classification来判断菜单名和非菜单名的评论这两个样本,进行分类.
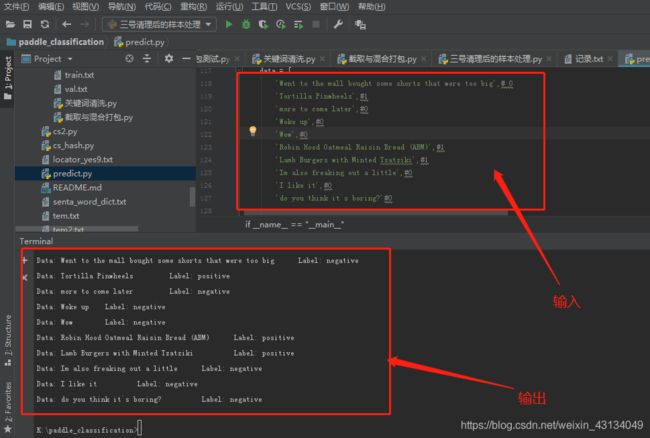
首先是展示结果图,图中我们输入代表菜单名,和非菜单名的字符串如下
data = [
        'Went to the mall bought some shorts that were too big',# 0
        'Tortilla Pinwheels',#1
        'more to come later',#0
        'Woke up',#0
        'Wow',#0
        'Robin Hood Oatmeal Raisin Bread (ABM)',#1
        'Lamb Burgers with Minted Tzatziki',#1
        'Im also freaking out a little',#0
        'I like it',#0
        'do you think it`s boring?'#0

    ]
一 环境搭建提一下
其实没啥说的,paddlpaddle框架安装好,然后版本也要弄对,特别注意安装的paddlenlp的版本
python >= 3.6
paddlepaddle >= 2.0.0-rc1
pip install paddlenlp==2.0.0b
我paddle框架的版本是2.0.0-rc1的CPU版本哈哈,貌似要高于2.0才能用paddlenlp的说,GPU版本的话conda设置好应该就没问题
其他的关于paddlepaddle的框架环境搭建问题多多参考官方链接
paddlenlp
paddle官网
二.准备数据字典(映射字典)
我们先来看看官方提供的数据字典 senta_word_dict.txt,而这次我做的分类是关于英文菜单的很明显是不能用这个的,需要自己做,

import io
import os
import sys
import requests
from collections import OrderedDict
import math
import random
import numpy as np
import paddle
import paddle.fluid as fluid

from paddle.fluid.dygraph.nn import Embedding

#读取text8数据
def load_text8():
    with open("./text8.txt", "r") as f:
        corpus = f.read().strip("\n")
    f.close()

    return corpus

#对语料进行预处理(分词)
def data_preprocess(corpus):
    #由于英文单词出现在句首的时候经常要大写,所以我们把所有英文字符都转换为小写,
    #以便对语料进行归一化处理(Apple vs apple等)
    #corpus = corpus.strip().lower()
    corpus = corpus.split(" ")

    return corpus


# 构造词典,统计每个词的频率,并根据频率将每个词转换为一个整数id
def build_dict(corpus):
    # 首先统计每个不同词的频率(出现的次数),使用一个词典记录
    word_freq_dict = dict()
    for word in corpus:
        if word not in word_freq_dict:
            word_freq_dict[word] = 0
        word_freq_dict[word] += 1

    # 将这个词典中的词,按照出现次数排序,出现次数越高,排序越靠前
    # 一般来说,出现频率高的高频词往往是:I,the,you这种代词,而出现频率低的词,往往是一些名词,如:nlp
    word_freq_dict = sorted(word_freq_dict.items(), key=lambda x: x[1], reverse=True)

    # 构造3个不同的词典,分别存储,
    # 每个词到id的映射关系:word2id_dict
    # 每个id出现的频率:word2id_freq
    # 每个id到词典映射关系:id2word_dict
    word2id_dict = dict()
    word2id_freq = dict()
    id2word_dict = dict()

    # 按照频率,从高到低,开始遍历每个单词,并为这个单词构造一个独一无二的id
    for word, freq in word_freq_dict:
        curr_id = len(word2id_dict)
        word2id_dict[word] = curr_id
        word2id_freq[word2id_dict[word]] = freq
        id2word_dict[curr_id] = word

    return word2id_freq, word2id_dict, id2word_dict


corpus = load_text8()
corpus = data_preprocess(corpus)
# print(corpus[:50])
word2id_freq, word2id_dict, id2word_dict = build_dict(corpus)
vocab_size = len(word2id_freq)
ss = open("./text9_big.txt", "w")
print("there are totoally %d different words in the corpus" % vocab_size)
for _, (word, word_id) in zip(range(100000000), word2id_dict.items()):
    print("word: %s, its id %d, its word freq %d" % (word, word_id, word2id_freq[word_id]))
    s_data = word + "\n"
    print(s_data)
    ss.write(s_data)
text8,txt: 是维基百科词汇集 和我收集到的菜品名字,以及相关评论字符串的集合 (有些菜品名有些惹怪,维基百科没有)
text9_big.txt: 为生成的新字典,并且是没有区分大小写的那种,要全部是小写取消上面data_preprocess方法内的注释
最后生成后,记得 手动加上,前缀 ,win的话打开txt另存为utf-8,避免之后由于格式问题报错
[PAD]

[UNK]
三.准备正负样本
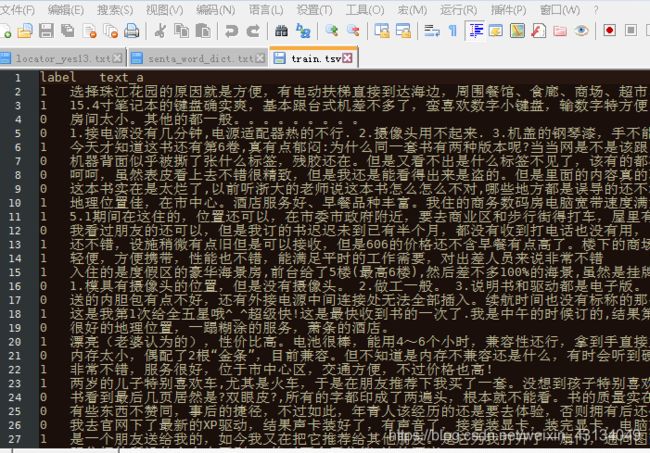
同上我们先看看官方的样本,在C:\Users\Administrator.paddlenlp\datasets\chnsenticorp内部,linux的话.paddlenlp\datasets\chnsenticorp没变,前面路径为用户目录
(当然要先运行一下原来的程序,才能下载下来,或者大家自己把官方的这个数据集下下来看看点击下载)

长上面这样,内部类是这样的

恩…看起来没有换行,但用notepad打开是有的,之后我制作数据集的时候经过验证是需要换行的,并且总结的空格是用 "\t"分割 而不是空格,使用空格的话是要报错的

对正负样本分割之后的数据按照训练集 测试集 验证集的比例 大概 0.8 ,0.1 ,0.1注意
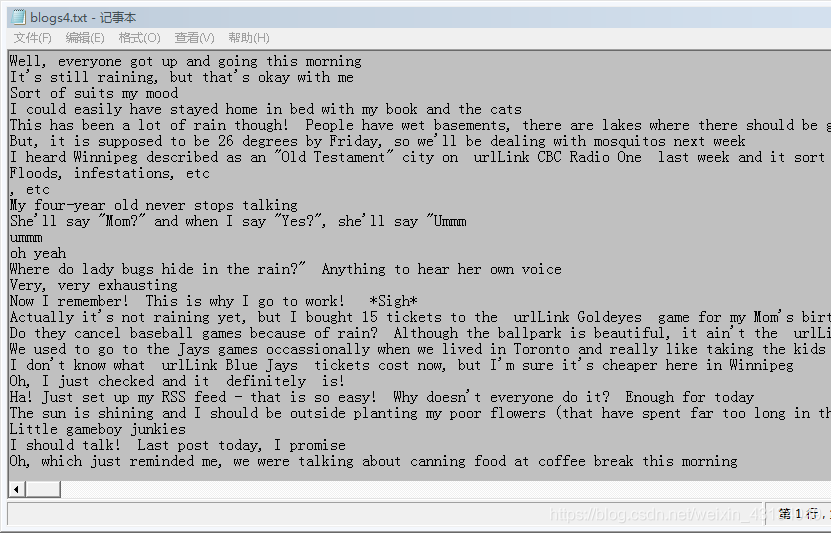
这时正负样本为默认已经从别的json文档等提出出来了,比如这里菜品名的样本我从json文档中提取出来的,而非菜品名及作为负样本的,我从一个博客数据集得到的.在对正负样本处理前要先处理成下面这样,一行一句,无空格要换行

处理代码
#1 通过读取与重新写入从而去掉每一行开头的空格
# with open("blogs.txt",'r',encoding='gb18030') as read_txt:
#     with open("blogs2.txt",'w',encoding="utf-8") as write_txt:
#         for line in read_txt.readlines():
#             write_txt.write(line.lstrip())

#2 以下进行对每个句子进行拆分,按照英语句号替换成换行符
# with open("blogs2.txt",'r',encoding='utf-8') as read_txt:
#     with open("blogs3.txt",'w',encoding="utf-8") as write_txt:
#
#         for line in read_txt.readlines():
#             line = str(line)
#             line = line.replace(".","\n")
#             write_txt.write(line.lstrip())
#

#
#3  消灭多行换行,以及前面的空格
# with open("blogs3.txt",'r',encoding='utf-8') as read_txt:
#     with open("blogs4.txt",'w',encoding="utf-8") as write_txt:
#         for line in read_txt.readlines():
#             if line != "\n" :
#                 write_txt.write(line.lstrip())
#


#4 读取每一行的词汇,有小于4字节长度的返回

# with open("blogs4.txt",'r',encoding="utf-8") as write_txt:
#     for line in write_txt.readlines():
#         # print(len(line))
#         if (len(line) < 5):
#             print(line)
#
下面的代码是我自己写的,大概流程是
1.过滤长度大于70的
2.由于正负样本长度不一样所以要裁剪成相同数据量.
3.匹配正负样本有无重复相同的(这里还需要感觉,时间复杂度高了,要的时间有些久,有想法该的小伙伴给我说下怎么改哈)
4.之后就是对正负样本文件按照比例拆分成总共六份(这里要自己按8:1:1)算着改
5.将拆分的正负两对应份,混合合并成train.tsv和dev.tsv 和test.tsv
import random
from collections import defaultdict

#0.对正负样本进行统计,过滤掉长度过长的

# if __name__ == "__main__":
#     file1 = open("blogs4.txt","r",encoding="utf-8")
#     file2 = open("locator_yes12.txt","r",encoding="utf-8")
#     file3 = open("blogs5.txt","w",encoding="utf-8")
#     file4 = open("locator_yes13.txt", "w", encoding="utf-8")
#
#     i = 1
#
#     for line in file1.readlines():
#         if( len(line) < 70 ):
#             file3.write(line)
#     for line in file2.readlines():
#         if (len(line) < 70):
#             file4.write(line)
#
#
#


#1.按照正样本的数量对负样本进行裁剪

# if __name__ == "__main__":
#     file1 = open("blogs5.txt","r",encoding="utf-8")
#     file2 = open("blogs_cut2.txt","w",encoding="utf-8")
#     # file3 = open("neg.txt","w",encoding="utf-8")
#
#     i = 1
#
#     for line in file1.readlines():
#         if (i < 162500):
#             file2.write(line)
#             i = i + 1
#         else:
#             file1.close()
#             file2.close()


#2 将正样本内的数据与负样本的数据进行匹配,发现负样本有重复的则删掉

# def shift_table(pattern):
#     # 生成 Horspool 算法的移动表
#     # 当前检测字符为c,模式长度为m
#     # 如果当前c不包含在模式的前m-1个字符中,移动模式的长度m
#     # 其他情况下移动最右边的的c到模式最后一个字符的距离
#     table = defaultdict(lambda: len(pattern))
#     for index in range(0, len(pattern) - 1):
#         table[pattern[index]] = len(pattern) - 1 - index
#     return table
#
#
# def horspool_match(pattern, text):
#     # 实现 horspool 字符串匹配算法
#     # 匹配成功,返回模式在text中的开始部分;否则返回 -1
#     table = shift_table(pattern)
#     index = len(pattern) - 1
#     while index <= len(text) - 1:
#         # print("start matching at", index)
#         match_count = 0
#         while match_count < len(pattern) and pattern[len(pattern)-1-match_count] == text[index-match_count]:
#             match_count += 1
#         if match_count == len(pattern):
#             return index-match_count+1
#         else:
#             index += table[text[index]]
#     return -1
#
# if __name__ == "__main__":
#     # file1 = open("cs1.txt","r",encoding="utf-8")
#     # file2 = open("cs2.txt","r",encoding="utf-8")
#     file1 = open("locator_yes13.txt","r",encoding="utf-8")
#     file2 = open("blogs_cut2.txt","r",encoding="utf-8")
#
#     i = 1
#     ii = 1
#
#
#     f1 = file1.readlines()
#     for neg in file2.readlines():
#         ju = 0  # 默认ju等于0,即默认正负样本中没有相同的
#         neg = str(neg)
#         # print("总"+ str(ii) +"次")
#         # print("1111111111111111111111111111111111111111111111111111111111111111111111111111111")
#         # print(pos)
#         ii = ii + 1
#         i3 = 1
#
#         for pos in f1:
#             pos = str(pos)
#             # print(neg+":"+pos)
#             # print("对比:",pos)
#
#             # print("..............................................................................")
#             if ((horspool_match(neg.lower(),pos.lower()) != -1) and (len(pos) == len(neg))):
#
#                 ju = 1 #ju等于1说明这个neg词汇在正样本中有相同的
#                 print("相同打印")
#                 print(neg + ":" + pos)
#                 print("相同" + str(i) + "次")
#                 i = i + 1
#         if (ju == 0):
#
#             # print("不相同" + str(i3) + "次")
#             # print(neg)
#             i3 = i3 + 1
#

#6666666666666666666666666666666666666666666666666666666666666666666666666666666666666666666666666666666666666666
# # 3.对正负样本加上前缀,locator_yes13_1  blogs_cut2_1 即加上前缀后的部分
# if __name__ == "__main__":
#     # file1 = open("cs1.txt","r",encoding="utf-8")
#     # file2 = open("cs2.txt","r",encoding="utf-8")
#     file1 = open("locator_yes13.txt", "r", encoding="utf-8")
#     file2 = open("blogs_cut2.txt", "r", encoding="utf-8")
#     file3 = open("locator_yes13_1.tsv","w",encoding="utf-8")
#     file4 = open("blogs_cut2_1.tsv", "w", encoding="utf-8")
#     # file5 = open("dev.txt", "w", encoding="utf-8")
#
#     i = 1
#     # file3.write("label" + "\t" + "text_a" + "\n")
#     # file4.write("label" + "\t" + "text_a" + "\n")
#
#     for line in file1.readlines():
#
#         s1 = "1" + "\t" + line
#         file3.write(s1)
#
#     for line in file2.readlines():
#
#         s2 = "0" + "\t" + line
#         file4.write(s2)
#
#


#4.对正负样本按照,129597 + 16212 + 16211的格式进行分割
#
# if __name__ == "__main__":
#
#     file3 = open("locator_yes13_1.tsv","r",encoding="utf-8")
#     file4 = open("blogs_cut2_1.tsv", "r", encoding="utf-8")
#
#     file5 = open("pos_1.txt", "w", encoding="utf-8")
#     file6 = open("pos_2.txt", "w", encoding="utf-8")
#     file7 = open("pos_3.txt", "w", encoding="utf-8")
#
#     file8 = open("neg_1.txt", "w", encoding="utf-8")
#     file9 = open("neg_2.txt", "w", encoding="utf-8")
#     file10 = open("neg_3.txt", "w", encoding="utf-8")
#
#     i = 1
#
#
#     for line in file3.readlines():
#         if (i <= 129597):
#             i = i + 1
#             file5.write(line)
#
#         elif(129597
#             i = i + 1
#             file6.write(line)
#         else:
#             i = i + 1
#             file7.write(line)
#     i = 1
#     for line in file4.readlines():
#         if (i <= 129597):
#             i = i + 1
#             file8.write(line)
#         elif (129597 < i <= 145809):
#             i = i + 1
#             file9.write(line)
#         else:
#             i = i + 1
#             file10.write(line)


#5.对正负样本分割之后的数据按照训练集 测试集 验证集的比例 大概 0.8 ,0.1 ,0.1(已经在上一部分割好了),然后使用random.shuffle()打乱顺序
#这里注意最后得到的结果没有加上label	text_a


def readlines_data(file):
    for line in file.readlines():
        yield line

def merge_random(file5,file8,file_train):
    s5 = file5.readlines()
    s8 = file8.readlines()
    train_list = s5 + s8
    random.shuffle(train_list)
    for line in train_list:

        file_train.write(line)

if __name__ == "__main__":

    file5 = open("pos_1.txt", "r", encoding="utf-8")
    file6 = open("pos_2.txt", "r", encoding="utf-8")
    file7 = open("pos_3.txt", "r", encoding="utf-8")
    #
    file8 = open("neg_1.txt", "r", encoding="utf-8")
    file9 = open("neg_2.txt", "r", encoding="utf-8")
    file10 = open("neg_3.txt", "r", encoding="utf-8")

    file_train = open("train.tsv", "w", encoding="utf-8")
    file_val = open("dev.tsv", "w", encoding="utf-8")
    file_teat = open("test.tsv", "w", encoding="utf-8")

    merge_random(file5,file8,file_train)
    merge_random(file6,file9,file_val)
    merge_random(file7,file10,file_teat)
四.开启训练
这里主要还是按照官方的命令来官方命令
1.首先在train.py中将路径更换成自己的数据字典
parser.add_argument("--vocab_path", type=str, default="./text9_big_utf8.txt", help="The directory to dataset.")
使用的时候,记得把训练命令去掉vocab_path如下
python train.py --vocab_path='./senta_word_dict.txt' --use_gpu=False --network=bilstm --lr=5e-4 --batch_size=64 --epochs=5 --save_dir='./checkpoints'

python train.py  --use_gpu=False --network=bilstm --lr=5e-4 --batch_size=64 --epochs=5 --save_dir='./checkpoints'
大坑一:看报错代码看了半天才找到,大家注意!
首先看这
Md5()
功能:MD5签名是一个哈希函数,把任意长度的数据转换为一个长度固定的数据串(通常用16进制的字符串表示);可用于文件命名
传入参数:bytes类型
导入:from hashlib import md5
在数据字典换成自己做的后,我又将之前做的数据集train.tsv , dev.tsv , test.tsv放到C:\Users\Administrator.paddlenlp\datasets\chnsenticorp替换了官方的数据集,结果每次运行都会被替换掉,甚至官方数据集我改一个标点符号都会重新替换
原因就在于官方的chnsenticorp.py中大概79行那里,每次它都会将现有的数据集通过md5模块,当然这个模块被放到另外一个文件的内里面进行了打包,
每次运行训练程序,就会匹配自定义数据集的md5哈希函数的返回值与官方的进行比较不同,则从重新下载官方的数据
所以我们需要将此处的判断代码进行注释.如下
  def _get_data(self, root, mode, **kwargs):

        default_root = DATA_HOME#说明存储的路径的前部分
        filename, data_hash, field_indices, num_discard_samples = self.SPLITS[
            mode]
        fullname = os.path.join(default_root,
                                filename) if root is None else os.path.join(
                                    os.path.expanduser(root), filename) #确定存储样本的地址
        #5555555555555555555555555555555555555555555555555555555555555555555555555555555555555555555555555555555555555
        # if not os.path.exists(fullname) or (data_hash and
        #                                     not md5file(fullname) == data_hash):#如果目标样本不存在 或者data_hash
        #                                                                         #即改文件数据的哈希函数处理的返回值与官方得到的不相同则执行下面的进行替换
        #     if root is not None:  # not specified, and no need to warn  只有不为none时才触发,实际上默认就是none
        #         warnings.warn(
        #             'md5 check failed for {}, download {} data to {}'.format(
        #                 filename, self.__class__.__name__, default_root))
        #     path = get_path_from_url(self.URL, default_root, self.MD5)
        #     print("打印数据集path路径")
        #     print(path)
        #     fullname = os.path.join(default_root, filename)
        #     print("打印数据集fullname路径")
        #     print(fullname)
            #666666666666666666666666666666666666666666666666666666666666666666666666666666666666666666

        super(ChnSentiCorp, self).__init__(
            fullname,
            field_indices=field_indices,
            num_discard_samples=num_discard_samples,
            **kwargs)
进入这个chnsenticorp.py的话从train.py的大概100多行的这里转到ChnSentiCorp的实现就可以了
    # Loads dataset.
    train_ds, dev_ds, test_ds = ChnSentiCorp.get_datasets(
        ['train', 'dev', 'test'])
大坑二:
目前数据集的数量在3万个左右(train.tsv , dev.tsv , test.tsv加起来),及3万个一下,没问题,不过三万个以上就会出现报错,官方目前还没有回的改怎么改,后面再更新
五.进行预测
1.先改下prodect.py的
parser.add_argument("--vocab_path", type=str, default="./text9_big_utf8.txt", help="The path to vocabulary.")
2.然后修改prodect.py大概97行的data列表,使用改成自己测试词汇
    # data = [
    #     '这个宾馆比较陈旧了,特价的房间也很一般。总体来说一般',
    #     '怀着十分激动的心情放映,可是看着看着发现,在放映完毕后,出现一集米老鼠的动画片',
    #     '作为老的四星酒店,房间依然很整洁,相当不错。机场接机服务很好,可以在车上办理入住手续,节省时间。',
    #     '友达LED屏,独显,满意,到手是完美屏,不错',
    #     '这套书是买给儿子的,小家伙两岁半不到,正是这套书适合的年龄阶段。之前看了许多评价,这套书好评如潮,令我十分期待。因为一本好书可以带给人知识,给人以愉悦,哪怕他只是一个小孩子。拿到书的瞬间我就肯定我的孩子会非常喜欢这套书。果真如此,小家伙非常喜欢,与其说是看,不如说是玩起这套书来不亦乐乎。再加上大人在一旁的指点与协助,真得是一个非常好的亲子游戏呢。第一次写评价,希望好书共享。'
    #     '这本书也许你不会一气读完,也许它不够多精彩,但确实是一本值得用心去看的书。活在当下,所谓的悲伤和恐惧都是人脑脱离当下自己瞎想出来的。书里的每句话每个理论都需要用心去体会,你会受益匪浅,这是真的!做个简单快乐的人,也不过如此。看了这本书,如果你用心去看了的话,会觉得豁然轻松了,一下子看开了,不会因为生活中的琐碎而成天担忧,惶恐不安。这是一本教你放下压力的值得一买的好书。',
    # ]
3.使用下面命令就ok了,不过要注意checkpoints目录是否在同级目录下```
python predict.py --use_gpu=False --network=bilstm --params_path=checkpoints/final.pdparams
后话
如果是多个分类的话,可以试着修改chnsenticorp.py的get_labels的返回值,

