11. vue-router
11.1 引用
//入口文件
import router from 'vue-router'
11.2 配置路由文件
export default new Router({
  routes: [
    {
      path: '/hello',
      name: 'HelloWorld',
      component: HelloWorld
    }
  ]
})
11.3 路由的跳转
//相当于跳转路由的超链接
点我跳转
//视图位置
11.4 路由的传参
//router-link中用params传参数
点我
//router中用:参数名 接收参数
export default new Router({
  routes: [
    {
      path: '/hello/:word',
      name: 'HelloWorld',
      component: HelloWorld
    },
  ]
})
//组件中这样接收
{{ this.$route.params.word }}
11.5 hash模式和history模式
- hash模式:vue-router 默认 hash 模式 —— 使用 URL 的 hash(#xxx) 来模拟一个完整的 URL,于是当 URL 改变时,页面不会重新加载。由于hash发生变化的url都会被浏览器记录下来,使得浏览器的前进后退都可以使用了,尽管浏览器没有亲求服务器,但是页面状态和url关联起来。
- history模式:当他们进行修改时,虽然修改了url,但浏览器不会立即向后端发送请求。 特别注意,history模式需要后台配置支持。
11.6 路由懒加载
当打包构建应用时,JavaScript 包会变得非常大,影响页面加载。如果我们能把不同路由对应的组件分割成不同的代码块,然后当路由被访问的时候才加载对应组件,这样就更加高效了。
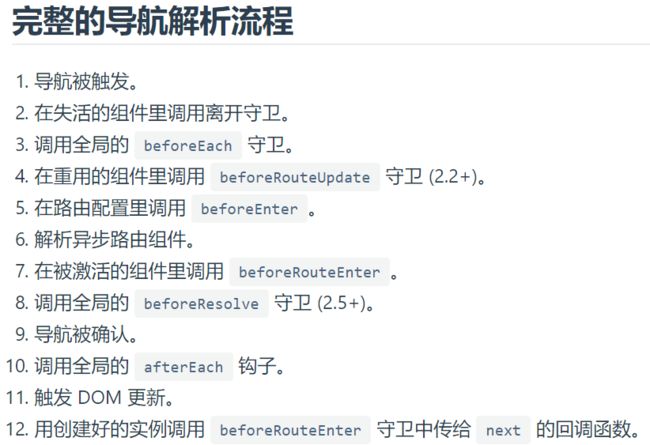
11.7 导航守卫
导航守卫主要用来通过跳转或取消的方式守卫导航。有多种机会植入路由导航过程中:全局的, 单个路由独享的, 或者组件级的。导航守卫就是路由跳转过程中的一些钩子函数,如路由跳转前做一些登陆验证等。
12. Axios
12.1 安装和引入
npm install axios
import axios from 'axios'
12.2 全局挂载
Vue.prototype.$axios = axios;
12.3 get请求
this.$axios.get('url',{params:{xxx:yyy}}).then(res){}.catch(){}
13. Vuex
13.1 安装和引入
//安装
npm install vuex
//入口文件引入和注入
import Vuex from 'vuex'
Vue.use(Vuex)
new Vue({
el: '#app',
router,
Vuex,
components: { App },
template: '13.2 状态管理
//state入口文件内创建全局状态仓库
var store = new Vuex.Store({
  state:{
    XXX:xxx
  }
})

//各自组建内取用
this.$store.state.XXX
13.3 状态改变
mutations:只能包括同步操作
//在全局状态仓库定义改变状态的方法mutations
var store = new Vuex.Store({
  state:{
    XXX:xxx
  },
  mutations:{
    YYY: function(state){}
  }
})
//在各自组建内触发改变状态的方法
this.$store.commit(YYY);
actions:可以包括异步操作
//在全局状态仓库定义改变状态的方法actions
var store = new Vuex.Store({
  state:{
    XXX:xxx
  },
  mutations:{
    YYY: function(state){}
  },
  actions{
    ZZZ:function(context){
      context.commit(YYY);
  }
}
})
//在各自组建内触发改变状态的方法
this.$store.dispatch(ZZZ);
13.4 派生状态(如过滤)
//在全局状态仓库定义派生状态的方法getters
var store = new Vuex.Store({
  state:{
    XXX:xxx
  },
  mutations:{
    YYY: function(state){}
  },
  actions{
    ZZZ: function(context){
      context.commit(YYY);
  },
  getters:{
    AAA: function(state){}
  }
}
})
//在各自组建内触发派生状态的方法
this.$store.getters.AAA
14. 深入响应式原理
- 当你把一个普通的 JavaScript 对象传入 Vue 实例作为 data 选项,Vue 将遍历此对象所有的属性,并使用Object.defineProperty 把这些属性全部转为getter/setter。
- Vue 不能检测到对象属性的添加或删除,解决方法是手动调用 Vue.set 或者 this.$set。
