UnRAVL 简介
什么是UnRAVL
UnRAVL 是一种通过编写JSON,来验证REST格式API的开源免费的自动化测试框架。
github地址:https://github.com/sassoftware/unravl
JSON文件内容
通过UnRAVL定义的一些关键字(语法)来编写JSON文件,这个JSON文件的描述可以包括HTTP method,URL,HTTP Headers ,Request Body,认证AUT等。其中HTTP method 包括GET,POST,PUT,DELETE,HEAD,PATCH,为必须包括项,URL也为必须,而其它三个均为可选项目。
UnRAVL 脚本语法
如下是从github上直接复制得到的关于UnRAVL脚本的JSON语法,如果想了解更多可以点击描述中的链接查看每个语法更详细的说明。
| Syntax element. | Description |
|---|---|
| { | An UnRAVL test script is a JSON object which begins with an open brace |
"name" : "test name", |
The name of this test |
"doc" : "a comment", |
More detailed comments/description |
"template" : "template-name", |
Inheritance of tests via templates |
"env" : {env-bindings}, |
Assign variables in the environment |
"preconditions" : [assertions], |
Assert preconditions are true before calling the API |
"if" : condition, |
Conditionally execute the test if condition is true |
"headers" : {request-headers} |
Names/values of request headers to pass to the API |
"auth" : {authentication}, |
Use authentication to call the API |
method : "URL", |
The HTTP method GET, POST, PUT, DELETE, HEAD, PATCH and target URL |
"body" : {body-specification} |
The request body (text, JSON, binary) |
"bind" : [api-bindings] |
Bind (extract) values from the response |
"assert: [assertions] |
Validate the response with assertions |
| } | End of the JSON object |
以下是个人对其中几个常用语法的简单认识:
例子
编写GET请求,并对返回值做校验
  {
    "name": "Google Everest Elevation setup",
    "env": {
      "locations": "27.988056,86.925278",
      "sensor": "false",
      "url": "http://maps.googleapis.com/maps/api/elevation/json?locations={locations}&sensor={sensor}"
    },
    "doc": "Save the response to assertJson.json",
    "GET": "{url}",
    "bind": [
      {
        "doc": "save a json file"
      },
      {
        "json": "@reponseBody.json"
      },
      {
        "doc": "jsonpath"
      },
      {
        "jsonPath": {
          "actualElevation": "$.results[0].elevation",
          "actuallat": "$.results[0].location.lat",
          "actuallng": "$.results[0].location.lng"
        }
      }
    ],
    "assert": [
      {
        "status": 200
      },
      {
        "groovy": "status == 200"
      },
      {
        "headers": {
          "Content-Type": "application/json; *charset=UTF-8"
        }
      },
      {
        "json": "@assertJson.json"
      },
      "actualElevation==8815.7158203125",
      "actuallat != 0",
      "actuallng > 0",
      "actuallat != null"
    ]
  }
接口返回json:
{
  "results" : [ {
    "elevation" : 8815.7158203125,
    "location" : {
      "lat" : 27.988056,
      "lng" : 86.925278
    },
    "resolution" : 152.7032318115234
  } ],
  "status" : "OK"
}
解释:
- name: 用于定义该API或者Case的描述。
- env: 里面定义了三个变量,locations,sensor,url,其中url中还通过{locations}{sensor}来获取同样evn里面的两个变量值,最后拼接成一个完整的接口地址。
- doc: 因JSON文件本身不提供像其他编程语言的注释功能,所以doc关键字的提供在这里就是起到注释作用。
- GET: GET就是表示HTTP请求方法是GET,上面已经提到UnRAVL提供了GET外的多种请求方式,GET的对应的值{url}则表示从env中获取url对应的值地址。
bind:里面包含多块,其中doc一样是注解作用;
"json": "@reponseBody.json",则表示把response的body用json文件保存到该用例json文件同级目录底下;
jsonPath 里面则是在解析请求返回的json。 - assert:关键字用于做校验,这个例子尽可能的列出多种校验方式,
其中"status": 200 表示校验请求的状态码是否为200;
"groovy": "status == 200"则表示通过groovy语音来校验状态码(UnRAVL支持groovy和JavaScript语法);
"headers": { "Content-Type": "application/json; *charset=UTF-8" } 表示校验接口返回的headers是否有Content-Type值为application/json; *charset=UTF-8;
"json": "@assertJson.json"则表示response body直接跟外部文件assertJson.json对比,对比整个json文件是否一致;
最后"actuallat != 0"等则是把bind的中jsonPath解析的结果和预期值做对比。
POST 请求
{
  "name" : "POST a hello message to httpbin",
  "env" : {
    "data1" : {
      "greeting" : "Hello, httpbin, from UnRAVL"
    }
  },
  "POST" : "http://www.httpbin.org/post",
  "headers" : {
    "Content-Type" : "text/plain",
    "Accept" : "text/plain",
    "Agent" : "UnRAVL"
  },
  "body" : {
    "json" : "data1"
  },
  "bind" : [
    {
      "json" : "@-"
    },
    {
      "groovy" : {
        "actualJson" : "responseBody.json",
        "headersJson" : "responseBody.headers"
      }
    }
  ],
  "assert" : [
    "data1 == actualJson",
    "headersJson['Accept'].textValue() == 'text/plain'",
    "headersJson['Content-Type'].textValue() == 'text/plain'",
    "headersJson['Agent'].textValue() == 'UnRAVL'"
  ]
}
接口请求返回结果:
{
"args" : { },
"data" : "{\"greeting\":\"Hello, httpbin, from UnRAVL\"}",
"files" : { },
"form" : { },
"headers" : {
"Accept" : "text/plain",
"Accept-Encoding" : "gzip,deflate",
"Agent" : "UnRAVL",
"Content-Length" : "42",
"Content-Type" : "text/plain",
"Host" : "www.httpbin.org",
"User-Agent" : "Apache-HttpClient/4.5 (Java/1.8.0_101)"
},
"json" : {
"greeting" : "Hello, httpbin, from UnRAVL"
},
"origin" : "59.60.10.35",
"url" : "http://www.httpbin.org/post"
}
解释:
- POST:表示HTTP 请求方式。
- heasers: 设置请求的headers值。
- body: 设置请求的body值,例子中获取evn中的data1的值。
- bind: 通过groovy关键字,表示使用groovy脚本,"responseBody.json" 获取接口请求返回的json中的叫“json”key的value值 , "responseBody.headers" 获取接口请求返回的json中的key名叫“headers”的value值。
- assert: 校验结果。 其中"data1 == actualJson", 用于校验接口返回的值是否与预期一致。 "headersJson['Accept'].textValue() == 'text/plain'",用于再具体解析请求返回的Json中的“headers” key中key为“Accept”的值是否为“text/plain”。
使用template
[
  {
    "name": "Google Everest Elevation setup",
    "env": {
      "url": "http://maps.googleapis.com/maps/api/elevation/json?locations=27.988056,86.925278&sensor=false"
    },
    "doc": "Save the response to GoogleEverestElevation.json",
    "GET": "{url}",
    "assert": [
      {
        "json": "@assertJson.json"
      }
    ]
  },
  {
    "name": "ThisIsATemplate.template",
    "doc": "Template which invokes the GET and asserts the response equals the contents of assertJson.json",
    "GET": "{url}",
    "assert": {
      "json": "@assertJson.json"
    }
  },
  {
    "name": "GoogleEverestElevation GET 3 use template",
    "template": "ThisIsATemplate.template"
  }
]
解释:
- 第一个{}内是一个完整的GET请求,并对接口返回跟assertJson.json文件做对比。
- 第二个name取名比较特殊:ThisIsATemplate.template这个名以.template为结尾则表示这个模块是一个template,template名为ThisIsATemplate。 模块的作用类似编程语言的公共方法,例如这个模块完成了GET请求的发起和对response整个json和assertJson.json文件的校验。
- 第三个name开始则表示新的Case,这个case里面"template": "ThisIsATemplate.template",则表示这个Case调用上面的template,这样这个case虽然这有name和template两个关键字但是同样完成从了GET请求的发起和结果跟外部json文件的校验。
运行
当我们编写好我们的接口Json文件后,就得考虑怎么把他们运行起来,UnRAVL 提供了多种的运行方式。
通过GUI运行
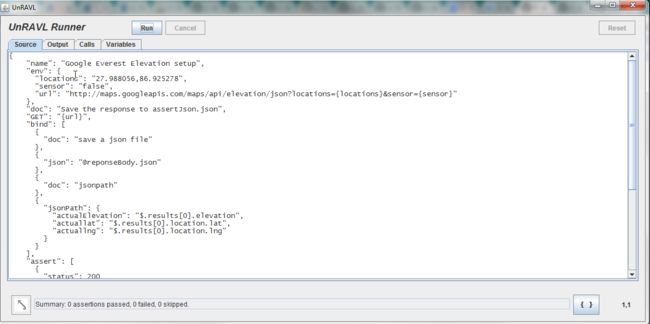
UnRAVL 提供了GUI界面来运行和调试Case。想要通过GUI方式来运行需要先下载UnRAVL包(https://github.com/sassoftware/unravl/releases),找到unravl-1.2.1.zip(目前最新版),并下载解压。得到如下目录:
其中doc是官方帮助文档,lib是依赖的jar包。
双击打开bin文件,根据自己系统双击运行unravl.bat或者unravl.sh文件便可以打开如下GUI界面。
关于GUI界面的更多使用说明,可以在doc文件夹中的 UI.md文件查看,或者访问 https://github.com/sassoftware/unravl/blob/master/doc/ui/UI.md 查看更多
GUI工具便于平时写Json脚本时边编写边调试使用,但是他每次只能运行一个Json文件,所以不方便我们做自动化。
通过命令行运行
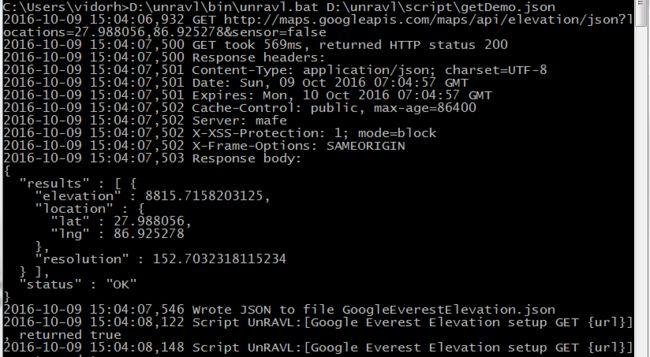
除了通过GUI工具,还可以通过命令行来运行脚本,运行方式也较为简单,在下载好GUI工具包解压后,打开控制台进入到bin目录,运行:unravl.bat D:\unravl\script\getDemo.json,后面跟上需要被执行的Json文件便可。
这种方式也是非常不方便,不建议使用。
通过Junit运行
Junit运行是比较推荐的方式,他可以批量运行多个Json,可以指定运行某个文件夹底下的所有Json文件,也可以很好的跟Jenkins结合,并生成Junit测试报告。
想通过这种方式运行,我们需要把UnRAVL项目搭建起来,可以直接GitHub上下载工程,也可以把UnRAVL相关包引入到Java工程中。
再新建好UnRAVL项目后,新建个java类,并添加junit的@Test方法,具体代码如下:
import com.sas.unravl.assertions.JUnitWrapper;
import org.junit.Test;

import java.util.HashMap;
import java.util.Map;

public class RunScripts {

    static Map env() {
        Map env = new HashMap();
        return env;
    }

    @Test
    public void runScript1() {
        //  运行当个json文件
        JUnitWrapper.runScriptFiles(env(), "src/test/scripts/demo/asd.json");
    }

    @Test
    public void runFailingScripts() {
        //  运行fail文件夹下的所有json文件
        JUnitWrapper.runScriptsInDirectory(env(), "src/test/scripts/fail");
    }
}
全局变量
UnRAVL 没有全局变量的概念,但是我们平时测试又需要用到,简单说一处修改所有引用生效,例如接口需要不同的环境。 UnRAVL 提供了另一种解决方法,不过编写一个Case这里需要涉及3个json文件。
第一个Json文件evn.json,我们用于设置“全局变量”,例如下:
{
  "name": "set environment",
  "doc": "This script is called by ../parts.son",
  "env": {
    "URL": "http://www.qa.org/post",
    "greeting":"Hello, httpbin, from UnRAVL"
  }
}
第二个Json文件caseTest.json,就是我们正常的一个Case的Json,例如下:
{
  "name": "assert environment set by env.json.",
  "doc": "This script is called by ../parts.son",
  "POST":"{URL}",
  "body":"{\"greeting\" : \"{greeting}\"}"
}
我们发现这个caseTest.json文件的POST和greeting都是取变量的,而该json却都没定义这两个参数,evn.json文件却定义了这两个变量,那两个不同的json文件如何传递变量呢?这时我们就需要用到第三个json文件。
第三个Json文件,parts.json,具体内容如下:
[
  "@src/test/scripts/demo/env.json",
  "@src/test/scripts/demo/caseTest.json"
]
其实第三个json文件只放如需要关联的json文件。并在运行时,运行该第三个json文件便可。
与Jenkins结合
当通过Junit方式运行脚本,我们就很容易和Jenkins结合,从而达到自动构建或者每日构建等。
Jenkins Job 配置
-
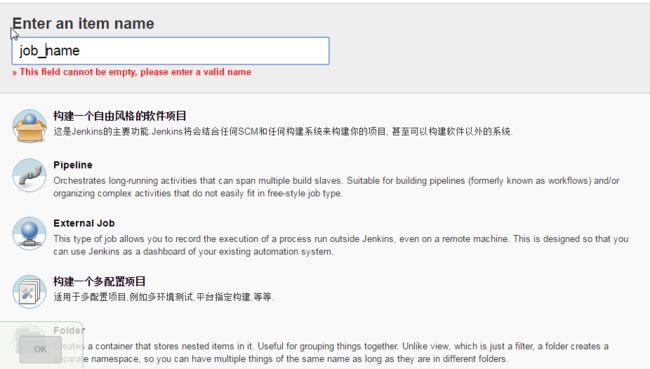
新建一个自由风格的job
源码管理
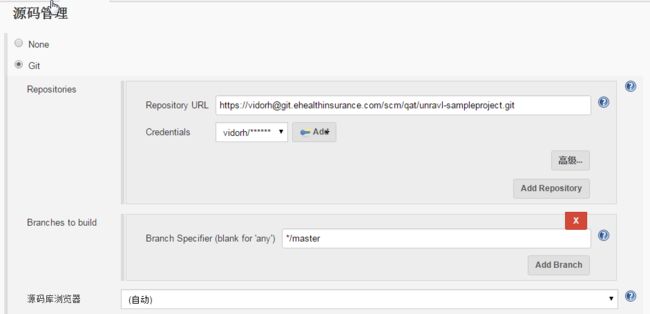
根据自己实际情况选择一种源码管理,例如我选用的是git,那么我只需要配置下git的一些账号密码等就可以。
- 构建
因为工程是 maven 工程,所以可以直接添加maven的构建方式(Invoke top-level Maven targets),并在Goals 中配置“clean test”,其余均可以默认
- 测试报告
Jenkins 提供了 Junit的测试报告,我们只需要在配置中的构建后操作添加Publish JUnit test result report,并设置build后生成的.xml的路径,便可。
- 等等
Jenkins 还提供了如每日构建,构建失败发邮件等等的功能,可以根据自己需要配置。
简单分析
优点
- 简单的接口编写json文件比较容易
- 可以走流程
- 开源
- 扩展性良好
不足
- 无法与数据库交互
- 与拥有UI界面的自动化测试工具相比,上手难度较大
- 复杂接口不容易编写
- 小众


