1. TableView结构
- 表头
- 单元格
- 表尾
备注:TableView最多包含3部分(一般不需要表头和表尾),此处重在实现带表头表尾TableView的实现,简单TableView的实现可移步TableView的使用
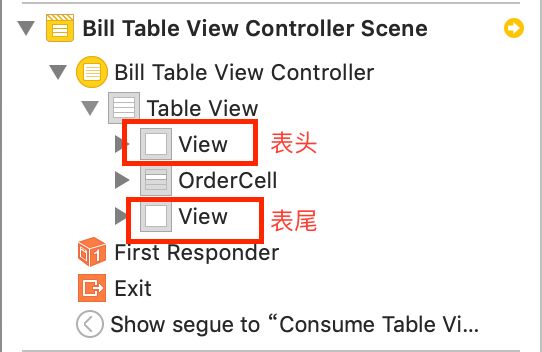
TableView结构.png
2. 界面示例

表头.png
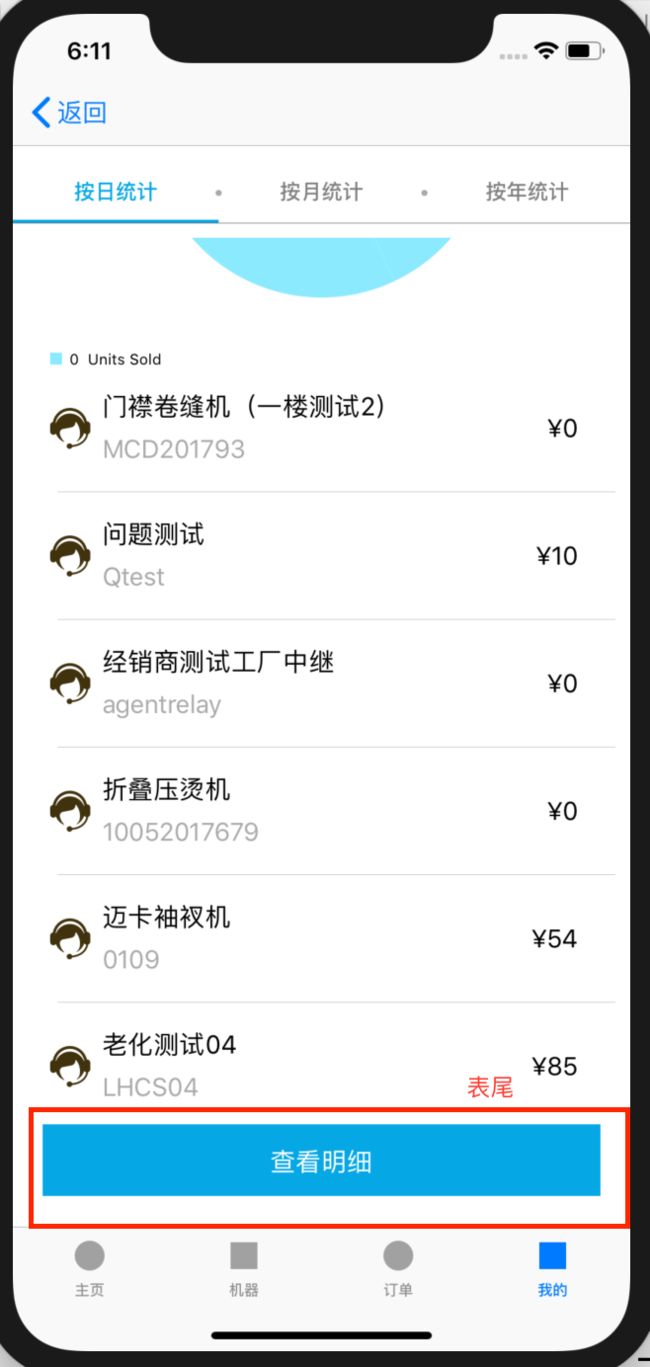
表尾.png
备注:顶部滑动菜单栏不属于TableView,参考 使用PageMenu实现顶部滑动菜单栏
3. 步骤
(1)在故事版中拖入一个TableViewController视图并绘制界面
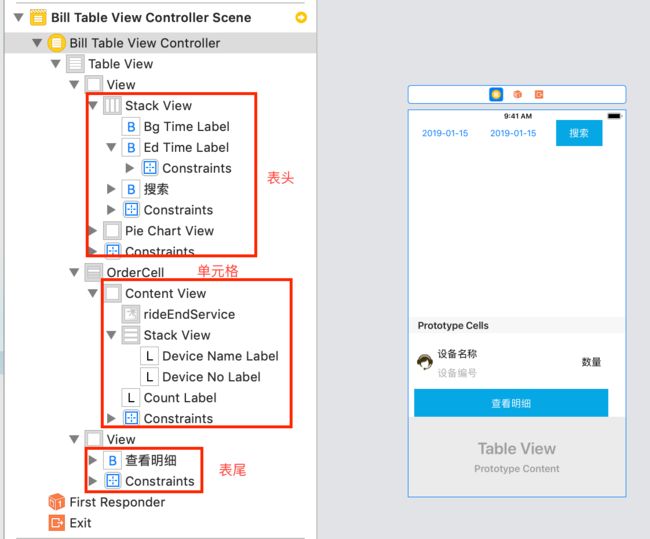
TableView视图的组成.png
(2)创建主视图对应的控制器BillTableViewController.swift和主视图中单元格对应的控制器OrderCell.swift
(3)视图和控制器绑定,并在控制器中添加视图中各个控件的引用
- 主视图和BillTableViewController.swift绑定,并在BillTableViewController.swift控制器中添加表头中各组件的引用
 主视图和控制器绑定并获取主视图表头各控件的引用.png
备注:图表的使用参考使用Charts实现图表 - 主视图中的TableView单元格和OrderCell.swift绑定,并在OrderCell.swift中添加TableView单元格中各组件的引用
 TableView单元格和控制器绑定并获取单元格中各控件的引用.png
备注:TableView相关使用参考TableView的使用
4. 具体实现
(1)BillTableViewController.swift
//
//  BillTableViewController.swift
//  JackUChat
//
//  Created by 徐云 on 2019/1/15.
//  Copyright © 2019 Liy. All rights reserved.
//

import UIKit
import Alamofire
import SwiftyJSON
import Charts

class BillTableViewController: UITableViewController {

    @IBOutlet weak var pieChartView: PieChartView!

    var currentTitle = "按日统计"

    var moneys:[String] = []
    var percents:[Double] = []

    var devices:[Device] = []

    override func viewDidLoad() {
        super.viewDidLoad()

        // Uncomment the following line to preserve selection between presentations
        // self.clearsSelectionOnViewWillAppear = false

        // Uncomment the following line to display an Edit button in the navigation bar for this view controller.
        // self.navigationItem.rightBarButtonItem = self.editButtonItem


        let defaults = UserDefaults.standard
        currentTitle = defaults.string(forKey: "category_mycount")!
        print("当前选择项为-------------:" + currentTitle)
        getListByAlomafire(title: currentTitle)
    }


    // MARK: - Table view data source

//    override func numberOfSections(in tableView: UITableView) -> Int {
//        // #warning Incomplete implementation, return the number of sections
//        return 0
//    }

    override func tableView(_ tableView: UITableView, numberOfRowsInSection section: Int) -> Int {
        // #warning Incomplete implementation, return the number of rows
        return devices.count
    }


    override func tableView(_ tableView: UITableView, cellForRowAt indexPath: IndexPath) -> UITableViewCell {
        //let cell = tableView.dequeueReusableCell(withIdentifier: "reuseIdentifier", for: indexPath)

        // Configure the cell...
        let cellId = String(describing: OrderCell.self)
        let cell = tableView.dequeueReusableCell(withIdentifier: cellId, for: indexPath) as! OrderCell
        let device = devices[indexPath.row]
        cell.deviceNameLabel.text = device.deviceName
        cell.deviceNoLabel.text = device.deviceId
        cell.countLabel.text = "¥" + device.deviceCount

        return cell
    }


    /*
    // Override to support conditional editing of the table view.
    override func tableView(_ tableView: UITableView, canEditRowAt indexPath: IndexPath) -> Bool {
        // Return false if you do not want the specified item to be editable.
        return true
    }
    */

    /*
    // Override to support editing the table view.
    override func tableView(_ tableView: UITableView, commit editingStyle: UITableViewCellEditingStyle, forRowAt indexPath: IndexPath) {
        if editingStyle == .delete {
            // Delete the row from the data source
            tableView.deleteRows(at: [indexPath], with: .fade)
        } else if editingStyle == .insert {
            // Create a new instance of the appropriate class, insert it into the array, and add a new row to the table view
        }
    }
    */

    /*
    // Override to support rearranging the table view.
    override func tableView(_ tableView: UITableView, moveRowAt fromIndexPath: IndexPath, to: IndexPath) {

    }
    */

    /*
    // Override to support conditional rearranging of the table view.
    override func tableView(_ tableView: UITableView, canMoveRowAt indexPath: IndexPath) -> Bool {
        // Return false if you do not want the item to be re-orderable.
        return true
    }
    */

    func getListByAlomafire(title:String) {
        if title == "" {
            return
        }
        var tab = ""
        let data = Date()
        let timeFormatter = DateFormatter()
        if (title == "按日统计") {
            tab = "day"
            timeFormatter.dateFormat = "yyyy-MM-dd"
        }else if (title == "按月统计") {
            tab = "month"
            timeFormatter.dateFormat = "yyyy-MM"
        }else if (title == "按年统计") {
            tab = "year"
            timeFormatter.dateFormat = "yyyy"
        }
        let currentTime = timeFormatter.string(from: data)
        let params:Parameters = ["tab":tab,"bg_time":currentTime,"dend_time":currentTime]
        AlamofireHelper.shareInstance.requestData(.post, url: "account/index", parameters: params) { (result) in
            let jsonDictory = JSON(result as Any)
            let code = jsonDictory["code"].string
            let msg = jsonDictory["msg"].string
            if(code == "0"){
                print("成功:"+code!+","+msg!)

                let nameList = jsonDictory["data"]["orderList"]["name"]
                let snList = jsonDictory["data"]["orderList"]["sn"]
                let dataList = jsonDictory["data"]["orderList"]["data"]
                for index in 0...dataList.count - 1{
                    let money = "\(dataList[index])"
                    self.moneys.append(money)
                    self.percents.append(dataList[index].double!)
                }
                if (nameList.count == snList.count && nameList.count == dataList.count){
                    for index in 0...nameList.count - 1{
                        //重用了OrderCell,为了不新增金额字段,此接口将接收到的金额存储在deviceCount字段中
                        let device = Device(deviceId: snList[index].string ?? "", deviceName: nameList[index].string ?? "", deviceStatus: "", deviceCount: "\(dataList[index])" , deviceImage: "", date: "")
                        self.devices.append(device)
                    }
                }

                dump(self.devices)//打印
                //异步获取数据,需在主线程中更新
                OperationQueue.main.addOperation {
                    self.setChart(dataPoints: self.moneys, values: self.percents)
                    self.tableView.reloadData()
                    self.tableView.refreshControl?.endRefreshing()//加载完数据后停止下拉刷新动画
                }

            }else{
                print("失败")
            }

        }

    }

    func setChart(dataPoints:[String],values:[Double]) {
        var dataEntries:[PieChartDataEntry] = []
for i in 0..备注:网络通信框架Alamofire的使用参考使用Alamofire与SwiftyJSON框架实现网络数据的获取与处理
(2)OrderCell.swift
//
// OrderCell.swift
// JackUChat
//
// Created by 徐云 on 2018/12/29.
// Copyright © 2018 Liy. All rights reserved.
//
import UIKit
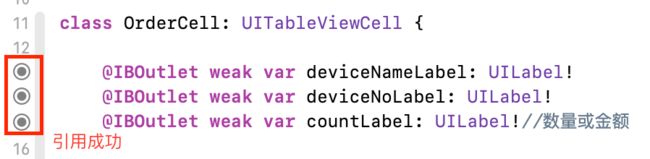
class OrderCell: UITableViewCell {
@IBOutlet weak var deviceNameLabel: UILabel!
@IBOutlet weak var deviceNoLabel: UILabel!
@IBOutlet weak var countLabel: UILabel!//数量或金额
override func awakeFromNib() {
super.awakeFromNib()
// Initialization code
}
override func setSelected(_ selected: Bool, animated: Bool) {
super.setSelected(selected, animated: animated)
// Configure the view for the selected state
}
}
(3)Device.swift
//
//  Device.swift
//  JackUChat
//
//  Created by 徐云 on 2018/12/26.
//  Copyright © 2018 Liy. All rights reserved.
//

//单元格数据模型
struct Device:Codable {
    var deviceId:String
    var deviceName:String
    var deviceStatus:String
    var deviceCount:String
    var deviceImage:String
    var date:String

}
5. 获取到的网络数据示例
{
  "code": "0",
  "msg": "success",
  "data": {
    "orderList": {
      "name": [
        "门襟卷缝机(一楼测试2)",
        "问题测试  ",
        "经销商测试工厂中继",
        "折叠压烫机",
        "迈卡袖衩机",
        "老化测试04"
      ],
      "sn": [
        "MCD201793",
        "Qtest",
        "agentrelay",
        "10052017679",
        "0109",
        "LHCS04"
      ],
      "data": [
        0,
        1,
        0,
        0,
        5,
        5
      ]
    },
    "total": "11.00"
  }
}
备注:数据当然可在本地自定义。