前言
在前面的文章中,我们讲述了Handler,MessageQueue,Looper三者的关系,从Java层深入到native层。
1、 Android线程间通信基础——Handler,Looper,MessageQueue
2、Handler,MessageQueue,Looper源码分析(Native层)
那么今天我们来讲讲跟Handler相关,在开发中我们经常用的更新UI的几种方式,透析他们的本质是什么?
主线程更新UI
这其实没什么可讲的,直接更新,但是你调用更新方法是是立即显示到屏幕上吗?这里我们在onCreate()里面用一个TextView setText()为例,展开流程讲解
public class FreshUIActivity extends AppCompatActivity {
    TextView mTextView;
    @Override
    protected void onCreate(Bundle savedInstanceState) {
        super.onCreate(savedInstanceState);
        setContentView(R.layout.activity_fresh_ui);
        mTextView = findViewById(R.id.textView);
        mTextView.setText("1123");
    }
}
进入TextView里面
private CharSequence mText;
public final void setText(CharSequence text) {
        setText(text, mBufferType);
}

public void setText(CharSequence text, BufferType type) {
        setText(text, type, true, 0);

        if (mCharWrapper != null) {
            mCharWrapper.mChars = null;
        }
}

private void setText(CharSequence text, BufferType type,
                         boolean notifyBefore, int oldlen) {
        .....
        mBufferType = type;
        mText = text;
        .....
        if (mLayout != null) {
            checkForRelayout();
        }
        .....
}
我们会发现它仅仅是吧text赋值给mText成员变量而已,并没有做真正的显示操作,而且在onCreate()这个时间点,屏幕还没显现我们的内容,这时的mLayout为null,那么真正的显示操作是在什么时候呢?
我们知道,一个View要显示会经历onMeasure(),onLayout(),onDraw()三个步骤,那么显示肯定是在onDraw()里面,果然我们找到了mText的踪影:
@Override
protected void onDraw(Canvas canvas) {
        restartMarqueeIfNeeded();

        // Draw the background for this view
        super.onDraw(canvas);
        .....
        //绘制背景,图片等其他操作
        .....
        Path highlight = getUpdatedHighlightPath();
        if (mEditor != null) {
            mEditor.onDraw(canvas, layout, highlight, mHighlightPaint, cursorOffsetVertical);
        } else {
            layout.draw(canvas, highlight, mHighlightPaint, cursorOffsetVertical);
        }
        .....
}
进入getUpdatedHighlightPath();
private Path getUpdatedHighlightPath() {
        Path highlight = null;
        Paint highlightPaint = mHighlightPaint;

        final int selStart = getSelectionStart();
        final int selEnd = getSelectionEnd();
        if (mMovement != null && (isFocused() || isPressed()) && selStart >= 0) {
            if (selStart == selEnd) {
                if (mEditor != null && mEditor.isCursorVisible()
                        && (SystemClock.uptimeMillis() - mEditor.mShowCursor)
                        % (2 * Editor.BLINK) < Editor.BLINK) {
                    if (mHighlightPathBogus) {
                        if (mHighlightPath == null) mHighlightPath = new Path();
                        mHighlightPath.reset();
                        //mText,找到了
                        mLayout.getCursorPath(selStart, mHighlightPath, mText);
                        mEditor.updateCursorsPositions();
                        mHighlightPathBogus = false;
                    }

                    // XXX should pass to skin instead of drawing directly
                    highlightPaint.setColor(mCurTextColor);
                    highlightPaint.setStyle(Paint.Style.STROKE);
                    highlight = mHighlightPath;
                }
            } else {
                if (mHighlightPathBogus) {
                    if (mHighlightPath == null) mHighlightPath = new Path();
                    mHighlightPath.reset();
                    mLayout.getSelectionPath(selStart, selEnd, mHighlightPath);
                    mHighlightPathBogus = false;
                }

                // XXX should pass to skin instead of drawing directly
                highlightPaint.setColor(mHighlightColor);
                highlightPaint.setStyle(Paint.Style.FILL);

                highlight = mHighlightPath;
            }
        }
        return highlight;
}
mLayout.getCursorPath(selStart, mHighlightPath, mText);这个方法绘制文字的路径,然后在onDraw()才绘制到屏幕上。
子线程更新
我们加入以下代码,在子线程更新UI
@Override
protected void onResume() {
        super.onPostResume();
        new Thread(){
            @Override
            public void run() {
              mTextView.setText("1123");
            }
        }.start();
}
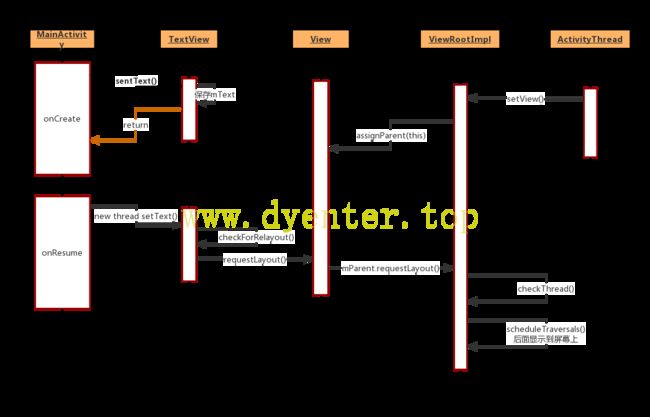
发现也能更新UI,不是说子线程不能更新UI吗,其实这时候画面还没真正完全显示到屏幕上,你会发现这是mLayout还是为null,所以也仅仅是赋值给mText而已。
假如我们让线程阻塞2秒呢?
@Override
protected void onResume() {
        super.onPostResume();
        new Thread(){
            @Override
            public void run() {
                    try {
                            Thread.sleep(2000);
                    } catch (InterruptedException e) {
                            e.printStackTrace();
                    }
                    mTextView.setText("1123");
            }
        }.start();
}

android.view.ViewRootImpl$CalledFromWrongThreadException: Only the original thread that created a view hierarchy can touch its views.
这个错误很熟悉吧,不能在子线程更新UI,那么为什么会这样呢,这是我们断点跟进源码发现mLayout不为空了,所以会调用checkForRelayout();
private void checkForRelayout() {
        ....
        requestLayout();
        invalidate();
        ....
}
这两行代码是不是很熟悉,我们经常在自定义View的时候是不是经常用?它会调用View的requestLayout()
public void requestLayout() {
        if (mParent != null && !mParent.isLayoutRequested()) {
               mParent.requestLayout();
        }
}
这个mParent其实就是ViewRootImpl,我们在启动Activity是,会经过ActivityThread的handleLaunchActivity->handleResumeActivity->performResumeActivity,performResumeActivity会回调Activity的performResume()方法,然后会通过Instrumentation回调onResume(),这表明onResume()回调时其实View还没显示到屏幕上,所以子线程也能更新UI。
那么现在我们看回来handleResumeActivity方法,执行完performResumeActivity方法回调了onResume方法后,会来到这一块代码:
r.activity.mVisibleFromServer = true;
mNumVisibleActivities++;
if (r.activity.mVisibleFromClient) {
        r.activity.makeVisible();
}
接着进入Activity的makeVisible()
Activity.java
void makeVisible() {
        if (!mWindowAdded) {
            ViewManager wm = getWindowManager();
            wm.addView(mDecor, getWindow().getAttributes());
            mWindowAdded = true;
        }
        mDecor.setVisibility(View.VISIBLE);
    }

WindowManagerImpl.java
@Override
    public void addView(@NonNull View view, @NonNull ViewGroup.LayoutParams params) {
        applyDefaultToken(params);
        mGlobal.addView(view, params, mContext.getDisplay(), mParentWindow);
    }

WindowManagerGlobal.java
public void addView(View view, ViewGroup.LayoutParams params,
            Display display, Window parentWindow) {
        .....

        root = new ViewRootImpl(view.getContext(), display);

            view.setLayoutParams(wparams);

            mViews.add(view);
            mRoots.add(root);
            mParams.add(wparams);

            // do this last because it fires off messages to start doing things
            try {
                root.setView(view, wparams, panelParentView);
            } catch (RuntimeException e) {
                // BadTokenException or InvalidDisplayException, clean up.
                if (index >= 0) {
                    removeViewLocked(index, true);
                }
                throw e;
            }
        .....
}
这里调用了ViewRootImpl的setView方法,这里面会把view通过IWindowSession 传递到WMS,再绘制到屏幕上,关于WMS,Window的原理我们之后再讲
public void setView(View view, WindowManager.LayoutParams attrs, View panelParentView) {
        ...
         view.assignParent(this);
        ...
}
它会把自己复制给mParent,几把ViewRootImpl给View的mParent,这就证实了前面的操作,所以它就是调用了ViewRootImpl的requestLayout()方法,
@Override
    public void requestLayout() {
        if (!mHandlingLayoutInLayoutRequest) {
            checkThread();
            mLayoutRequested = true;
            scheduleTraversals();
        }
    }

void checkThread() {
        if (mThread != Thread.currentThread()) {
            throw new CalledFromWrongThreadException(
                    "Only the original thread that created a view hierarchy can touch its views.");
        }
    }
这下是不是很明朗了?经历了这么多,到最后才检查线程是不是UI线程,如果不是,将会抛出异常。注意mThread实在ViewRootImpl的构造函数时候赋值的,而ViewRootImpl是在ActivityThraed里初始化的,即主线程
