引
有人问我何时产生了做这种东西的想法,其实很早就产生了,最初是在我刚开始接触入门级路由器(类似网件以及阿苏斯的入门级)的时候,梅林固件上面就有一些离线下载软件类似 Aria2、迅雷离线下载 Xware(已经停止服务),并且当时正值郭佳插手网盘行业引起一大批网盘服务关闭,出于对个人数据的敏感,便开始了解 个人/家庭NAS。经过一番了解后便止步于价格上呵呵呵......(群晖主流型号 DS218+ 价格2500左右)之后便转向更为经济的 VPS 自建网盘。
正文
这次因为有网盘的作用,所以需要一个大硬盘的VPS,同时也要兼顾与国内的带宽速度,我用的是 Hosthatch 家 1核1G内存1T硬盘1Gbps位于 LA 的 VPS。
内容简述
本次教程主要涉及在 Debian9 中安装 NextCloud、Transmission,并为 NextCloud的 访问添加 HTTPS 证书。
开启 Debian9 中的 BBR
这里参考自:Debian 9快速开启Google BBR的方法,实现高效单边加速
- 修改系统变量
echo "net.core.default_qdisc=fq" >> /etc/sysctl.conf
echo "net.ipv4.tcp_congestion_control=bbr" >> /etc/sysctl.conf
- 保存生效
sysctl -p
- 查看内核是否已开启BBR
sysctl net.ipv4.tcp_available_congestion_control

#显示以下即已开启:
net.ipv4.tcp_available_congestion_control = bbr cubic reno
4、查看BBR是否启动
lsmod | grep bbr

#显示以下即启动成功:
tcp_bbr                20480  00
NextCloud 的安装
参考自:How to Install Nextcloud 13 Server on Debian 9
- 系统准备
apt-get update -y
#下面这条需要时间较长,可以不运行
apt-get upgrade -y
- LAMP服务安装
NextCloud 的运行需要Apache、MySQL和PHP
#安装 Apache 和 MariaDB
apt-get install apache2 mariadb-server -y
安装完成后运行以下命令来运行 Apache 和MariaDB 并开启开机启动
systemctl start apache2
systemctl enable apache2
systemctl start mysql
systemctl enable mariadb
安装 PHP 以及其他需要的模块
apt-get install libapache2-mod-php php7.0 php7.0-xml php7.0 php7.0-cgi php7.0-cli php7.0-gd php7.0-curl php7.0-zip php7.0-mysql php7.0-mbstring wget unzip -y
- 配置 MariaDB
数据库安全配置
mysql_secure_installation
配置
Enter current password for root (enter for none): 设置 mysql 的管理密码
Change the root password? [Y/n] 输入n
Remove anonymous users? [Y/n] 输入y
Disallow root login remotely? [Y/n] 输入y
Remove test database and access to it? [Y/n] 输入y
Reload privilege tables now? [Y/n] 输入y
登陆 MariaDB 控制台进行配置
mysql -u root -p
#输入上面设置的密码
CREATE DATABASE nextclouddb;
#创建 nextcloud 的数据库,请务必带上分号;运行
CREATE USER 'nextcloud'@'localhost' IDENTIFIED BY 'mypassword';
#mypassword 字段请替换为数据库密码(非管理密码)
GRANT ALL PRIVILEGES ON nextclouddb.* TO 'nextcloud'@'localhost';
#向Nextcloud数据库授予权限
FLUSH PRIVILEGES;
#重载privileges table
\q
#离开控制台
- 安装 NextCloud
获取最新版本的NextCloud
wget https://download.nextcloud.com/server/releases/latest.zip
解压
unzip latest.zip
将解压得到的文件夹移到 /var/www/html/
mv nextcloud /var/www/html/
为 nextcloud 文件夹提供适当的权限
chown -R www-data:www-data /var/www/html/nextcloud
为NextCloud创建一个apache虚拟主机文件
nano /etc/apache2/sites-available/nextcloud.conf
写入以下内容(不必太过介意其中的参数,后面 HTTPS 的配置还会修改)
完成后Ctlr+O、回车、Ctlr+X、回车
ServerAdmin [email protected]
DocumentRoot "/var/www/html/nextcloud"
ServerName 192.168.0.187

Options MultiViews FollowSymlinks

AllowOverride All
Order allow,deny
Allow from all

TransferLog /var/log/apache2/nextcloud_access.log
ErrorLog /var/log/apache2/nextcloud_error.log
启用NextCloud虚拟主机文件并禁用默认虚拟主机文件
a2dissite 000-default
a2ensite nextcloud
重启 Apache 以应用改变
systemctl restart apache2
- 开放防火墙端口
安装防火墙管理软件(iptable 真尼玛难用hhh)
apt-get install ufw -y
开启并配置 ufw
ufw enable
ufw allow 80
ufw allow 22
- NextCloud 数据库以及管理员账户配置
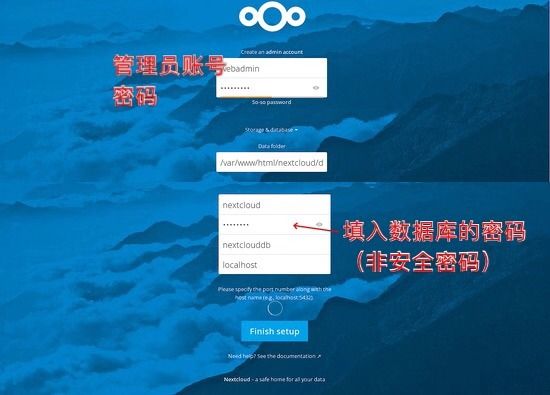
在浏览器输入你服务器的公网 ip 地址就可以访问你刚刚搭建好的 NextCloud 了,初次访问需要配置 admin 账号以及数据库访问密码,其他照填就行。
为 NextCloud 配置 HTTPS 证书
参考文章:How To Secure Apache with Let's Encrypt on Debian 9
这里你需要有一个自己注册的域名,你可以去 www.name.com 买,或者注册一个免费但需要隔一段时间就要验证的 www.freenom.com ;购买后将域名解析到 VPS 的公网地址。
- 安装 Certbot
这里的认证我们使用 Let's Encrypt 签发的免费证书,第一步是在服务器上安装Certbot软件。默认情况下,Debian软件存储库中不提供Certbot,为了使用apt下载软件,您需要将backports存储库添加到sources.list文件中。
打开sources.list并在最后一行写入以下内容
nano /etc/apt/sources.list
#写入内容
deb http://ftp.debian.org/debian stretch-backports main
Save and close the file by pressing CTRL+X, Y, then ENTER, then update your package lists:(其实直接看参考文章就行了,瞧瞧这™简单到爆炸的英语)
apt update
使用特定的源来安装 Certbot :
apt install python-certbot-apache -t stretch-backports
- 配置 SSL证书
打开网站虚拟化配置文件,替换ServerName后的值为指向这台vps的域名
nano /etc/apache2/sites-available/nextcloud.conf
#修改例子
...
ServerName example.com;
...
保存后运行命令检查配置文件的语法
apache2ctl configtest
#正常输出的显示
Syntax OK
重启 Apache 以加载新配置
systemctl reload apache2
现在 Certbot 能够读取配置了。
- 防火墙开放443端口
ufw allow 443
- 获取 SSL证书
Certbot提供了多种通过插件获取SSL证书的方法。Apache插件将负责重新配置Apache并在必要时重新加载配置。请运行以下命令:
#其中的 example.com 换成自己的域名
certbot --apache -d example.com
第一次运行时,他会让你输入你的邮箱来让你同意使用协议并验证你使用的域名是否属于你。
然后会让你选择是否重定向 HTTP 流量到 HTTPS 中
Please choose whether or not to redirect HTTP traffic to HTTPS, removing HTTP access.
-------------------------------------------------------------------------------
1: No redirect - Make no further changes to the webserver configuration.
2: Redirect - Make all requests redirect to secure HTTPS access. Choose this for
new sites, or if you're confident your site works on HTTPS. You can undo this
change by editing your web server's configuration.
-------------------------------------------------------------------------------
Select the appropriate number [1-2] then [enter] (press 'c' to cancel):
#输入2并回车
输入选择并回车之后,程序就会进行配置,成功后会告诉你你的证书被放在哪里、证书过期时间以及其他杂七杂八的信息。
现在你已经可以通过安全的 HTTPS 协议来访问自己的 NextCloud 了。
- Verifying Certbot Auto-Renewal(我懒了)
Let's Encrypt's certificates are only valid for ninety days. This is to encourage users to automate their certificate renewal process. The certbot package we installed takes care of this for us by adding a renew script to /etc/cron.d. This script runs twice a day and will automatically renew any certificate that's within thirty days of expiration.
To test the renewal process, you can do a dry run with certbot:
certbot renew --dry-run
If you see no errors, you're all set. When necessary, Certbot will renew your certificates and reload Apache to pick up the changes. If the automated renewal process ever fails, Let’s Encrypt will send a message to the email you specified, warning you when your certificate is about to expire.
安装 Transmission
参考文章:BitTorrent/Transmission
我装 Transmission 主要是用来玩 PT(PT下载,BT的一种,不过较为隐秘),但如果你要在国外下载公开盗版 BT资源的话,你的 VPS 会面临投诉被 BAN 的风险。
- 安装 Server 端
apt install transmission-daemon --install-suggests
似乎这种安装方法存在依赖编译的过程,时间比较久,大概半个多到一个小时,这个时间可以出去买个奶茶吃个夜宵啥的。
- 配置
#停止服务
service transmission-daemon stop
#打开配置文件配置
nano /etc/transmission-daemon/settings.json
#更改以下参数的值
#替换为远程连接的密码
"rpc-password":"yourpassword",
#远程管理访问端口
"rpc-port": 9999,
#登陆用户名
"rpc-username": "username",
#关闭远程连接白名单
"rpc-whitelist-enabled": false,
#启动服务
service transmission-daemon start
默认下载文件夹:/var/lib/transmission-daemon/downloads
现在你可以通过网页端管理 Transmission 了,也可以下载 Client 端获取更舒适的界面体验(Transmission 官网获取)。
网页地址:ip地址:端口
在 NextCloud 中添加 Transmission 的下载文件夹
- 为 NextCloud 安装外部储存插件
- 点击右上角的圆圈头像上,点击展开菜单「应用」
- 找到 “External storage support” 并启用
- 点击右上角的圆圈头像上,点击展开菜单「设置」
- 点击左侧菜单栏中的「管理」中的「外部储存」
- 「目录名称」任意填写,「外部储存」选择本地,「配置」
填写/var/lib/transmission-daemon/downloads,「可用于」选择admin用户组或用户 - 回到首页「文件」页面你就会看到你刚才添加的文件夹了,但里面的东西你只有读取权限,这个是数据库用户组
www-data对 Transmission 创建的文件/文件夹没有写入/执行权限造成的,将 Transmission 文件夹及其下的文件设置成 5777 应该就行了(我不知道也没试过hhh)
- 使用
大致流程就是在 Transmission 上下载完成后,在 NextCloud 里头在线播放就行了,但有时候会下到没有配字幕的视频文件,这里推荐一个软件,可以置顶单纯播放字幕文件,挺好用的,来源:[Windows] Penguin Subtitle Player【独立字幕播放器】【支持.srt, .ssa, .ass字幕及透明背景】
你也可以直接搜名字下载。
题外话
如果说要搭建离线下载平台的话,更好的下载工具是 Aria2,但它不能用于 PT下载(具体为什么我也没去了解,反正我的PT站不允许),所以实用性就大打折扣了,如果你想用国外 VPS 来加速你下载国外的资源速度的话,有更简单的方法,就是给下载工具如IDM或者FDM套一层代理就行了,这种方法我后续会更新在我另一篇文章 教你通过软件创建HTTP代理并连接 中,具体什么时候,我也不知道,过几个星期吧hhh,最近太忙忙忙忙忙忙忙忙忙忙忙忙忙忙忙忙了(都是假的,就是懒hhh)
现在北京时间2018.11.1——3:13:52
不知不觉就到了11月,今年又快过去了,想来今年过得真快,呵呵呵呵我是不是重复两次快了......话说回一年多的大学生活来,看到了各种各样的人,也还是印证了那句话「鸟子大了什么林子都有」,人和人之间的关系是那么的「薄」,有多少是因为有了「接触」才产生的「关系」,可又有多少为了这「关系」而不遗余力地创造着「接触」,得好好珍惜一直在身边的人呀。
送给我,也送给所有看到这里的人。
话说真的会有人看到这里吗?
不知道
