SpringData的jdbc和durid
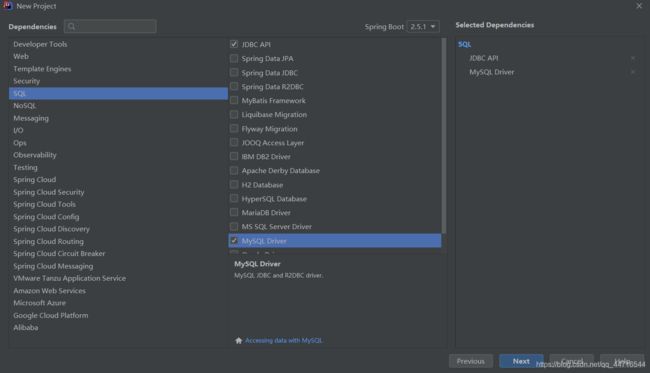
创建一个项目,勾选以下选项
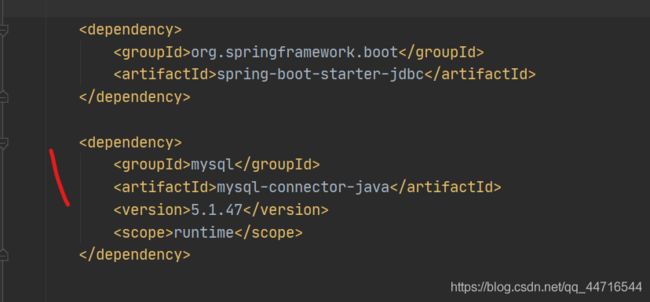
项目构建完成后pom.xml已导入(springboot默认导入数据库驱动为8.0,要使用低版本需要手动改版本)
编写yaml配置文件连接数据库;
spring:
  datasource:
    username: root
    password: 123
    url: jdbc:mysql://localhost:3306/mybatis?useUnicode=true&characterEncoding=utf-8
    driver-class-name: com.mysql.jdbc.Driver
    #springBoot数据库驱动默认为mysql8.0版本,使用8.0以下版本的数据库需要在pom.xml手动更改数据库驱动版本
因为SpringBoot已经默认进行了自动配置;去测试类测试一下
@Test
    void contextLoads() throws SQLException {

          //查看一下默认的数据源 :class com.zaxxer.hikari.HikariDataSource
        System.out.println(dataSource.getClass());

        //获得数据库连接
        Connection connection=dataSource.getConnection();
        System.out.println(connection);

        //xxxx Template:SpringBoot 已经配置好模板bean,拿来即用 CRUD

        //关闭
        connection.close();

    }
查看控制台,输出为:
class com.zaxxer.hikari.HikariDataSource
说明没有问题
HikariDataSource 号称 Java WEB 当前速度最快的数据源,相比于传统的 C3P0 、DBCP、Tomcat jdbc 等连接池更加优秀;
可以使用 spring.datasource.type 指定自定义的数据源类型,值为 要使用的连接池实现的完全限定名。
- 有了数据库连接,就可以 CRUD 操作数据库了。使用对象 JdbcTemplate进行操作。
- 即使不使用第三方第数据库操作框架,如 MyBatis等,Spring 本身也对原生的JDBC 做了轻量级的封装,即JdbcTemplate。
- 数据库操作的所有 CRUD 方法都在 JdbcTemplate 中。
JdbcTemplate主要提供以下几类方法:
- execute方法:可以用于执行任何SQL语句,一般用于执行DDL语句;
- update方法及batchUpdate方法:update方法用于执行新增、修改、删除等语句;batchUpdate方法用于执行批处理相关语句;
- query方法及queryForXXX方法:用于执行查询相关语句;
- call方法:用于执行存储过程、函数相关语句。
然后进行编写测试类,进行crud
创建一个控制类,JDBCController.java
import org.springframework.beans.factory.annotation.Autowired;
import org.springframework.jdbc.core.JdbcTemplate;
import org.springframework.web.bind.annotation.GetMapping;
import org.springframework.web.bind.annotation.PathVariable;
import org.springframework.web.bind.annotation.RestController;

import java.util.List;
import java.util.Map;

@RestController
public class JDBCController {

     @Autowired
    JdbcTemplate jdbcTemplate;


     //查询数据库的所有信息
    //没有实体类,数据库中的东西,怎么获取?map
    @GetMapping("userList")
    public List> userList(){
        String sql="select*from user";
        List> mapList=jdbcTemplate.queryForList(sql);
        return mapList;
    }

    //添加一个用户
    @GetMapping("/addUser")
    public String addUser(){
        String sql="insert into mybatis.user(name,pwd) values('笑','123456')";
       int n= jdbcTemplate.update(sql);
        return String.valueOf(n);
    }


    //更改一个用户
    @GetMapping("/updateUser/{id}")
    public String updateUser(@PathVariable("id") int id){
        String sql="update  mybatis.user set name=?,pwd=? where id="+id;

        //封装
        Object[] objects=new Object[2];
        objects[0] ="小明2";
        objects[1] ="456";
        int n= jdbcTemplate.update(sql,objects);
        return String.valueOf(n);
    }

    //删除一个用户
    @GetMapping("/deleteUser/{id}")
    public String deleteUser(@PathVariable("id") int id){
        String sql="delete from mybatis.user where id=?";
        int n= jdbcTemplate.update(sql,id);
        return String.valueOf(n);
    }


}
创建一个数据库:mybatis
然后创建数据表:
DROP TABLE IF EXISTS `user`;
CREATE TABLE `user`  (
  `id` int(11) NOT NULL AUTO_INCREMENT,
  `name` varchar(25) CHARACTER SET gbk COLLATE gbk_chinese_ci NULL DEFAULT NULL,
  `pwd` varchar(25) CHARACTER SET gbk COLLATE gbk_chinese_ci NULL DEFAULT NULL,
  PRIMARY KEY (`id`) USING BTREE
) ENGINE = InnoDB AUTO_INCREMENT = 18 CHARACTER SET = gbk COLLATE = gbk_chinese_ci ROW_FORMAT = Compact;

-- ----------------------------
-- Records of user
-- ----------------------------
INSERT INTO `user` VALUES (3, '小黑', '789');
INSERT INTO `user` VALUES (4, '可可2', '151');
INSERT INTO `user` VALUES (5, '阿毛', '4566977');
INSERT INTO `user` VALUES (6, '小明', 'cafa1414f');
INSERT INTO `user` VALUES (7, '嘻嘻3', '101112');
INSERT INTO `user` VALUES (8, '很爱很爱你', '101112');
INSERT INTO `user` VALUES (9, '小霞', '159');
INSERT INTO `user` VALUES (10, '嘻嘻5', '101112');
INSERT INTO `user` VALUES (11, '陈', 'dad45');
INSERT INTO `user` VALUES (12, '陈2', 'd2ad45');
INSERT INTO `user` VALUES (13, '小明', '123456');
INSERT INTO `user` VALUES (14, '小明2', '456');
INSERT INTO `user` VALUES (17, '阿毛', '4566977');

SET FOREIGN_KEY_CHECKS = 1;
然后启动服务,在浏览器打开:http://localhost:8080/userList
其它更改,删除,添加操作也是如此,
Druid 是阿里巴巴开源平台上一个数据库连接池实现,结合了 C3P0、DBCP 等 DB 池的优点,同时加入了日志监控. Druid 可以很好的监控 DB 池连接和 SQL 的执行情况,天生就是针对监控而生的 DB 连接池.
然后更改application.yml
spring:
  datasource:
    username: root
    password: 123
    url: jdbc:mysql://localhost:3306/mybatis?useUnicode=true&characterEncoding=utf-8
    driver-class-name: com.mysql.jdbc.Driver
    #springBoot数据库驱动默认为mysql8.0版本,使用8.0以下版本的数据库需要在pom.xml手动更改数据库驱动版本

    #切换为阿里巴巴druid源
    type: com.alibaba.druid.pool.DruidDataSource
    # 自定义数据源


      #Spring Boot 默认是不注入这些属性值的,需要自己绑定
      #druid 数据源专有配置
    initialSize: 5
    minIdle: 5
    maxActive: 20
    maxWait: 60000
    timeBetweenEvictionRunsMillis: 60000
    minEvictableIdleTimeMillis: 300000
    validationQuery: SELECT 1 FROM DUAL
    testWhileIdle: true
    testOnBorrow: false
    testOnReturn: false
    poolPreparedStatements: true

      #配置监控统计拦截的filters,stat:监控统计、log4j:日志记录、wall:防御sql注入
      #如果允许时报错  java.lang.ClassNotFoundException: org.apache.log4j.Priority
      #则导入 log4j 依赖即可,Maven 地址:https://mvnrepository.com/artifact/log4j/log4j
    filters: stat,wall,log4j
    maxPoolPreparedStatementPerConnectionSize: 20
    useGlobalDataSourceStat: true
    connectionProperties: druid.stat.mergeSql=true;druid.stat.slowSqlMillis=500
然后在pom.xml导入依赖
            com.alibaba
            druid
            1.2.5


            log4j
            log4j
            1.2.16
再次在测试类测试
发现数据源已更改为阿里的:class com.alibaba.druid.pool.DruidDataSource
Druid 数据源具有监控的功能,并提供了一个 web 界面方便用户查看,类似安装 路由器 时,人家也提供了一个默认的 web 页面。
所以第一步需要设置 Druid 的后台管理页面,比如 登录账号、密码 等;配置后台管理
新建一个配置类:DruidConfig
import com.alibaba.druid.pool.DruidDataSource;
import com.alibaba.druid.support.http.StatViewServlet;
import com.alibaba.druid.support.http.WebStatFilter;
import org.springframework.boot.context.properties.ConfigurationProperties;

import org.springframework.boot.web.servlet.FilterRegistrationBean;
import org.springframework.boot.web.servlet.ServletRegistrationBean;
import org.springframework.context.annotation.Bean;
import org.springframework.context.annotation.Configuration;

import javax.sql.DataSource;
import java.util.HashMap;
import java.util.Map;

@Configuration
public class DruidConfig {

    @ConfigurationProperties(prefix = "spring.datasource")
    @Bean
    public DataSource druidDataSource(){

        return  new DruidDataSource();
    }


    //后台监控:web.xml,ServletRegistrationBean
    //因为SpringBoot 内置了servlet容器,所以没有web.xml,替代方法
    //访问:http://localhost:8080/druid
    @Bean
    public ServletRegistrationBean statViewServlet(){
       ServletRegistrationBean bean=   new ServletRegistrationBean<>(new StatViewServlet(),"/druid/*");


       //后台需要有人登录,账号密码配置
        HashMap  initParameters=new HashMap<>();
        initParameters.put("loginUsername","admin");//登录key 是固定的loginUserUsername loginPassword
        initParameters.put("loginPassword","123456");

        //允许谁可以访问
        initParameters.put("allow","");
        //禁止谁能访问  initParameters.put("allow","121.0.0.1");

        bean.setInitParameters(initParameters);//设置初始化参数
         return bean;

    }

    //filter
    @Bean
    public FilterRegistrationBean webStatFilter(){

        FilterRegistrationBean bean=new FilterRegistrationBean();

        bean.setFilter(new WebStatFilter());
        //可以过滤哪些请求呢?
        Map initParameters=new HashMap<>();

        //这些东西不进行统计
        initParameters.put("exclusions","*.js,*.css,/druid/*");

        bean.setInitParameters(initParameters);

       return  bean;
    }

}
然后启动项目
浏览器打开:
http://localhost:8080/druid,进入登陆页面,填写登陆账号,密码
进入到监控页面
到此这篇关于SpringBoot简单使用SpringData的jdbc和durid的文章就介绍到这了,更多相关SpringData的jdbc和durid内容请搜索脚本之家以前的文章或继续浏览下面的相关文章希望大家以后多多支持脚本之家!


