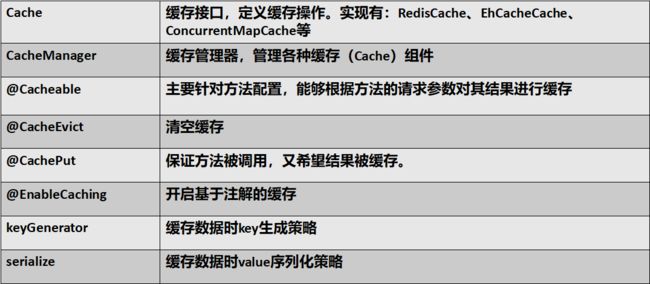
缓存相关
重要概念&注解
使用步骤
引入spring-boot-starter-cache依赖
@EnableCaching
在SpringBoot启动器上添加注解,开启缓存。
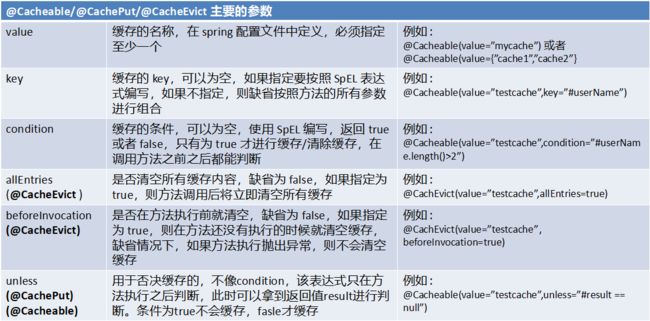
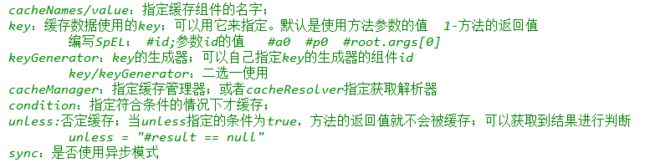
@Cacheable
在方法上添加此注解,若不指定key则以传入参数生成key,缓存该方法的返回参数。
@CacheEvict
在方法上添加此注解,若不指定key则以传入参数生成key,删除该缓存。
@CachePut
在方法上添加此注解,若不指定key则以传入参数生成key,调用该方法后更新缓存。
使用redis缓存
引入spring-boot-starter-data-redis依赖,SpringBoot会自动切换
application.properties中添加redis主机地址:spring.redis.host=192.168.37.135
自定义使用redis
@Autowired
StringRedisTemplate stringRedisTemplate;//键值对都为String的操作器
@Autowired
RedisTemplate redisTemplate;//键值对都为对象的操作器,对象需继承序列号接口
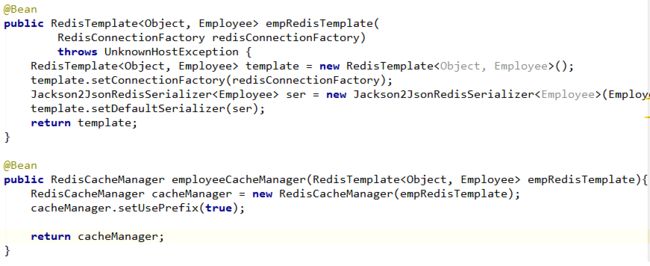
自定义RedisTemplate可实现不同的序列化方式,默认为jdk序列化方式。
添加自定义缓存管理器(需定义泛型),在service里添加@CacheConfig(cacheManager="")注解指定缓存管理器。
任务相关
异步任务
@Async
此注解标注在方法或类型上,可开启异步处理。
定时任务
@EnableScheduling
在SpringBoot启动器上添加注解,开启定时任务。
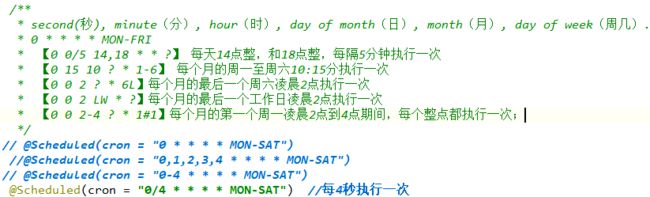
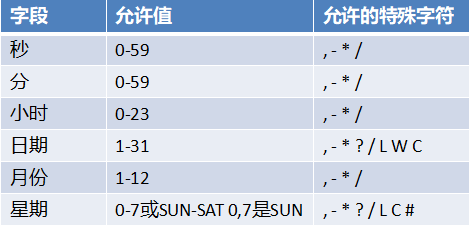
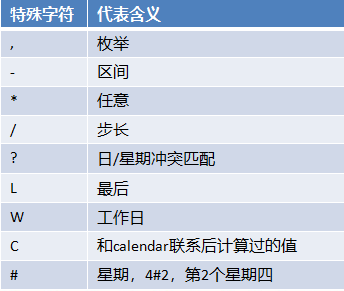
@Scheduled
可以在方法和注解类型上添加注解,设置任务的定时规则。
邮件任务
引入spring-boot-starter-mail
配置application.properties
[email protected]
spring.mail.password=xxxx
spring.mail.host=smtp.qq.com
spring.mail.properties.mail.smtp.ssl.enable=true
注入邮件发送bean
@Autowired
JavaMailSenderImpl mailSender;
发送简单邮件
SimpleMailMessage message = new SimpleMailMessage();
message.setSubject("这是主题");
message.setText("这是正文");
message.setTo("发送给@qq.com");
message.setFrom("接收到@qq.com");
mailSender.send(message);
发送带附件的邮件
MimeMessage mimeMessage = this.mailSender.createMimeMessage();
MimeMessageHelper helper = new MimeMessageHelper(mimeMessage, true);
helper.setSubject("这是主题");
helper.setText("这是正文", true);
helper.setTo("发送给@163.com");
helper.setFrom("接收到@qq.com");
helper.addAttachment("1.jpg", new File("C:\\Users\\sc\\Pictures\\1.jpg"));
helper.addAttachment("2.jpg", new File("C:\\Users\\sc\\Pictures\\2.jpg"));
this.mailSender.send(mimeMessage);
安全相关
SpringSecurity
引入jar包
spring-boot-starter-security
创建一个配置类,继承WebSecurityConfigurerAdapter,需要注解@EnableWebSecurity开启,重写configure(HttpSecurity http)和configure(AuthenticationManagerBuilder auth)
//super.configure(http);//定制请求的授权规则

http.authorizeRequests().antMatchers("/").permitAll()
            .antMatchers("/level1/**").hasRole("VIP1")
            .antMatchers("/level2/**").hasRole("VIP2")
            .antMatchers("/level3/**").hasRole("VIP3");

//开启自动配置的登陆功能,效果,如果没有登陆,没有权限就会来到登陆页面http.formLogin().usernameParameter("user").passwordParameter("pwd").loginPage("/userlogin");
//1、/login来到登陆页
//2、重定向到/login?error表示登陆失败
//3、更多详细规定
//4、默认post形式的 /login代表处理登陆
//5、一但定制loginPage;那么 loginPage的post请求就是登陆

//开启自动配置的注销功能。
http.logout().logoutSuccessUrl("/");
//1、访问 /logout 表示用户注销,清空session
//2、注销成功会返回 /login?logout 页面;
//开启记住我功能
http.rememberMe().rememberMeParameter("remember");
//登陆成功以后,将cookie发给浏览器保存,以后访问页面带上这个cookie,只要通过检查就可以免登录
//点击注销会删除cookie

//该方法为增加可验证的用户,实际操作是从数据库获得,这里暂时放在内存,方便演示
auth.inMemoryAuthentication()
            .whthUser("U1").password("P1").roles("R1")
            .and()
            .whthUser("U2").password("P2").roles("R2");
引入依赖
    org.thymeleaf.extras
    thymeleaf-extras-springsecurity4


    org.springframework.boot
    spring-boot-starter-thymeleaf
判断是否已认证
获取姓名,
获取角色
根据角色判断是否展示
参考链接:https://spring.io/guides/gs/securing-web/
消息队列相关
安装RabbitMQ
docker中运行RabbitMQ服务
在网页管理端可进行交换器的创建与消息队列的创建与绑定。
交换器路由键,不同的队列
配置application.properties
spring.rabbitmq.host=118.24.44.169
spring.rabbitmq.username=guest
spring.rabbitmq.password=guest
#虚拟地址
#spring.rabbitmq.virtual-host=
发送消息
@Autowired
RabbitTemplate rabbitTemplate;
this.rabbitTemplate.convertAndSend("exchange.direct", "test.tests","this is a message");
接受消息
Object o = this.rabbitTemplate.receiveAndConvert("test.tests");
System.out.println(o.getClass());
System.out.println(o);
使用json序列化方式
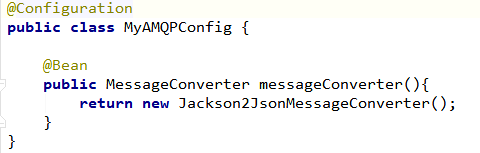
使用步骤
@EnableRabbit
在SpringBoot启动器上添加注解,开启基于注解的RabbitMQ模式。
@RabbitListener(queues="test.tests")//在方法上添加该注解,接受该消息并处理。
public void receive(Book book){
System.out.println(book);
}

public void receive(Message message){
System.out.println(message.getBody());
System.out.println(message.getMessageProperties());
}
@Autowired
AmqpAdmin amqpAdmin;//通过这个类进行交换器与队列的管理
检索相关
安装Elasticsearch
docker中安装运行Elasticsearch服务,限制内存大小256MB(默认为2G)。
操作请求
地址:http://localhost:9200/testGroup/employee/1
GET请求
查询文档
PUT请求
添加文档
{
请求体
}
DELETE请求
删除文档
HEAD请求(找到则200,未找到404)
检查文档是否存在
POST请求
搜索文档
地址:http://localhost:9200/testGroup/employee/_search
{
请求体
}
使用步骤
使用jest
导入jest的jar包。
配置地址
spring.elasticsearch.jest.uris=http://118.24.44.169:9200
@Autowired
JestClient jestClient;
//添加
Book book = new Book ();
book .setId(1);
book .setName("好书");
Index index = ((Builder)((Builder)(new Builder(book )).index("test")).type("book")).build();
jestClient.execute(index);

//搜索
String json = "{\n    \"query\" : {\n        \"match\" : {\n            \"name\" : \"好\"\n        }\n    }\n}";
Search search = ((io.searchbox.core.Search.Builder)((io.searchbox.core.Search.Builder)(new io.searchbox.core.Search.Builder(json)).addIndex("atguigu")).addType("news")).build();
SearchResult result = (SearchResult)this.jestClient.execute(search);
System.out.println(result.getJsonString());
使用SpringData ElasticSearch
配置地址
spring.data.elasticsearch.cluster-name=elasticsearch
spring.data.elasticsearch.cluster-nodes=118.24.44.169:9301
创建实体类存储器接口继承ElasticsearchRepository
添加文档
@Document(indexName = "test",type = "book")//在实体上设置索引和类型
pulic class book{
}

@Autowired
BookRepository bookRepository;
bookRepository.index(book);

//BookRepository 内可添加findByBookNameLike等方法查询,也支持在方法上添加@Query注解实现自己的查询表达式
for(Book book : bookRepository.findByBookNameLike("好") ){
  System.out.println(book);
}
GET /index/type/_search?q=字段:搜索值
QueryBuilder的使用:https://www.cnblogs.com/wenbronk/p/6432990.html
分布式相关
dubbo与SpringCloud的区别
Dubbo是分布式服务框架,主要解决各服务调用的问题(即RPC)。
Spring Cloud是一个分布式的整体解决方案。Spring Cloud 为开发者提供了在分布式系统(配置管理,服务发现,熔断,路由,微代理,控制总线,一次性token,全局琐,leader选举,分布式session,集群状态)中快速构建的工具,使用Spring Cloud的开发者可以快速的启动服务或构建应用、同时能够快速和云平台资源进行对接。
SpringCloud分布式开发五大常用组件
服务发现——Netflix Eureka
客服端负载均衡——Netflix Ribbon
断路器——Netflix Hystrix
服务网关——Netflix Zuul
分布式配置——Spring Cloud Config
zookeeper与dubbo使用步骤
在docker内安装好zookeeper服务
引入jar包
引入dubbo的jar包
    com.alibaba.boot
    dubbo-spring-boot-starter
        0.1.0
引入zookeeper客户端的jar包
    com.github.sgroschupf
    zkclient
        0.1
发布服务
在application.properties里添加
dubbo.application.name=provider-ticket
dubbo.registry.address=zookeeper://118.24.44.169:2181
dubbo.scan.base-packages=com.test.ticket.service
在实现类里添加
@Component
@Service(dubbo注解)
消费服务
在application.properties里添加
dubbo.application.name=consumer-user
dubbo.registry.address=zookeeper://118.24.44.169:2181
需实现接口类
//消费时添加。
@Reference
SpringCloud使用步骤
Eureka注册中心
添加application.yml
server:
  port: 8761
eureka:
  instance:
    hostname: eureka-server  # eureka实例的主机名
  client:
    register-with-eureka: false #不把自己注册到eureka上
    fetch-registry: false #不从eureka上来获取服务的注册信息
    service-url:
      defaultZone: http://localhost:8761/eureka/
@EnableEurekaServer
在SpringBoot启动器上添加注解,开启注册中心功能。
提供服务
添加application.yml
server:
  port: 8002
spring:
  application:
    name: provider-ticket
eureka:
  instance:
    prefer-ip-address: true # 注册服务的时候使用服务的ip地址
  client:
    service-url:
      defaultZone: http://localhost:8761/eureka/
消费服务
添加application.yml
spring:
  application:
    name: consumer-user
server:
  port: 8200

eureka:
  instance:
    prefer-ip-address: true # 注册服务的时候使用服务的ip地址
  client:
    service-url:
      defaultZone: http://localhost:8761/eureka/
@EnableDiscoveryClient
在SpringBoot启动器上添加注解,开启发现服务功能。
@LoadBalanced//负载均衡
@Bean
public RestTemplate restTemplate(){
          return new RestTemlate();
}

@Autowired
RestTemplate restTemplate;
restTemplate.gerForObject("url",String,class);
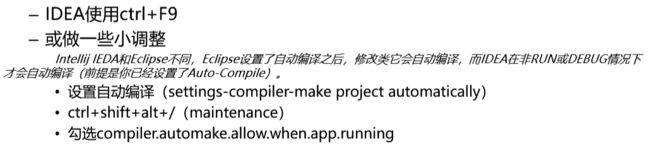
热部署相关
使用步骤
引入依赖
    org.springframework.boot
    spring-boot-devtools
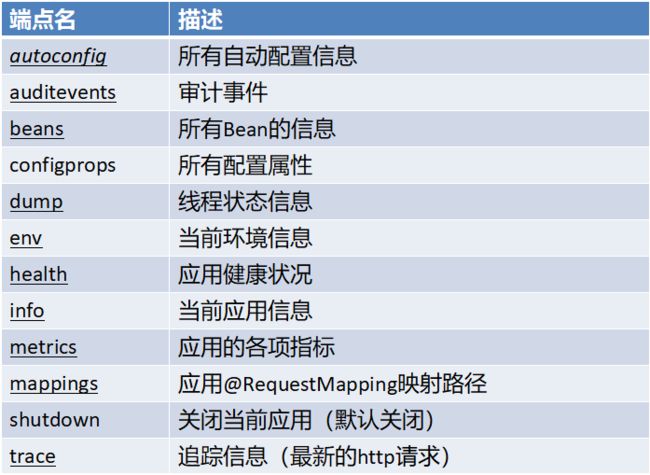
监控相关
使用步骤
引入spring-boot-starter-actuator依赖