版本记录
| 版本号 | 时间 |
|---|---|
| V1.0 | 2018.10.18 星期四 |
前言
很多的app都有定位功能,比如说滴滴,美团等,他们都需要获取客户所在的位置,并且根据位置推送不同的模块数据以及服务,可以说,定位方便了我们的生活,接下来这几篇我们就说一下定位框架
CoreLocation。感兴趣的可以看我写的上面几篇。
1. CoreLocation框架详细解析 —— 基本概览(一)
2. CoreLocation框架详细解析 —— 选择定位服务的授权级别(二)
3. CoreLocation框架详细解析 —— 确定定位服务的可用性(三)
4. CoreLocation框架详细解析 —— 获取用户位置(四)
5. CoreLocation框架详细解析 —— 监控用户与地理区域的距离(五)
6. CoreLocation框架详细解析 —— 确定接近iBeacon(六)
7. CoreLocation框架详细解析 —— 将iOS设备转换为iBeacon(七)
8. CoreLocation框架详细解析 —— 获取指向和路线信息(八)
9. CoreLocation框架详细解析 —— 在坐标和用户友好的地名之间转换(九)
10. CoreLocation框架详细解析(十) —— 跟踪访问位置简单示例(一)
11. CoreLocation框架详细解析(十一) —— 跟踪访问位置简单示例(二)
12. CoreLocation框架详细解析(十二) —— 仿Runkeeper的简单实现(一)
Send the Simulator On a Run - 在模拟器中跑步模拟
您应该在发布之前在真实设备上测试您的应用程序,但每次要测试MoonRunner时都不必进行跑步。
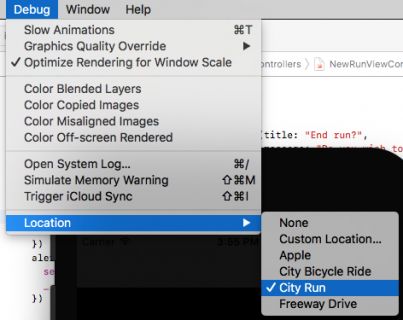
在模拟器中构建并运行。 在按New Run运行按钮之前,从Simulator菜单中选择Debug\Location\City Run。
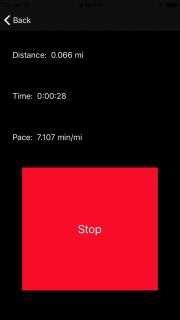
现在,按New Run,然后按Start并验证模拟器是否开始锻炼。
Map It Out - 在地图上展示
在完成所有这些艰苦的工作之后,是时候向用户展示他们去哪里以及他们做得如何。
打开RunDetailsViewController.swift并将configureView()替换为:
private func configureView() {
  let distance = Measurement(value: run.distance, unit: UnitLength.meters)
  let seconds = Int(run.duration)
  let formattedDistance = FormatDisplay.distance(distance)
  let formattedDate = FormatDisplay.date(run.timestamp)
  let formattedTime = FormatDisplay.time(seconds)
  let formattedPace = FormatDisplay.pace(distance: distance,
                                         seconds: seconds,
                                         outputUnit: UnitSpeed.minutesPerMile)

  distanceLabel.text = "Distance:  \(formattedDistance)"
  dateLabel.text = formattedDate
  timeLabel.text = "Time:  \(formattedTime)"
  paceLabel.text = "Pace:  \(formattedPace)"
}
这将格式化运行的所有详细信息并将其设置为显示。
在地图上渲染运行需要更多的工作。 这有三个步骤:
- 1) 设置地图的区域,以便仅显示运行区域,而不是整个世界。
- 2) 提供一个委托方法,正确设置地图叠加
overlay的样式。 - 3) 创建描述要绘制的线的
MKOverlay。
添加以下方法:
private func mapRegion() -> MKCoordinateRegion? {
  guard
    let locations = run.locations,
    locations.count > 0
  else {
    return nil
  }

  let latitudes = locations.map { location -> Double in
    let location = location as! Location
    return location.latitude
  }

  let longitudes = locations.map { location -> Double in
    let location = location as! Location
    return location.longitude
  }

  let maxLat = latitudes.max()!
  let minLat = latitudes.min()!
  let maxLong = longitudes.max()!
  let minLong = longitudes.min()!

  let center = CLLocationCoordinate2D(latitude: (minLat + maxLat) / 2,
                                      longitude: (minLong + maxLong) / 2)
  let span = MKCoordinateSpan(latitudeDelta: (maxLat - minLat) * 1.3,
                              longitudeDelta: (maxLong - minLong) * 1.3)
  return MKCoordinateRegion(center: center, span: span)
}
MKCoordinateRegion表示地图的显示区域。 您可以通过提供定义水平和垂直范围的中心点和跨度来定义它。 添加一个小间距非常重要,这样地图边缘就不会占用路线。
在文件的末尾,在结束括号后,添加以下扩展:
extension RunDetailsViewController: MKMapViewDelegate {
  func mapView(_ mapView: MKMapView, rendererFor overlay: MKOverlay) -> MKOverlayRenderer {
    guard let polyline = overlay as? MKPolyline else {
      return MKOverlayRenderer(overlay: overlay)
    }
    let renderer = MKPolylineRenderer(polyline: polyline)
    renderer.strokeColor = .black
    renderer.lineWidth = 3
    return renderer
  }
}
每次MapKit想要显示叠加层时,它都会要求其代理呈现该叠加层。 目前,如果叠加层是MKPolyine(线段的集合),则返回MapKit的MKPolylineRenderer,其配置为以黑色绘制。 你很快就会变得更加丰富多彩。
最后,您需要创建叠加层。 将以下方法添加到RunDetailsViewController(不是扩展中):
private func polyLine() -> MKPolyline {
  guard let locations = run.locations else {
    return MKPolyline()
  }

  let coords: [CLLocationCoordinate2D] = locations.map { location in
    let location = location as! Location
    return CLLocationCoordinate2D(latitude: location.latitude, longitude: location.longitude)
  }
  return MKPolyline(coordinates: coords, count: coords.count)
}
在这里,您可以根据MKPolyline的要求将每个记录的位置从跑步转换为CLLocationCoordinate2D。
现在是时候将所有这些位粘合在一起了。 添加以下方法:
private func loadMap() {
  guard
    let locations = run.locations,
    locations.count > 0,
    let region = mapRegion()
  else {
      let alert = UIAlertController(title: "Error",
                                    message: "Sorry, this run has no locations saved",
                                    preferredStyle: .alert)
      alert.addAction(UIAlertAction(title: "OK", style: .cancel))
      present(alert, animated: true)
      return
  }

  mapView.setRegion(region, animated: true)
  mapView.add(polyLine())
}
在这里,你确保有一些东西可以绘制。 然后设置地图区域并添加叠加层。
现在,在configureView()的末尾添加以下内容。
loadMap()
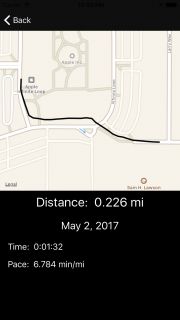
Build并运行。 保存完成的运行后,您现在应该看到跑步的地图!
注意:在控制台中,您可能会看到一些看起来像以下一个或多个的错误消息:
ERROR /BuildRoot/Library/Caches/com.apple.xbs/Sources/VectorKit_Sim/VectorKit-1230.34.9.30.27/GeoGL/GeoGL/GLCoreContext.cpp 1763: InfoLog SolidRibbonShader:
ERROR /BuildRoot/Library/Caches/com.apple.xbs/Sources/VectorKit_Sim/VectorKit-1230.34.9.30.27/GeoGL/GeoGL/GLCoreContext.cpp 1764: WARNING: Output of vertex shader 'v_gradient' not read by fragment shader
/BuildRoot/Library/Caches/com.apple.xbs/Sources/VectorKit_Sim/VectorKit-1295.30.5.4.13/src/MDFlyoverAvailability.mm:66: Missing latitude in trigger specification
在模拟器上,这是正常的。 消息来自MapKit,并不表示您的错误。
Introducing Color - 引入颜色
该应用程序已经非常棒了,但如果您使用颜色突出显示速度差异,那么地图可能会更好。
添加一个新的Cocoa Touch Class文件,并将其命名为MulticolorPolyline。 使其成为MKPolyline的子类。
打开MulticolorPolyline.swift并导入MapKit:
import MapKit
在类中添加color属性:
var color = UIColor.black
现在,对于更困难的东西,打开RunDetailsViewController.swift并添加以下方法:
private func segmentColor(speed: Double, midSpeed: Double, slowestSpeed: Double, fastestSpeed: Double) -> UIColor {
  enum BaseColors {
    static let r_red: CGFloat = 1
    static let r_green: CGFloat = 20 / 255
    static let r_blue: CGFloat = 44 / 255

    static let y_red: CGFloat = 1
    static let y_green: CGFloat = 215 / 255
    static let y_blue: CGFloat = 0

    static let g_red: CGFloat = 0
    static let g_green: CGFloat = 146 / 255
    static let g_blue: CGFloat = 78 / 255
  }

  let red, green, blue: CGFloat

  if speed < midSpeed {
    let ratio = CGFloat((speed - slowestSpeed) / (midSpeed - slowestSpeed))
    red = BaseColors.r_red + ratio * (BaseColors.y_red - BaseColors.r_red)
    green = BaseColors.r_green + ratio * (BaseColors.y_green - BaseColors.r_green)
    blue = BaseColors.r_blue + ratio * (BaseColors.y_blue - BaseColors.r_blue)
  } else {
    let ratio = CGFloat((speed - midSpeed) / (fastestSpeed - midSpeed))
    red = BaseColors.y_red + ratio * (BaseColors.g_red - BaseColors.y_red)
    green = BaseColors.y_green + ratio * (BaseColors.g_green - BaseColors.y_green)
    blue = BaseColors.y_blue + ratio * (BaseColors.g_blue - BaseColors.y_blue)
  }

  return UIColor(red: red, green: green, blue: blue, alpha: 1)
}
在这里,您可以定义基本红色,黄色和绿色的配方。 然后根据指定速度在最慢到最快的范围内创建混合颜色。
用以下内容替换polyLine()实现:
private func polyLine() -> [MulticolorPolyline] {

  // 1
  let locations = run.locations?.array as! [Location]
  var coordinates: [(CLLocation, CLLocation)] = []
  var speeds: [Double] = []
  var minSpeed = Double.greatestFiniteMagnitude
  var maxSpeed = 0.0

  // 2
  for (first, second) in zip(locations, locations.dropFirst()) {
    let start = CLLocation(latitude: first.latitude, longitude: first.longitude)
    let end = CLLocation(latitude: second.latitude, longitude: second.longitude)
    coordinates.append((start, end))

    //3
    let distance = end.distance(from: start)
    let time = second.timestamp!.timeIntervalSince(first.timestamp! as Date)
    let speed = time > 0 ? distance / time : 0
    speeds.append(speed)
    minSpeed = min(minSpeed, speed)
    maxSpeed = max(maxSpeed, speed)
  }

  //4
  let midSpeed = speeds.reduce(0, +) / Double(speeds.count)

  //5
  var segments: [MulticolorPolyline] = []
  for ((start, end), speed) in zip(coordinates, speeds) {
    let coords = [start.coordinate, end.coordinate]
    let segment = MulticolorPolyline(coordinates: coords, count: 2)
    segment.color = segmentColor(speed: speed,
                                 midSpeed: midSpeed,
                                 slowestSpeed: minSpeed,
                                 fastestSpeed: maxSpeed)
    segments.append(segment)
  }
  return segments
}
下面进行细分说明:
- 1) 折线由线段组成,每个线段由其端点标记。 准备收集坐标对以描述每个细分和每个细分的速度。
- 2) 将每个端点转换为
CLLocation对象并将它们成对保存。 - 3) 计算细分的速度。 请注意,
Core Location偶尔会返回多个具有相同时间戳的更新,因此请防止除以0。保存速度并更新最小和最大速度。 - 4) 计算跑步的平均速度。
- 5) 使用先前准备的坐标对创建新的
MulticolorPolyline。 设置它的颜色。
现在,您将在loadMap()中的mapView.add(polyLine())行中看到错误。 将该行替换为:
mapView.addOverlays(polyLine())
现在用以下代码替换MKMapViewDelegate扩展中的mapView(_:rendererFor :):
func mapView(_ mapView: MKMapView, rendererFor overlay: MKOverlay) -> MKOverlayRenderer {
  guard let polyline = overlay as? MulticolorPolyline else {
    return MKOverlayRenderer(overlay: overlay)
  }
  let renderer = MKPolylineRenderer(polyline: polyline)
  renderer.strokeColor = polyline.color
  renderer.lineWidth = 3
  return renderer
}
这与之前的版本非常相似。 现在,它希望每个叠加层都是MulticolorPolyline,并使用嵌入的颜色来渲染分段。
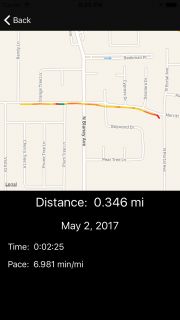
Build并运行! 让模拟器快速慢跑,然后在最后查看花哨的彩色地图!
How About Some Breadcrumbs?
跑步后的地图令人惊叹,但在跑步期间如何制作地图?
故事板是使用UIStackViews设置的,可以轻松添加一个!
首先,打开NewRunViewController.swift并导入MapKit:
import MapKit
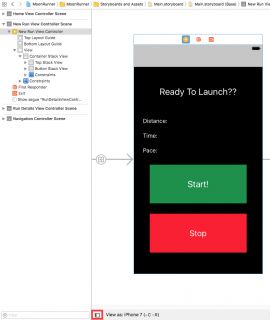
现在,打开Main.storyboard并找到New Run View Controller Scene。 确保Document Outline可见。 如果没有,请按下面的红色按钮:
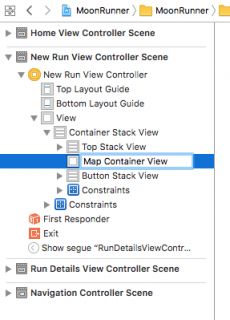
将UIView拖到Document Outline中,并将其放在Top Stack View和Button Stack View之间。 确保它出现在它们之间而不是其中一个。 双击它并将其重命名为Map Container View。
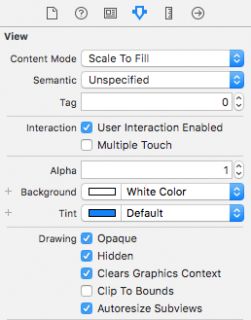
在Attributes Inspector中,选中Drawing下的Hidden。
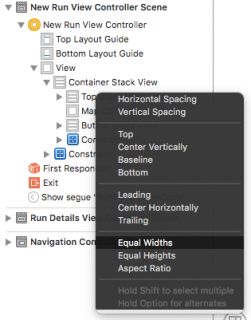
在Document Outline中,按住Control键从Map Container View拖动到Top Stack View,然后从弹出窗口中选择Equal Widths。
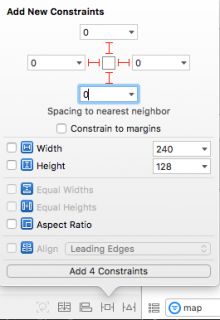
将MKMapView拖动到Map Container View中。 按Add New Constraints按钮(A.K.A“Tie Fighter按钮”)并将所有4个约束设置为0。确保未选中Constrain to margin。 单击Add 4 Constraints。
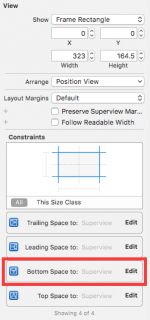
在Document Outline中选择Map View后,打开Size Inspector (View\Utilities\Show Size Inspector)。 双击约束Bottom Space to: Superview。
将priority修改为High (750)
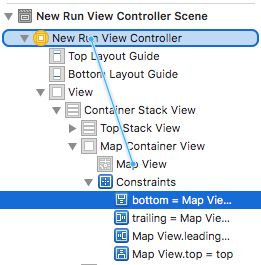
在Document Outline中,按住Control键并从Map View拖动到New Run View Controller并选择delegate。
打开Assistant Editor,确保它显示NewRunViewController.swift并从Map View中按住Control键拖动以创建名为mapView的outlet。 从Map Container View控制拖动并创建一个名为mapContainerView的outlet。
关闭Assistant Editor并打开NewRunViewController.swift。
将以下内容添加到startRun()的顶部:
mapContainerView.isHidden = false
mapView.removeOverlays(mapView.overlays)
在stopRun()的顶部添加以下内容:
mapContainerView.isHidden = true
现在,您需要一个MKMapViewDelegate来为该线提供渲染器。 在文件底部的扩展中添加以下实现:
extension NewRunViewController: MKMapViewDelegate {
  func mapView(_ mapView: MKMapView, rendererFor overlay: MKOverlay) -> MKOverlayRenderer {
    guard let polyline = overlay as? MKPolyline else {
      return MKOverlayRenderer(overlay: overlay)
    }
    let renderer = MKPolylineRenderer(polyline: polyline)
    renderer.strokeColor = .blue
    renderer.lineWidth = 3
    return renderer
  }
}
这就像你在RunDetailsViewController.swift中编写的委托一样,除了线是蓝色的。
最后,您只需添加线段覆盖并更新地图区域,以使其专注于您的运行区域。 在distance = distance + Measurement(value: delta, unit: UnitLength.meters)之后,将以下内容添加到locationManager(_:didUpdateLocations :):
let coordinates = [lastLocation.coordinate, newLocation.coordinate]
mapView.add(MKPolyline(coordinates: coordinates, count: 2))
let region = MKCoordinateRegionMakeWithDistance(newLocation.coordinate, 500, 500)
mapView.setRegion(region, animated: true)
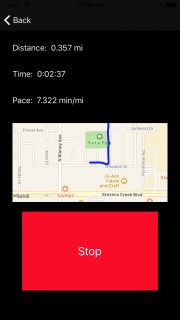
构建并运行并开始新的运行。 您将看到实时更新新地图!
您可能已经注意到,即使您的区域设置导致距离以米(或km)显示,用户的速度也始终以“min / mi”显示。 找到一种方法来使用区域设置在您调用FormatDisplay.pace(distance:seconds:outputUnit :)的位置中选择.minutesPerMile和.minutesPerKilometer。
下一篇将引入徽章系统!
后记
本篇主要讲述了仿Runkeeper的简单实现,感兴趣的给个赞或者关注~~~
