python集成Bartender的雏形
BarTender是一款优秀的条形码打印软件,可以支持很多种类型的条形码设计和打印,具体大家可参考他的官网,这里不多介绍。
参考文章:BarTender与ASP.NET的集成小结
BarTender 安装后,可以在开始菜单栏下找到自带的 .NET SDK,里面分开了两个,一个是标准的,一个是Server版的,标准的只是简单的开启BarTender进程去处理打印任务,所以当有多个任务同时打印的时候,就需要自己去管理任务队列问题;而Server版的就是里面有了任务队列机制,很方便的管理任务队列和BarTender的进程资源。
以下都是基于标准版的。程序流程核心是:把任务放进任务队列里,任务队列检测到有任务在排队的话,就把任务扔到引擎管理中,选择一个空闲的引擎来执行任务。
PS:本文的Bardenter软件安装的是试用版。因为要使用它的SDK必须是自动化版及以上,而试用版则可以无限制使用。
本文源码:上位机雏形(仅集成Bartender)__补充了1个文件.rar
python集成Bartender的雏形
- 一、创建标签模板文件.btw
-
- 1.1、新建空白模板
- 1.2、加入二维码
- 1.3、绑定数据源
- 二、程序框架分析
-
- 2.1、main函数
- 2.2、构造函数与析构函数
- 2.3、信号与槽函数的绑定
- 2.4、启动/关闭bartender引擎
- 2.5、打开/关闭标签文件(.btw)
- 2.6、操作标签文件中的数据单元
- 2.7、配置并打印
- 2.8、打印状态的显示
- 三、效果展示
一、创建标签模板文件.btw
1.1、新建空白模板
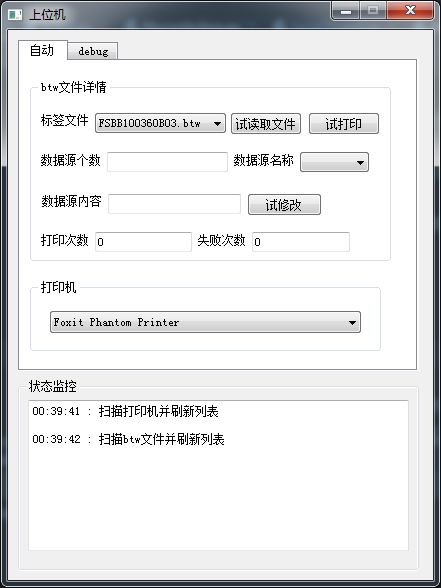
模板是提前在Bartender软件中设计好的,简单测试脚本就偷懒不配置那么多,新建文档-空白模板-next-next-next-直到完成。


1.2、加入二维码
从工具栏拖入一个二维码或者条形码

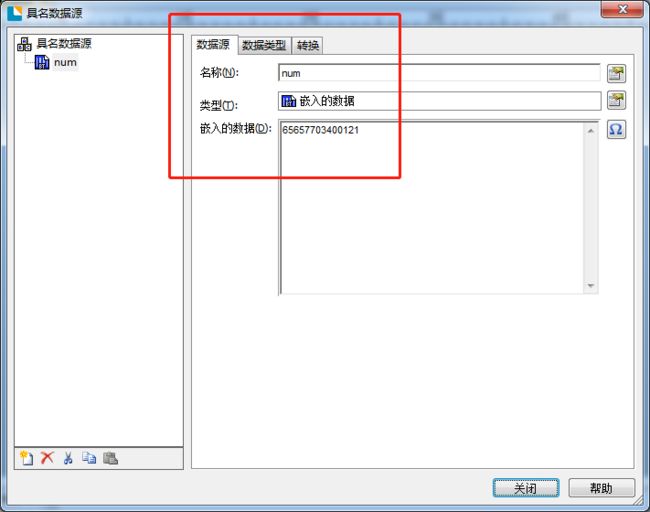
右键“具名数据源”,并创建一个新的数据源“num”


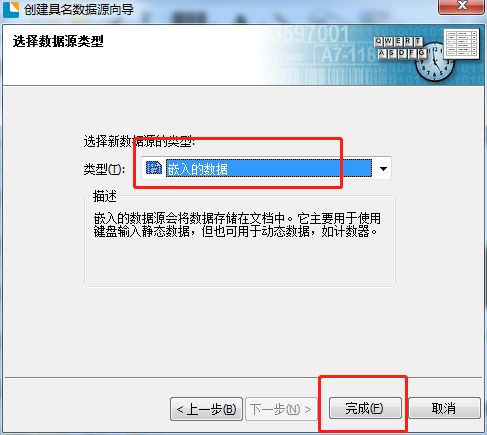
1.3、绑定数据源
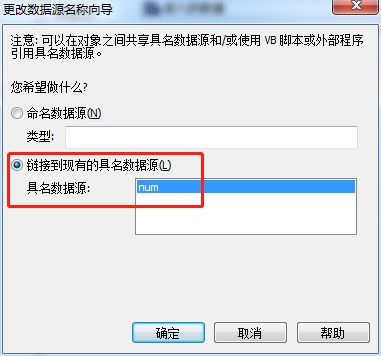
先双击二维码码模块,再右击“数据源”选项,新建数据源,然后链接数据源


最终效果图

二、程序框架分析
软件是python3.7 + Pycharm + Seagull.BarTender.Print.dll(Bartender’s SDK)
传送门:
本文源码
基于Pycharm的pyqt5的安装
怎么使用C#语言实现的SDK
2.1、main函数
这是固定套路,MyUi()继承自QtDesigner生成的UI类,并且由我往其中添加各种信号与槽函数而形成的最终类;
if __name__ == '__main__':
    try:
        app = QApplication(sys.argv)  # 实例化一个应用对象,sys.argv是一组命令行参数的列表。Python可以在shell里运行,这是一种通过参数来选择启动脚本的方式。
        myshow = MyUi()			# 调用构造函数构造对象
        myshow.show()			# 显示并不断刷新UI
        sys.exit(app.exec_()) 	# 确保主循环安全退出
    except Exception as ex:
        print(ex)
2.2、构造函数与析构函数
- 在
MyUI的构造函数中,看到self.bartender = Bartender()创建了Bartender对象,进入Bartender.py文件下可以看到,我在Bartender的__init__()函数中使用了Engine(True):创建时自动运行。 - 因此需要在
__del__()函数中停止运行,并主动释放资源,否则UI界面关闭了,bartender服务却还在后台运行着。
class MyUi(QWidget, Ui_Form, QObject):
    warning_signal = pyqtSignal(str)  # 输出信号,用于告知用户的警告信息
    def __init__(self):
        super(MyUi, self).__init__()    # 分别调用了2个父类的初始化函数
        self.setupUi(self)                          # UI界面控件的初始化
        self.bartender = Bartender()                # Bartender打印引擎
        self.my_file_sys = FileSystem()             # 创建日志
        self.signal_connect()                       # 信号与槽函数绑定
    def __del__(self):
        self.bartender.__del__()
# Bartender.py
class Bartender(QObject):
	eventSignal = pyqtSignal(str)  # 输出信号,用于告知调用者,发送和接受情况
	def __init__(self):
		self.btEngine = Engine(True)            # 创建 BarTender 的 Engine,参数True代表创建时自动调用Start函数
	def __del__(self):
		if self.btEngine.IsAlive:
            # 保存文件
            self.close_btwfile()
            # 停止引擎
            self.btEngine.Stop()
            # 释放资源
            self.btEngine.Dispose()
2.3、信号与槽函数的绑定
下面是一些常规的信号与槽函数绑定。
# 信号与槽函数绑定
    def signal_connect(self):
        # 软件启动时列表刷新
        self.scan_printer_list_slot()
        self.scan_btwfile_list_slot()
        # 试打印
        self.bnt_tryReadFile.clicked.connect(self.try_read_file_slot)
        self.bnt_tryModifySourceContent.clicked.connect(self.try_modify_source_content_slot)
        self.bnt_tryPrint.clicked.connect(self.try_print_slot)
        self.btwFileList_copy.clicked.connect(self.scan_btwfile_list_slot)              # 扫描btw
        self.btwFileList_copy.currentIndexChanged.connect(self.btwfile_changed_slot)    # 切换btw
        # 打印机
        self.PrintersList.clicked.connect(self.scan_printer_list_slot)              # 扫描打印机
        # 其他内部信号
        self.bartender.eventSignal.connect(self.bartender_event_slot)  # 打印引擎的事件信息
值得一提的是:
self.PrintersList与self.btwFileList_copy这2个控件,是通过我自定义的类Mycombobox实例化出来的,目的是给它们加上鼠标点击触发信号,参考博文《实现pyqt5的ComboBox的鼠标点击触发事件》。
当我点击这个控件时,会调用一个刷新函数,使其自动刷新。
- 点击控件
self.PrintersList时,会自动刷新打印机列表并显示 - 点击控件
self.btwFileList_copy时,会自动刷新btw文件列表并显示
# testUI.py
from Mycombobox import MyComboBox
...
self.PrintersList = MyComboBox(self.groupBox_3)
self.btwFileList_copy = MyComboBox(self.groupBox_2)
...
2.4、启动/关闭bartender引擎
Engine(True):参数True代表创建时自动调用Start函数
# Bartender.py
    def __init__(self):
        super(Bartender, self).__init__()
        self.btEngine = Engine(True)            # 创建 BarTender 的 Engine,参数True代表创建时自动调用Start函数
        # EventHandler 来自 System,在C#中EventHandler其实是一个模板,由于在python里面不用声明类型所以直接使用了模板
        self.btEngine.JobCancelled += EventHandler(self.btEngine_JobCancelledSlot)
        self.btEngine.JobErrorOccurred += EventHandler(self.btEngine_JobErrorOccurredSlot)
        self.btEngine.JobMonitorErrorOccurred += EventHandler(self.btEngine_JobMonitorErrorOccurredSlot)
        self.btEngine.JobPaused += EventHandler(self.btEngine_JobPausedSlot)
        self.btEngine.JobQueued += EventHandler(self.btEngine_JobQueuedSlot)
        self.btEngine.JobRestarted += EventHandler(self.btEngine_JobRestartedSlot)
        self.btEngine.JobResumed += EventHandler(self.btEngine_JobResumedSlot)
        self.btEngine.JobSent += EventHandler(self.btEngine_JobSentSlot)
        self.btFormat = None
        self.btwfile_using = None
关闭bartender引擎
根据bartender的SDK帮助手册,关闭时需要主动停止、释放。
# Bartender.py
    def __del__(self):
        if self.btEngine.IsAlive:
            # 保存文件
            self.close_btwfile()
            # 停止引擎
            self.btEngine.Stop()
            # 释放资源
            self.btEngine.Dispose()
2.5、打开/关闭标签文件(.btw)
简单的打开和关闭btw文件:
-
打开:
self.btFormat = self.btEngine.Documents.Open(new_file_path)
获得一个对象(句柄),之后许多操作都需要通过这个对象加.来调用,例如self.btFormat.Close() -
关闭(保存修改):
self.btFormat.Close(SaveOptions.SaveChanges)
其实Bartender的引擎支持同时打开多个btw文件。
但是,我的项目应用不需要打开多个btw文件,因此我给自己的项目写了下面的函数:
先关闭旧文件,再打开新文件,每次只保持一个btw文件为打开状态。
# Bartender.py
    def set_btwfile_using(self, new_btwfile_name):
        # 不能重复打开
        if new_btwfile_name and self.btwfile_using == new_btwfile_name:
            return True
        # 关闭并保存旧文件,打开新文件
        try:
            new_file_path = FolderPath + "\\btw\\" + new_btwfile_name
            if self.btFormat:
                self.btFormat.Close(SaveOptions.SaveChanges)
            self.btFormat = self.btEngine.Documents.Open(new_file_path)
            self.btwfile_using = new_btwfile_name
            return True
        except Exception as ex:
            print(ex)
            return False
2.6、操作标签文件中的数据单元
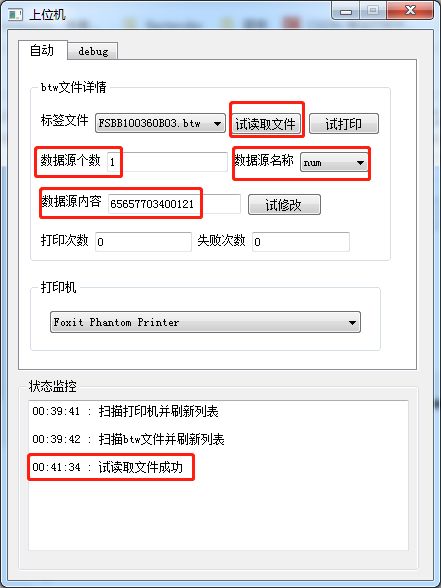
在本项目中的数据单元是二维码:二维码会随着变量num的值改变而改变
本小节的功能:对num的值进行读取和修改。

# Bartender.py
	# 返回一个字典:{'num':2103400110}
    def get_data_dict(self, key=None):
        data_dict = {
     }
        if self.btFormat:
            if key:
                return self.btFormat.SubStrings[key].Value
            for substring in self.btFormat.SubStrings:
                data_dict[substring.Name] = substring.Value
        return data_dict
    # 传入一个字典:{'num':11111}则会把num变量的值设置为11111
    def set_data_dict(self, data_dict):
        if len(data_dict) and self.btFormat:
            for key, value in data_dict.items():
                for substring in self.btFormat.SubStrings:
                    if substring.Name == key:
                        self.btFormat.SubStrings.SetSubString(key, value)
2.7、配置并打印
本项目中,需要对标签的二维码实现以下功能:
# Bartender.py
    def get_substring_config(self, substring):
        data_dict = {
     }
        if self.btFormat:
            # Substring类
            data_dict['SerializeBy'] = self.btFormat.SubStrings[substring].SerializeBy  # 返回str
            data_dict['SerializeEvery'] = self.btFormat.SubStrings[substring].SerializeEvery  # 返回str
            # PrintSetup类
            data_dict['NumberOfSerializedLabels'] = self.btFormat.PrintSetup.NumberOfSerializedLabels
            data_dict['IdenticalCopiesOfLabel'] = self.btFormat.PrintSetup.IdenticalCopiesOfLabel
        return data_dict
    def set_substring_config(self, substring, data_dict):
        if self.btFormat:
            # Substring类
            self.btFormat.SubStrings[substring].SerializeBy = data_dict['SerializeBy']
            self.btFormat.SubStrings[substring].SerializeEvery = data_dict['SerializeEvery']
            # PrintSetup类
            self.btFormat.PrintSetup.NumberOfSerializedLabels = data_dict['NumberOfSerializedLabels']
            self.btFormat.PrintSetup.IdenticalCopiesOfLabel = data_dict['IdenticalCopiesOfLabel']
            return True
        return False
- 在调用打印函数时,先对标签文件进行配置,然后再打印
即:
选择打印机self.btFormat.PrintSetup.PrinterName、
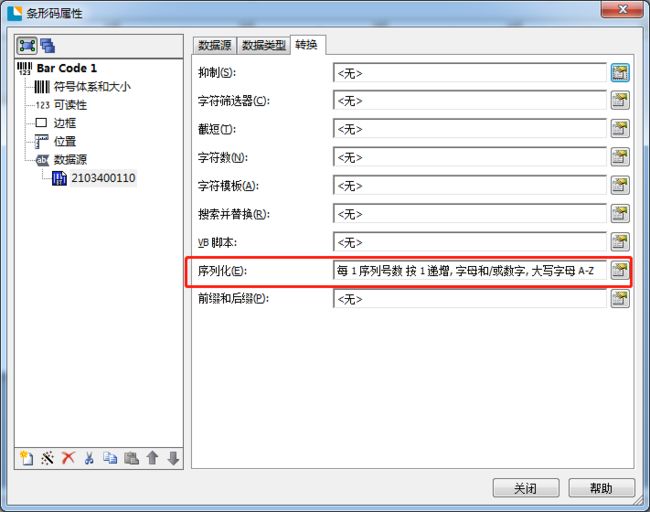
选择num变量(下面也叫序列)的递增步长btFormat.SubStrings['num'].SerializeBy = 1、
选择打印序列长度btFormat.PrintSetup.NumberOfSerializedLabels = 2、
选择每个序列号使用次数btFormat.PrintSetup.IdenticalCopiesOfLabel = 1
调用bartender提供的打印APIbtFormat.Print("printjob", timeout)
# Bartender.py
    def my_print(self, printer, timeout=2000):             # 返回nResult,0=成功,1=失败
        # 判断bartender是否启动
        if self.btEngine.IsAlive:
            pass
        else:
            self.btEngine.Start()
        try:                                    # 开始打印
            self.btFormat.PrintSetup.PrinterName = printer
            self.btFormat.SubStrings['num'].SerializeBy = 1
            self.btFormat.PrintSetup.NumberOfSerializedLabels = 2
            self.btFormat.PrintSetup.IdenticalCopiesOfLabel = 1
            # 调用库的打印函数,将数据推入打印队列
            nResult = self.btFormat.Print("printjob", timeout)
            return nResult                    # 0=成功,1=超时,2=失败
        except Exception as ex:
            print(ex)
            return 2
2.8、打印状态的显示
在前面2.4、启动/关闭bartender引擎,可以看到有一系列的信号与槽函数的绑定。
下面就是这些槽函数的实现了,只有一句:
-
self.eventSignal.emit()表明状态信息(eventSignal)被我从self.bartender发送了出去: -
发送到哪呢?在2.3、信号与槽函数的绑定贴出的代码中可以看到
eventSignal信号与bartender_event_slot槽函数绑定了,self.bartender.eventSignal.connect(self.bartender_event_slot) # 打印引擎的事件信息
也就是说,状态信息(eventSignal)从对象self.bartender发送给了对象myshow,并触发了myshow中的槽函数self.bartender_event_slot
# Bartender.py
    # 任务发送时触发
    def btEngine_JobSentSlot(self, sender, event):
        self.eventSignal.emit(" ID :" + str(event.ID)+"\n"+"任务发送:" + event.Name + " "+event.Status+"\n")

    # 任务回溯时触发
    def btEngine_JobResumedSlot(self, sender, event):
        self.eventSignal.emit(" ID :" + str(event.ID)+"\n"+"任务恢复:" + event.Name + " "+event.Status+"\n")

    # 任务重启时触发
    def btEngine_JobRestartedSlot(self, sender, event):
        self.eventSignal.emit(" ID :" + str(event.ID)+"\n"+"任务重启:" + event.Name + " "+event.Status+"\n")

    # 任务暂停时触发
    def btEngine_JobPausedSlot(self, sender, event):
        self.eventSignal.emit(" ID :" + str(event.ID)+"\n"+"任务暂停:" + event.Name + " "+event.Status+"\n")

    # 监控出错时触发
    def btEngine_JobMonitorErrorOccurredSlot(self, sender, event):
        self.eventSignal.emit(" ID :" + str(event.ID)+"\n"+"监控出错:" + event.Name + " "+event.Status+"\n")

    # 打印出错时触发
    def btEngine_JobErrorOccurredSlot(self, sender, event):
        self.eventSignal.emit(" ID :" + str(event.ID)+"\n"+"任务出错:" + event.Name + " "+event.Status+"\n")

    # 打印任务关闭时触发
    def btEngine_JobCancelledSlot(self, sender, event):
        self.eventSignal.emit(" ID :" + str(event.ID)+"\n"+"任务关闭:" + event.Name + " "+event.Status+"\n")

    # 打印任务入列时触发
    def btEngine_JobQueuedSlot(self, sender, event):
        self.eventSignal.emit(" ID :" + str(event.ID)+"\n"+"任务入列:" + event.Name + " "+event.Status+"\n")
myshow的槽函数bartender_event_slot收到信号作何处理?
# Labeling.py
    def bartender_event_slot(self, msg):
        # 监控bartender所有打印事件,当打印机打印完成后,会触发"任务发送"的事件
        self.my_log_print(msg)
        if msg.find("发送") > 0:
            self.my_log_print("打印机打印完成!")
值得注意的是:
在2.7、配置并打印中,调用打印API会返回结果:
0=成功,1=超时,2=失败
我在项目中使用的斑马打印机,经过测试,发现以下规律:
- 调用打印API后返回
0时,打印还没完成,直到2.8、打印状态的显示中的任务发送状态触发时,才打印完成,这中间有一段时间差~~ - 若没有外接打印机而使用PDF打印机时,调用打印API会返回
2(2=打印错误),但是仍会生成打印后的PDF,有点奇怪了~~ - 若返回
1则表明打印超时了,一般是打印机连接不稳定导致


