YOLOv5学习笔记 ——Jetson TX1部署模型
Jetson TX1实现TensorRT加速YOLOv5进行实时检测
- 一、前言
- 二、移动端部署思路
- 三、部署步骤
-
- 1. 克隆YOLOv5工程文件
- 2. pt 转 ONNX
-
- 安装 ONNX
- 转换文件
- 3. 移动端部署
-
- 克隆工程
- 生成 .wts 文件
- 生成引擎文件
- 4. python 调用摄像头实时检测
-
- 安装 pycuda
- 四、总结
一、前言
前段时间在 Jetson TX1 上直接跑 YOLOv5 模型,由于 TX1 算力不够,实时检测画面出现卡帧现象,因为 YOLOv5 支持并且可以轻松地编译为 ONNX ,因此这里我们采用 TensorRT 对其进行推理加速处理。
二、移动端部署思路
YOLOv5 的部署,我们可以先在 x86 系统上将 Pytorch 的 .pt 文件转化成中间模型 .onnx 文件/ .wts 文件,然后在 TX1 上将中间模型 .onnx 文件/ .wts 文件转到 trt 的 engine ,最后通过 TensorRT 进行推理。
三、部署步骤
1. 克隆YOLOv5工程文件
git clone https://github.com/ultralytics/yolov5.git
2. pt 转 ONNX
安装 ONNX
在 YOLOv5 文件夹下运行
pip install -r requirements.txt onnx # install requirements.txt and ONNX
转换文件
YOLOv5 官方提供了将 .pt 模型移植到 TorchScript、ONNX、CoreML 格式的 .py 文件

我们只需要将 export.py 中加载 .pt 文件的路径修改为自己想要转换的模型路径即可,我这里使用 YOLOv5l 训练出来的 best.pt 文件进行操作

之后可以在 .pt 文件所在的文件夹中得到对应的 ONNX 文件
3. 移动端部署
接下来我们移步到 TX1 上进行进一步的部署
克隆工程
git clone https://github.com/wang-xinyu/tensorrtx.git
git clone https://github.com/ultralytics/yolov5.git
生成 .wts 文件
这一步可以在 x86 系统上操作
将 tensorrtx/yolov5/gen_wts.py文件 复制到 yolov5 文件夹中
在目录命令行下输入 .pt 文件路径即可生成对应的 .wts 文件
python3 gen_wts.py weights/best.pt
生成引擎文件
生成部署引擎,将 .wts 文件放到 tensorrtx/yolov5 文件夹中,可以在 yolov5.cpp 文件中修改 fp、int8、device、nms_thresh、conf_thresh、batch_size,这里我使用默认参数。
接下来我们在 yololayer.h 文件中修改模型类个数,我们还可以在 yololayer.h 文件中修改输入图片的尺寸,图片尺寸必须是32的倍数。缩小输入尺寸在一定程度上可以加快推理速度。

至此,我们已将 .wts 文件放到 tensorrtx/yolov5 文件夹中,并且在 yololayer.h 文件中修改了我们自己模型的类个数,接下来我们生成引擎文件。
在 tensorrtx/yolov5 文件夹中运行以下命令行
mkdir build
cd build
cmake ..
make -j6
sudo ./yolov5 -s ../best.wts best.engine l
#sudo ./yolov5 -s [.wts] [.engine] [s/m/l/x/s6/m6/l6/x6 or c/c6 gd gw]
4. python 调用摄像头实时检测
在 TX1 上安装 pytorch 和 torchvision 比较麻烦,因此这里我们这里跳过了安装库的步骤直接对 yolov5_trt.py 文件进行修改。
注释掉 yolov5_trt.py 文件中的 import torch 和 import torchvision ,添加 import argparse

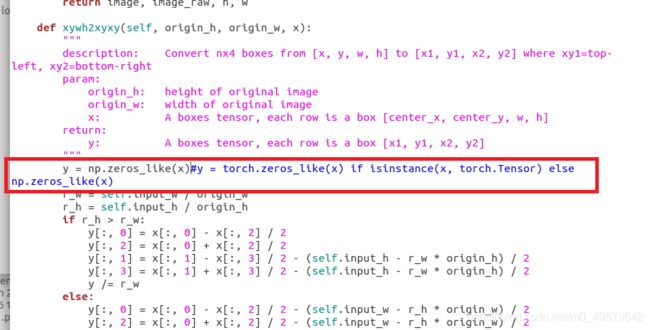
这一行直接改为 y = np.zeros_like(x),创建一个与 x 形状相同的0矩阵,因为我们不用torch

这一行注释掉这段话,因为我们不用 torch ,numpy 也不存在 cuda 方法

在 YoLov5TRT 类中加入以下代码,用 numpy 的方式代替实现 nms
def  nms(self,boxes, scores, iou_threshold=IOU_THRESHOLD):
         x1 = boxes[:, 0]
         y1 = boxes[:, 1]
         x2 = boxes[:, 2]
         y2 = boxes[:, 3]
         areas = (y2 - y1 + 1) * (x2 - x1 + 1)
         scores = scores
         keep = []
         index = scores.argsort()[::-1]
         while index.size > 0:
            i = index[0]  # every time the first is the biggst, and add it directly
            keep.append(i)

            x11 = np.maximum(x1[i], x1[index[1:]])  # calculate the points of overlap
            y11 = np.maximum(y1[i], y1[index[1:]])
            x22 = np.minimum(x2[i], x2[index[1:]])
            y22 = np.minimum(y2[i], y2[index[1:]])

            w = np.maximum(0, x22 - x11 + 1)  # the weights of overlap
            h = np.maximum(0, y22 - y11 + 1)  # the height of overlap

            overlaps = w * h
            ious = overlaps / (areas[i] + areas[index[1:]] - overlaps)

            idx = np.where(ious <= iou_threshold)[0]
            index = index[idx + 1]  # because index start from 1

         return keep
这里注释掉这几段话并进行修改,把 nms 的结果赋值给 indices 变量
fps = 0.0
if __name__ == "__main__":
    # load custom plugins
    parser = argparse.ArgumentParser()
    parser.add_argument('--engine', nargs='+', type=str, default="build/best.engine", help='.engine path(s)')
    parser.add_argument('--save', type=int, default=0, help='save?')
    opt = parser.parse_args()
    PLUGIN_LIBRARY = "build/libmyplugins.so"
    engine_file_path = opt.engine

    ctypes.CDLL(PLUGIN_LIBRARY)

    # load coco labels

    categories = ["person", "bicycle", "car", "motorcycle", "airplane", "bus", "train", "truck", "boat", "traffic light",
            "fire hydrant", "stop sign", "parking meter", "bench", "bird", "cat", "dog", "horse", "sheep", "cow",
            "elephant", "bear", "zebra", "giraffe", "backpack", "umbrella", "handbag", "tie", "suitcase", "frisbee",
            "skis", "snowboard", "sports ball", "kite", "baseball bat", "baseball glove", "skateboard", "surfboard",
            "tennis racket", "bottle", "wine glass", "cup", "fork", "knife", "spoon", "bowl", "banana", "apple",
            "sandwich", "orange", "broccoli", "carrot", "hot dog", "pizza", "donut", "cake", "chair", "couch",
            "potted plant", "bed", "dining table", "toilet", "tv", "laptop", "mouse", "remote", "keyboard", "cell phone",
            "microwave", "oven", "toaster", "sink", "refrigerator", "book", "clock", "vase", "scissors", "teddy bear",
            "hair drier", "toothbrush"]

    # a YoLov5TRT instance
    yolov5_wrapper = YoLov5TRT(engine_file_path)
    cap = cv2.VideoCapture(1)
    try:
        thread1 = inferThread(yolov5_wrapper)
        thread1.start()
        thread1.join()
        while 1:
            t1 = time.time()
            _,frame = cap.read()

            img,t=thread1.infer(frame)
            fps = ( fps + (1./(time.time()-t1)) ) / 2
            print("fps= %.2f"%(fps))
            img = cv2.putText(img, "fps=%.2f"%(fps), (0, 40), cv2.FONT_HERSHEY_SIMPLEX, 1,(0,255,0), 2)
            cv2.imshow("result", img)
            if cv2.waitKey(1) & 0XFF == ord('q'):  # 1 millisecond
                break


    finally:
        # destroy the instance
        cap.release()
        cv2.destroyAllWindows()
        yolov5_wrapper.destroy()
最后,将引擎载入路径修改为自己的引擎的路径和修改模型标签,在命令行中输入下面代码就可以调用自己的模型进行实时检测了
python3 yolov5_trt.py
安装 pycuda

由于我们的 TX1 仅仅只是刷了系统并没有安装以外的库,所以出现了找不到 pycuda 这个库的报错,因此我们要安装 pycuda 这个库,我们先安装 pip
sudo apt-get install python3-pip
sudo pip3 install pycuda
到此,我们可以正常通过 TensoRT 加速推理进行实时检测


