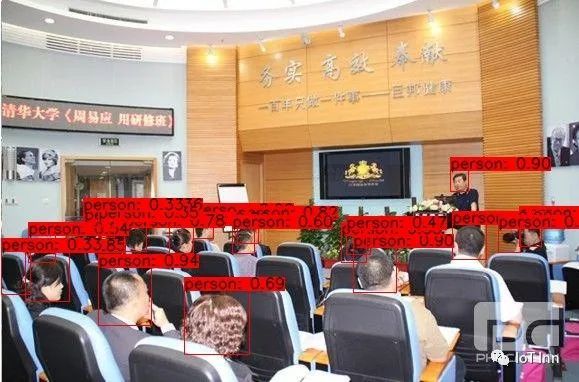
基于YOLOV3的安全帽检测
“ 作为目标检测的鸿篇巨制YOLOV3,用来做安全帽检测非常合适”
01
—
Yolov3简介
Yolo_v3使用了darknet-53的前面的52层(没有全连接层),yolo_v3这个网络是一个全卷积网络,大量使用残差的跳层连接,并且为了降低池化带来的梯度负面效果,作者直接摒弃了POOLing,用conv的stride来实现降采样。在这个网络结构中,使用的是步长为2的卷积来进行降采样。为了加强算法对小目标检测的精确度,YOLO v3中采用类似FPN的upsample和融合做法(最后融合了3个scale,其他两个scale的大小分别是26×26和52×52),在多个scale的feature map上做检测。作者在3条预测支路采用的也是全卷积的结构,其中最后一个卷积层的卷积核个数是255,是针对COCO数据集的80类:3*(80+4+1)=255,3表示一个grid cell包含3个bounding box,4表示框的4个坐标信息,1表示objectness score。
具体的网络结构介绍可以参见:
https://blog.csdn.net/litt1e/article/details/88907542
model.summary()可以看到整个参数大小

02
—
数据集介绍
关于安全帽的数据集,可以通过网络爬取,也可以通过其他途径获取,剩下的就是数据打标了,这是一个体力活,具体的打标教程网上也可以找到很多,基本都是LabelImg,具体可以参见:
https://www.jianshu.com/p/ff99d430150f
我这边使用的数据集是已经打标好了的,需要数据集的小伙伴可以关注公众号私信

03
—
训练集和测试集的制作
Yolov3使用的数据集格式是遵循VOC数据集的格式,所以需要根据如下目录做好训练集和测试集
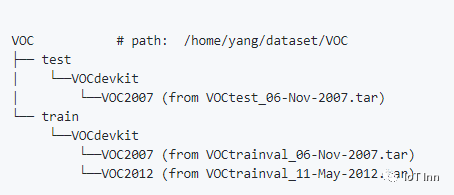
关于两个数据集的目录,可以手工创建,也可以通过脚本来进行创建
import os
from shutil import copyfile
#根据tarin.txt和test.txt将数据集分为标准数据集
train_text_path = '/home/test/Lewis_Workspace/VOC2028/ImageSets/Main/train.txt'
test_text_path = '/home/test/Lewis_Workspace/VOC2028/ImageSets/Main/test.txt'
#图片存放地址
image_path = '/home/test/Lewis_Workspace/VOC2028/JPEGImages'
#xml文件存放地址
xml_path = '/home/test/Lewis_Workspace/VOC2028/Annotations'


#输出的目录
outdir = '/home/test/Lewis_Workspace/VOC2028'
#创建各级文件夹
test_xml_out = os.path.join(outdir,'VOC/test/VOCdevkit/VOC2028/Annotations')
os.makedirs(test_xml_out)
os.makedirs(os.path.join(outdir,'VOC/test/VOCdevkit/VOC2028/ImageSets/Layout'))
os.makedirs(os.path.join(outdir,'VOC/test/VOCdevkit/VOC2028/ImageSets/Main'))
os.makedirs(os.path.join(outdir,'VOC/test/VOCdevkit/VOC2028/ImageSets/Segmentation'))
test_img_out = os.path.join(outdir,'VOC/test/VOCdevkit/VOC2028/JPEGImages')
os.makedirs(test_img_out)
os.makedirs(os.path.join(outdir,'VOC/test/VOCdevkit/VOC2028/SegmentationClass'))
os.makedirs(os.path.join(outdir,'VOC/test/VOCdevkit/VOC2028/SegmentationObject'))
train_xml_out = os.path.join(outdir,'VOC/train/VOCdevkit/VOC2028/Annotations')
os.makedirs(train_xml_out)
os.makedirs(os.path.join(outdir,'VOC/train/VOCdevkit/VOC2028/ImageSets/Layout'))
os.makedirs(os.path.join(outdir,'VOC/train/VOCdevkit/VOC2028/ImageSets/Main'))
os.makedirs(os.path.join(outdir,'VOC/train/VOCdevkit/VOC2028/ImageSets/Segmentation'))
train_img_out = os.path.join(outdir,'VOC/train/VOCdevkit/VOC2028/JPEGImages')
os.makedirs(train_img_out)
os.makedirs(os.path.join(outdir,'VOC/train/VOCdevkit/VOC2028/SegmentationClass'))
os.makedirs(os.path.join(outdir,'VOC/train/VOCdevkit/VOC2028/SegmentationObject'))


with open(train_text_path) as f:
    lines = f.readlines()
    for i in lines:
        img_save_path = os.path.join(train_img_out,i.rstrip('\n')+'.jpg')
        xml_save_path = os.path.join(train_xml_out, i.rstrip('\n') + '.xml')
        copyfile(os.path.join(image_path,i.rstrip('\n')+'.jpg'),img_save_path)
        copyfile(os.path.join(xml_path, i.rstrip('\n') + '.xml'), xml_save_path)
        print(i)
with open(test_text_path) as f:
    lines = f.readlines()
    for i in lines:
        img_save_path = os.path.join(test_img_out, i.rstrip('\n') + '.jpg')
        xml_save_path = os.path.join(test_xml_out, i.rstrip('\n') + '.xml')
        copyfile(os.path.join(image_path, i.rstrip('\n') + '.jpg'), img_save_path)
        copyfile(os.path.join(xml_path, i.rstrip('\n') + '.xml'), xml_save_path)
        print(i)
然后需要对原始数据集进行分割,可用如下脚本文件split.py
import os
import random
import sys
if len(sys.argv) < 2:
    print("no directory specified, please input target directory")
    exit()
root_path = sys.argv[1]
xmlfilepath = root_path + '/Annotations'
txtsavepath = root_path + '/ImageSets/Main'


if not os.path.exists(root_path):
    print("cannot find such directory: " + root_path)
    exit()


if not os.path.exists(txtsavepath):
    os.makedirs(txtsavepath)


trainval_percent = 0.9
train_percent = 0.8
total_xml = os.listdir(xmlfilepath)
num = len(total_xml)
list = range(num)
tv = int(num * trainval_percent)
tr = int(tv * train_percent)
trainval = random.sample(list, tv)
train = random.sample(trainval, tr)


print("train and val size:", tv)
print("train size:", tr)


ftrainval = open(txtsavepath + '/trainval.txt', 'w')
ftest = open(txtsavepath + '/test.txt', 'w')
ftrain = open(txtsavepath + '/train.txt', 'w')
fval = open(txtsavepath + '/val.txt', 'w')


for i in list:
    name = total_xml[i][:-4] + '\n'
    if i in trainval:
        ftrainval.write(name)
        if i in train:
            ftrain.write(name)
        else:
            fval.write(name)
    else:
        ftest.write(name)


ftrainval.close()
ftrain.close()
fval.close()
ftest.close()
python split.py /home/test/Lewis_Workspace/VOC2028/VOC/train/VOCdevkit/VOC2028/
python split.py /home/train/Lewis_Workspace/VOC2028/VOC/train/VOCdevkit/VOC2028/
04
—
训练
直接运行train.py
# -*- coding: utf-8 -*-
#! /usr/bin/env python
# coding=utf-8
import os
import time
import shutil
import numpy as np
import tensorflow as tf
import core.utils as utils
from tqdm import tqdm
from core.dataset import Dataset
from core.yolov3 import YOLOv3, decode, compute_loss
from core.config import cfg
import logging


logging.basicConfig(level=logging.DEBUG,
                    format='%(asctime)s %(filename)s[line:%(lineno)d] %(levelname)s %(message)s',
                    datefmt='%a, %d %b %Y %H:%M:%S',
                    filename='train.log',
                    filemode='w')


trainset = Dataset('train')
logdir = "./data/log"
steps_per_epoch = len(trainset)
global_steps = tf.Variable(1, trainable=False, dtype=tf.int64)
warmup_steps = cfg.TRAIN.WARMUP_EPOCHS * steps_per_epoch
total_steps = cfg.TRAIN.EPOCHS * steps_per_epoch


input_tensor = tf.keras.layers.Input([416, 416, 3])
conv_tensors = YOLOv3(input_tensor)


output_tensors = []
for i, conv_tensor in enumerate(conv_tensors):
    pred_tensor = decode(conv_tensor, i)
    output_tensors.append(conv_tensor)
    output_tensors.append(pred_tensor)


model = tf.keras.Model(input_tensor, output_tensors)
optimizer = tf.keras.optimizers.Adam()
if os.path.exists(logdir): shutil.rmtree(logdir)
writer = tf.summary.create_file_writer(logdir)


def train_step(image_data, target):
    with tf.GradientTape() as tape:
        pred_result = model(image_data, training=True)
        giou_loss=conf_loss=prob_loss=0


        # optimizing process
        for i in range(3):
            conv, pred = pred_result[i*2], pred_result[i*2+1]
            loss_items = compute_loss(pred, conv, *target[i], i)
            giou_loss += loss_items[0]
            conf_loss += loss_items[1]
            prob_loss += loss_items[2]


        total_loss = giou_loss + conf_loss + prob_loss


        gradients = tape.gradient(total_loss, model.trainable_variables)
        optimizer.apply_gradients(zip(gradients, model.trainable_variables))
        tf.print("=> STEP %4d   lr: %.6f   giou_loss: %4.2f   conf_loss: %4.2f   "
                 "prob_loss: %4.2f   total_loss: %4.2f" %(global_steps, optimizer.lr.numpy(),
                                                          giou_loss, conf_loss,
                                                          prob_loss, total_loss))

        logging.info("=> STEP %4d   lr: %.6f   giou_loss: %4.2f   conf_loss: %4.2f   "
                 "prob_loss: %4.2f   total_loss: %4.2f" %(global_steps, optimizer.lr.numpy(),
                                                          giou_loss, conf_loss,
                                                          prob_loss, total_loss))
        # update learning rate
        global_steps.assign_add(1)
        if global_steps < warmup_steps:
            lr = global_steps / warmup_steps *cfg.TRAIN.LR_INIT
        else:
            lr = cfg.TRAIN.LR_END + 0.5 * (cfg.TRAIN.LR_INIT - cfg.TRAIN.LR_END) * (
                (1 + tf.cos((global_steps - warmup_steps) / (total_steps - warmup_steps) * np.pi))
            )
        optimizer.lr.assign(lr.numpy())


        # writing summary data
        with writer.as_default():
            tf.summary.scalar("lr", optimizer.lr, step=global_steps)
            tf.summary.scalar("loss/total_loss", total_loss, step=global_steps)
            tf.summary.scalar("loss/giou_loss", giou_loss, step=global_steps)
            tf.summary.scalar("loss/conf_loss", conf_loss, step=global_steps)
            tf.summary.scalar("loss/prob_loss", prob_loss, step=global_steps)
        writer.flush()


if __name__ == '__main__':
    for epoch in range(cfg.TRAIN.EPOCHS):
        for image_data, target in trainset:
            train_step(image_data, target)
        model.save_weights("./yolov3")
下面这个截图是训练到2玩多步的时候的一个loss值

另外通过tensorboard --logdir ./log查看学习率和各种loss的变化

05
—
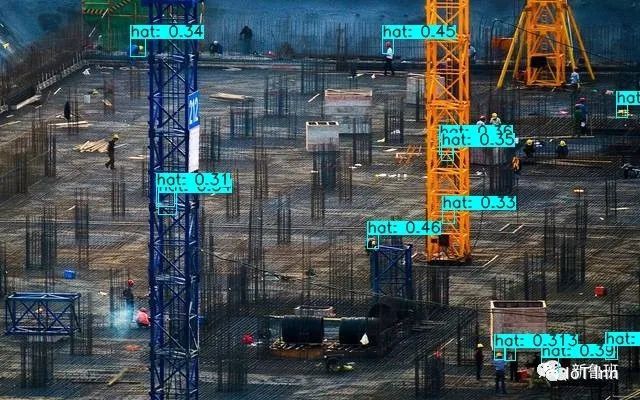
测试
#! /usr/bin/env python
# coding=utf-8
import cv2
import numpy as np
import core.utils as utils
import tensorflow as tf
from core.yolov3 import YOLOv3, decode
from PIL import Image


input_size   = 416
image_path   = "./docs/000000.jpg"


input_layer  = tf.keras.layers.Input([input_size, input_size, 3])
feature_maps = YOLOv3(input_layer)


original_image      = cv2.imread(image_path)
original_image      = cv2.cvtColor(original_image, cv2.COLOR_BGR2RGB)
original_image_size = original_image.shape[:2]


image_data = utils.image_preporcess(np.copy(original_image), [input_size, input_size])
image_data = image_data[np.newaxis, ...].astype(np.float32)


bbox_tensors = []
for i, fm in enumerate(feature_maps):
    bbox_tensor = decode(fm, i)
    bbox_tensors.append(bbox_tensor)


model = tf.keras.Model(input_layer, bbox_tensors)
#utils.load_weights(model, "./yolov3.weights")
model.load_weights("./yolov3")
model.summary()


pred_bbox = model.predict(image_data)
pred_bbox = [tf.reshape(x, (-1, tf.shape(x)[-1])) for x in pred_bbox]
pred_bbox = tf.concat(pred_bbox, axis=0)
bboxes = utils.postprocess_boxes(pred_bbox, original_image_size, input_size, 0.3)
bboxes = utils.nms(bboxes, 0.45, method='nms')


image = utils.draw_bbox(original_image, bboxes)
image = cv2.cvtColor(image, cv2.COLOR_RGB2BGR)
cv2.imwrite("image_demo_result.jpg",image)
05
—
需要注意的问题
1、如果是在windows上运行,保存weights的时候需要保存为.h5格式,不然无法保存。
model.save("myolov3.h5")
导入模型
model.load_weights("myolov3.h5")
2、如果在windows上出现测试的时候无法保存检测框的时候,可以尝试在linux下运行代码,至少现在在linux下还没碰到类似的问题
3、如果在训练过程中loss值出现nan,可以试着调整学习率的上升速度和下降速度。
if global_steps < warmup_steps:
    lr = global_steps / warmup_steps *cfg.TRAIN.LR_INIT
else:
    lr = cfg.TRAIN.LR_END + 0.5 * (cfg.TRAIN.LR_INIT - cfg.TRAIN.LR_END) * (
        (1 + tf.cos((global_steps - warmup_steps) / (total_steps - warmup_steps) * np.pi))
    )
具体可以通过改变warm_up的值,以及学习率的初始值。让学习率的上升速率和下降速度更缓和一点。
4、关于为什么要使用warm_up
由于刚开始训练时,模型的权重(weights)是随机初始化的,此时若选择一个较大的学习率,可能带来模型的不稳定(振荡),选择Warmup预热学习率的方式,可以使得开始训练的几个epoches或者一些steps内学习率较小,在预热的小学习率下,模型可以慢慢趋于稳定,等模型相对稳定后再选择预先设置的学习率进行训练,使得模型收敛速度变得更快,模型效果更佳。
在Residul NetWork训练中https://arxiv.org/abs/1512.03385,有提到这样一段话

然后在transformer的一篇论文https://arxiv.org/abs/1706.03762中也有提到:
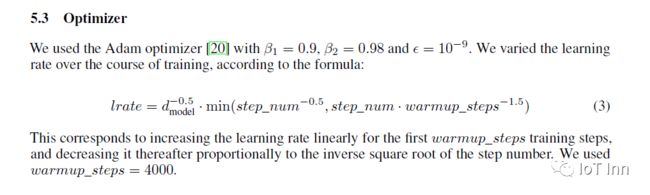
根据上面的公式进行图像展示,可以发现学习率是先上升后下降的
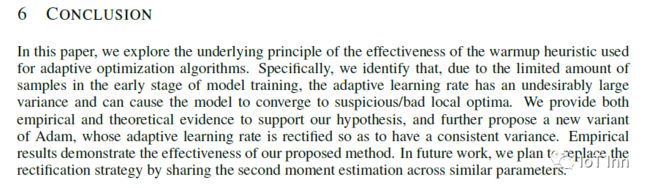
如果各位想具体了解学习率warm-up的作用,可以详见这篇论文
https://arxiv.org/abs/1908.03265
听说关注公众号的都是大牛
