核心理念:既拥有Native的用户体验,又保留React的开发效率.
目前,React Native基本完成了对多端的支持,实现了真正意义上的面向配置开发:开发者可以灵活的使用HTML和CSS布局,使用React语法构建组件,实现:H5,Android,iOS多端代码的复用.
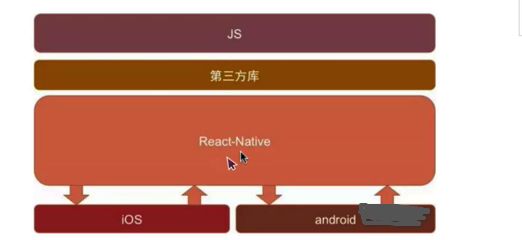
React Native的优势
跨平台开发: 运用React Native,我们可以使用同一份业务逻辑核心代码来创建原生应用运行在Web端,Android端和iOS端;
追求极致的用户体验:实时热部署
Learn once, write anywhere 只需要学习React Native,我们就能够编写针对不同平台的应用,并且使用React Native框架开发相较于原生代码开发应用,更简单更高效。
React Native开发注意事项
- 官方文档
目前React Native在iOS上仅支持ios7以上,Android仅支持Android4.1以上版本;
github地址:https://github.com/facebook/react-native
官方文档:http://facebook.github.io/react-native/docs/getting-started.html
环境需求
1.1安装Homebrew
ruby -e"$(curl -fsSLhttps://raw.githubusercontent.com/Homebrew/install/master/install)"
命令行执行brew -v进行检查brew是否已经安装成功
1.2安装npm 和 Node.js
brew install node
此方式需要将Xcode更新到8.0
1.3安装WatchMan
watchman是Facebook用于监视JavaScript文件改动的开源项目,该插件用于监控bug变化和文件变化,并且可以触发指定的操作
brew install watchman
1.4安装flow
flow是Facebook开源的一个JavaScript静态类型检查器,建议安装它,以方便找出JavaScript程序中可能存在的类型错误
brew install flow
==注意事项==
- 在Mac终端上出现
npm command not found
执行
curl -L http://npmjs.org/install.sh | sudo sh
- 配置全局环境变量
打开Mac终端,配置全局环境变量
vim .bash_profile
打开之后添加一行以下代码,(Mac的node,npm可执行文件都在/usr/local/bin/目录下)
PATH=$PATH:/usr/local/bin/
:wq  //保存并退出

#执行下面一句代码

$source .bash_profile
- bash: react-native: command not found
npm install -g yarn react-native-cli //安装多个包

npm install -g react-native-cli
- nvm安装路径
/Users/MengYu/.nvm/versions/node/v8.1.0/lib/node_modules
React Native的安装
安装react-native-cli
react-native-cli是React Native的命令行工具,安装react-native-cli后我们就能够通过react-native相关命令管理ReactNative工程。
npm install -g react-native-cli
不报错即为安装成功
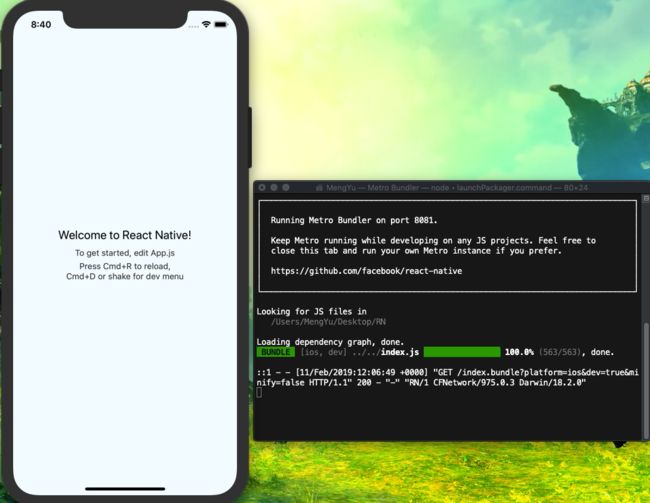
创建第一个RN工程
react-native init 项目名称(RN)
是否成功标志
Installing Jest...

+ [email protected]

+ [email protected]

+ [email protected]

+ [email protected]

+ [email protected]

added 449 packages from 255 contributors and updated 2 packages in 63.055s

To run your app on iOS:

  cd /Users/MengYu/Desktop/RN

  # react-native run-ios

  - or -

  Open ios/RN.xcodeproj in Xcode

  Hit the Run button

To run your app on Android:

  cd /Users/MengYu/Desktop/RN

  Have an Android emulator running (quickest way to get started), or a device connected

  # react-native run-android

** BUILD SUCCEEDED **

The following commands produced analyzer issues:

Analyze /Users/MengYu/Desktop/RN/node_modules/react-native/React/Base/RCTModuleMethod.mm normal x86_64

Analyze /Users/MengYu/Desktop/RN/node_modules/react-native/Libraries/Image/RCTImageCache.m normal x86_64

Analyze /Users/MengYu/Desktop/RN/node_modules/react-native/Libraries/Network/RCTNetInfo.m normal x86_64

(3 commands with analyzer issues)

Installing build/Build/Products/Debug-iphonesimulator/RN.app

Launching org.reactjs.native.example.RN

org.reactjs.native.example.RN: 18533
运行iOS工程
cd /Users/MengYu/Desktop/RN

  #执行 react-native run-ios
运行成功标志
第二种方式创建RN项目
1.创建并安装依赖
npm install -g expo-cli
expo init AwesomeProject

cd AwesomeProject

npm start #you can also use: expo start
2.Server后台监听
This will start a development server for you.
3.运行在iOS平台
- 运行在模拟器
npm run ios

或

expo start --ios
- 运行在自己手机上
在AppStore 下载Expo client App
打开相机扫描二维码,在Expo中打开
刷新: Command + R
展示菜单 : Command + D
4.开发
复制下列代码到App.js
import React, { Component } from 'react';
import { AppRegistry, Image } from 'react-native';
export default class Bananas extends Component {
render() {
let pic = {
uri: 'https://upload.wikimedia.org/wikipedia/commons/d/de/Bananavarieties.jpg'
};
return (
Command + S 保存,在手机上就能看到你修改的内容
注意
如果服务断开,请重新执行 $expo start ,之后重新扫码查看

跳转到RN界面
RNViewController *VC = [[RNViewController alloc] init];

[self.navigationController pushViewController:VC animated:YES];
RN简单配置

#import

@interface RNViewController ()

@end

@implementation RNViewController

- (void)viewDidLoad {

    [super viewDidLoad];

self.view.backgroundColor = [UIColor whiteColor];

    self.title = @"RN Hybrid";

    NSURL * jsCodeLocation;

    NSString * strUrl = @"http://localhost:8081/index.ios.bundle?platform=ios&dev=true";

    jsCodeLocation = [NSURL URLWithString:strUrl];

    RCTRootView * rootView = [[RCTRootView alloc] initWithBundleURL:jsCodeLocation moduleName:@"iOSHybridRNDemo"initialProperties:nil

                                                      launchOptions:nil];

    self.view = rootView;

}
RN项目index.ios.js配置
import React, {Component} from 'react'

import {

  Platform,

  StyleSheet,

  Text,

  View,

  AppRegistry

} from 'react-native';

const instructions = Platform.select({

  ios: 'Press Cmd+R to reload,\n' +

    'Cmd+D or shake for dev menu',

  android: 'Double tap R on your keyboard to reload,\n' +

    'Shake or press menu button for dev menu',

});

class App extends Component {

  render() {

    return (


          Welcome to React Native!


          To get started, edit App.js


          {instructions}


    );

  }

}

const styles = StyleSheet.create({

  container: {

    flex: 1,

    justifyContent: 'center',

    alignItems: 'center',

    backgroundColor: '#F5FCFF',

  },

  welcome: {

    fontSize: 20,

    textAlign: 'center',

    margin: 10,

  },

  instructions: {

    textAlign: 'center',

    color: '#333333',

    marginBottom: 5,

  },

});

AppRegistry.registerComponent('iOSHybridRNDemo', () => App)
RN 项目运行步骤
- cd 到 RN目录下执行
npm install - cd 到iOS目录下执行
pod install - 监听 cd 到 RN目录下执行
npm start