网页演示:https://desertsx.github.io/dataviz-in-action/02-eschers-gallery/index.html
开源代码(可点 Star 支持):DesertsX/dataviz-in-action
Wendy Shijia 的「 Escher's Gallery」可视化作品复现系列文章(一)
Wendy Shijia 的「 Escher's Gallery」可视化作品复现系列文章(二)
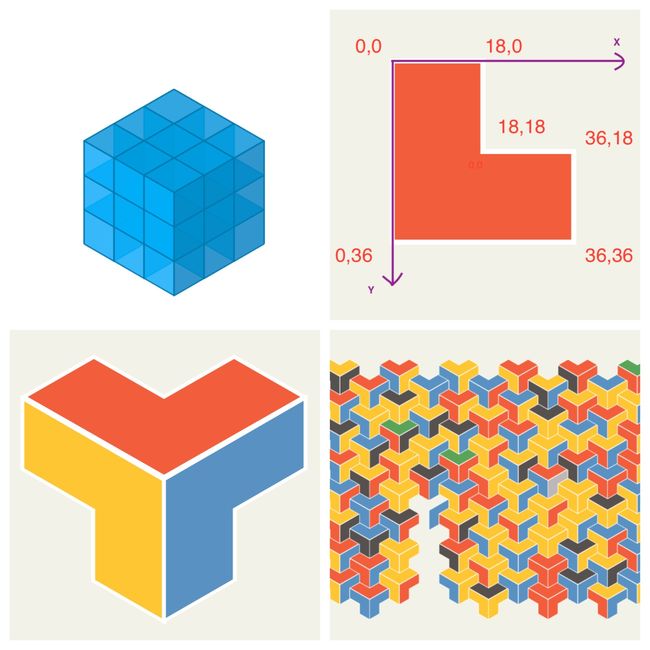
通过前两篇文章,古柳拼凑出了一个 cube,并且构造伪数据将整体布局效果大致搞定,在第二篇文章最后古柳给出了更优雅的、和 Wendy 原始方式一致的 unit/cube 实现代码,不过新的实现在后续尺寸和布局上无法完全替换旧的实现,"牵一发而动全身",已开源的代码需要较多改动,因而只能暂时按最初的实现来讲解复现过程,感兴趣的可以自行基于新的实现来修改。
书接上文,用伪数据搞定布局后,就该替换成真实数据了,其实想想 Wendy 的作品发布在 tableau public 上,仔细找下应该也会有数据集,但没准需要下载 tableau 就有些麻烦,想着去原始网站爬取应该也不难,就采取了写个 Python 爬虫自行爬取的方案。
链接:https://public.tableau.com/profile/wendy.shijia#!/vizhome/MCEschersGallery_15982882031370/Gallery
当然爬虫不是重点,爬取的数据也开源了,大家直接关注可视化部分即可,这里简单看下源网站页面结构/数据情况:下图分别是一个包含470个作品的列表页和其中1个作品的详情页,抽取出相应数据即可。
存储的数据格式如下,挺好懂,就不多余解释了。
[
  {
    "id": 0,
    "url": "https://www.wikiart.org/en/m-c-escher/bookplate-bastiaan-kist",
    "img": "https://uploads4.wikiart.org/images/m-c-escher/bookplate-bastiaan-kist.jpg",
    "title": "Bookplate Bastiaan Kist",
    "date": "1916",
    "style": "Surrealism",
    "genre": "symbolic painting"
  },
  ...
]
接下来就是本次复现的代码部分,习惯看源码的可直接去 GitHub 里阅读即可。
开源代码(可点 Star 支持):DesertsX/dataviz-in-action
虽然古柳也不喜欢在文章里大段大段贴代码片段,但还是有必要简单讲解下,自然看到这篇文章的读者背景/基础可能都不同,一定会有不少人不一定能完全看懂,本系列也并非 D3.js 入门教程,所以可能无法顾及所有读者,虽然并没有过于深奥的地方,但若是有疑惑可评论或群里交流。
首先用的是 D3.js v5 版本,由于用到 d3.rollup() 方法,需要另外引入 d3-array.v2.min.js,如果用最新的 D3.js v6 版本就无需另外引入后者了。
HTML 页面结构并不复杂,主要是整个图表 svg 部分加上交互显示每件作品信息时的 tooltip。其中 svg 里放了上篇文章里实现的不太优雅的三个 unit 多边形,后续用 D3.js 绘图时通过生成 use 标签分别进行调用即可。
app.js 里就是所有实现代码,且都写在了 drawChart() 里。读取数据并对 date 年份以及作品类型进行处理。
async function drawChart() {
  const data = await d3.json("./data.json");

  const svg = d3.select("#chart");
  const bounds = svg.append("g");

  // console.log([...new Set(data.map((d) => d.style))]);
  // ["Surrealism", "Realism", "Expressionism", "Cubism", "Op Art", "Art Nouveau (Modern)", "Northern Renaissance", "Art Deco"]
  data.map((d) => {
    d.date = d.date !== "?" ? +d.date : "?";
    d.style = d.style === "Op Art" ? "Optical art" : d.style;
    d.style2 = ["Surrealism", "Realism", "Expressionism", "Cubism", "Optical art"].includes(d.style) ? d.style : "Other";
  });
  console.log(data);

  const colorScale = {
    "Optical art": "#ffc533",
    Surrealism: "#f25c3b",
    Expressionism: "#5991c2",
    Realism: "#55514e",
    Cubism: "#5aa459",
    Other: "#bdb7b7",
  };

  // more...

}

drawChart();
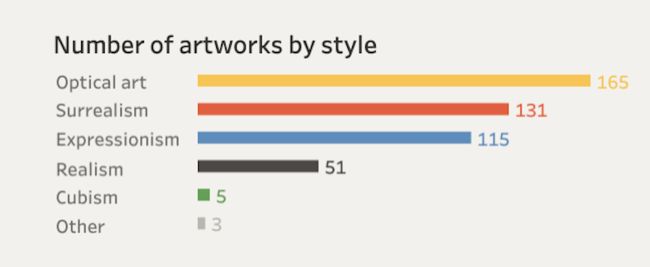
style2 作品类型会通过 colorScale() 和颜色相对应,styleCount 会用于 drawStyleLegend() 绘制类型图例。这里用 d3.rollup() 统计各类型的数量,其它实现方式亦可。
链接:https://observablehq.com/@d3/d3-group
  const styleCountMap = d3.rollup(
    data,
    (v) => v.length,
    (d) => d.style2
  );
  // console.log("styleCount :", styleCountMap);
  const styleCount = [];
  for (const [style, count] of styleCountMap) {
    styleCount.push({ style, count });
  }
  // console.log(styleCount);
  // drawStyleLegend() 里会用到
既然讲到了图例,就先看看类型图例的实现,很常规的 D3.js 绘图的内容。
  // style bar chart
  function drawStyleLegend() {
    const countScale = d3
      .scaleLinear()
      .domain([0, d3.max(styleCount, (d) => d.count)])
      .range([0, 200]);

    const legend = bounds.append("g").attr("transform", "translate(1000, 40)");

    const legendTitle = legend
      .append("text")
      .text("Number of artworks by style")
      .attr("x", 20)
      .attr("y", 10);

    const legendGroup = legend
      .selectAll("g")
      .data(styleCount.sort((a, b) => b.count - a.count))
      .join("g")
      .attr("transform", (d, i) => `translate(110, ${28 + 15 * i})`);

    const lengedStyleText = legendGroup
      .append("text")
      .text((d) => d.style) // this's style2
      .attr("x", -90)
      .attr("y", 6)
      .attr("text-anchor", "start")
      .attr("fill", "grey")
      .attr("font-size", 11);

    const lengedRect = legendGroup
      .append("rect")
      .attr("width", (d) => countScale(d.count))
      .attr("height", 8)
      .attr("fill", (d) => colorScale[d.style]);

    const lengedStyleCountText = legendGroup
      .append("text")
      .text((d) => d.count)
      .attr("x", (d) => countScale(d.count) + 10)
      .attr("y", 8)
      .attr("fill", (d) => colorScale[d.style])
      .attr("font-size", 11);
  }

  drawStyleLegend();
当然实在不想自己从头绘制图例,也可以用 Susie Lu 的 d3 SVG Legend (v4) 库。
接着,通过 getXY() 函数返回作品 unit 布局时会用到的组内顺序、列数、行数,在上一篇文章Wendy Shijia 的「 Escher's Gallery」可视化作品复现系列文章(二)里已经有过介绍,基本相同。
  const getXY = (idx) => {
    let col;
    let row;
    if (idx < 14) {
      col = 1;
      row = parseInt((idx % 24) / 3) + 1;
      groupIdx = idx;
    } else if (idx < 99) {
      groupIdx = idx - 14;
      col = 1 + parseInt(groupIdx / 24) + 1;
      row = parseInt((groupIdx % 24) / 3) + 1;
    } else if (idx < 273) {
      groupIdx = idx - 99;
      col = 5 + parseInt(groupIdx / 24) + 1;
      row = parseInt((groupIdx % 24) / 3) + 1;
    } else if (idx < 335) {
      groupIdx = idx - 273;
      col = 13 + parseInt(groupIdx / 24) + 1;
      row = parseInt((groupIdx % 24) / 3) + 1;
    } else if (idx < 416) {
      groupIdx = idx - 335;
      col = 16 + parseInt(groupIdx / 24) + 1;
      row = parseInt((groupIdx % 24) / 3) + 1;
    } else if (idx < 457) {
      groupIdx = idx - 416;
      col = 20 + parseInt(groupIdx / 24) + 1;
      row = parseInt((groupIdx % 24) / 3) + 1;
    } else {
      groupIdx = idx - 457;
      col = 22 + parseInt(groupIdx / 24) + 1;
      row = parseInt((groupIdx % 24) / 3) + 1;
    }
    return [groupIdx, col, row];
  };
通过 drawArtwork() 函数生成所有作品的 use 标签,调用 defs 标签里的 unit,结合 getXY() 函数传入正确的x/y坐标及 unit id,绘制出图表主体的内容即可。注意每列高度隔行相等,简单处理下即可。
  const cubeWidth = 32;
  //  2%3=2  parseInt(4/3)=1  or Math.floor(4/3)
  const artworkGroup = bounds
    .append("g")
    .attr("class", "main-chart")
    .attr("transform", `scale(1.12)`);

  function drawArtwork() {
    const artworks = artworkGroup
      .selectAll("use.artwork")
      .data(data)
      .join("use")
      .attr("class", "artwork")
      .attr("xlink:href", (d, i) =>
        getXY(i)[0] % 3 === 0
          ? "#unit-0"
          : getXY(i)[0] % 3 === 1
          ? "#unit-1"
          : "#unit-2"
      )
      .attr("fill", (d) => colorScale[d.style2])
      .attr("stroke", "white")
      .attr("data-index", (d) => d.style2)
      .attr("id", (d, i) => i)
      .attr("x", (d, i) => getXY(i)[1] * 1.5 * cubeWidth - 80)
      .attr(
        "y",
        (d, i) =>
          110 +
          getXY(i)[2] * 1.5 * cubeWidth +
          (getXY(i)[1] % 2 === 0 ? 0 : 0.75 * cubeWidth)
      );
  }

  drawArtwork();
接着加上背景的空白 cube,古柳复现时还原了原作这部分效果,虽然可加可不加,偷个懒也没事,但一开始觉得没准这部分和埃舍尔的艺术风格有关,于是还是加上了。后来看 Wendy 关于该可视化作品的分享 「VizConnect - Drawing Polygons in Tableau: The processing of making Escher's Gallary」,从中了解到背景这部分是最后才加上的,大概是 Wendy 觉得每组之间有空隙所以加上背景纹理进行填充。
构造需要添加空白 unit 的数据,blankData 数据分成两部分,一部分是每列上方和下方完整的那些 cube,即 d3.range(1, 24).map() 里遍历的那些 x/y 行列位置,重复3次把3个 unit 都列出来,其中 rawMax 是每列的 cube 数、每列上方起始位置隔列不同、每列下方根据 rawMax 里对应的值把剩余的空白位置填满即可;另一部分是每组年龄段最后一个 cube 可能需要另外补充的那些 unit ,可通过 specialBlank 列举出所有特殊情况。最后同样生成 use 标签以绘制出空白 unit 即可。
这里的实现不一定是最好的,可按照自己的思路实践,仅供参考。
  function drawBlankArtwork() {
    // bottom odd 9 / even 10
    const rawMax = [5, 8, 8, 8, 5, 8, 8, 8, 8, 8, 8, 8, 2, 8, 8, 5, 8, 8, 8, 3, 8, 6, 5, ];
    // console.log(rawMax.length); // 23
    const blank = [];
    d3.range(1, 24).map((d) => {
      // top odd 0/-1 / even 0
      d % 2 === 0
        ? blank.push({ x: d, y: 0 })
        : blank.push({ x: d, y: 0 }, { x: d, y: -1 });
      // bottom odd 9 / even 10
      if (d % 2 === 0) {
        for (let i = rawMax[d - 1] + 1; i <= 10; i++)
          blank.push({ x: d, y: i });
      } else {
        for (let i = rawMax[d - 1] + 1; i <= 9; i++) blank.push({ x: d, y: i });
      }
    });

    let blankData = [];
    blank.map((d) => {
      // repeat 3 times
      d3.range(3).map(() => blankData.push({ x: d.x, y: d.y }));
    });
    const specialBlank = [
      { x: 1, y: 5, unit: 2 },
      { x: 5, y: 5, unit: 1 },
      { x: 5, y: 5, unit: 2 },
      { x: 16, y: 5, unit: 2 },
      { x: 22, y: 6, unit: 2 },
      { x: 23, y: 5, unit: 1 },
      { x: 23, y: 5, unit: 2 },
    ];
    blankData = [...blankData, ...specialBlank];

    const blankArtworks = artworkGroup
      .selectAll("use.blank")
      .data(blankData)
      .join("use")
      .attr("class", "blank")
      .attr("xlink:href", (d, i) =>
        d.unit
          ? `#unit-${d.unit}`
          : i % 3 === 0
          ? "#unit-0"
          : i % 3 === 1
          ? "#unit-1"
          : "#unit-2"
      )
      .attr("fill", "#f2f2e8")
      .attr("stroke", "white")
      .attr("stroke-width", 1)
      .attr("x", (d) => d.x * 1.5 * cubeWidth - 80)
      .attr(
        "y",
        (d) =>
          110 + d.y * 1.5 * cubeWidth + (d.x % 2 === 0 ? 0 : 0.75 * cubeWidth)
      );
  }

  drawBlankArtwork();
然后每组加上文字信息。
  function drawDateInfo() {
    const dateText = [
      { col: 1, shortLine: false, age: "age<20", range: "1898-" },
      { col: 2, shortLine: true, age: "20-29", range: "1918-1927" },
      { col: 6, shortLine: true, age: "30-39", range: "1928-1937" },
      { col: 14, shortLine: true, age: "40-49", range: "1938-1947" },
      { col: 17, shortLine: false, age: "50-59", range: "1948-1957" },
      { col: 21, shortLine: false, age: "60-69", range: "1958-1972" },
      { col: 23, shortLine: false, age: "", range: "Year Unknown" },
    ];
    const dateTextGroup = artworkGroup.selectAll("g").data(dateText).join("g");

    dateTextGroup
      .append("text")
      .text((d) => d.age)
      .style("text-anchor", "start")
      .attr("x", (d, i) => d.col * 1.5 * cubeWidth + (i === 0 ? 34 : 42))
      .attr("y", 195)
      .attr("font-size", 13);

    dateTextGroup
      .append("text")
      .text((d) => d.range)
      .style("text-anchor", "start")
      .attr("x", (d, i) => d.col * 1.5 * cubeWidth + (i === 6 ? 30 : 35))
      .attr("y", 210)
      .attr("fill", "grey")
      .attr("font-size", 11);

    dateTextGroup
      .append("line")
      .attr("x1", (d, i) => d.col * 1.5 * cubeWidth + 63)
      .attr("x2", (d, i) => d.col * 1.5 * cubeWidth + 63)
      .attr("y1", 215)
      .attr("y2", (d) => (d.shortLine ? 246 : 270))
      .attr("stroke", "#2980b9")
      .attr("stroke-dasharray", "1px 1px");
  }

  drawDateInfo();
然后把标题、下方文字描述等剩余部分都加上即可,都是些细枝末节的工作了,没啥难度看源码即可,这里就不放了。需要说明的是下方文字内容原本古柳用 HTML+CSS 实现,但可能太菜总感觉效果不理想,最后也还是用 D3.js SVG text 等各种拼接出来,也不够优雅、略显冗余。
最后是加上交互,点击每个 unit 时显示相应作品数据,点击 svg 其余区域时隐藏 tooltip。交互也很简陋,有改进空间。
  const tooltip = d3.select("#tooltip");

  svg.on("click", displayTooltip);

  function displayTooltip() {
    tooltip.style("opacity", 0);
  }

  d3.selectAll("use.artwork").on("click", showTooltip);

  function showTooltip(datum) {
    tooltip.style("opacity", 1);
    tooltip.select("#title").text(datum.title);
    tooltip
      .select("#date")
      .text(datum.date !== "?" ? datum.date : "Year Unknown");
    tooltip.select("#style").text(datum.style);
    tooltip.select("#genre").text(datum.genre);
    tooltip.select("#image img").attr("src", datum.img);
    tooltip.select("#url a").attr("href", datum.url);

    let [x, y] = d3.mouse(this);
    x = x > 700 ? x - 300 : x;
    y = y > 450 ? y - 300 : y;
    tooltip.style("left", `${x + 100}px`).style("top", `${y + 50}px`);

    d3.event.stopPropagation();
  }
以上就是本文全部内容,真的只是简单的讲下一些要点,其实大家只要大致知道实现的思路,就完全可以靠自己的理解去复现了,古柳的复现代码也有很多不足,仅供参考,仍有困惑的可以评论或群里交流。
如果大家还想看到更多干货,欢迎【点赞】、【评论】、【分享】,多多捧场,古柳也有持续创作的动力,毕竟这惨淡的阅读量实在也是有点说服不了自己太频繁更新,还真不是因为懒。逃。

