2022年C++学习笔记

第一节 C++编写动态库

1.1 编写库代码

  动态加载不需要.h和.lib文件,只需要.dll文件,同时知道所要使用的函数的参数类型以及返回值类型。

1.1.1 代码编写

案例代码:OperationFolder.cpp

#include // 包含_access函数
#include // 包含_mkdir函数
#include
#include "OperationFolder.h"

int COperationFolder::CreateFolder(const std::string& strFolderPath)
{
   if (0 != _access(strFolderPath.c_str(), 0))
   {
   	int iRet = _mkdir(strFolderPath.c_str());
   	if (0 == iRet)
   	{
   		std::cout << "Create Folder Success. The Folder Name is:" 
   			<< strFolderPath 
   			<< std::endl;
   	}
   	else
   	{
   		std::cout << "CreateFolder Failed. The Folder Path:" 
   			<< strFolderPath 
   			<< std::endl;
   	}
   }
   else
   {
   	std::cout << "CreateFolder Failed. The Folder Path:" << strFolderPath << std::endl;
   }
   return 0;
}

int COperationFolder::DeleteFolder(const std::string& strFolderPath)
{
   return 0;
}

int COperationFolder::MoveFolder(
   const std::string& strSourceFolderPath, 
   const std::string& strTargetFolderPath)
{
   return 0;
}

案例代码:OperationFolder.h

#pragma once
#ifdef OPERATIONFOLDER_EXPORTS
#define OPERATIONFOLDER_API _declspec(dllexport)
#else
#define OPERATIONFOLDER_API _declspec(dllimport)
#endif

#include 

class OPERATIONFOLDER_API COperationFolder
{
public:
	COperationFolder() = default;
	~COperationFolder() = default;
	int CreateFolder(const std::string& strFolderPath);
	int DeleteFolder(const std::string& strFolderPath);
	int MoveFolder(const std::string& strSourceFolderPath, 
		const std::string& strTargetFolderPath);
};

1.2 静态加载dll

1.2.1 将编译生成的dll文件,.h文件,.lib文件拷贝到引用的目录下。

在Lovers01的工程目录下引用静态库
2022年C++学习笔记_第1张图片

1.3 修改代码实现编写动态库

  动态库就是说,无需.h.lib文件,只需要.dll文件,同时知道所要使用的函数的参数类型以及返回值类型,依旧以1.2节的DLL为例。不过要稍做修改。这个时候我在原来的MyDll项目中改变了如下文件
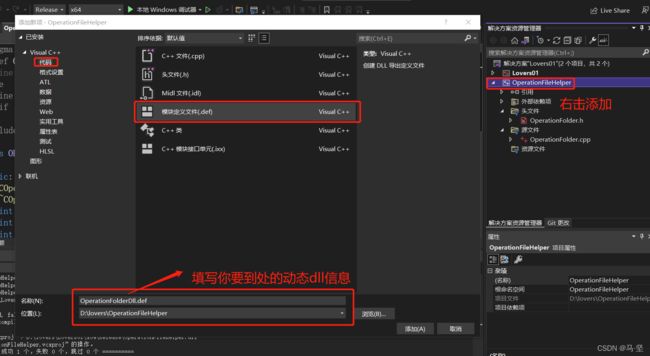
2022年C++学习笔记_第2张图片
OperationFolderDll.def

LIBRARY "OperationFolder"
EXPORTS
	getInstance

如果没有EXPORTS后面的代码会出现,找不到的问题。原因由于C++的编译方式考虑了函数重载,所以对函数名进行了新的修饰,产生了所谓的破坏性命名。这样实际上,我们在exe中调用的函数名字就是已经被修饰过的,所以我们直接按照原来的函数名自然就找不到了!
OperationFolderHelper.h

#pragma once
#include 

#ifdef OPERATIONFOLDERHEPLER_EXPORT
#define OPERATIONFOLDERHEPLER_API _declspec(dllexport)
#else
#define OPERATIONFOLDERHEPLER_API _declspec(dllimport)
#endif // OPERATIONFOLDERHEPLER_EXPORT

class COperationFolderHelper
{
public:
	virtual int CreateFolder(const std::string& strFolderPath) = 0;
};

COperationFolderHelper* getInstance(); // 用于导出接口的,动态dll只能导出函数

OperationFolderHelper.cpp

#include "OperationFolderHelper.h"
#include "OperationFolder.h"

COperationFolderHelper* getInstance()
{
	return new COperationFolder();
}

OperationFolder.h

#pragma once
#include 
#include "OperationFolderHelper.h"


class  COperationFolder: public COperationFolderHelper
{
public:
	COperationFolder() = default;
	~COperationFolder() = default;
	int CreateFolder(const std::string& strFolderPath) override;
	int DeleteFolder(const std::string& strFolderPath);
	int MoveFolder(const std::string& strSourceFolderPath, 
		const std::string& strTargetFolderPath);
};

OperationFolder.cpp

#include // 包含_access函数
#include // 包含_mkdir函数
#include
#include "OperationFolder.h"

int COperationFolder::CreateFolder(const std::string& strFolderPath)
{
	if (0 != _access(strFolderPath.c_str(), 0))
	{
		int iRet = _mkdir(strFolderPath.c_str());
		if (0 == iRet)
		{
			std::cout << "Create Folder Success. The Folder Name is:" 
				<< strFolderPath 
				<< std::endl;
		}
		else
		{
			std::cout << "CreateFolder Failed. The Folder Path:" 
				<< strFolderPath 
				<< std::endl;
		}
	}
	else
	{
		std::cout << "CreateFolder Failed. The Folder Path:" << strFolderPath << std::endl;
	}
	return 0;
}

int COperationFolder::DeleteFolder(const std::string& strFolderPath)
{
	return 0;
}

int COperationFolder::MoveFolder(
	const std::string& strSourceFolderPath, 
	const std::string& strTargetFolderPath)
{
	return 0;
}

main.cpp

#include
#include
#include
#include"OperationFolderHelper.h"

int main()
{
	HINSTANCE hDll;
	typedef COperationFolderHelper* (*MyGetInstance)(); // 函数指针
	MyGetInstance instance; // 函数指针
	hDll = ::LoadLibrary(L"OperationFileHelper.dll");
	if (hDll)
	{
		std::cout << "hDll is not nullptr" << hDll << std::endl;
		std::string strNewFolderName = "D:\\lovers\\Albums\\Albums02";
		instance = (MyGetInstance)GetProcAddress(hDll, "getInstance");
		COperationFolderHelper* objCOperationFolderHelper = instance();
		objCOperationFolderHelper->CreateFolder(strNewFolderName);
	}
	else
	{
		std::cout << "hDll is nullptr" << hDll << std::endl;
	}
	
	return EXIT_SUCCESS;
}

函数指针:如果在程序中定义了一个函数,那么在编译时系统就会为这个函数代码分配一段存储空间,这段存储空间的首地址称为这个函数的地址。而且函数名表示的就是这个地址。既然是地址我们就可以定义一个指针变量来存放,这个指针变量就叫作函数指针变量,简称函数指针。函数指针是指向函数的指针,而指针函数是返回值是指针的函数。指针函数定义:int *fun(int x); 函数指针定义:int (*f)(int); typedef void(*Func)(void) 是函数指针的类型定义,作用是声明一个 void(*)() 类型的函数指针 Func.

第二节 C++对文件的基本操作

2.1 使用C++代码创建文件夹。

2.1.1 使用direct.h头文件中的mkdir创建文件夹和io.h中的_access判断是否存在目标文件夹。

创建文件夹代码

#include
#include
#include
#include

int main()
{
	std::string strDirPath = "D:\\lovers\\Albums\\Albums01";
	if (0 != _access(strDirPath.c_str(), 0)) // access做权限核查,查看给定文件是否有读写权限
	{
		int iRet = _mkdir(strDirPath.c_str());
		if (0 == iRet)
		{
			std::cout << "Create success! The Albums is:" << strDirPath << std::endl;
		}
		else
		{
			std::cout << "Create Failed! The Albums is:" << strDirPath << std::endl;
		}
	}
	else
	{
		std::cout << "Create Failed! The Albums is:" << strDirPath << std::endl;
	}
	std::cout << strDirPath << std::endl;
	return EXIT_SUCCESS;
}

第三节 C++项目工程配置

3.1 保证生成的.dll和.lib以及.h到指定的文件夹

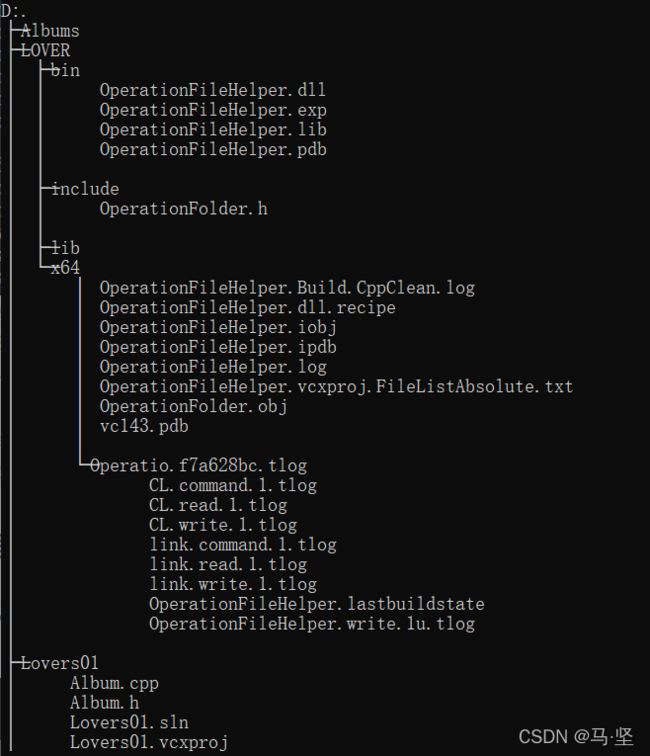
假设代码目录如下
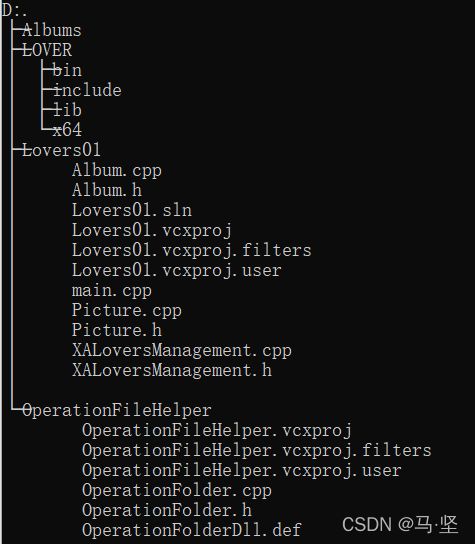
2022年C++学习笔记_第3张图片
说明:代码位于OPerationFileHelper文件夹下,目的将生成的dll和lib文件放入到LOVER\bin\目录下,将.h文件放入到LOVER/include文件下。中间文件放入到x64文件夹下。

3.1.1 配置项目的输出目录,使得生成的dll和lib文件放入到LOVER\bin\目录下。
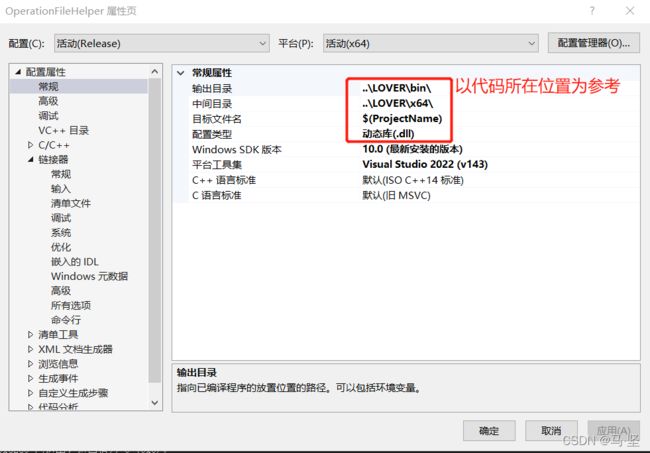
2022年C++学习笔记_第4张图片
输出的目录填写后,会将dll生成到该目录下
2022年C++学习笔记_第5张图片
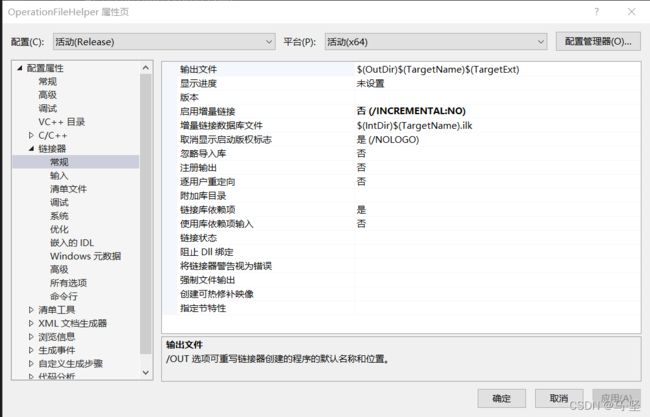
设置输出的dll和exe的路径,通过设置链接器+常规中的输出文件来实现。
2022年C++学习笔记_第6张图片设置输出的lib的路径,通过设置链接器+高级中的导入库(其实是导出的)来实现。

3.1.2 配置项目的生成事件,将.h文件拷贝到LOVER/bin目录中。
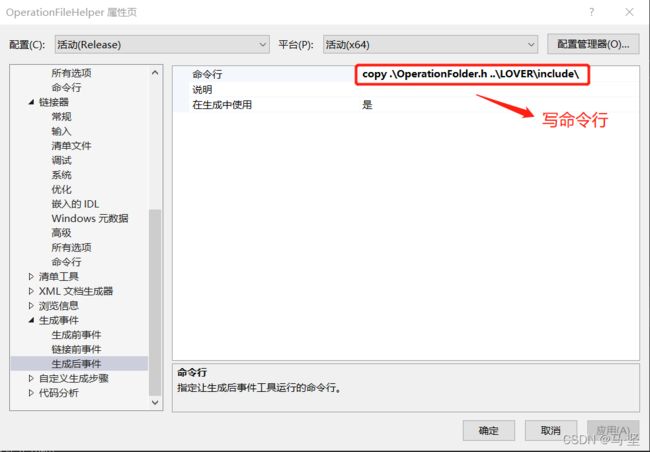
2022年C++学习笔记_第7张图片
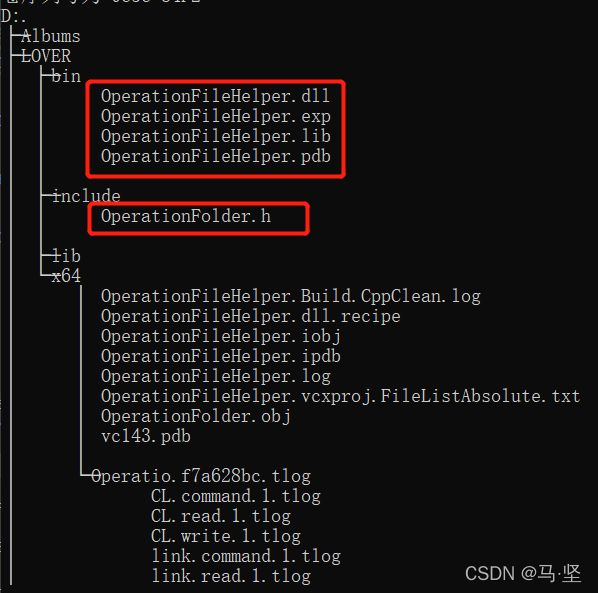
经过如上配置后,点击生成项目,生成目录如下。可以发现成功生成。
2022年C++学习笔记_第8张图片

3.2 使用dll工程配置

3.2.1 目录说明

2022年C++学习笔记_第9张图片
如上图所示,工程Lovers01需要调用LOVER/bin/目录下的OperationFolderHelper.dll文件,需要的配置如下

3.2.2 配置步骤

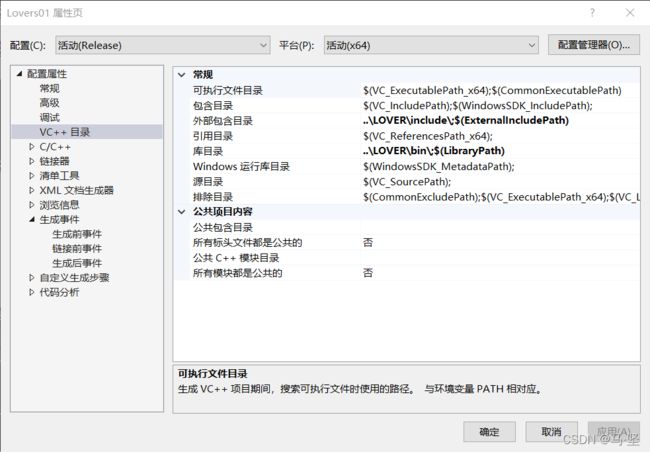
第一步,配置VC++目录。

  • 包含目录:寻找#include中的xxxx.h的搜索目录
  • 库目录:寻找.lib文件的搜索目录
    2022年C++学习笔记_第10张图片

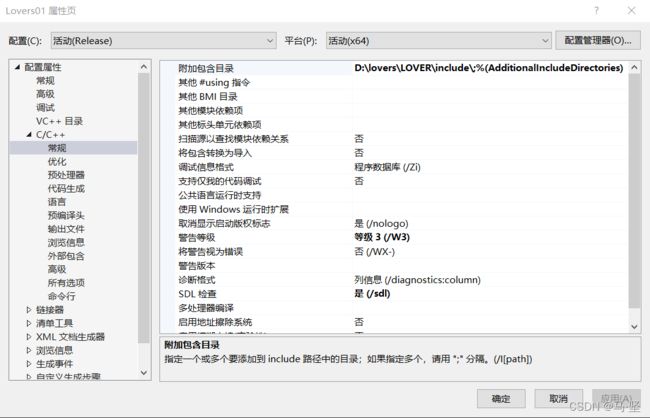
第二步,配置C/C++常规

  • 附加包含目录:寻找#include中的xxxx.h的搜索目录(每一项对应一个文件夹XXXX,文件夹中包含了编译时所需的头文件,使用时直接#include即可)
    2022年C++学习笔记_第11张图片

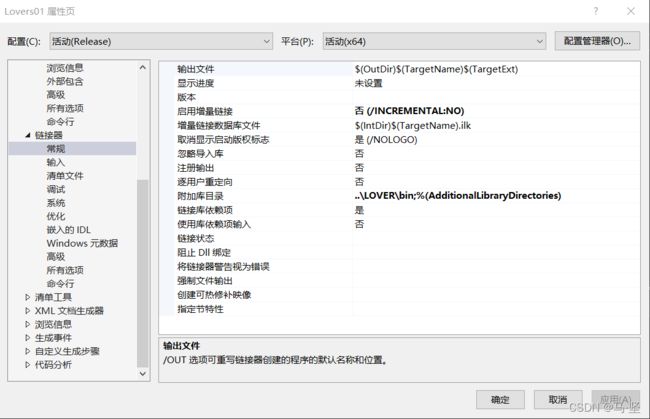
第三部 配置链接器+常规

  • 附加库目录:寻找.lib文件的搜索目录
    2022年C++学习笔记_第12张图片

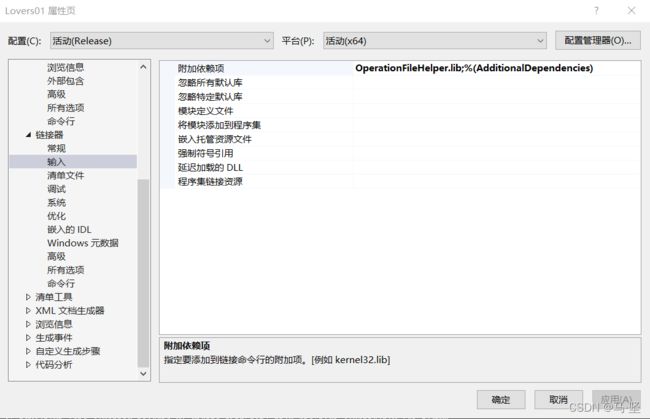
第四步 配置连接器+输入

  • 附加依赖项:lib库(C++的库会把函数、类的声明放在*.h中,实现放在*.cpp*.cc中。编译之后,*.cpp*.cc*.c会被打包成一个.lib文件,这样可以保护源代码。
    2022年C++学习笔记_第13张图片

第五步 总结备注

  • 包含目录附加包含目录(库目录和附加库目录)的区别
    • 包含目录:修改了系统的include宏的值,是全局的;
    • 附加包含目录:用于当前项目,对其他项目没有影响。
  • 一般当需要对某工程添加这些目录时,通常情况下,都是在附加包含目录附加库目录中添加的。添加方法如下
    • 附加包含目录—添加工程的头文件目录
      • 项目->属性->配置属性->C/C+±>常规->附加包含目录:加上头文件的存放目录;
    • 附加库目录—添加文件引用的lib静态库路径
      • 项目->属性->配置属性->链接器->常规->附加库目录:加上lib文件的存放目录;
    • 附加依赖项—添加工程引用的lib文件名
      • 项目->属性->配置属性->链接器->输入->附加依赖项:加上lib文件名。

你可能感兴趣的:(001,学习笔记,c++,visual,studio,开发语言)