笔记:基于keras的不同神经网络模型Minst手写体识别
基于keras的不同神经网络模型MNIST手写体识别
1.CNN版
1.导入数据
相关库(导入plt是为了看数据集的图)
import keras
from keras.datasets import mnist

from keras.models import Sequential
from keras.layers import Dense, Flatten, Conv2D, MaxPool2D,Activation,Dropout
from matplotlib import pyplot as plt
以下是keras里的原装数据集mnist的源码
def load_data(path='mnist.npz'):
    # Returns
        Tuple of Numpy arrays: `(x_train, y_train), (x_test, y_test)`.
    """
    path = get_file(path,
                    origin='https://s3.amazonaws.com/img-datasets/mnist.npz',
                    file_hash='8a61469f7ea1b51cbae51d4f78837e45')
    with np.load(path, allow_pickle=True) as f:
        x_train, y_train = f['x_train'], f['y_train']
        x_test, y_test = f['x_test'], f['y_test']
    return (x_train, y_train), (x_test, y_test)
这个load_data就相当于一个爬虫,函数得到(x_train, y_train), (x_test, y_test)
的返回值。
所以我们导入mnist的数据的时候,要这样来导入
(x_train, y_train), (x_test, y_test) = mnist.load_data()
接下来可以看看mnist数据集的数据特征(x_train和x_test是图像img,而x_test和y_test是图片的标签值 0~9)
print(x_train.shape, y_train.shape, x_test.shape, y_test.shape)
plt.imshow(x_train[5]) x代表的都是手写体的图
plt.show()
# print(y_train)
# plt.imshow(x_test[0])
# plt.show()
# print(y_test)
(60000, 28, 28) (60000,) (10000, 28, 28) (10000,)
这是输出的数据特征(x_train是三维的矩阵,60000张/每张像素点28*28)
然后这个就是输出来的图像
2.数据处理:转换数据格式和归一化
x_train = x_train.reshape(-1, 28, 28, 1)
x_test = x_test.reshape(-1, 28, 28, 1)
然后就是归一化 normalization
数据灰度最大就是255 归一化操作就是除255
x_train = x_train / 255
x_test = x_test / 255
再对标签值做个one_hot处理(独热处理可以应对0~9的多分类问题)
y_train = keras.utils.to_categorical(y_train)
y_test = keras.utils.to_categorical(y_test)
到这里 我们就基本把数据处理做好了
再来看看处理后的数据集的数据特征
print(x_train.shape) (60000, 28, 28, 1)
print(y_train.shape) (60000, 10)
print(x_test.shape)  (10000, 28, 28, 1)
print(y_test.shape)  (10000, 10)
思考:区别在哪?
3.建模(这里用的lenet5)
基本上是:卷积池化—再卷积池化—平铺—全连接*2—输出softmax
model = Sequential()

model.add(Conv2D(6, kernel_size=3, strides=1, padding='same', input_shape=(28, 28, 1)))
model.add(Activation('relu'))
model.add(MaxPool2D(pool_size=2, strides=2))

model.add(Conv2D(16, kernel_size=5, strides=1, padding='valid'))
model.add(Activation('relu'))
model.add((MaxPool2D(pool_size=2, strides=2)))

model.add(Flatten())

model.add(Dense(120))
model.add(Activation('relu'))

model.add(Dropout(0.25))

model.add(Dense(84))
model.add(Activation('relu'))

model.add(Dense(10, activation='softmax'))
4.配置模型参数再训练
model.compile(optimizer='Adam', loss='categorical_crossentropy', metrics=['accuracy'])

model.fit(x_train, y_train, batch_size=64, epochs=50, validation_split=0.2)

训练的时候就能体现出CNN相对于传统深层神经网络的优势了
耗时短,准确率也比较搞
5.评估模型
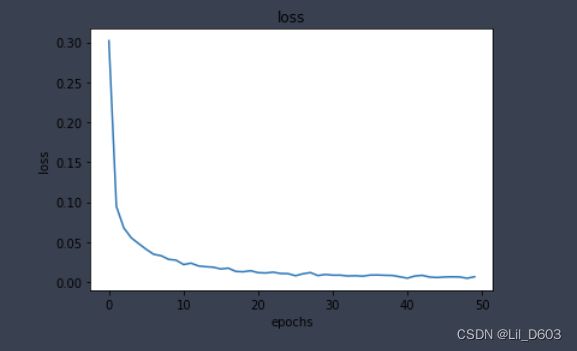
#做出训练集上loss同步变化的情况
plt.plot(model.history.history['loss'])
plt.title('loss')
plt.xlabel('epochs')
plt.ylabel('loss')
plt.show()
#做出训练集上accuracy同步变化的情况
plt.plot(model.history.history['accuracy'])
plt.title('loss')
plt.xlabel('epochs')
plt.ylabel('loss')
plt.show()


