环境信息
| 名称 | 版本号 |
|---|---|
| Spring Boot | 2.4.5 |
| Idea | 2021.3.2 |
服务端实现
导入依赖
    org.springframework.boot
    spring-boot-starter-websocket
注意:Spring Boot在父工程中已经管理了websocket的版本信息,所以不用指定版本号也是可以的
创建配置类
package com.fenzhichuanmei.configuration;

import org.springframework.context.annotation.Bean;
import org.springframework.context.annotation.Configuration;
import org.springframework.web.socket.server.standard.ServerEndpointExporter;

/**
 * @author Yi Dai [email protected]
 * @since 2022/5/13 11:34
 */

@Configuration
public class WebsocketConfiguration {

    @Bean
    public ServerEndpointExporter serverEndpointExporter() {
        return new ServerEndpointExporter();
    }

}
创建此配置类的目的只是为了把ServerEndpointExporter 这个类的实例交给spring 容器进行管理,您可以用任意一种方式交给容器,如使用@Import(ServerEndpointExporter.class)这种方式等进行操作;此处只是我的编码风格如此;并非必须这样操作
创建一个注解式的端点并在其中通过配套注解声明回调方法
package com.fenzhichuanmei.websocket;

import com.fenzhichuanmei.websocket.utils.SessionManager;
import lombok.extern.slf4j.Slf4j;
import org.springframework.stereotype.Component;

import javax.annotation.Resource;
import javax.websocket.*;
import javax.websocket.server.PathParam;
import javax.websocket.server.ServerEndpoint;

/**
 * @author Yi Dai [email protected]
 * @since 2022/3/7 15:47
 */

@Slf4j
@Component
@ServerEndpoint("/arcticFoxServerEndpoint/{websocketClientType}")
public class ArcticFoxServerEndpoint {

    private static SessionManager sessionManager;

    @Resource
    public void setProcessor(SessionManager sessionManager) {
        ArcticFoxServerEndpoint.sessionManager = sessionManager;
    }

    /**
     * 建立连接成功的回调方法
     *
     * @param session             会话对象
     * @param websocketClientType 此参数就是路径中{websocketClientType}位置传入的参数
     */
    @OnOpen
    public void onOpen(Session session, @PathParam("websocketClientType") int websocketClientType) {
        sessionManager.onOpen(session, websocketClientType);
    }

    /**
     * 当会话关闭时执行的回调方法
     *
     * @param session             会话对象
     * @param websocketClientType 此参数就是路径中{websocketClientType}位置传入的参数
     */
    @OnClose
    public void onClose(Session session, @PathParam("websocketClientType") int websocketClientType) {
        sessionManager.onClose(session, websocketClientType);
    }

    /**
     * 当收到客户端信息时执行的回调方法
     *
     * @param session             会话对象
     * @param message             客户端传递过来的信息
     * @param websocketClientType 此参数就是路径中{websocketClientType}位置传入的参数
     */
    @OnMessage
    public void onMessage(Session session, String message, @PathParam("websocketClientType") int websocketClientType) {
        sessionManager.onMessage(session, message, websocketClientType);
    }

    /**
     * 当发生错误时的回调方法
     *
     * @param session             会话对象
     * @param e                   异常对象
     * @param websocketClientType 此参数就是路径中{websocketClientType}位置传入的参数
     */
    @OnError
    public void onError(Session session, Throwable e, @PathParam("websocketClientType") int websocketClientType) {
        sessionManager.onError(session, e, websocketClientType);
    }

}
@ServerEndpoint注解标注此类为一个服务端的端点类,此注解有一个必须的参数,用于指定客户端访问的地址,本案例中为:/arcticFoxServerEndpoint,而路径后面的/{websocketClientType}这个是路径中参数的占位符,有点类似与Spring Mvc中Rest接口和@PathVariable注解的作用
注意事项: 一定要将此类交给spring 容器进行管理!!还有一个坑就是,此类的实例时非单例的,所以如果要在此类中注入其他的bean,不能使直接在属性上使用@Resource注解或者@Autowired等注解进行注入,否则会报错。正确操作应该是把要注入的字段设置为静态的,然后通过非静态的set方法进行注入,具体代码请看上方实例
服务端主动发送消息给客户端
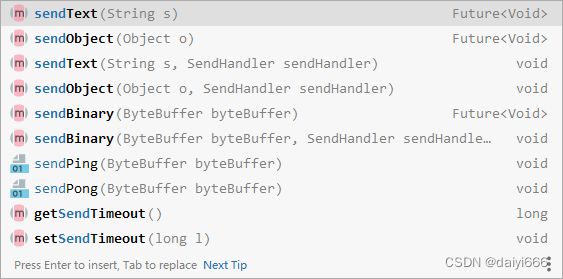
通过上面的代码我们可以知道每个回调方法中都会收到一个Session对象,正如您所想,要向客户端发送消息正是要借助此对象;Session对象有一个getAsyncRemote方法,调用此方法可以得到一个RemoteEndpoint.Async对象,查看此对象,发现有很多send打头的方法;
是的,这些方法就是发送消息的方法,博主这个项目中主要是通过JSON来进行交互的,所以我使用了sendText方法,示例代码:
RemoteEndpoint.Async asyncRemote = session.getAsyncRemote();
asyncRemote.sendText(jsonString);
很显然中转变量asyncRemote 没什么太大的用处,不如直接写成:
session.getAsyncRemote().sendText(jsonString);
通过方法名看到,似乎还可以发送对象,二进制序列等,博主没有深入研究,有兴趣的小伙伴可以尝试尝试
客户端实现
一般来讲客户端应该是用Java Script实现,但是博主这个项目比较特殊,需要用Java来实现客户端,下面博主先以Java客户端说明其实现细节,然后再说再前端如何实现
Java客户端实现
导入依赖
    org.java-websocket
    Java-WebSocket
    1.5.3
其实Java中实现WebSocket的第三方包还有很多,博主这个地方使用的是Java-WebSocket,有兴趣的小伙伴可以试试其他的包
建立连接和处理回调
package com.fenzhichuanmei.websocket;

import com.fasterxml.jackson.core.JsonProcessingException;
import com.fasterxml.jackson.databind.ObjectMapper;
import com.fenzhichuanmei.components.PaymentComponent;
import com.fenzhichuanmei.pojo.Instructions;
import com.fenzhichuanmei.utils.WebsocketClientType;
import lombok.Data;
import lombok.extern.slf4j.Slf4j;
import org.java_websocket.client.WebSocketClient;
import org.java_websocket.enums.ReadyState;
import org.java_websocket.handshake.ServerHandshake;
import org.springframework.boot.context.properties.ConfigurationProperties;
import org.springframework.stereotype.Component;

import javax.annotation.Resource;
import java.net.URI;
import java.net.URISyntaxException;

/**
 * @author Yi Dai [email protected]
 * @since 2022/5/13 10:16
 */

@Slf4j
@Component
public class ArcticFoxWebSocketClient {

    @Resource
    private ObjectMapper objectMapper;

    @Resource
    private PaymentComponent paymentComponent;

    @Resource
    private ArcticFoxWebSocketClientProperties properties;

    public void establishConnection() throws URISyntaxException {
        WebSocketClient webSocketClient = new WebSocketClient(new URI(String.format("%s/%d", properties.getWebSocketServerUrl(), WebsocketClientType.PAYMENT_DEVICE))) {
            @Override
            public void onOpen(ServerHandshake serverHandshake) {
                log.info("WebSocketClient: onOpen : {}", serverHandshake);
            }

            @Override
            public void onMessage(String jsonString) {
                try {
                    Instructions instructions = objectMapper.readValue(jsonString, Instructions.class);
                    if (instructions.getType() == Instructions.NOTICE_PAYMENT) {
                        paymentComponent.queryAnUnpaidOrdersAndPay();
                    } else {
                        throw new RuntimeException("错误的指令类型");
                    }
                } catch (JsonProcessingException e) {
                    e.printStackTrace();
                }
            }

            @Override
            public void onClose(int i, String s, boolean b) {
                log.info("WebSocketClient: onClose : i:{},s:{},b:{}", i, s, b);
                try {
                    Thread.sleep(1000 * 20);
                    establishConnection();
                } catch (InterruptedException | URISyntaxException e) {
                    e.printStackTrace();
                }
            }

            @Override
            public void onError(Exception e) {
                log.error("WebSocketClient: onError {}", e.getMessage());
            }
        };
        webSocketClient.connect();
        while (!(webSocketClient.getReadyState() == ReadyState.OPEN)) {
            try {
                Thread.sleep(1000 * 2);
            } catch (InterruptedException e) {
                e.printStackTrace();
            }
        }
        log.info("WebSocketClient: connection established successfully");
    }


    @Data
    @Component
    @ConfigurationProperties("arctic-fox-web-socket-client.properties")
    public static class ArcticFoxWebSocketClientProperties {

        private String webSocketServerUrl;

    }
}
代码解释: 其实我的establishConnection方法中上来就实例化了一个WebSocketClient 类的实例,请注意,此类是个抽象类,我在这里用匿名实现类的方式实现的,此类有几个抽象方法需要实现,也就是onOpen,onMessage,onClose,onError四个方法,其作用其实已经是很见名知意了,和服务端的回调方法一样,就不过多解释;实例化此类需要传入一个URI对象,这个URI对象其实就是封装了对服务端连接的地址,由于博主不希望把服务端的地址给写死了,所以我配置到了配置文件中,然后通过String.format静态方法配合占位符拼接url地址和参数;路径的规则是:协议名://IP地址(或域名):端口号/服务端声明的地址/参数;举个例子:
ws://192.168.88.88:8080/arcticFoxServerEndpoint/1
ws://localhost:8080/arcticFoxServerEndpoint/2
ws://为协议;实例化WebSocketClient 类的实例之后,调用其connect()方法即开始建立连接,调用getReadyState()方法可以获得其状态;由于我的服务端可能随时都连不上,所以我在客户端的onClose回调函数中进行了一个递归(20秒后),用于重新连接。
客户端向服务端发送消息
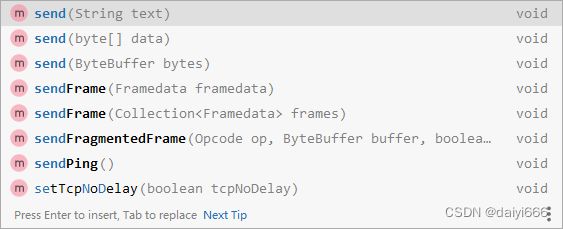
通过WebSocketClient 类的实例,我们可以看到有以下方法,很明显send方法就是用来发送消息使用的
示例代码:
//判断一下是否为空
if (Objects.nonNull(webSocketClient)) {
    try {
    	//通过jackson将对象转换为json字符串(非必须)
        String jsonString = objectMapper.writeValueAsString(feedback);
        //发送信息
        webSocketClient.send(jsonString);
    } catch (JsonProcessingException e) {
        e.printStackTrace();
    }
} else {
    log.warn("no connection established");
}
在前端环境(vue)中使用websocket
安装reconnecting-websocket包(非必须)
npm i --save reconnecting-websocket
安装这个包是为了websocket能在断线之后重新连接,其实不使用这个包也是可以用原生Java Script实现的;但是他和原生的api几乎一样;
示例代码:
import ReconnectingWebSocket from "reconnecting-websocket";

export default function initializationWebsocket() {
    let reconnectingWebSocket = new ReconnectingWebSocket(`ws://localhost:8080/arcticFoxServerEndpoint/${2}`);
    reconnectingWebSocket.onopen = event => {
        console.log("on open :", event);
    };

    reconnectingWebSocket.onmessage = event => {
    	//event对象中data存储的就是服务端发送过来的消息
        let parse = JSON.parse(event.data);
        console.log("webSocket on message :", parse);
    };

    reconnectingWebSocket.onclose = event => {
        console.log(event);
    };

    reconnectingWebSocket.onerror = event => {
        console.log(event);
    };

	//窗口关闭时断开连接
    window.onbeforeunload = function () {
        reconnectingWebSocket.close();
    }
}
在前端中实现websocket就比较简单了,就上面的几行代码即可,不用调用其他函数进行连接,实例化之后就开始连接了
想服务端发送信息
在前端中发送信息就更简单了,直接调用reconnectingWebSocket的send方法,传入要发送的数据即可
到此这篇关于SpringBoot+WebSocket实现即时通讯的方法详解的文章就介绍到这了,更多相关SpringBoot WebSocket即时通讯内容请搜索脚本之家以前的文章或继续浏览下面的相关文章希望大家以后多多支持脚本之家!

