使用PyTorch实现简单的RNN
使用PyTorch实现简单的RNN
假设 X t ∈ R n × d X_t \in R^{n \times d} Xt∈Rn×d 是序列中时间步 t t t 的小批量输入, H t ∈ R n × h H_t \in R^{n \times h} Ht∈Rn×h 是该时间步输入的隐藏变量。计算过程如下::
H t = ϕ ( X t W d h + H t − 1 W h h + b h ) H_{t}=\phi(X_tW_{dh}+H_{t-1}W_{hh}+b_h) Ht=ϕ(XtWdh+Ht−1Whh+bh)
其中,隐藏层的权重 W d h ∈ R d × h W_{dh} \in R^{d \times h} Wdh∈Rd×h、 W h h ∈ R h × h W_{hh} \in R^{h \times h} Whh∈Rh×h 和偏置项系数 b h ∈ R 1 × h b_h \in R^{1 \times h} bh∈R1×h, d d d 表示输入特征向量的维度, h h h 表示隐藏层单元的个数。
O t = H t W h q + b q O_{t}=H_{t}W_{hq}+b_{q} Ot=HtWhq+bq
其中,输出变量 O t ∈ R n × q O_t \in R^{n \times q} Ot∈Rn×q,输出层权重参数 W h q ∈ R h × q W_{hq} \in R^{h \times q} Whq∈Rh×q,输出层的偏置项 b q ∈ R 1 × q b_q \in R^{1 \times q} bq∈R1×q, q q q 表示输出层的个数。
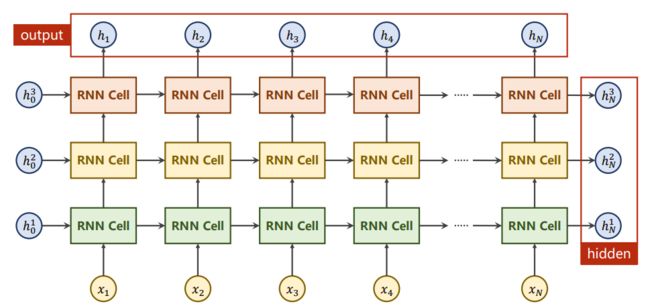
一个基本的 RNN Cell 如下图所示:

将多个 RNN Cell 依次串联起来就可以得到最传统的循环神经网络的结构;

2.1 torch.nn.RNNCell
下面我们通过 PyTorch 内置的 RNNCell 方法实现一个简单的单隐藏循环神经网课。
"""
input_size:输入层输入的特征维度
hidden_size:隐藏层输出的特征维度
bias:bool类型,如果是False,那么不提供偏置,默认为True
nonlinearity:字符串类型,进行激活函数选择,可以是 "tanh" 或 "relu",默认为 "tanh"
"""
cell = torch.nn.RNNCell(input_size, hidden_size, bias, nonlinearity)
hidden = cell(input, hidden)
其中,input 是一个二维张量,维度是 (batch, input_size),input_size 表示的是当前特征的维度;而 hidden 也是一个维度为 (batch, hidden_size) 的二维张量,第一维表示的是批量大小,第二维则表示隐藏层的维度。

# 初始化模型参数
batchSize = 5     # 批量大小
seqLen = 3        # 序列长度
inputSize = 4     # 特征维度
hiddenSize = 2    # 隐藏层大小
由于我们使用的是一个 RNNCell,所以需要通过循环或迭代的方式将多个 RNNCell 连结起来,构成一个含有 3 个时间步或者序列长度为 3 的单隐藏循环神经网络。
import torch

# 初始化模型参数
batch_size = 5    # 批量大小
seq_len = 3       # 序列长度
input_size = 4    # 特征维度
hidden_size = 2   # 隐藏层大小

cell = torch.nn.RNNCell(input_size=input_size, hidden_size=hidden_size)
# 输入张量是三维的,维度为(seq, batch, features)
dataset = torch.randn(seq_len, batch_size, input_size)
hidden = torch.zeros(batch_size, hidden_size)  # 因为是单隐藏,所以没有layer_size
# 由于没有先验,所以初始化第一个隐藏层单元设置为全零
for idx, input in enumerate(dataset):
    # 每次取出一个seq:(batch, features)
    print("=" * 30, idx, "=" * 30)
    print("Input Size:", input.shape)

    # 迭代隐藏状态
    hidden = cell(input, hidden)
    print("outputs size:", hidden.shape)
    print(hidden)
输入结果如下所示:
============================== 0 ==============================
Input Size: torch.Size([5, 4])
outputs size: torch.Size([5, 2])
tensor([[-0.4303, -0.7020],
        [ 0.8070, -0.8489],
        [ 0.9530, -0.2026],
        [ 0.4949,  0.6330],
        [ 0.4102, -0.7713]], grad_fn=)
============================== 1 ==============================
Input Size: torch.Size([5, 4])
outputs size: torch.Size([5, 2])
tensor([[-0.7902,  0.0440],
        [-0.4864, -0.3627],
        [ 0.2286, -0.8892],
        [-0.9849, -0.9189],
        [-0.6484,  0.2796]], grad_fn=)
============================== 2 ==============================
Input Size: torch.Size([5, 4])
outputs size: torch.Size([5, 2])
tensor([[-0.8761, -0.8581],
        [-0.3768, -0.5525],
        [-0.9380, -0.8973],
        [-0.2933, -0.6940],
        [ 0.0205, -0.7125]], grad_fn=)
2.2 torch.nn.RNN
用于定义多层循环神经网络,函数原型如下:
"""
input_size:输入特征的维度
hidden_size:隐藏层神经元个数
num_layers:网络的层数,或者说是隐藏层的层数
nonlinearity:激活函数,默认为 tanh
bias:是否使用偏置,默认为True
"""
cell = torch.nn.RNN(input_size, hidden_size, num_layers=1, nonlinearity=tanh, bias=True)
out, hn = cell(inputs, h0)
其中, i n p u t input input 的维度为 (seqLen, batchSize, inputSize),初始化隐藏变量 h 0 h_0 h0 的维度是 (numLayers, batchSize, hiddenSize);
o u t out out 的维度为 (seqlen, batch, hidden_size), h n h_n hn 的维度是 (numlayers, batch, hidden)。
初始化模型参数:
batchSize = 5  # 批量大小
seqLen = 6   # 序列长度或时间步个数
inputSize = 4, hiddenSize = 2  # 输入特征维度,隐藏神经元个数
numLayers = 3  # 隐藏层的数目
通过一个案例来理解多层循环神经网络的工作原理:
import torch

batch_size = 5     # 批量大小
seq_len = 6        # 序列长度或时间步
input_size = 4     # 输入特征维度
hidden_size = 2    # 隐藏层神经元个数
num_layers = 3      # 隐藏层的层数

cell = torch.nn.RNN(input_size=input_size, hidden_size=hidden_size, num_layers=num_layers)
# 输入数据的维度:(seqLen, batchSize, inputSize)
inputs = torch.randn(seq_len, batch_size, input_size)
h0 = torch.zeros(num_layers, batch_size, hidden_size)
out, hidden = cell(inputs, h0)
print("Output size:", out.shape)
print("Output:", out)
print("Hidden size:",hidden.shape)
print("Hidden:",hidden)
输入结果如下所示:
Output size: torch.Size([6, 5, 2])
Output: tensor([[[-0.7661, -0.1398],
         [-0.8071, -0.2583],
         [-0.7350, -0.2608],
         [-0.7267, -0.0988],
         [-0.8062, -0.4056]],...

Hidden size: torch.Size([3, 5, 2])
Hidden: tensor([[[ 0.4582,  0.1637],
         [ 0.0329,  0.2484],
         [ 0.6672,  0.2769],
         [ 0.2256,  0.8171],
         [ 0.9833, -0.3417]],...

cell = torch.nn.RNN(input_size=input_size, hidden_size=hidden_size,num_layers=num_layers, batch_first=True)
其中,如果参数 batch_first 设置为 True,则输入张量的维度为 (batchSize, seqLen, input_size) ,即序列长度与批量交换。一般地,为了避免混淆,我们将输入张量的维度设置为 (seqLen, batchSize, input_size) 是比较容易理解的。