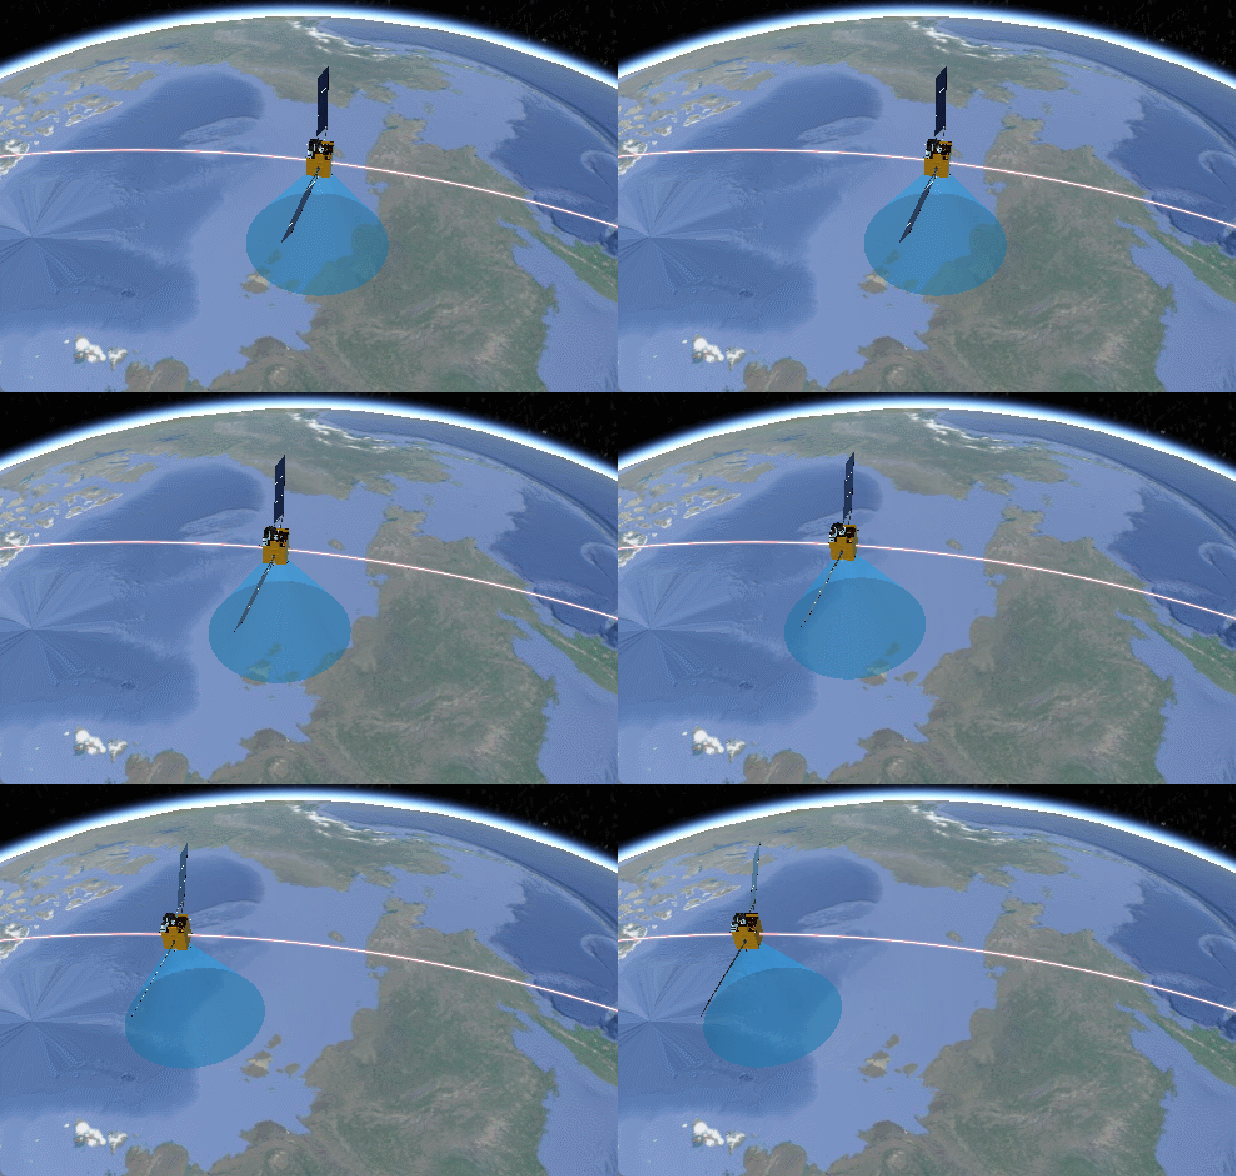
这个效果其实网上很多案例了,本来不打算写了,但是做都做了,稍微来说一下吧,代码实测可用!
最后的效果就是这个样子的啦!
就是很简单的一个卫星,放射信号,然后围着轨道转圈圈。
资源网站
首先呢,分享几个网站,尽管大家应该都有,但是还是分享一下子吧。
cesium API 中文网站
3D模型下载
其中这个下载3D模型的网站有很多3D模型,可以根据自己的需要搜索下载使用,尽管大部分是收费的,但是又免费的呀,自己测试或者是玩的话,我觉得够用了,我觉得还不错的呢!
绘制卫星绕轨动效
首先这个稍微说一下哈,其实就是用了 cesium 的时间轴,然后添加卫星模型,在距离地面的固定高度按照设置好的轨迹进行绕地旋转,关于下面的锥形信号覆盖区域,就是在卫星正下方,添加绘制了一个圆柱形的模型,使得上面的圆截面半径为0,下面的圆截面半径大一些,然后就是一个锥形了,具体锥形绘制案例看我 这篇博客【穿梭门】 哈,有好多绘制形状的案例。
接下来直接上代码!!!! 其实我也是看的别的博主发的文章,然后稍作修改出来的效果,但是大体实现方式就是我上面说的。
初始化蓝星
首先要实现这个功能,一定要开启时间轴的呀,不然不好使哈!
timeline: true, //是否显示时间线控件
上面这个得开起来!
    viewer = new Cesium.Viewer('map', {
      baseLayerPicker: false,  // 影像切换
      animation: true,  //是否显示动画控件
      infoBox: false, //是否显示点击要素之后显示的信息
      geocoder: false, //是否显示地名查找控件
      timeline: true, //是否显示时间线控件
      fullscreenButton: false,
      shouldAnimate: false,
      navigationHelpButton: false, //是否显示帮助信息控件
      terrainProvider: new Cesium.createWorldTerrain({
        requestWaterMask: true,
        requestVertexNormals: true
      }),
      imageryProvider: new Cesium.UrlTemplateImageryProvider({
        url: "http://mt1.google.cn/vt/lyrs=s&hl=zh-CN&x={x}&y={y}&z={z}&s=Gali"
      })
    })
添加卫星模型方法
主要是配置这个时间轴,然后就调用方法把卫星放进蓝星里面。
  // 卫星
  function satellite() {
    start = new Cesium.JulianDate.fromDate(new Date());  // 获取当前时间 这不是国内的时间
    start = Cesium.JulianDate.addHours(start, 8, new Cesium.JulianDate());  // 添加八小时,得到我们东八区的北京时间
    stop = Cesium.JulianDate.addSeconds(start, 360, new Cesium.JulianDate());  // 设置一个结束时间,意思是360秒之后时间结束


    viewer.clock.startTime = start.clone();   // 给cesium时间轴设置开始的时间,也就是上边的东八区时间
    viewer.clock.stopTime = stop.clone();     // 设置cesium时间轴设置结束的时间
    viewer.clock.currentTime = start.clone(); // 设置cesium时间轴设置当前的时间
    viewer.clock.clockRange = Cesium.ClockRange.LOOP_STOP;  // 时间结束了,再继续重复来一遍
    //时间变化来控制速度 // 时间速率,数字越大时间过的越快
    viewer.clock.multiplier = 2;
    //给时间线设置边界
    viewer.timeline.zoomTo(start, stop);

    rrStates = [];
    getRandState(arrStates, 1);
    startFunc();
  }
相关方法
一股脑直接把代码发过来了,然后网上其实都有,我不发你也找得到,然后这些也是网上拼凑起来的,然后嘞,应该能看懂,看不懂的直接找那个 Cesium API 中文版网站去查,应该没什么难的。加油!
function mySatePosition() {
    this.lon = 0;
    this.lat = 0;
    this.hei = 700000;          //卫星高度
    this.phei = 700000 / 2;     //轨道高度
    this.time = 0;
  }

  function computeCirclularFlight(source, panduan) {
    var property = new Cesium.SampledPositionProperty();
    if (panduan == 1) {         //卫星位置
      for (var i = 0; i < source.length; i++) {
        var time = Cesium.JulianDate.addSeconds(start, source[i].time, new Cesium.JulianDate);
        var position = Cesium.Cartesian3.fromDegrees(source[i].lon, source[i].lat, source[i].hei);
        // 添加位置,和时间对应
        property.addSample(time, position);
      }
    } else if (panduan == 2) {//轨道位置
      for (var i = 0; i < source.length; i++) {
        var time = Cesium.JulianDate.addSeconds(start, source[i].time, new Cesium.JulianDate);
        var position = Cesium.Cartesian3.fromDegrees(source[i].lon, source[i].lat, source[i].phei);
        // 添加位置,和时间对应
        property.addSample(time, position);
      }
    }
    return property;
  }

  function getRandState(brr, count) {
    for (var m = 0; m < count; m++) {
      var arr = [];
      var t1 = Math.floor(Math.random() * 360);
      var t2 = Math.floor(Math.random() * 360);
      for (var i = t1; i <= 360 + t1; i += 30) {
        var aaa = new mySatePosition();
        aaa.lon = t2;
        aaa.lat = i;
        aaa.time = i - t1;
        arr.push(aaa);
      }
      brr.push(arr);
    }
  }

  function getStatePath(aaa) {
    var entity_ty1p = computeCirclularFlight(aaa, 2);
    var entity_ty1 = viewer.entities.add({
      availability: new Cesium.TimeIntervalCollection([new Cesium.TimeInterval({
        start: start,
        stop: stop
      })]),
      position: entity_ty1p,   //轨道高度
      orientation: new Cesium.VelocityOrientationProperty(entity_ty1p),
      cylinder: {
        HeightReference: Cesium.HeightReference.CLAMP_TO_GROUND,
        length: 700000,
        topRadius: 0,
        bottomRadius: 900000 / 2,
        // material: Cesium.Color.RED.withAlpha(.4),
        // outline: !0,
        numberOfVerticalLines: 0,
        // outlineColor: Cesium.Color.RED.withAlpha(.8),
        material: Cesium.Color.fromBytes(35, 170, 242, 80)
      },
    });

    entity_ty1.position.setInterpolationOptions({
      interpolationDegree: 5,
      interpolationAlgorithm: Cesium.LagrangePolynomialApproximation
    });

    var entity1p = computeCirclularFlight(aaa, 1);
    //创建实体
    var entity1 = viewer.entities.add({
      // 将实体availability设置为与模拟时间相同的时间间隔。
      availability: new Cesium.TimeIntervalCollection([new Cesium.TimeInterval({
        start: start,
        stop: stop
      })]),
      position: entity1p,//计算实体位置属性
      //基于位置移动自动计算方向.
      orientation: new Cesium.VelocityOrientationProperty(entity1p),
      //加载飞机模型
      model: {
        uri: './models/weixing/scene.gltf',
        scale: 1000
      },
      //路径
      path: {
        resolution: 1,
        material: new Cesium.PolylineGlowMaterialProperty({
          glowPower: 0.1,
          color: Cesium.Color.PINK
        }),
        width: 5
      }
    });

    //差值器
    entity1.position.setInterpolationOptions({
      interpolationDegree: 5,
      interpolationAlgorithm: Cesium.LagrangePolynomialApproximation
    });
  }

  function startFunc() {
    for (var i = 0; i < arrStates.length; i++) {
      getStatePath(arrStates[i]);
    }
  }
到此这篇关于基于Cesium实现卫星在轨绕行动画的文章就介绍到这了,更多相关Cesium卫星在轨绕行动画内容请搜索脚本之家以前的文章或继续浏览下面的相关文章希望大家以后多多支持脚本之家!

