YOLO训练自己的数据集-Pytorch
github地址:https://github.com/ultralytics/yolov3
目录
- 环境配置要求
- 数据集
- 配置文件修改
- 训练
- 测试评估
- 可视化
- Ref
环境配置要求
可以使用anaconda通过conda creat -n pytorch python=3.7创建环境
source activate pytorch进入环境
Python 3.7或更高版本,包含以下pip3 install -U -r requirements.txt软件包:
- numpy
- torch >= 1.0.0
- opencv-python
- tqdm
数据集
运行bash yolov3/data/get_coco_dataset.sh
这个库需要的是COCO版的数据集,需要将已有的转换
VOC版数据集制作以及转化为COCO版指路->https://blog.csdn.net/frothmoon/article/details/89242849
根据下载的格式可以对自己的数据集进行修改
coco.name需要修改为自己的类别,一个占一行

coco.data也需要根据自己的情况进行修改
classes = 3					    # 数据集的类别
train = ./data/2007_train.txt 	# 通过voc_label.py文件生成的txt文件
valid = ./data/2007_test.txt	# 通过voc_label.py文件生成的txt文件
names = data/coco.names 		# 上述文件类别
backup = backup/ 				# 记录结果checkpoint存放位置
eval = coco 				    # 选择map计算方式
最终数据集的格式可参照下载下来的文件,处理好后才能运行。
- yolov3
    - data
      - 2007_train.txt
      - 2007_test.txt
      - coco.names
      - coco.data
      - annotations(json files)
      - images(将2007_train.txt中的图片放到train2014文件夹中,test同理)
        - train2014
          - 0001.jpg
          - 0002.jpg
        - val2014
          - 0003.jpg
          - 0004.jpg
      - labels(voc_labels.py生成的内容需要重新组织一下)
        - train2014
          - 0001.txt
          - 0002.txt
        - val2014
          - 0003.txt
          - 0004.txt
      - samples(存放待测试图片)
配置文件修改
在cfg文件夹下进行网络结构的修改y,此处使用yolov3.cfg,需要修改其中的类别以及filter个数(和Darknet版一致)
将最后一个[convolutional](紧挨着[region]的前一个)中的filter改为(filter的公式filters=(classes+ coords+ 1)* (NUM)
其中coods是四个用来定位目标的框的信息(其实是相对当前grid的相对值),classes是自己的类别个数,1是1个objectness,NUM是每个尺度下预测的个数
根据自己对cfg进行调整,可改变网络结构,cfg详解指路->https://blog.csdn.net/frothmoon/article/details/90322651
训练
Pretrained Weights:
- Darknet *.weights format: https://pjreddie.com/media/files/yolov3.weights
- PyTorch *.pt format: https://drive.google.com/drive/folders/1uxgUBemJVw9wZsdpboYbzUN4bcRhsuAI
开始训练python train.py --data data/coco.data --cfg cfg/yolov3.cfg
中断恢复python train.py --data data/coco.data --cfg cfg/yolov3.cfg --resume
测试评估
将测试图片放到data/samples中进行测试python detect.py --weights weights/best.pt
评估:python test.py --weights weights/latest.pt
Use test.py --weights weights/yolov3.weights to test the official YOLOv3 weights.
Use test.py --weights weights/latest.pt to test the latest training results.
Compare to darknet published results https://arxiv.org/abs/1804.02767.
cocoapi使用;
git clone https://github.com/ultralytics/yolov3
# bash yolov3/data/get_coco_dataset.sh
git clone https://github.com/cocodataset/cocoapi && cd cocoapi/PythonAPI && make && cd ../.. && cp -r cocoapi/PythonAPI/pycocotools yolov3
cd yolov3

python3 test.py --save-json --img-size 416
Namespace(batch_size=32, cfg='cfg/yolov3-spp.cfg', conf_thres=0.001, data_cfg='data/coco.data', img_size=416, iou_thres=0.5, nms_thres=0.5, save_json=True, weights='weights/yolov3-spp.weights')
Using CUDA device0 _CudaDeviceProperties(name='Tesla V100-SXM2-16GB', total_memory=16130MB)
               Class    Images   Targets         P         R       mAP        F1
Calculating mAP: 100%|█████████████████████████████████████████| 157/157 [05:59<00:00,  1.71s/it]
                 all     5e+03  3.58e+04     0.109     0.773      0.57     0.186
 Average Precision  (AP) @[ IoU=0.50:0.95 | area=   all | maxDets=100 ] = 0.335
 Average Precision  (AP) @[ IoU=0.50      | area=   all | maxDets=100 ] = 0.565
 Average Precision  (AP) @[ IoU=0.75      | area=   all | maxDets=100 ] = 0.349
 Average Precision  (AP) @[ IoU=0.50:0.95 | area= small | maxDets=100 ] = 0.151
 Average Precision  (AP) @[ IoU=0.50:0.95 | area=medium | maxDets=100 ] = 0.360
 Average Precision  (AP) @[ IoU=0.50:0.95 | area= large | maxDets=100 ] = 0.493
 Average Recall     (AR) @[ IoU=0.50:0.95 | area=   all | maxDets=  1 ] = 0.280
 Average Recall     (AR) @[ IoU=0.50:0.95 | area=   all | maxDets= 10 ] = 0.432
 Average Recall     (AR) @[ IoU=0.50:0.95 | area=   all | maxDets=100 ] = 0.458
 Average Recall     (AR) @[ IoU=0.50:0.95 | area= small | maxDets=100 ] = 0.255
 Average Recall     (AR) @[ IoU=0.50:0.95 | area=medium | maxDets=100 ] = 0.494
 Average Recall     (AR) @[ IoU=0.50:0.95 | area= large | maxDets=100 ] = 0.620

python3 test.py --save-json --img-size 608 --batch-size 16
Namespace(batch_size=16, cfg='cfg/yolov3-spp.cfg', conf_thres=0.001, data_cfg='data/coco.data', img_size=608, iou_thres=0.5, nms_thres=0.5, save_json=True, weights='weights/yolov3-spp.weights')
Using CUDA device0 _CudaDeviceProperties(name='Tesla V100-SXM2-16GB', total_memory=16130MB)
               Class    Images   Targets         P         R       mAP        F1
Computing mAP: 100%|█████████████████████████████████████████| 313/313 [06:11<00:00,  1.01it/s]
                 all     5e+03  3.58e+04      0.12      0.81     0.611     0.203
 Average Precision  (AP) @[ IoU=0.50:0.95 | area=   all | maxDets=100 ] = 0.366
 Average Precision  (AP) @[ IoU=0.50      | area=   all | maxDets=100 ] = 0.607
 Average Precision  (AP) @[ IoU=0.75      | area=   all | maxDets=100 ] = 0.386
 Average Precision  (AP) @[ IoU=0.50:0.95 | area= small | maxDets=100 ] = 0.207
 Average Precision  (AP) @[ IoU=0.50:0.95 | area=medium | maxDets=100 ] = 0.391
 Average Precision  (AP) @[ IoU=0.50:0.95 | area= large | maxDets=100 ] = 0.485
 Average Recall     (AR) @[ IoU=0.50:0.95 | area=   all | maxDets=  1 ] = 0.296
 Average Recall     (AR) @[ IoU=0.50:0.95 | area=   all | maxDets= 10 ] = 0.464
 Average Recall     (AR) @[ IoU=0.50:0.95 | area=   all | maxDets=100 ] = 0.494
 Average Recall     (AR) @[ IoU=0.50:0.95 | area= small | maxDets=100 ] = 0.331
 Average Recall     (AR) @[ IoU=0.50:0.95 | area=medium | maxDets=100 ] = 0.517
 Average Recall     (AR) @[ IoU=0.50:0.95 | area= large | maxDets=100 ] = 0.618
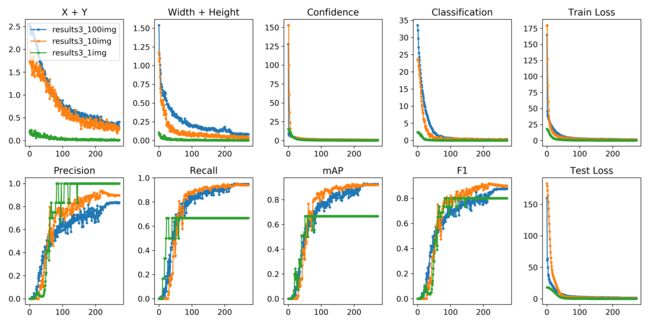
可视化
python -c from utils import utils;utils.plot_results()
创建 drawLog.py:
def plot_results():
    # Plot YOLO training results file 'results.txt'
    import glob
    import numpy as np
    import matplotlib.pyplot as plt
    #import os; os.system('rm -rf results.txt && wget https://storage.googleapis.com/ultralytics/results_v1_0.txt')

    plt.figure(figsize=(16, 8))
    s = ['X', 'Y', 'Width', 'Height', 'Objectness', 'Classification', 'Total Loss', 'Precision', 'Recall', 'mAP']
    files = sorted(glob.glob('results.txt'))
    for f in files:
        results = np.loadtxt(f, usecols=[2, 3, 4, 5, 6, 7, 8, 17, 18, 16]).T  # column 16 is mAP
        n = results.shape[1]
        for i in range(10):
            plt.subplot(2, 5, i + 1)
            plt.plot(range(1, n), results[i, 1:], marker='.', label=f)
            plt.title(s[i])
            if i == 0:
                plt.legend()
    plt.savefig('./plot.png')
if __name__ == "__main__":
    plot_results()
Ref
https://github.com/ultralytics/yolov3
http://baijiahao.baidu.com/s?id=1598995651281221792&wfr=spider&for=pc
https://blog.csdn.net/haoqimao_hard/article/details/82185135
参考资料以及网络更改经验:https://pprp.github.io/2018/06/20/yolo.html
