python--随机森林建模3(调参)
以下内容笔记出自‘跟着迪哥学python数据分析与机器学习实战’,外加个人整理添加,仅供个人复习使用。
这里是在新数据集建模的基础上进行调参。
首先导入数据,划分测试集与训练集:
1. 原数据建模
import pandas as pd
import warnings
warnings.filterwarnings('ignore')
features=pd.read_csv(r'temps_extended.csv')
print(features.shape)
features.head(6)
#哑编码
features=pd.get_dummies(features)

#划分训练集与测试集
labels=features['actual']
features_x=features.drop('actual',axis=1)

feature_list=list(features_x.columns)

import numpy as np
features_x=np.array(features_x)
labels=np.array(labels)

from sklearn.model_selection import train_test_split
X_train,X_test,y_train,y_test=train_test_split(features_x,labels,
                                              test_size=0.25,
                                              random_state=42)
print(X_train.shape,X_test.shape)
(1643, 17) (548, 17)
2. 选择重要变量建模
#选择6个最重要变量
imp_features=['temp_1','average','ws_1','temp_2',
             'friend','year']
#找到她们的索引,挑选数据
imp_features_indices=[feature_list.index(feature)
                     for feature in imp_features]

imp_X_train=X_train[:,imp_features_indices]
imp_X_test=X_test[:,imp_features_indices]
2.1 调节参数
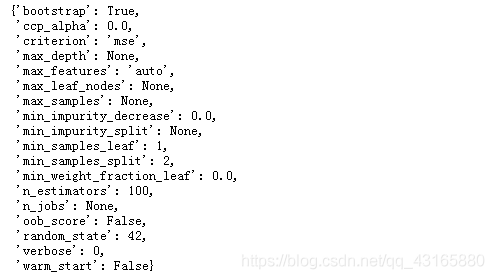
先打印出所有参数看看:
#打印出所有的参数
from sklearn.ensemble import RandomForestRegressor
rf=RandomForestRegressor(random_state=42)

from pprint import pprint
pprint(rf.get_params())

参数的的可能组合有很多,可以使用网格搜索,但当参数的候选值较多时,建模的时间会拉长。函数:RandomizedSearchCV(),可以帮助我们在候选集组合中,不断地随机选择一组合适的参数来建模,并且求其交叉验证后的评估结果。
2.2 参数调节
这里是做个例子:
from sklearn.model_selection import RandomizedSearchCV

#树个数
n_estimators=[int(x) for x in np.linspace(start=200,
                                         stop=2000,num=10)]
#最大特征选择方式
max_features=['auto','log2']
 #默认auto=sqrt(n_features) 与sqrt相同
#树最大深度
max_depth=[int(x) for x in np.linspace(10,20,num=2)]
max_depth.append(None)
#节点最小分裂所需样本数
min_samples_split=[2,5,10]
#叶子节点最小样本数,任何分裂不能让其子节点样本数小于此值
min_samples_leaf=[1,2,4]
#样本采样方法
bootstrap=[True,False]
  #自助采样:有放回的均匀抽样

random_grid={'n_estimators':n_estimators,
            'max_features':max_features,
            'max_depth':max_depth,
            'min_samples_split':min_samples_split,
            'min_samples_leaf':min_samples_leaf,
            'bootstrap':bootstrap}

rf=RandomForestRegressor()
rf_random=RandomizedSearchCV(estimator=rf,
                            param_distributions=random_grid,
                             #参数组合空间
                            n_iter=100,
                             #随机寻找参数组合的个数,这里组合100组,然后找最好的一组
                            scoring='neg_mean_absolute_error',
                            cv=3,verbose=2,
                             #verbose打印信息的数量
                            random_state=42,
                            n_jobs=-1 #多线程跑程序,如果用-1就会用所有的)
#执行
rf_random.fit(imp_X_train,y_train)
即便设成n_jobs=-1,程序运行的还是很慢,因为建立100次模型来选择参数,并且带有3折交叉验证,相当于300个任务。
#最好参数
rf_random.best_params_
{‘n_estimators’: 200,
‘min_samples_split’: 10,
‘min_samples_leaf’: 4,
‘max_features’: ‘auto’,
‘max_depth’: None,
‘bootstrap’: True}
评估函数
#建立评估函数
def evaluate(model,X_test,y_test):
    predictions=model.predict(X_test)
    errors=abs(predictions-y_test)
    mape=100*np.mean(errors/y_test)
    accuracy=100-mape

    print('平均误差:',np.mean(errors))
    print('acc:',accuracy)
2.3 旧模型准确率
base_model=RandomForestRegressor(random_state=42)
base_model.fit(imp_X_train,y_train)
evaluate(base_model,imp_X_test,y_test)
平均误差: 3.829032846715329
acc: 93.55535365977748
2.4 新模型准确率
best_random=rf_random.best_estimator_
evaluate(best_random,imp_X_test,y_test)
平均误差: 3.724228284195437
acc: 93.71412777231247
3. 交叉验证
可以看到模型效果有所提升,但已经到上限了吗?接下来可以用网格搜索交叉验证,GridSearchCV(),一个个组合遍历.
随机选择的最好参数是:
{'n_estimators': 200,
 'min_samples_split': 10,
 'min_samples_leaf': 4,
 'max_features': 'auto',
 'max_depth': None,
 'bootstrap': True}
from sklearn.model_selection import GridSearchCV

#网格搜索
param_grid={
    'bootstrap':[True],
    'max_depth':[8,10,12],
    'max_features':['auto'],
    'min_samples_leaf':[2,3,4,5,6], #节点分裂最小样本
    'min_samples_split':[3,5,7],  #叶子节点最小样本 值越小,越易分裂,树越大
    'n_estimators':[800,900,1000,1200]
}

#基础模型
rf=RandomForestRegressor(random_state=42)

grid_search=GridSearchCV(estimator=rf,
                       param_grid=param_grid,
                       scoring='neg_mean_absolute_error',
                       cv=3,n_jobs=-1,verbose=2)

grid_search.fit(imp_X_train,y_train)
grid_search.best_params_
{‘bootstrap’: True,
‘max_depth’: 8,
‘max_features’: ‘auto’,
‘min_samples_leaf’: 6,
‘min_samples_split’: 3,
‘n_estimators’: 900}
best_grid=grid_search.best_estimator_
evaluate(best_grid,imp_X_test,y_test)
平均误差: 3.673594482591628
acc: 93.79803527746205
准确率较上次还是有所提高的!
4. 另一组参数
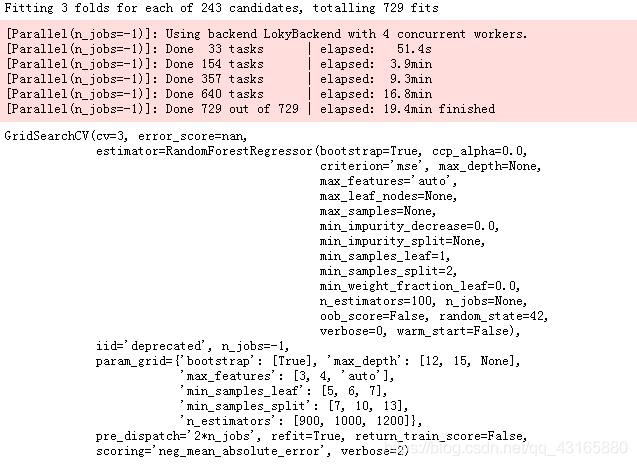
经过再次调整后,模型准确率有所提升。再用网格搜索的时候,遍历次数太多,通常并不把所有的可能性都放进去,而是分成不同的组来分别执行,下面看一下另外一组网格搜索。
param_grid={
    'bootstrap':[True],
    'max_depth':[12,15,None],
    'max_features':[3,4,'auto'],
    'min_samples_leaf':[5,6,7],
    'min_samples_split':[7,10,13],
    'n_estimators':[900,1000,1200]
}
rf=RandomForestRegressor(random_state=42)
grid_search_ad=GridSearchCV(estimator=rf,
                           param_grid=param_grid,
                           scoring='neg_mean_absolute_error',
                           cv=3,
                           n_jobs=-1,verbose=2)
grid_search_ad.fit(imp_X_train,y_train)
grid_search_ad.best_params_
{‘bootstrap’: True,
‘max_depth’: 12,
‘max_features’: 4,
‘min_samples_leaf’: 6,
‘min_samples_split’: 7,
‘n_estimators’: 1000}
best_grid_ad=grid_search_ad.best_estimator_
evaluate(best_grid_ad,imp_X_test,y_test)
平均误差: 3.660595500519537
acc: 93.82047201545083
模型效果有进一步提升
5. 最终模型
print('最终模型参数\n')
pprint(best_grid_ad.get_params())
6. 总结
- 参数空间非常重要!在开始任务前,选择一个还是区间,可参考论文经验值。
- 随机搜索可以节省时间,尤其是任务开始阶段,不知道哪一个参数在哪一个位置的效果更好,这样可以把参数间隔设置的更大一些,先用随机搜索确定一些大致位置。
- 网格搜索相当于地毯式搜索,当得到大致位置后,想寻找到最优参数的时候就排上用场了。可以把随机搜索和网格搜索结合,搭配使用。
- 调参方法还有很多,比如贝叶斯优化。基本思想在于每一个优化都是在不断积累经验,会慢慢得到最优位置,具体可参考Hyperopt工具包。


