Opencv笔记
最近在刷opecnv的课,没什么时间进行整理,先粗略的把所学的记录下来,以后有空再进行整理。
一、加载显示图片、保存图片
import cv2
import numpy as np
import matplotlib.pyplot as plt
#加载
img =  cv2.imread("111.jpg", cv2.IMREAD_GRAYSCALE)  #转为灰度图, 0是彩图,-1是原图


cv2.imshow("map", img)  #opencv是BGR, matplotlib是RGB

cv2.waitKey(0)
cv2.destroyAllWindows()

#保存图像
cv2.imwrite("copy-map.jpg", img)
二、加载摄像头、保存视频
(1)
#打开摄像头
cap = cv2.VideoCapture(0)
fourcc = cv2.VideoWriter_fourcc(*'XVID')  #编码器
out = cv2.VideoWriter("output.avi", fourcc, 20.0,(640, 480))
while True:
    ret, frame = cap.read()
    cv2.imshow("frame", frame)  #原色摄像头
    gray = cv2.cvtColor(frame, cv2.COLOR_BGR2GRAY)
    out.write(frame)
    cv2.imshow("gray", gray)

    if cv2.waitKey(1)& 0xFF == ord("q"):  #注意:cv2.waitkey()会有返回值,是32-bit int值1
        break

#关闭摄像头进程
cap.release()
out.release()
cv2.destroyAllWindows()
(2)视频流pipeline(直接用)
def stackImages(scale,imgArray):
    rows = len(imgArray)
    cols = len(imgArray[0])
    rowsAvailable = isinstance(imgArray[0], list)
    width = imgArray[0][0].shape[1]
    height = imgArray[0][0].shape[0]
    if rowsAvailable:
        for x in range ( 0, rows):
            for y in range(0, cols):
                if imgArray[x][y].shape[:2] == imgArray[0][0].shape [:2]:
                    imgArray[x][y] = cv2.resize(imgArray[x][y], (0, 0), None, scale, scale)
                else:
                    imgArray[x][y] = cv2.resize(imgArray[x][y], (imgArray[0][0].shape[1], imgArray[0][0].shape[0]), None, scale, scale)
                if len(imgArray[x][y].shape) == 2: imgArray[x][y]= cv2.cvtColor( imgArray[x][y], cv2.COLOR_GRAY2BGR)
        imageBlank = np.zeros((height, width, 3), np.uint8)
        hor = [imageBlank]*rows
        hor_con = [imageBlank]*rows
        for x in range(0, rows):
            hor[x] = np.hstack(imgArray[x])
        ver = np.vstack(hor)
    else:
        for x in range(0, rows):
            if imgArray[x].shape[:2] == imgArray[0].shape[:2]:
                imgArray[x] = cv2.resize(imgArray[x], (0, 0), None, scale, scale)
            else:
                imgArray[x] = cv2.resize(imgArray[x], (imgArray[0].shape[1], imgArray[0].shape[0]), None,scale, scale)
            if len(imgArray[x].shape) == 2: imgArray[x] = cv2.cvtColor(imgArray[x], cv2.COLOR_GRAY2BGR)
        hor= np.hstack(imgArray)
        ver = hor
    return ver
三、图像基本操作
(1)对图像局部区域像素改色
import cv2
import numpy as np
import matplotlib.pyplot as plt

"""-------ROI提取--------"""
img = cv2.imread("111.jpg", 1)
img2= img
img[:100, :200] = [255,0,0]
cv2.imshow("crop", img2)
cv2.waitKey(10)
(2)画矩形、圆形
"""----------画矩形-------"""
img = cv2.imread("111.jpg", 1)

cv2.rectangle(img,(100, 200), (400, 500), (0, 255, 0), thickness=3)
cv2.imshow("rectangle",  img)

"""---------画圆----------"""
cv2.circle(img, (500, 500), 65, (255,0,0), 3)  #不填充
cv2.circle(img, (800, 5800), 65, (255,0,0), thickness=-1)   #不填充


cv2.imshow("circle",  img)

cv2.waitKey(0)
cv2.destroyAllWindows()
\
四、图像算法运算
(1)图像加法cv2.add
(2)图像融合cv2.weight
(3)图像像素的逻辑按位操作

"""逻辑与操作,提取非矩形ROI"""
import cv2
import numpy as np

#读取两张图片
img1 = cv2.imread("mainlogo.png",1)
img2 = cv2.imread("3D-Matplotlib.png",1)
# cv2.imshow("img1",img1)
# cv2.waitKey(0)
# cv2.destroyAllWindows()
#提取感兴趣区域ROI
rows, cols,_ = img1.shape
roi = img2[:rows,:cols]
# cv2.imshow("ROI",roi)
# cv2.waitKey(0)
# cv2.destroyAllWindows()

#转为灰度图,提取前景图像,生成掩码
img1_gray = cv2.cvtColor(img1,cv2.COLOR_BGR2GRAY)
retval, mask = cv2.threshold(img1_gray,220,255,type=cv2.THRESH_BINARY_INV)
img1_fn = cv2.bitwise_and(img1,img1,mask=mask)
cv2.imshow("mask",mask)
cv2.imshow("img1_fn",img1_fn)
cv2.waitKey(0)
cv2.destroyAllWindows()

#提取背景图像ROI位置的掩码
mask_inv = cv2.bitwise_not(mask)  #反转
img2_bg = cv2.bitwise_and(roi,roi,mask=mask_inv)
cv2.imshow("img2_bg",img2_bg)
cv2.waitKey(0)
cv2.destroyAllWindows()

dst = cv2.add(img1_fn,img2_bg)
img2[:rows,:cols] = dst
cv2.imshow("result",img2)
cv2.waitKey(0)
cv2.destroyAllWindows()
运行结果:

四、对灰度图二值化,阈值处理
功能:去噪声,去掉图标的白低
ret, thresh = cv2.threshold(src, thresh, maxval, type, dst=None)
五、平滑处理:均值滤波,高斯滤波,中值滤波,方波
import cv2
import numpy as np

img = cv2.imread("mainsvmimage.png")
# 均值滤波
img2 = cv2.blur(img, (3, 3))

#高斯滤波
img3 = cv2.GaussianBlur(img,(3,3), 1)

#中值滤波
img4 = cv2.medianBlur(img,3)

#方波
img5 = cv2.boxFilter(img, -1, (3,3), normalize=True)

cv2.imshow("blur:", img2)
cv2.imshow("GaussianBlur:",img3)
cv2.imshow("medianBlur:",img4)
cv2.imshow("bpxFilter:",img5)

res = np.hstack((img2, img3, img4, img5))
cv2.imshow("All:", res)
cv2.waitKey(0)
cv2.destroyAllWindows()
六、形态学处理(腐蚀操作)
kernel = getStructuringElement(shape = cv2.MORPH_RECT, ksize=(10, 3))
(1)腐蚀操作
(2)膨胀操作
(3)开运算
操作:先腐蚀,消除毛刺,再膨胀
dst = open(src,element) = dilate(erode(src,element))
效果:消除毛刺
import cv2
import numpy as np

kernel = np.ones((3,3),dtype=np.uint8)
img = cv2.imread("dige.png")
open = cv2.morphologyEx(img,cv2.MORPH_OPEN,kernel,1)  #开运算
cv2.imshow("src",img)
cv2.imshow("open",open)
src_dst = np.hstack((img,open))
cv2.imshow("src_dst",src_dst)

cv2.waitKey(0)
cv2.destroyAllWindows()
运行结果:

(4)闭运算(先膨胀,再腐蚀)
操作:先膨胀,再腐蚀
dst = close(src,element) = dilate(erode(src,element))
效果:基本没什么效果
import cv2
import numpy as np

kernel = np.ones((3,3),dtype=np.uint8)
img = cv2.imread("dige.png")
open = cv2.morphologyEx(img,cv2.MORPH_CLOSE,kernel,1)  #闭运算,先膨胀,再腐蚀
cv2.imshow("src",img)
cv2.imshow("open",open)
src_dst = np.hstack((img,open))
cv2.imshow("src_dst",src_dst)

cv2.waitKey(0)
cv2.imwrite("src_dst.jpg",src_dst)
cv2.destroyAllWindows()
运行结果:

(5)梯度运算(膨胀-腐蚀=轮廓)
操作:膨胀-腐蚀
dst = morph_grad(src,element) = dilate(src,element) − erode(src,element)
效果:获得图像的轮廓,类似于findContours()操作,里面黑,边缘白,不是轮廓的附近都会变成黑色(像素值为0)
import cv2
import numpy as np

kernel = np.ones((3,3),dtype=np.uint8)
img = cv2.imread("credit_card_01.png")
gray = cv2.cvtColor(img,cv2.COLOR_BGR2GRAY)

#形态学梯度运算
dil = cv2.dilate(gray,kernel,1)
ero = cv2.erode(gray,kernel,1)
dst = cv2.morphologyEx(gray, cv2.MORPH_GRADIENT, kernel, 1)
src_dst = np.hstack((gray, dst))
dil_ero = np.hstack((dil,ero))
cv2.imshow("dil_ero",dil_ero)
cv2.imshow("src_dst",src_dst)
cv2.waitKey(0)
cv2.destroyAllWindows()
运行结果:


(6)礼帽(TOPHAT):原始图像-开运算
操作:原始图像-开运算图像 (先腐蚀,再膨胀)
dst = tophat(src, element) = src − open(src, element)
效果:突出更明亮的区域(杂质),不是轮廓的附近都会变成黑色(像素值为0)
import cv2
import numpy as np

kernel = np.ones((3,3),dtype=np.uint8)
img = cv2.imread("credit_card_01.png")
gray = cv2.cvtColor(img,cv2.COLOR_BGR2GRAY)

#形态学礼貌操作
open = cv2.morphologyEx(gray,cv2.MORPH_OPEN,kernel,1)
tohat = cv2.morphologyEx(gray, cv2.MORPH_TOPHAT, kernel, 1)
src_dst = np.hstack((gray, tohat))
cv2.imshow("open",open)
cv2.imshow("src_dst",src_dst)
cv2.waitKey(0)
cv2.destroyAllWindows()
运行结果:


(7)黑帽(BLACKHAT):闭运算-原始图像
操作:闭运算-原始图像
dst = blackhat(src, element) = close(src, element) − src
效果:基本全黑,不知道有什么用
import cv2
import numpy as np

kernel = np.ones((3,3),dtype=np.uint8)
img = cv2.imread("credit_card_01.png")
gray = cv2.cvtColor(img,cv2.COLOR_BGR2GRAY)

#形态学黑帽操作
close = cv2.morphologyEx(gray,cv2.MORPH_CLOSE,kernel,1)
blackhat = cv2.morphologyEx(gray, cv2.MORPH_BLACKHAT, kernel, 1)
src_dst = np.hstack((gray, blackhat))
cv2.imshow("close",close)
cv2.imshow("src_dst",src_dst)
cv2.waitKey(0)
cv2.destroyAllWindows()
运行结果:


七、梯度计算,sobel算子,scharr算子,laplacian算子
import cv2
import numpy

"""--------------梯度计算,边缘--------------"""

img = cv2.imread("2.jpg", cv2.IMREAD_GRAYSCALE)

#图像梯度Sobel算子
sobelx = cv2.Sobel(img,cv2.CV_64F, ksize=3, dx=1, dy=0)
sobely = cv2.Sobel(img,cv2.CV_64F, ksize=3, dx=0, dy=1)
sobelx = cv2.convertScaleAbs(sobelx)
sobely = cv2.convertScaleAbs(sobely)

#图像梯度Scharr算子,soebl的增强版
scharrx = cv2.Scharr(img,cv2.CV_64F, dx=1, dy=0)
scharry = cv2.Scharr(img,cv2.CV_64F, dx=0, dy=1)
scharrx = cv2.convertScaleAbs(scharrx)
scharry = cv2.convertScaleAbs(scharry)

#图像梯度拉普拉斯算子
lp = cv2.Laplacian(img,cv2.CV_64F,ksize=3)
lp = cv2.convertScaleAbs(lp)

sobel_img = cv2.addWeighted(sobelx,0.5,sobely,0.5,0)
scharr_img = cv2.addWeighted(scharrx,0.5,scharry,0.5,0)

dst = np.hstack((sobel_img, scharr_img, lp))

cv2.namedWindow("dst", cv2.WINDOW_NORMAL)
cv2.imshow("dst", dst)
cv2.waitKey(0)
cv2.destroyAllWindows()
八、边缘检测Canny算子
过程:
(1)高斯平滑处理
(2)梯度计算、方向计算
(3)NMS非极大值抑制:有两种方式
(4)双阈值:官网文档建议比例rate为1:2~1:3
(5)通过抑制孤弱的孤立点刻画出边缘
import cv2
import numpy as np

img = cv2.imread("3.jpg", cv2.IMREAD_GRAYSCALE)
#高斯处理
# img = cv2.GaussianBlur(img,(3,3),1)
#边缘检测Canny,
img = cv2.Canny(img,10,30)
cv2.namedWindow("img", cv2.WINDOW_NORMAL)
cv2.imshow("img", img)
cv2.waitKey(0)
cv2.destroyAllWindows()
九、图像金字塔
(1)高斯金字塔
import cv2
import numpy as np

img = cv2.imread("0IUO1B5C.jpg", cv2.IMREAD_COLOR)  #人民币100元图像
# 图像金字塔
img_d1 = cv2.pyrDown(img)  #下采样
img_u1 = cv2.pyrUp(img_d1)  #上采样

cv2.imshow("img",img)
cv2.imshow("img_d1",img_d1)
cv2.imshow("img_u1",img_u1)
cv2.waitKey(0)
cv2.destroyAllWindows()
(2)拉普拉斯金字塔
先对图像进行下采样,再上采样,最后用原图像与上采用后的图像做差
import cv2
import numpy as np

img = cv2.imread("0IUO1B5C.jpg", cv2.IMREAD_COLOR)
# 图像金字塔
img_d1 = cv2.pyrDown(img)  #下采样
print(img_d1.shape)
img_u1 = cv2.pyrUp(img_d1)  #上采样
img_u1 = cv2.resize(img_u1,(795,424))
print(img_u1.shape)
print("---scr:",img.shape)
#拉普拉斯金字塔
img_lp = img + img_u1


cv2.imshow("img",img)
cv2.imshow("img_d1",img_d1)
cv2.imshow("img_u1",img_u1)
cv2.imshow("lp",img_lp)
cv2.waitKey(0)
cv2.destroyAllWindows()
十、轮廓检测(车牌)
contours, hierarchy	=	cv2.findContours(image, mode, method[, contours[, hierarchy[, offset]]])
功能:对二值图像进行轮廓检测,轮廓用于目标检测、识别、形状分析(周长计算、面积计算)
参数:
	mode:mode of the contour retrieval algorithm---轮廓检索方式
		常用:
				cv2.RETR_EXTERNAL---只检索外部轮廓
				cv2.RETR_TREE
	method:the contour approximation algorithm---轮廓逼近计算的方式
		常用:
				cv2.CHAIN_APPROX_SIMPLE---轮廓的4个点
				cv2.CHAIN_APPROX_NONE---轮廓边的所有点

返回值:contours是个列表list,列表存放是轮廓点所组成的向量
"""示例:绘制外部边界"""
import cv2
#注意,一定要原图读取,再转为灰度图
img = cv2.imread("contours2.png")
gray = cv2.cvtColor(img,cv2.COLOR_BGR2GRAY)

contours, hierarchy = cv2.findContours(gray, cv2.RETR_EXTERNAL, cv2.CHAIN_APPROX_SIMPLE)
draw_img = img.copy()
res = cv2.drawContours(draw_img, contours, -1, (0, 0, 255), 2)
cv2.imshow('img',img)
cv2.imshow("contours",res)
(2)轮廓的特征:边界框、面积、周长、质心
"""示例:绘制边界框boundingRect"""
import cv2
#注意,一定要原图读取,再转为灰度图
img = cv2.imread("contours2.png")
gray = cv2.cvtColor(img,cv2.COLOR_BGR2GRAY)

contours, hierarchy = cv2.findContours(gray, cv2.RETR_EXTERNAL, cv2.CHAIN_APPROX_SIMPLE)
draw_img = img.copy()
res = cv2.drawContours(draw_img, contours, -1, (0, 0, 255), 2)
cv2.imshow('img',img)
cv2.imshow("contours",res)

#边界矩形
x,y,w,h = cv2.boundingRect(contours[0])
img_bounding = cv2.rectangle(res,(x,y),(x+w,y+h),(0,255,0),2)

# draw_img = cv2.rectangle(img,(x,y), (x+w,y+h),(0,255,0),2)

cv2.imshow("boundingRect",img_bounding)

cv2.waitKey(0)
cv2.destroyAllWindows()
(3)轮廓周长、面积计算:
"""轮廓周长、面积计算"""
import cv2

img = cv2.imread("contours2.png")
gray = cv2.cvtColor(img, cv2.COLOR_BGR2GRAY)

ret, thresh = cv2.threshold(gray, 50, 255, cv2.THRESH_BINARY)
#寻找轮廓
contours, hierarchy = cv2.findContours(thresh,mode=cv2.RETR_EXTERNAL, method=cv2.CHAIN_APPROX_NONE)
#绘制轮廓
draw_img = img.copy()
res = cv2.drawContours(draw_img,contours,-1,(255,0,0),2)
#绘制轮廓外接的boundingRec
x,y,w,h = cv2.boundingRect(contours[0])
cv2.rectangle(res,(x,y),(x+w,y+h),(0,255,0),2)

#计算轮廓的面积
cnt = contours[0]
area = cv2.contourArea(cnt)
#计算轮廓的周长
length = cv2.arcLength(cnt,True)
#输出结果
cv2.putText(res,"area:%d, length:%d"%(area,length),(10,20),cv2.FONT_HERSHEY_COMPLEX,0.5,(0,0,255),2)

cv2.imshow("contour",res)
cv2.waitKey(0)
cv2.destroyAllWindows()
运行结果:

十一、模板匹配
eval()
result	=	cv2.matchTemplate(image, templ, method[, result[, mask]]
min_val, max_val, min_loc, max_loc = cv2.minMaxloc(imgage)
功能:对原始图像灰度图进行滑动匹配,返回一个尺寸为(W-w+1, H-h+1)的灰度图,灰度图中最亮或者最黑的位置为匹配的最佳结果。
参数:匹配对比的方式大致分为两大类六小种,一类是不带归一化的,一类是带归一化的相似性,分为六种
methods = ['cv.TM_CCOEFF', 'cv.TM_CCOEFF_NORMED', 'cv.TM_CCORR', 'cv.TM_CCORR_NORMED', 'cv.TM_SQDIFF', 'cv.TM_SQDIFF_NORMED'],其中最后两种取最小值为最佳匹配结果
"""模板匹配,匹配方法是TM_SQDIFF_NORMED,因此最小值是最佳结果"""
import cv2

#加载图片、模板
img = cv2.imread("lena.jpg",0)
template = cv2.imread("face.jpg",0)
w, h = template.shape[::-1]

#对比方式 TM_SQDIFF_NORMED
res = cv2.matchTemplate(img,template,cv2.TM_SQDIFF_NORMED)  #返回一个灰度图像,尺寸为(W-w+1, H-h+1)
min_val, max_val, min_loc, max_loc = cv2.minMaxLoc(res)
#对结果绘制
cv2.imshow("res",res)
draw_img = img.copy()
cv2.rectangle(draw_img,(min_loc[0],min_loc[1]), (min_loc[0]+w,min_loc[1]+h),(255,0,0),2)
cv2.imshow("draw",draw_img)
cv2.waitKey(0)
cv2.destroyAllWindows()
运行结果:


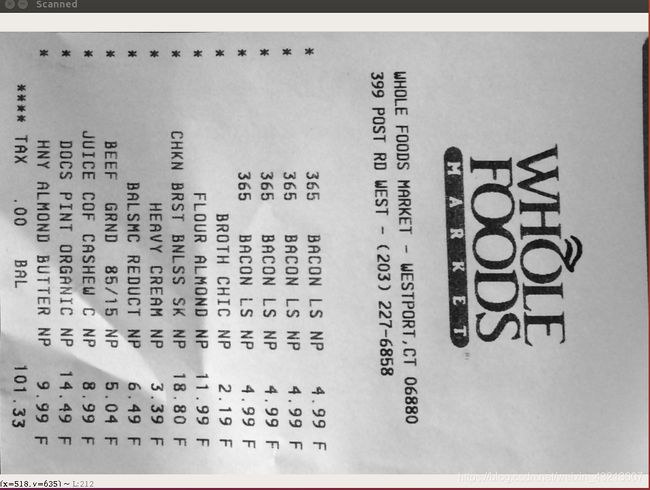
十一、图像几何变换
(1)透视变换
功能:矫正文本
相关API接口:
1.求取M矩阵: M = cv2.getPerspectiveTransform(src, dst)
2.warped = cv2.warpPerspective(src, M, dsize)
注意:求取M矩阵的src和dst必须是float32数据类型,四个points中三三不得共线;
	dsize的尺寸形式是(width, height)
"""myutils"""
import cv2
import numpy as np

def show(name, img):
    # cv2.namedWindow(name, cv2.WINDOW_NORMAL)
    # cv2.namedWindow(name, cv2.WINDOW_KEEPRATIO)
    cv2.imshow(name, img)
    cv2.waitKey(0)
    cv2.destroyAllWindows()

def resize(img, width=None, height=None):
    rows, cols = img.shape[0:2]
    if width==None and height==None:
        return img


    if width:
        rate = cols / float(width)
        height = int(rows / rate)
        return cv2.resize(img, (width,height), interpolation=cv2.INTER_AREA)

    if height:
        rate = rows / float(height)
        width = int(cols / rate)
        return cv2.resize(img, (width,height), interpolation=cv2.INTER_AREA)

def four_point_transform(img,points):
    """对四个点进行排序,并求出最大width,height,进而确定dst尺寸"""
    points = sorted(points, key=lambda x:x[0])
    # print("points",points)
    # print("type:",type(points))
    tl, bl, tr, br = points

    tw = np.sqrt((tr[0] - tl[0])**2 + (tr[1] - tl[1])**2)  # 上边宽度
    bw = np.sqrt((br[0] - bl[0])**2 + (br[1] - bl[1])**2)    # 底边宽度
    lh = np.sqrt((bl[0] - tl[0])**2 + (bl[1] - tl[1])**2)    # 左边高度
    rh = np.sqrt((br[0] - tr[0])**2 + (br[1] - tr[1])**2)  # 右边高度
    # print("rate shape", rate.shape)
    # print("tw shape", tw.shape)
    maxWidth = max((int(tw), int(bw)))
    print("maxWidth type:", type(maxWidth))
    maxHeight = max((int(lh), int(rh)))
    print("maxWidth", maxWidth)
    print("maxHeight", maxHeight)


    # 变换后对应的坐标
    dst = np.array([
                [0, 0],
                [0, maxHeight - 1],
                [maxWidth-1, 0],
                [maxWidth-1, maxHeight-1]], dtype="float32")

    #把point转为ndarray
    points = np.array(points, dtype="float32")

    # 计算变换矩阵M,进行透视变换
    M = cv2.getPerspectiveTransform(points, dst)
    # warped = cv2.warpPerspective(img, M, (maxHeight, maxWidth))
    warped = cv2.warpPerspective(img, M, (maxWidth, maxHeight))
    # warped = cv2.warpPerspective(img, M, (maxHeight, maxHeight))

    return warped
"""main"""
import cv2
import numpy as np
import argparse
import sys
from myutils import *

EPSILON = 0.1
argparse = argparse.ArgumentParser()
argparse.add_argument("-i","--image", required=True, help="path to add the image you will process")
args = vars(argparse.parse_args())

# 加载图片
img = cv2.imread(args["image"], cv2.IMREAD_COLOR)
orig = img.copy()
ratio = img.shape[0] / 500.0

draw_img = resize(img.copy(), height=500)
# show("img",img)

# 图片预处理:转为灰度图,尺寸缩小,高斯去噪, canny边缘检测
gray = cv2.cvtColor(img,cv2.COLOR_BGR2GRAY)
gray = resize(gray, height=500)
blur = cv2.GaussianBlur(gray,(5,5),sigmaX=0)

# thresh = cv2.threshold(blur,50)
show("blur", blur)
edge = cv2.Canny(blur,90,200)
show("edge", edge)

# 提取轮廓
contour = cv2.findContours(edge, mode=cv2.RETR_EXTERNAL, method=cv2.CHAIN_APPROX_SIMPLE)[0]
# print("contour",contour)
# print("contour type:",type(contour))
# 轮廓近似
length = cv2.arcLength(contour[0], True)
# 逼近轮廓
approx = cv2.approxPolyDP(contour[0], epsilon=EPSILON * length, closed=True)

# 去除冗余的维度
approx = np.squeeze(approx)
print("approx's shape: ",approx.shape)
# 四点排序,求出最大的width,heigth,以及dst尺寸,计算变换矩阵M,进行透视变换
warped = four_point_transform(orig, approx.reshape(4,2) * ratio)
# 二值处理
ref = cv2.cvtColor(warped,cv2.COLOR_BGR2GRAY)
# ref = cv2.threshold(warped, 100, 255, cv2.THRESH_BINARY)[1]
cv2.imshow("Scanned", resize(ref, height = 650))
cv2.waitKey(0)
结果:


示例2:

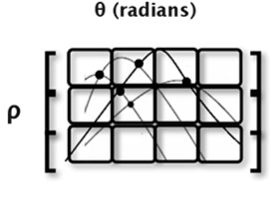
十一、霍夫变换直线检测(车道线检测)
接口API:cv2.HoughLinesP()
参数:第二、第三个参数表示的是resolution of the Hough accumulator arrary (2D) ,俗称grid、bin,因此,第二第三参数指定了bin的大小,bin越大,精度越低,一般选择two pixels  and one degree precesion
第四参数:threshold---minimum number of votes needed to accept a candidate line(根据最优情况选择,如100)
第五参数:minLineLength=40, indicating the minimum length of line in pixels that we will accpet into output.
第六:maxLanGap = 5,indicating maxmum distance in pixels between segmented lines which allows be connected into a single line instead of them being broken up


"""myutils"""
import cv2
import numpy as np

def img_process(img):
    """
    对图片进行预处理:转为灰度图,高斯降噪,边缘检测
    :param img:
    :return:blur_
    """
    gray = cv2.cvtColor(img, cv2.COLOR_BGR2GRAY)
    blur = cv2.GaussianBlur(gray, (5,5), 0)
    edge = cv2.Canny(blur,20,80)
    cv2.imwrite("edge.png", edge)

    return edge

def roi_extract(img):
    """
    生成掩码,提取ROI
    :param img:
    :return: roi
    """
    # 生成掩码,提取ROI
    mask = np.zeros_like(img, dtype=np.int8)
    # print(mask)
    points = np.array([[[300,217], [350,217], [570,366], [92,366]]], dtype=np.int32)
    mask = cv2.fillPoly(mask,points, color=255)
    # print(mask)
    roi = cv2.bitwise_and(img,img,mask=mask)
    # cv2.imshow("roi",roi)
    # cv2.waitKey(0)
    # cv2.destroyAllWindows()
    cv2.imwrite("roi.png", roi)

    return roi

def line_detect(img):
    """
    霍夫变换检测直线,获取一系列点对,进一步筛选左右直线的点对,离群点过滤
    :param img:
    :return: 一系列优质的点对
    """
    lines = cv2.HoughLinesP(img, rho=1, theta=np.pi/180, threshold=15, minLineLength=40, maxLineGap=20)

    # print("lines numbers:",len(lines))
    # print("lines shape:",lines.shape)
    # print("lines type:",type(lines))

    #筛选左右直线
    left_lines = [line for line in lines if calculate_slopes(line) < 0]
    right_lines = [line for line in lines if calculate_slopes(line) > 0]
    # print("left_lines",left_lines)
    # print("left_lines numbers:",len(left_lines))
    # print("right_lines",right_lines)
    print("right_lines nums:",len(right_lines),"\nleft_lines nums",len(left_lines))

    return left_lines, right_lines

def calculate_slopes(point):
    """
    计算直线的斜率,并筛选出左右直线
    :param points: 2-D shape np.array([[x1, y1, x2, y2])
    :return: slope
    """
    (x1, y1, x2, y2) = point[0]
    slope = (y2-y1) / (x2-x1)
    return slope

def filter_lines(lines, threshold):
    """
    离群值过滤,对于斜率偏移严重的直线进行过滤
    :param lines: list[,np.array([[x1,y1,x2,y2]],]
    :return:
    """
    #对斜率进行标准化
    slopes = [calculate_slopes(line) for line in lines]

    while len(slopes)>0:
        mean_slopes = np.min(slopes)
        diff = [abs(slope-mean_slopes) for slope in slopes]
        idx = np.argmax(diff)
        if diff[idx] > threshold:
            slopes.pop(idx)
            lines.pop(idx)

        else:
            break

    return lines

def fit(lines):
    """
    用最小二乘拟合法,将线段拟合成一条直线
    :param lines: [np.array([[x1,y1,x2,y2]]),...,np.array([[x1,y1,x2,y2]])]
    :return:
    """
    # 1. 取出所有坐标点
    x_coords = np.ravel([[line[0][0], line[0][2]]for line in lines])
    y_coords = np.ravel([[line[0][1], line[0][3]]for line in lines])
    # 2. 进行多项式拟合,得到多项式系数 k, b
    pooly = np.polyfit(x_coords,y_coords,deg=1)  # np.array([k,b]
    print("pooly:",pooly)

    # 3. 根据多项式系数,计算一条直线上的两个端点,用于唯一确定这条直线
    min_point = (np.min(x_coords), np.polyval(pooly, np.min(x_coords)))
    max_point = (np.max(x_coords), np.polyval(pooly, np.max(x_coords)))

    return np.array([min_point, max_point], dtype=np.int)
"""main"""
import cv2
import numpy as np
import matplotlib.pyplot as plt
import argparse
from myutils import *

parse = argparse.ArgumentParser()
parse.add_argument("-i", "--image", help="path to the image detected")
parse.add_argument("-v", "--video",help="path to the video detected")
args = parse.parse_args()

# 传入图片
if args.image:
    img = cv2.imread(args.image)
    orig = img.copy()
    # cv2.imshow("img",img)
    # cv2.waitKey(0)

    edge = img_process(img)  # 图像预处理,返回边缘检测图像
    roi = roi_extract(edge)  # 提取ROI
    left_lines, right_lines = line_detect(roi)  # 左右线分类
    print("left_lines:",left_lines)
    print("right_lines", right_lines)
    # 离群值过滤
    filterleft_lines = filter_lines(left_lines,0.2)
    filterright_lines = filter_lines(right_lines,0.2)
    # print("filterleft_lines:",filterleft_lines,"\tfilterright_lines:",len(filterright_lines))
    # 最小二乘拟合
    fit_leftline_points = fit(filterleft_lines)
    fit_rightline_points = fit(filterright_lines)

    print(fit_leftline_points)
    line = cv2.line(orig,tuple(fit_leftline_points[0]),tuple(fit_leftline_points[1]),(0,255,0),5)
    line = cv2.line(orig,tuple(fit_rightline_points[0]),tuple(fit_rightline_points[1]),(0,255,0),5)

    cv2.imshow("line",line)


    cv2.waitKey(0)


if args.video:
    cap = cv2.VideoCapture(args.video)
    while(cap.isOpened()):
        ret, frame = cap.read()
        orig = frame.copy()  # 用于图画
        orig2 = frame.copy()  # 原始图画
        edge = img_process(frame)  # 图像预处理,返回边缘检测图像
        roi = roi_extract(edge)  # 提取ROI
        left_lines, right_lines = line_detect(roi)  # 左右线分类
        print("left_lines:", left_lines)
        print("right_lines", right_lines)
        # 离群值过滤
        filterleft_lines = filter_lines(left_lines, 0.2)
        filterright_lines = filter_lines(right_lines, 0.2)
        # print("filterleft_lines:",filterleft_lines,"\tfilterright_lines:",len(filterright_lines))
        # 最小二乘拟合
        fit_leftline_points = fit(filterleft_lines)
        fit_rightline_points = fit(filterright_lines)

        print(fit_leftline_points)
        line = cv2.line(orig, tuple(fit_leftline_points[0]), tuple(fit_leftline_points[1]), (0, 255, 0), 5)
        line = cv2.line(orig, tuple(fit_rightline_points[0]), tuple(fit_rightline_points[1]), (0, 255, 0), 5)
        cv2.imshow("frame",orig2)
        cv2.imshow("line", line)

        if cv2.waitKey(1)  == ord("q"):
        	break

    cap.release()
    cv2.destroyAllWindows()
(2)高级车道线检测(弯道)
"""---myutils---"""
import cv2
import numpy as np
import pickle
import queue

LEFT_LANE_A = queue.Queue(maxsize=15)
LEFT_LANE_B = queue.Queue(maxsize=15)
LEFT_LANE_C = queue.Queue(maxsize=15)
RIGHT_LANE_A = queue.Queue(maxsize=15)
RIGHT_LANE_B = queue.Queue(maxsize=15)
RIGHT_LANE_C = queue.Queue(maxsize=15)
left_a_sum = 0
left_b_sum = 0
left_c_sum = 0
right_a_sum = 0
right_b_sum = 0
right_c_sum = 0

LEFT_LANE_A_REAL = queue.Queue(maxsize=15)
LEFT_LANE_B_REAL = queue.Queue(maxsize=15)
LEFT_LANE_C_REAL = queue.Queue(maxsize=15)
RIGHT_LANE_A_REAL = queue.Queue(maxsize=15)
RIGHT_LANE_B_REAL = queue.Queue(maxsize=15)
RIGHT_LANE_C_REAL = queue.Queue(maxsize=15)
left_a_sum_real = 0
left_b_sum_real = 0
left_c_sum_real = 0
right_a_sum_real = 0
right_b_sum_real = 0
right_c_sum_real = 0

def empty(x):
    pass

def undistort(img, caliFile):
    with open(caliFile, "rb") as f:
        file = pickle.load(f)

    mtx = file["mtx"]
    dist = file["dist"]
    img = cv2.undistort(img,mtx,dist,None,mtx)

    return img


def createTrackbar():

    cv2.namedWindow("TrackBar")
    cv2.resizeWindow("Bar",640, 480)
    cv2.createTrackbar("topWidth", "TrackBar", 43, 50, empty)
    cv2.createTrackbar("topHeight", "TrackBar", 63, 179, empty)
    cv2.createTrackbar("bottomWidth", "TrackBar", 14, 50, empty)
    cv2.createTrackbar("bottomHeight", "TrackBar", 93, 100, empty)

    # hue_min = cv2.getTrackbarPos("Hue_min", "Bar")
    # hue_max = cv2.getTrackbarPos("Hue_max", "Bar")
    # sat_min = cv2.getTrackbarPos("Sat_min", "Bar")
    # sat_max = cv2.getTrackbarPos("Sat_max", "Bar")
    # val_min = cv2.getTrackbarPos("Val_min", "Bar")
    # val_max = cv2.getTrackbarPos("Val_max", "Bar")

def getTrackbar():
    topWidth = cv2.getTrackbarPos("topWidth", "TrackBar")
    topHeight = cv2.getTrackbarPos("topHeight", "TrackBar")
    bottomWidth = cv2.getTrackbarPos("bottomWidth", "TrackBar")
    bottomHeight = cv2.getTrackbarPos("bottomHeight", "TrackBar")

    # hue_min = cv2.getTrackbarPos("Hue_min", "Bar")
    # hue_max = cv2.getTrackbarPos("Hue_max", "Bar")
    # sat_min = cv2.getTrackbarPos("Sat_min", "Bar")
    # sat_max = cv2.getTrackbarPos("Sat_max", "Bar")
    # val_min = cv2.getTrackbarPos("Val_min", "Bar")
    # val_max = cv2.getTrackbarPos("Val_max", "Bar")
    # return hue_min, hue_max, sat_min, sat_max, val_min, val_max
    return topWidth, topHeight, bottomWidth, bottomHeight
def colorsFilter(img):
    """
    黄色、白色检测
    :param img:
    :return:
    """
    lowerYellow = np.array([0, 86, 228])
    upperYellow = np.array([179, 255, 255])
    lowerWhite = np.array([0, 0, 200])
    upperWhite = np.array([255, 255, 255])
    # lowerYellow = np.array([18,94,140])
    # upperYellow = np.array([48,255,255])
    # lowerWhite = np.array([0, 0, 200])
    # upperWhite = np.array([255, 255, 255])

    blurHSV = cv2.cvtColor(img, cv2.COLOR_BGR2HSV)

    maskYellow = cv2.inRange(blurHSV, lowerYellow, upperYellow)
    maskWhihe = cv2.inRange(blurHSV, lowerWhite, upperWhite)
    mask = cv2.bitwise_or(maskYellow, maskWhihe)

    return mask
#===============================


def threshoding(img):
    """
    对图像进行预处理
    :param img:
    :return:
    """
    # 1.高斯模糊,边缘检测,闭运算
    kenel = np.ones((5,5),dtype=np.uint8)
    blur = cv2.GaussianBlur(img, (5,5), 0)
    canny = cv2.Canny(blur,50, 100)
    # canny = cv2.Canny(blur,50, 100)

    imgClose = cv2.morphologyEx(canny, cv2.MORPH_CLOSE, kenel, iterations=1)
    # 2.颜色过滤
    imgColorsmask = colorsFilter(blur)
    # 3.融合
    imgCombined = cv2.bitwise_or(imgClose, imgColorsmask)

    return imgCombined, imgClose, imgColorsmask

def warpPerspective(img, imgcolor,dstSize=(640,480)):
    """
    根据trackbar选取的点,生成鸟瞰图
    :param img: 融合的图片
    :param imgcolor: 矫正后的彩色图片
    :return:srcPoints原始图像中的坐标点(float32),用于下一次的逆透视变换作为dst
            dstPoints是用于作为下一次逆透视变换中的src,该数据已经是图像尺度的坐标
    """
    # 获取trackbar的值
    topWidth, topHeight, bottomWidth, bottomHeight = getTrackbar()
    # 获取4个点坐标,以及dst坐标
    topLeft = (topWidth/100, topHeight/100)
    topRight = (1-topWidth/100, topHeight/100)
    bottomLeft = (bottomWidth/100, bottomHeight/100)
    bottomRight = (1-bottomWidth/100, bottomHeight/100)
    srcPoints = np.float32([topLeft,topRight,bottomLeft,bottomRight])
    srcPoints = np.array(srcPoints * np.float32([(img.shape[1], img.shape[0])]), dtype="float32")
    dstPoints = np.array(np.float32([(0,0),(1,0), (0,1), (1,1)])*dstSize, dtype="float32")


    # 求取M矩阵,生成鸟蓝图
    M = cv2.getPerspectiveTransform(srcPoints, dstPoints)
    warped = cv2.warpPerspective(img, M, dstSize)
    warpedColor = cv2.warpPerspective(imgcolor, M, dstSize)
    return warped, warpedColor, srcPoints, dstPoints

def drawScreenpoints(img, screenPoints):
    """
    在非失真图像上绘制4个点
    :param img:
    :param screenPoints:
    :return:
    """
    screenPoints = np.array(screenPoints, dtype=int)
    for point in screenPoints:
        cv2.circle(img, (point[0],point[1]), 10, (0,0,255), cv2.FILLED)

def getHist(img):
    """
    统计像素值
    :param img:
    :return:
    """
    hist= np.sum(img[img.shape[0]//2:, :], axis=0)
    return hist

def slidingWins(imgWarp, winNum=15, margin=50):
    """
    先对鸟瞰图统计直方图,确定左右两边最大的像素值
    :param imgWarp:
    :param winNum:
    :param margin:
    :return: 鸟蓝图的矩形框绘制以及上色、左右车道线二次曲线的参数
    """

    imgDrawrect = np.dstack((imgWarp, imgWarp, imgWarp))

    histogram = getHist(imgWarp)
    midpoint = imgWarp.shape[1] // 2
    leftBase = np.argmax(histogram[:midpoint])
    rightBase= np.argmax(histogram[midpoint:]) + midpoint

    # 确定窗口的高度
    winHeight = np.int(imgWarp.shape[0] / winNum)

    # 确定图像中像素值不为0的像素点x,y坐标
    nonezero = np.nonzero(imgWarp)
    nonezerox = nonezero[1]
    nonezeroy = nonezero[0]

    letfLanepointidx = []
    rightLanepointidx = []

    leftCurrent,  rightCurrent = leftBase, rightBase
    # 滑动窗口,对上面找到的所有不为0的像素点坐标x,y进行分类,左、右
    for win in range(winNum):
        # 左车道线框
        leftwin_leftx = leftCurrent - margin
        leftwin_rightx = leftCurrent + margin
        leftwin_topy = imgWarp.shape[0] - (win+1) * winHeight
        leftwin_bottomy = imgWarp.shape[0] - win * winHeight


        # 右车道线框
        rightwin_leftx = rightCurrent - margin
        rightwin_rightx = rightCurrent + margin
        rightwin_topy = imgWarp.shape[0] - (win+1) * winHeight
        rightwin_bottomy = imgWarp.shape[0] - win * winHeight

        cv2.rectangle(imgDrawrect, (leftwin_leftx,leftwin_topy), (leftwin_rightx, leftwin_bottomy),  (0, 255, 255),2)
        cv2.rectangle(imgDrawrect, (rightwin_leftx,rightwin_topy), (rightwin_rightx, rightwin_bottomy), (255, 0, 255),2)

        # 对矩形框内左右车道线像素点idx,以列表保存
        leftwinIdx = ((nonezeroy >= leftwin_topy) & (nonezeroy < leftwin_bottomy) &
                          (nonezerox >= leftwin_leftx) & (nonezerox < leftwin_rightx)).nonzero()[0]

        rightwinIdx = ((nonezerox<rightwin_rightx) & (nonezerox>=rightwin_leftx) & (nonezeroy>=rightwin_topy) &
                   (nonezeroy<rightwin_bottomy)).nonzero()[0]
        letfLanepointidx.append(leftwinIdx)
        rightLanepointidx.append((rightwinIdx))

        print(rightLanepointidx)

        # 下一次窗口的中心
        if len(leftwinIdx) > 1:
            leftCurrent = np.int(np.mean(nonezerox[leftwinIdx]))
        if len(rightwinIdx) > 1:
            rightCurrent = np.int(np.mean(nonezerox[rightwinIdx]))


    # 获取x, y值,进行曲线拟合
    leftIdx = np.concatenate(letfLanepointidx)
    leftXcor = nonezerox[leftIdx]
    leftYcor = nonezeroy[leftIdx]

    rightIdx = np.concatenate(rightLanepointidx)
    rightXcor = nonezerox[rightIdx]
    rightYcor = nonezeroy[rightIdx]


    leftFit = np.polyfit(leftYcor, leftXcor, deg=2)
    rightFit = np.polyfit(rightYcor, rightXcor, deg=2)
    global left_a_sum, left_b_sum, left_c_sum, right_a_sum, right_b_sum, right_c_sum
    # 左车道线
    if LEFT_LANE_A.full() & LEFT_LANE_B.full()& LEFT_LANE_C.full():
        la = LEFT_LANE_A.get()
        lb = LEFT_LANE_B.get()
        lc = LEFT_LANE_C.get()
        left_a_sum -= la
        left_b_sum -= lb
        left_c_sum -= lc
    LEFT_LANE_A.put(leftFit[0])
    LEFT_LANE_B.put(leftFit[1])
    LEFT_LANE_C.put(leftFit[2])
    left_a_sum += leftFit[0]
    left_b_sum += leftFit[1]
    left_c_sum += leftFit[2]

    no_of_leftlane_a_val = LEFT_LANE_A.qsize()
    no_of_leftlane_b_val = LEFT_LANE_B.qsize()
    no_of_leftlane_c_val = LEFT_LANE_C.qsize()
    left_a = left_a_sum / no_of_leftlane_a_val
    left_b = left_b_sum / no_of_leftlane_b_val
    left_c = left_c_sum / no_of_leftlane_c_val

    # 右车道线
    if RIGHT_LANE_A.full() & RIGHT_LANE_B.full() & RIGHT_LANE_C.full():
        la = RIGHT_LANE_A.get()
        lb = RIGHT_LANE_B.get()
        lc = RIGHT_LANE_C.get()
        right_a_sum -= la
        right_b_sum -= lb
        right_c_sum -= lc
    RIGHT_LANE_A.put(rightFit[0])
    RIGHT_LANE_B.put(rightFit[1])
    RIGHT_LANE_C.put(rightFit[2])
    right_a_sum += rightFit[0]
    right_b_sum += rightFit[1]
    right_c_sum += rightFit[2]

    no_of_rightlane_a_val = RIGHT_LANE_A.qsize()
    no_of_rightlane_b_val = RIGHT_LANE_B.qsize()
    no_of_rightlane_c_val = RIGHT_LANE_C.qsize()
    right_a = right_a_sum / no_of_rightlane_a_val
    right_b = right_b_sum / no_of_rightlane_b_val
    right_c = right_c_sum / no_of_rightlane_c_val

    #对鸟蓝图车道线上色
    polyy = np.linspace(0,imgWarp.shape[0]-1, imgWarp.shape[0])

    # polyxLeft = left_a*polyy*polyy + left_b*polyy + left_c
    # polyxRight = right_a*polyy*polyy + right_b*polyy + right_c

    imgDrawrect[leftYcor,leftXcor] = (255,0,0)
    imgDrawrect[rightYcor,rightXcor] = (255,0,0)

    return imgDrawrect, (left_a, left_b, left_c), (right_a, right_b, right_c), polyy


def fillLane(img, leftFit, rightFit, polyy, dst, dst_size, src):
    """

    :param img:
    :param leftFit:  左车道线参数(a, b, c)
    :param rightFit: 右车道线参数(a,b,c)
    :param polyy:
    :param dst:
    :param dst_size:
    :param src:
    :return:
    """

    imgLane = np.zeros_like(img)
    polyxLeft = leftFit[0]*polyy*polyy + leftFit[1]*polyy + np.array(leftFit[2])
    polyxRight = rightFit[0]*polyy*polyy + rightFit[1]*polyy + np.array(rightFit[2])

    polyy = np.array(polyy, dtype=np.int)

    leftPoints = np.transpose(np.vstack((np.array(polyxLeft, dtype=np.int), polyy)))
    rightPoints = np.flipud(np.transpose(np.vstack((np.array(polyxRight, dtype=np.int),polyy))))
    points = np.vstack((leftPoints, rightPoints))
    cv2.fillPoly(imgLane, np.array([[points]]),(255,0,0))
    invsWarp = invswarpPerspective(imgLane, dst, dst_size, src)
    # 图像融合,绘制车道
    imgLane = cv2.addWeighted(img,0.8, invsWarp,0.4,0)

    return imgLane

def invswarpPerspective(img, dst, dst_size, src):
    """
    逆透视变换
    :param img:
    :param dst:
    :param dst_size:
    :param src:
    :return:
    """
    M = cv2.getPerspectiveTransform(src, dst)
    invsWarp = cv2.warpPerspective(img, M, dst_size)
    return invsWarp

def radiiAndcarposition(img, leftFit, rightFit, polyy):
    """
    此函数用于计算左右车道线的曲率、平均曲率, 车偏离位置,
    :param img
    :param leftFit:左车道线的参数(a,b,c)
    :param rightFit:右车道线的参数
    :param polyy: y方向上的点,flaot32
    :return:
    """
    y_eval = np.argmax(polyy)
    ym_per_pix = 1 / img.shape[0]  # meters per pixel in y dimension
    xm_per_pix = 0.1 / img.shape[0]  # meters per pixel in x dimension

    # 计算左车道线的曲率
    leftLane_x = leftFit[0]*polyy*polyy + leftFit[1]**polyy +leftFit[2]
    rightLane_x = rightFit[0]*polyy*polyy + rightFit[1]*polyy + rightFit[2]

    # real_world coordinates
    polyyCor = ym_per_pix * polyy
    leftLane_xCor = leftLane_x * xm_per_pix
    rightLane_xCor = rightLane_x * xm_per_pix

    # 拟合曲线,再用队列,进行平均,
    leftFit_real = np.polyfit(polyyCor,leftLane_xCor,deg=2)
    rightFit_real = np.polyfit(polyyCor,rightLane_xCor,deg=2)

    global left_a_sum_real, left_b_sum_real, left_c_sum_real, right_a_sum_real, right_b_sum_real, right_c_sum_real

        #用队列,进行平均计算,减少误差
    if LEFT_LANE_A_REAL.full() & LEFT_LANE_B_REAL.full() & LEFT_LANE_C_REAL.full():
        # 弹出第一个值
        la = LEFT_LANE_A_REAL.get()
        lb = LEFT_LANE_B_REAL.get()
        lc = LEFT_LANE_C_REAL.get()
        left_a_sum_real -= la
        left_b_sum_real -= lb
        left_c_sum_real -= lc

    LEFT_LANE_A_REAL.put(leftFit_real[0])
    LEFT_LANE_B_REAL.put(leftFit_real[1])
    LEFT_LANE_C_REAL.put(leftFit_real[2])
    left_a_sum_real += leftFit_real[0]
    print("left_a_sum_real",left_a_sum_real)
    left_b_sum_real += leftFit_real[1]
    left_c_sum_real += leftFit_real[2]
    left_a_real = left_a_sum_real / LEFT_LANE_A_REAL.qsize()
    print("left_a_real",left_a_real)
    left_b_real = left_b_sum_real / LEFT_LANE_B_REAL.qsize()
    left_c_real = left_c_sum_real / LEFT_LANE_C_REAL.qsize()

    if RIGHT_LANE_A_REAL.full():
        # 弹出第一个值
        la = RIGHT_LANE_A_REAL.get()
        lb = RIGHT_LANE_B_REAL.get()
        lc = RIGHT_LANE_C_REAL.get()
        right_a_sum_real -= la
        right_b_sum_real -= lb
        right_c_sum_real -= lc

    RIGHT_LANE_A_REAL.put(rightFit_real[0])
    RIGHT_LANE_B_REAL.put(rightFit_real[1])
    RIGHT_LANE_C_REAL.put(rightFit_real[2])
    right_a_sum_real += rightFit_real[0]
    right_b_sum_real += rightFit_real[1]
    right_c_sum_real += rightFit_real[2]
    right_a_real = right_a_sum_real / RIGHT_LANE_A_REAL.qsize()
    right_b_real = right_b_sum_real / RIGHT_LANE_B_REAL.qsize()
    right_c_real = right_c_sum_real / RIGHT_LANE_C_REAL.qsize()

    leftFit_real = np.array([left_a_real,left_b_real,left_c_real])
    rightFit_real = np.array([right_a_real,right_b_real,right_c_real])

    # real_word_radii_of_curature
    # r = [1+(2ay+b)**2]**1.5 / 2a
    # 计算左车道曲率半径
    left_curverad = (1 + (leftFit_real[0]*y_eval*ym_per_pix+leftFit_real[1])**2)**1.5 / np.absolute(2*leftFit_real[0])
    right_curverad = (1+ (rightFit_real[0]*y_eval*ym_per_pix+rightFit_real[1])**2)**1.5 / np.absolute(2*rightFit_real[0])
    curve_radius = (left_curverad+right_curverad)/2

    # 计算车在图像中的位置,车道像素的宽度,从而确定车的方向
    car_position = (img.shape[1] / 2)
    laneWidth, lanecenterPosition = getLanewidth(leftFit, rightFit,img)
    # 计算center_distance
    centerDistance = (car_position-lanecenterPosition) * xm_per_pix

    direction = getDirection(centerDistance)

    return curve_radius, direction, centerDistance

def getLanewidth(leftFit, rightFit, img):
    """
    在像素上计算车道宽度

    :param leftFit:
    :param rightFit:
    :param img:
    :return:
    """
    leftlane = leftFit[0]*img.shape[0]*img.shape[0] + leftFit[1]*img.shape[0] + leftFit[2]
    rightlane = rightFit[0]*img.shape[0]*img.shape[0] + rightFit[1]*img.shape[0] + rightFit[2]
    lane_width = leftlane-rightlane
    lanecenterPosition = (leftlane + rightlane) / 2
    return lane_width, lanecenterPosition

def getDirection(centerDistance):
    dirction = ''
    if centerDistance>0:
        dirction = "right"
        return dirction

    elif centerDistance<0:
        dirction = "left"
        return dirction


def puttext(frameWidth,laneFilled,curve_radius, direction, centerDistance):
    cv2.putText(laneFilled,"RadiusOfCurvature:" +str(round(curve_radius,1)),(frameWidth//3-70, 70),cv2.FONT_HERSHEY_DUPLEX,1,(0,0,255), 2, cv2.LINE_AA)
    cv2.putText(laneFilled, "Dirction: " + direction,(frameWidth//3-70,100),cv2.FONT_HERSHEY_DUPLEX,1,(0,0,255), 2, cv2.LINE_AA)
    cv2.putText(laneFilled, "CenterDistance: " + str(round(centerDistance,4)),(frameWidth//3-70,130),cv2.FONT_HERSHEY_DUPLEX,1,(0,0,255), 2, cv2.LINE_AA)

def stackImages(scale,imgArray):
    rows = len(imgArray)
    cols = len(imgArray[0])
    rowsAvailable = isinstance(imgArray[0], list)
    width = imgArray[0][0].shape[1]
    height = imgArray[0][0].shape[0]
    if rowsAvailable:
        for x in range ( 0, rows):
            for y in range(0, cols):
                if imgArray[x][y].shape[:2] == imgArray[0][0].shape [:2]:
                    imgArray[x][y] = cv2.resize(imgArray[x][y], (0, 0), None, scale, scale)
                else:
                    imgArray[x][y] = cv2.resize(imgArray[x][y], (imgArray[0][0].shape[1], imgArray[0][0].shape[0]), None, scale, scale)
                if len(imgArray[x][y].shape) == 2: imgArray[x][y]= cv2.cvtColor( imgArray[x][y], cv2.COLOR_GRAY2BGR)
        imageBlank = np.zeros((height, width, 3), np.uint8)
        hor = [imageBlank]*rows
        hor_con = [imageBlank]*rows
        for x in range(0, rows):
            hor[x] = np.hstack(imgArray[x])
        ver = np.vstack(hor)
    else:
        for x in range(0, rows):
            if imgArray[x].shape[:2] == imgArray[0].shape[:2]:
                imgArray[x] = cv2.resize(imgArray[x], (0, 0), None, scale, scale)
            else:
                imgArray[x] = cv2.resize(imgArray[x], (imgArray[0].shape[1], imgArray[0].shape[0]), None,scale, scale)
            if len(imgArray[x].shape) == 2: imgArray[x] = cv2.cvtColor(imgArray[x], cv2.COLOR_GRAY2BGR)
        hor= np.hstack(imgArray)
        ver = hor
    return ver
"""---main---"""
import cv2
import numpy as np
import argparse
import myutils
CAMERA_AVAILABLE = False
FRAME_WIDTH = 640
FRAME_HEIGHT = 480
CALIBRATION_PATH = "cal_pickle.p"
# 1.传入参数
parser = argparse.ArgumentParser()
parser.add_argument("-i", "--image", required=False,
                    help="path to add the image detected.")
parser.add_argument("-v", "--video", required=False,
                    help="path to add the video detected.")

args = parser.parse_args()

if CAMERA_AVAILABLE:
    cap = cv2.VideoCapture(0)


elif args.video:
    cap = cv2.VideoCapture(args.video)

fourcc = cv2.VideoWriter_fourcc(*'XVID')  #编码器


# 创建Trackbar,用于生成鸟瞰图
valBar = myutils.createTrackbar()
while(cap.isOpened()):
    _, frame =cap.read()
    frame = cv2.resize(frame, (FRAME_WIDTH, FRAME_HEIGHT))

    # 1.图像矫正
    img = myutils.undistort(frame, CALIBRATION_PATH)
    imgDrwapoints = img.copy()
    # 2.图像预处理
    imgCombined, imgClose, imgColorsmask = myutils.threshoding(img)
    # 3.鸟瞰图
    warp, warpedColor, srcPoints, dstPoints = myutils.warpPerspective(imgCombined, img)
    # 4.在原始是视频上可视化4个点,方便调节trackbar
    myutils.drawScreenpoints(imgDrwapoints, srcPoints)

    # 5.鸟瞰图的直方图统计,确定最大像素值位置,进而确定BOX的位置,滑动窗口,
    imgDrawrect, leftFit, rightFit, polyy = myutils.slidingWins(warp,)

    # 6.对鸟蓝图中的车道进行填充,再逆透视变换,与原始图像融合
    laneFilled = myutils.fillLane(img, leftFit, rightFit, polyy, dst=srcPoints,
                     dst_size=(FRAME_WIDTH,FRAME_HEIGHT), src=dstPoints)
    # 7.计算曲率,车偏离车道中心的位置,以及车的方位(左右)
    curve_radius, direction, centerDistance = myutils.radiiAndcarposition(img, leftFit, rightFit, polyy)

    # 8.显示信息:
    myutils.puttext(FRAME_WIDTH,laneFilled,curve_radius, direction, centerDistance)


    # cv2.imshow("frame",frame)


    imgStacked = myutils.stackImages(0.6,[[img,warpedColor,imgDrwapoints],
                             [imgClose,imgColorsmask,imgCombined],
                             [warp,imgDrawrect,laneFilled]])


    cv2.imshow("imgStacked",imgStacked)
    cv2.imshow("result",laneFilled)

    if cv2.waitKey(1) == ord("q"):
        break

cap.release()
cv2.destroyAllWindows()
关于曲率的数学模型
https://www.intmath.com/applications-differentiation/8-radius-curvature.php