canny c++ 复现
2.canny edge detection(canny边缘检测)_哔哩哔哩_bilibili
参考这个大佬的讲解做的,希望对图像处理有更深的认识
百度的canny 的知识点
转《canny边缘检测算法》 - 简书 (jianshu.com)
https://en.wikipedia.org/wiki/Canny_edge_detector
The process of Canny edge detection algorithm can be broken down to five different steps:
- Apply Gaussian filter to smooth the image in order to remove the noise
- Find the intensity gradients of the image
- Apply gradient magnitude thresholding or lower bound cut-off suppression to get rid of spurious response to edge detection
- Apply double threshold to determine potential edges
- Track edge by hysteresis: Finalize the detection of edges by suppressing all the other edges that are weak and not connected to strong edges.
1、高斯滤波
就是理由高斯核对图像进行卷积操作
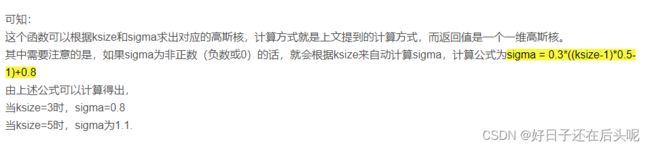
(52条消息) opencv高斯滤波GaussianBlur()详解(sigma取值)_wuqindeyunque的博客-CSDN博客_高斯滤波sigma取值 
我是照着维基百科上的 方式求高斯核,之前做的高斯滤波直接用了一个矩阵,现在这种直接封装了,可以自己设置核的大小了
//vector 嵌套着 vector
vector> createFilter(int row, int column, double sigmaIn)
{
	vector> filter;// 卷积核

	for (int i = 0; i < row; i++)
	{
		vector col;//创建一个vector 被filter这个Vector包着

		for (int j = 0; j < column; j++)
		{
			col.push_back(-1);//为col 这个vector 创建空间
		}
		filter.push_back(col);

	}

	//上面的操作构建好了row * col 的vector

	float coordSum = 0;
	float constant = 2.0 * sigmaIn * sigmaIn;

	// Sum is for normalization 标准化
	float sum = 0.0;

	for (int x = -row / 2; x <= row / 2; x++)
	{

		for (int y = -column / 2; y <= column / 2; y++)
		{
			coordSum = (x * x + y * y);
			filter[x + row / 2][y + column / 2] = (exp(-(coordSum) / constant)) / (M_PI * constant);
			sum += filter[x + row / 2][y + column / 2];
		}
	}

	// Normalize the Filter
	for (int i = 0; i < row; i++)
		for (int j = 0; j < column; j++)
			filter[i][j] /= sum;//就是图片里的 卷积核除以 所有的值之和

	return filter;

}
2、利用 Sobel 找图像梯度
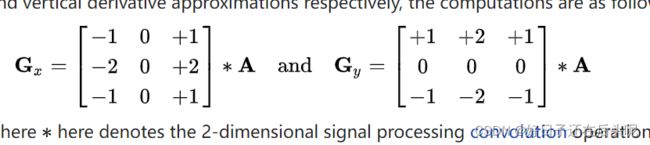
图像中的边缘可能指向不同的方向,因此Canny算法使用四个滤波器来检测模糊图像中的水平、垂直和对角边缘。边缘检测算子(如Roberts、Prewitt或Sobel)返回水平方向(Gx)和垂直方向(Gy)的一阶导数的值。由此可以确定边缘梯度和方向:

其中G可以使用hypot函数来计算,atan2是带有两个参数的反正切函数。边缘方向角被圆角化为表示垂直、水平和两条对角线(0°、45°、90°和135°)的四个角之一。每个颜色区域的边缘方向将被设置为一个特定的角度值,例如,θ在[0°,22.5°]或[157.5°,180°]映射到0°。
sobel 算子
Mat SobelG(Mat& image)
{
	//Sobel X Filter,对应的是 图上的 Gx的矩阵
	double x1[] = { -1.0, 0, 1.0 };
	double x2[] = { -2.0, 0, 2.0 };
	double x3[] = { -1.0, 0, 1.0 };

	vector> xFilter(3);
	xFilter[0].assign(x1, x1 + 3);
	xFilter[1].assign(x2, x2 + 3);
	xFilter[2].assign(x3, x3 + 3);

	//Sobel Y Filter 对应的是 图上的 Gy的矩阵
	double y1[] = { 1.0, 2.0, 1.0 };
	double y2[] = { 0, 0, 0 };
	double y3[] = { -1.0, -2.0, -1.0 };

	vector> yFilter(3);
	yFilter[0].assign(y1, y1 + 3);
	yFilter[1].assign(y2, y2 + 3);
	yFilter[2].assign(y3, y3 + 3);

	//Limit Size
	int size = (int)xFilter.size() / 2;

	Mat filteredImg = Mat(image.rows - 2 * size, image.cols - 2 * size, CV_8UC1);
	//同样的,sobel 边缘检测就是用sobel算子对图像进行卷积操作

	Mat angles = Mat(image.rows - 2 * size, image.cols - 2 * size, CV_32FC1); //AngleMap

	for (int i = size; i < image.rows - size; i++)
	{
		for (int j = size; j < image.cols - size; j++)
		{
			double sumx = 0;
			double sumy = 0;
			//因为 是方阵 所以size都是一样的
			for (int x = 0; x < xFilter.size(); x++)
				for (int y = 0; y < yFilter.size(); y++)
				{
					sumx += xFilter[x][y] * (double)(image.at(i + x - size, j + y - size)); //Sobel_X Filter Value
					sumy += yFilter[x][y] * (double)(image.at(i + x - size, j + y - size)); //Sobel_Y Filter Value
				}
			double sumxsq = sumx * sumx;//因为卷积核中包含负数,所以可能卷积的结果为负数,而图像的矩阵是没有负数的
			double sumysq = sumy * sumy;

			double sq2 = sqrt(sumxsq + sumysq);//对应图上的梯度的最大值,x 和 y 方向之和

			if (sq2 > 255) //Unsigned Char Fix
				sq2 = 255;

			filteredImg.at(i - size, j - size) = sq2;//该点的像素值就是所求的梯度值

			//梯度的方向求解
			if (sumx == 0) //Arctan Fix
				angles.at(i - size, j - size) = 90;
			else
				angles.at(i - size, j - size) = atan(sumy / sumx);
		}
	}

	return filteredImg;
}
3、非极大值抑制
简而言之就是,让检测到的边界变的更加细,即对检测到位边的像素进行一个筛选
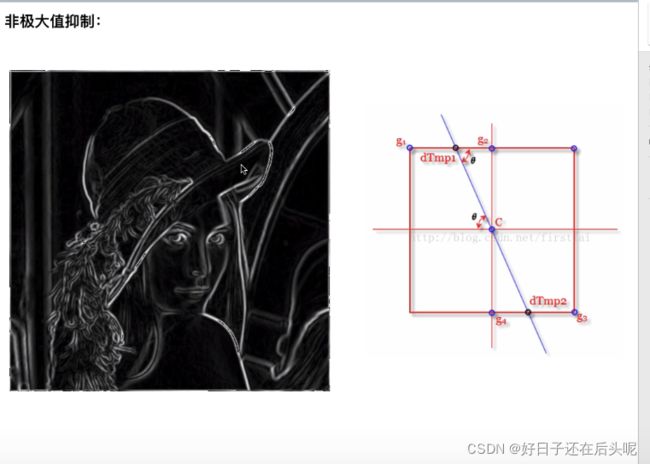
解释一下,在上图的右边C 点是我们此时关注的像素点,那条直线就是上面求的梯度的方向 θ,在这个方向上有有两个点,这两个点不一定就刚好是像素点,所以要用线性插值将这两个点求出,如果C点的像素值是三者之间最大的保留这个C点,反之删去C点,这样就起到了抑制的作用。

这是维基百科上的非极大抑制的解释,意思和我说的一样。
https://en.wikipedia.org/wiki/Canny_edge_detector#Gaussian_filter
只是实现的算法,具体可对照代码理解
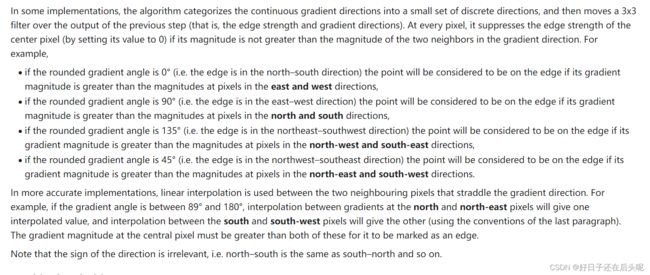
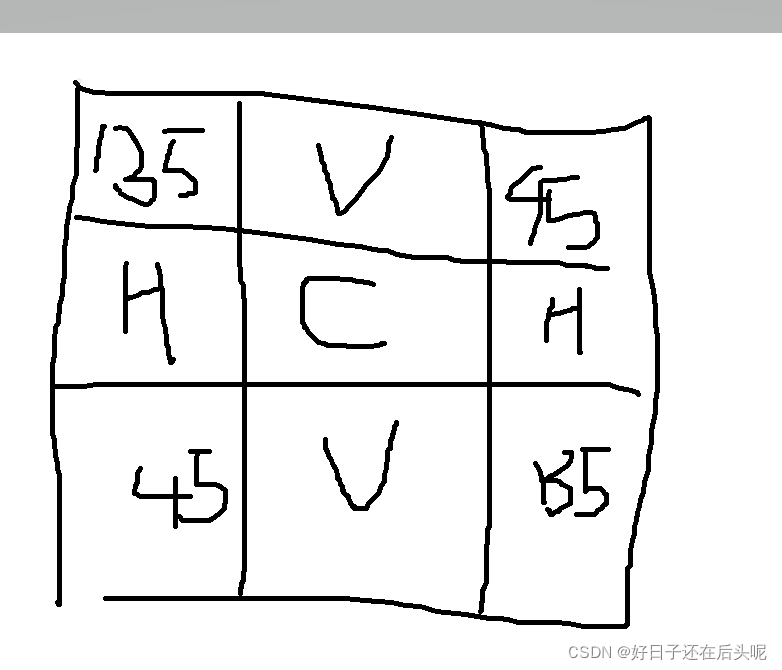
moves a 3x3 filter over ,解释一下这个非极大值抑制算法为什么是3*3 的卷积,求中心像素的值是否保留与周围的像素值是否比他大有关(相当于如上图所示构成了3*3的filter。因此代码中的抑制的图像矩阵也要同3*3卷积核操作过一样padding = 1(只不过我直接减去2,省得padding,s损失反之无所谓)。
Mat noMaxSupress(Mat& image)
{
	Mat nonMaxSupped = Mat(image.rows - 2, image.cols - 2, CV_8UC1);//非极大抑制后的图像矩阵,算法中明确使用3*3 的卷积核 故padding = 1

	for (int i = 1; i < image.rows - 1; i++) {
		for (int j = 1; j < image.cols - 1; j++) {
			float Tangent = angles.at(i, j);//当前像素的梯度方向

			nonMaxSupped.at(i - 1, j - 1) = image.at(i, j);//卷积的中心,也是比较这个像素点的值是不是最大

			//Horizontal Edge 对应 0 度,图面上有写
			if (((-22.5 < Tangent) && (Tangent <= 22.5)) || ((157.5 < Tangent) && (Tangent <= -157.5)))
			{
				if ((image.at(i, j) < image.at(i, j + 1)) || (image.at(i, j) < image.at(i, j - 1)))
					nonMaxSupped.at(i - 1, j - 1) = 0;
			}
			//Vertical Edge 对应90 度
			if (((-112.5 < Tangent) && (Tangent <= -67.5)) || ((67.5 < Tangent) && (Tangent <= 112.5)))
			{
				if ((image.at(i, j) < image.at(i + 1, j)) || (image.at(i, j) < image.at(i - 1, j)))
					nonMaxSupped.at(i - 1, j - 1) = 0;
			}

			//-45 Degree Edge 对应135度
			if (((-67.5 < Tangent) && (Tangent <= -22.5)) || ((112.5 < Tangent) && (Tangent <= 157.5)))
			{
				if ((image.at(i, j) < image.at(i - 1, j + 1)) || (image.at(i, j) < image.at(i + 1, j - 1)))
					nonMaxSupped.at(i - 1, j - 1) = 0;
			}

			//45 Degree Edge
			if (((-157.5 < Tangent) && (Tangent <= -112.5)) || ((22.5 < Tangent) && (Tangent <= 67.5)))
			{
				if ((image.at(i, j) < image.at(i + 1, j + 1)) || (image.at(i, j) < image.at(i - 1, j - 1)))
					nonMaxSupped.at(i - 1, j - 1) = 0;
			}
		}
	}
	return nonMaxSupped;

}
阈值化 Double threshold + Edge tracking by hysteresis
阈值化很简单,设定高低阈值,分别设定strong pixel or weak pixel
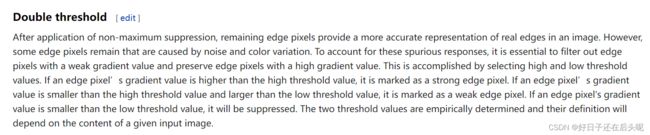
Edge tracking by hysteresis 边缘跟踪的滞后
减少有些像素被判定为weak pixel, 检查这个weak像素的8领域内是否有strong pixel,那么这个weak pixel 就保留下来。具体的判别方法,就是上图标蓝的 bolb analysis ()这个方法。
https://en.wikipedia.org/wiki/Connected-component_labeling
两次扫描算法的图形解释
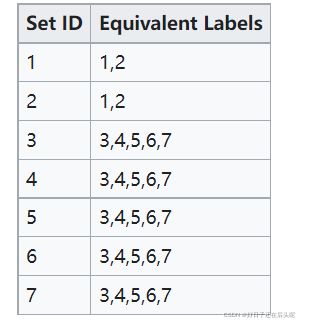
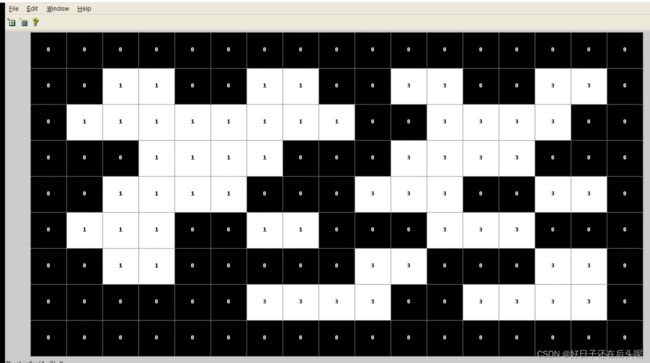
以一个8领域的例子来说明两次扫描算法。 该算法的数据结构为并查集。 1,第一次扫描: 将0视为背景像素,1为目标像素。原始图像如下。

从左往右从上到下扫描,背景像素保持0不变,遇到1值时,分析它的8邻域(只考虑已被扫描的的像素点,即左边、左上、上和右上这四个方向的像素值)
- 如果这四个方向的值都是0,那么该位置就创建一个新的标号(在原标号上加1);
- 如果这四个方向的非0值(即标号)都一样,那么该位置标号就是其领域的非0标号;
- 如果这四个方向的非0值有两个不同的标号,那么该位置标号就选其中之一,并记录这两个不同的标号(因为这两个标号是连通的,故视为等同的标号);
第一次扫描结束后得到如下标好号的图:
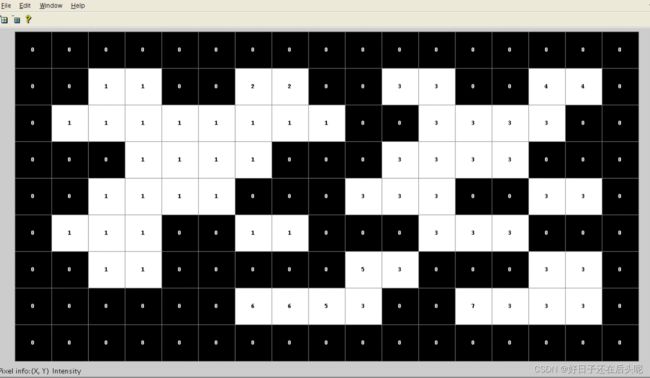
并且同时得到哪些标号相同的。(这里的标号相同点,对应上面的原则3)
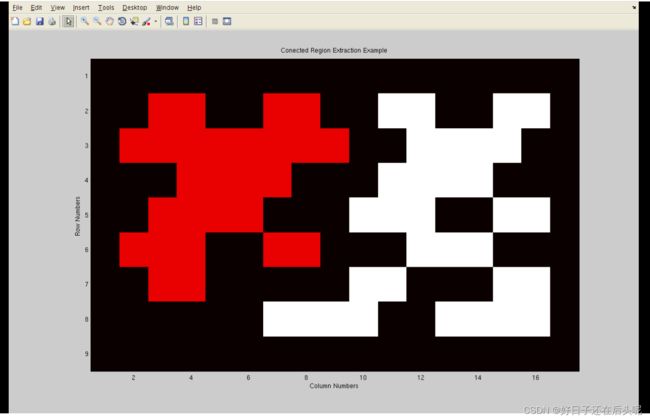
2,第二次扫描: 合并这些相同的标号,得到结果
最后可以将这两个区域以不同颜色显示出来
algorithm TwoPass(data) is
linked = []
labels = structure with dimensions of data, initialized with the value of Background
NextLabel = 0
First pass
for row in data do
for column in row do
if data[row][column] is not Background then
neighbors = connected elements with the current element's value
if neighbors is empty then
linked[NextLabel] = set containing NextLabel
labels[row][column] = NextLabel
NextLabel += 1
else
Find the smallest label
L = neighbors labels
labels[row][column] = min(L)
for label in L do
linked[label] = union(linked[label], L)
Second pass
for row in data do
for column in row do
if data[row][column] is not Background then
labels[row][column] = find(labels[row][column])
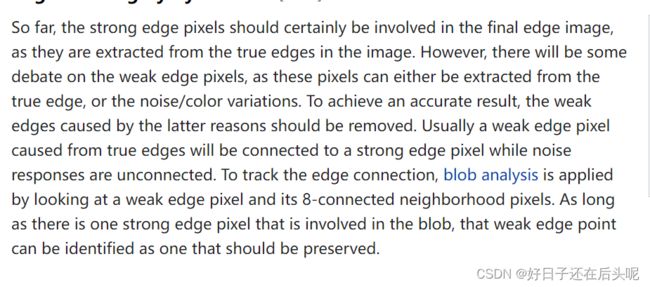
return labelsTo track the edge connection, blob analysis is applied by looking at a weak edge pixel and its 8-connected neighborhood pixels. As long as there is one strong edge pixel that is involved in the blob, that weak edge point can be identified as one that should be preserved.
这个部分我也有点疑问,怎样算把blob analysis应用到这里呢,只对weak点的8领域进行检测和bolb analysis 有啥关系啊,希望大佬看见帮忙解答一下。
Mat doubleT(Mat& image, int low, int high)
{
	//对高低阈值的设定进行限制
	if (low > 255)
		low = 255;
	if (high > 255)
		high = 255;

	Mat EdgeMat = Mat(image.rows, image.cols, image.type());

	for (int i = 0; i < image.rows; i++)
	{
		for (int j = 0; j < image.cols; j++)
		{
			EdgeMat.at(i, j) = image.at(i, j);
			if (EdgeMat.at(i, j) > high)
				EdgeMat.at(i, j) = 255;//strong 直接保留
			else if (EdgeMat.at(i, j) < low)
				EdgeMat.at(i, j) = 0;//直接抑制
			//消除边缘跟踪的滞后
			else//这个像素点的梯度值位于 low 和 high 之间,因此要进行进一步的选择
			{
				bool anyHigh = false;
				bool anyBetween = false;//值为与low 和 hignh 之间
				for (int x = i - 1; x < i + 2; x++)//此处x和y 刚好是检查像素点(i,j)的8领域
				{
					for (int y = j - 1; y < j + 2; y++)
					{
						if (x <= 0 || y <= 0 || EdgeMat.rows || y > EdgeMat.cols) //Out of bounds
							continue;
						else
						{
							if (EdgeMat.at(x, y) > high)//边缘点有strong
							{
								EdgeMat.at(i, j) = 255;//将这个weak保留下来
								anyHigh = true;
								break;
							}
							else if (EdgeMat.at(x, y) <= high && EdgeMat.at(x, y) >= low)
								anyBetween = true;//
						}
					}
					if (anyHigh)
						break;

				}

				if (!anyHigh)
					EdgeMat.at(i, j) = 0;


			}
		}
	}
	return EdgeMat;

}
代码和效果
#include
#include
#include
#include
using namespace cv;
using namespace std;
#define M_PI 3.14159265358979323846
vector> createFilter(int row, int column, double sigmaIn);//filter ,创建高斯核
Mat GsBlur(Mat& image);//高斯模糊
Mat SobelG(Mat& image);// sobel 求梯度大小 和 梯度方向
Mat noMaxSupress(Mat& image);//非极大值抑制
Mat doubleT(Mat& image,int low,int high);//双阈值法
int main(int argc, char* argv[])
{
//load pics
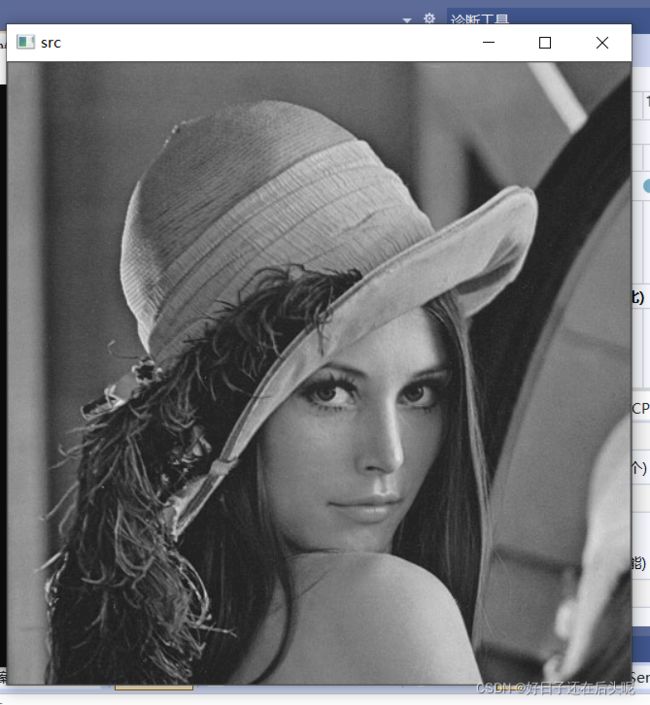
string imgPath = "E:\\研究生\\数字图像处理\\c++\\字符识别\\Project1\\lena.png";
Mat srcImg = imread(imgPath, 0);//RGB,JPG,PNG,TIFF格式,灰度格式读入
if (srcImg.empty()) {
cout << "can't load pic" << endl;
exit(-1);
}
//show pics
imshow("src",srcImg);
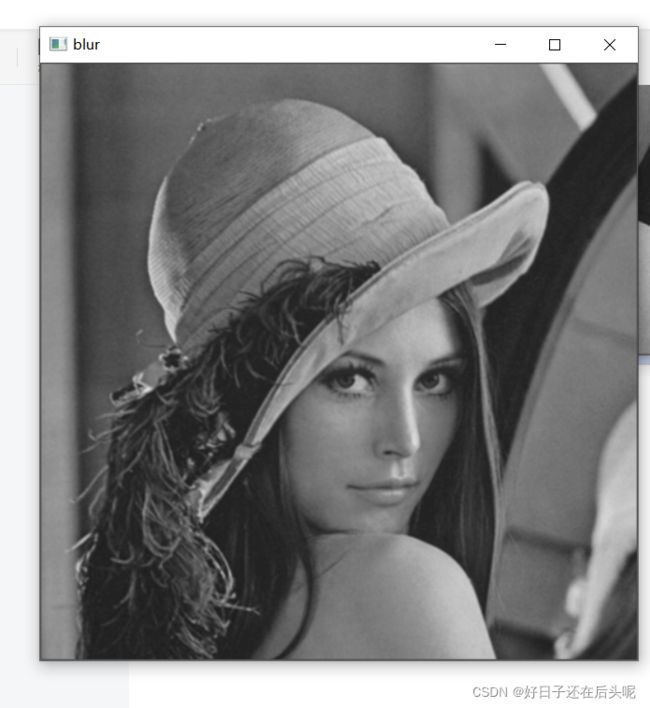
Mat blurImg = GsBlur(srcImg);
imshow("blur", blurImg);
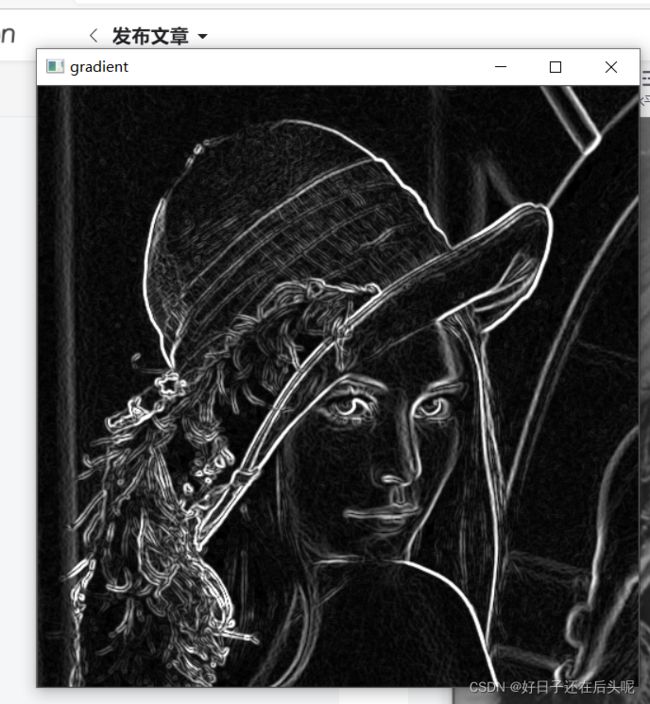
Mat Gimg = SobelG(blurImg);
imshow("gradient", Gimg);
Mat supImg = noMaxSupress(Gimg);
imshow("supress", supImg);
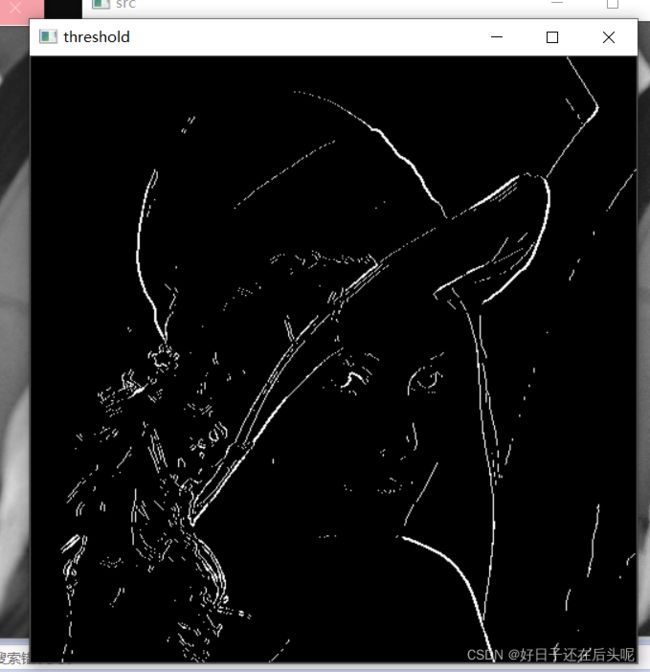
Mat DtImg = doubleT(supImg,50,150);
imshow("threshold",DtImg);
//opencv canny test
Mat dstImage;
//blur
GaussianBlur(srcImg,dstImage,Size(3,3),0,0);
Canny(dstImage, dstImage, 50, 150, 3);
//【7】显示效果图
imshow("【效果图】Canny边缘检测2", dstImage);
waitKey(0);//wait function
destroyAllWindows();
return 0;
}
//vector 嵌套着 vector
vector> createFilter(int row, int column, double sigmaIn)
{
vector> filter;// 卷积核
for (int i = 0; i < row; i++)
{
vector col;//创建一个vector 被filter这个Vector包着
for (int j = 0; j < column; j++)
{
col.push_back(-1);//为col 这个vector 创建空间
}
filter.push_back(col);
}
//上面的操作构建好了row * col 的vector
float coordSum = 0;
float constant = 2.0 * sigmaIn * sigmaIn;
// Sum is for normalization 标准化
float sum = 0.0;
for (int x = -row / 2; x <= row / 2; x++)
{
for (int y = -column / 2; y <= column / 2; y++)
{
coordSum = (x * x + y * y);
filter[x + row / 2][y + column / 2] = (exp(-(coordSum) / constant)) / (M_PI * constant);
sum += filter[x + row / 2][y + column / 2];
}
}
// Normalize the Filter
for (int i = 0; i < row; i++)
for (int j = 0; j < column; j++)
filter[i][j] /= sum;//就是图片里的 卷积核除以 所有的值之和
return filter;
}
Mat GsBlur(Mat& image)
{
cout << "src size: " << image.size() << endl;
vector> Gskernal = createFilter(3, 3, 0.8);//创建一个卷积核
int size = (int)Gskernal.size() / 2;
Mat filteredImg = Mat(image.rows - 2 * size, image.cols - 2 * size, CV_8UC1);
//就像 6*6的矩阵 给3*3的卷积核卷积,要填充padding = 1,
//我们把返回的矩阵的大小缩小,这样省去了padding的步骤
cout << "size: " << filteredImg.size() << endl;
for (int i = size; i < image.rows - size; i++)
{
for (int j = size; j < image.cols - size; j++)
{
double sum = 0;
for (int x = 0; x < Gskernal.size(); x++)
for (int y = 0; y < Gskernal.size(); y++)
{
sum += Gskernal[x][y] * (double)(image.at(i + x - size, j + y - size));
}
filteredImg.at(i - size, j - size) = sum;
}
}
return filteredImg;
}
Mat angles;//表示梯度的方向
Mat SobelG(Mat& image)
{
//Sobel X Filter,对应的是 图上的 Gx的矩阵
double x1[] = { -1.0, 0, 1.0 };
double x2[] = { -2.0, 0, 2.0 };
double x3[] = { -1.0, 0, 1.0 };
vector> xFilter(3);
xFilter[0].assign(x1, x1 + 3);
xFilter[1].assign(x2, x2 + 3);
xFilter[2].assign(x3, x3 + 3);
//Sobel Y Filter 对应的是 图上的 Gy的矩阵
double y1[] = { 1.0, 2.0, 1.0 };
double y2[] = { 0, 0, 0 };
double y3[] = { -1.0, -2.0, -1.0 };
vector> yFilter(3);
yFilter[0].assign(y1, y1 + 3);
yFilter[1].assign(y2, y2 + 3);
yFilter[2].assign(y3, y3 + 3);
//Limit Size
int size = (int)xFilter.size() / 2;
Mat filteredImg = Mat(image.rows - 2 * size, image.cols - 2 * size, CV_8UC1);
//同样的,sobel 边缘检测就是用sobel算子对图像进行卷积操作
angles = Mat(image.rows - 2 * size, image.cols - 2 * size, CV_32FC1); //AngleMap
for (int i = size; i < image.rows - size; i++)
{
for (int j = size; j < image.cols - size; j++)
{
double sumx = 0;
double sumy = 0;
//因为 是方阵 所以size都是一样的
for (int x = 0; x < xFilter.size(); x++)
for (int y = 0; y < yFilter.size(); y++)
{
sumx += xFilter[x][y] * (double)(image.at(i + x - size, j + y - size)); //Sobel_X Filter Value
sumy += yFilter[x][y] * (double)(image.at(i + x - size, j + y - size)); //Sobel_Y Filter Value
}
double sumxsq = sumx * sumx;//因为卷积核中包含负数,所以可能卷积的结果为负数,而图像的矩阵是没有负数的
double sumysq = sumy * sumy;
double sq2 = sqrt(sumxsq + sumysq);//对应图上的梯度的最大值,x 和 y 方向之和
if (sq2 > 255) //Unsigned Char Fix
sq2 = 255;
filteredImg.at(i - size, j - size) = sq2;//该点的像素值就是所求的梯度值
//梯度的方向求解
if (sumx == 0) //Arctan Fix
angles.at(i - size, j - size) = 90;
else
angles.at(i - size, j - size) = atan(sumy / sumx);
}
}
return filteredImg;
}
Mat noMaxSupress(Mat& image)
{
Mat nonMaxSupped = Mat(image.rows - 2, image.cols - 2, CV_8UC1);//非极大抑制后的图像矩阵,算法中明确使用3*3 的卷积核 故padding = 1
for (int i = 1; i < image.rows - 1; i++) {
for (int j = 1; j < image.cols - 1; j++) {
float Tangent = angles.at(i, j);//当前像素的梯度方向
nonMaxSupped.at(i - 1, j - 1) = image.at(i, j);//卷积的中心,也是比较这个像素点的值是不是最大
//Horizontal Edge 对应 0 度,图面上有写
if (((-22.5 < Tangent) && (Tangent <= 22.5)) || ((157.5 < Tangent) && (Tangent <= -157.5)))
{
if ((image.at(i, j) < image.at(i, j + 1)) || (image.at(i, j) < image.at(i, j - 1)))
nonMaxSupped.at(i - 1, j - 1) = 0;
}
//Vertical Edge 对应90 度
if (((-112.5 < Tangent) && (Tangent <= -67.5)) || ((67.5 < Tangent) && (Tangent <= 112.5)))
{
if ((image.at(i, j) < image.at(i + 1, j)) || (image.at(i, j) < image.at(i - 1, j)))
nonMaxSupped.at(i - 1, j - 1) = 0;
}
//-45 Degree Edge 对应135度
if (((-67.5 < Tangent) && (Tangent <= -22.5)) || ((112.5 < Tangent) && (Tangent <= 157.5)))
{
if ((image.at(i, j) < image.at(i - 1, j + 1)) || (image.at(i, j) < image.at(i + 1, j - 1)))
nonMaxSupped.at(i - 1, j - 1) = 0;
}
//45 Degree Edge
if (((-157.5 < Tangent) && (Tangent <= -112.5)) || ((22.5 < Tangent) && (Tangent <= 67.5)))
{
if ((image.at(i, j) < image.at(i + 1, j + 1)) || (image.at(i, j) < image.at(i - 1, j - 1)))
nonMaxSupped.at(i - 1, j - 1) = 0;
}
}
}
return nonMaxSupped;
}
Mat doubleT(Mat& image, int low, int high)
{
//对高低阈值的设定进行限制
if (low > 255)
low = 255;
if (high > 255)
high = 255;
Mat EdgeMat = Mat(image.rows, image.cols, image.type());
for (int i = 0; i < image.rows; i++)
{
for (int j = 0; j < image.cols; j++)
{
EdgeMat.at(i, j) = image.at(i, j);
if (EdgeMat.at(i, j) > high)
EdgeMat.at(i, j) = 255;//strong 直接保留
else if (EdgeMat.at(i, j) < low)
EdgeMat.at(i, j) = 0;//直接抑制
//消除边缘跟踪的滞后
else//这个像素点的梯度值位于 low 和 high 之间,因此要进行进一步的选择
{
bool anyHigh = false;
bool anyBetween = false;//值为与low 和 hignh 之间
for (int x = i - 1; x < i + 2; x++)//此处x和y 刚好是检查像素点(i,j)的8领域
{
for (int y = j - 1; y < j + 2; y++)
{
if (x <= 0 || y <= 0 || EdgeMat.rows || y > EdgeMat.cols) //Out of bounds
continue;
else
{
if (EdgeMat.at(x, y) > high)//边缘点有strong
{
EdgeMat.at(i, j) = 255;//将这个weak保留下来
anyHigh = true;
break;
}
else if (EdgeMat.at(x, y) <= high && EdgeMat.at(x, y) >= low)
anyBetween = true;//
}
}
if (anyHigh)
break;
}
if (!anyHigh)//在他的8领域没找到strong ,将其抑制
EdgeMat.at(i, j) = 0;
}
}
}
return EdgeMat;
} 

与opencv对比
//opencv canny test
	Mat dstImage;
	//blur
	GaussianBlur(srcImg,dstImage,Size(3,3),0,0);
	Canny(dstImage, dstImage, 150, 50, 3);


	//【7】显示效果图
	imshow("【效果图】Canny边缘检测2", dstImage);

	waitKey(0);//wait function
destroyAllWindows(); 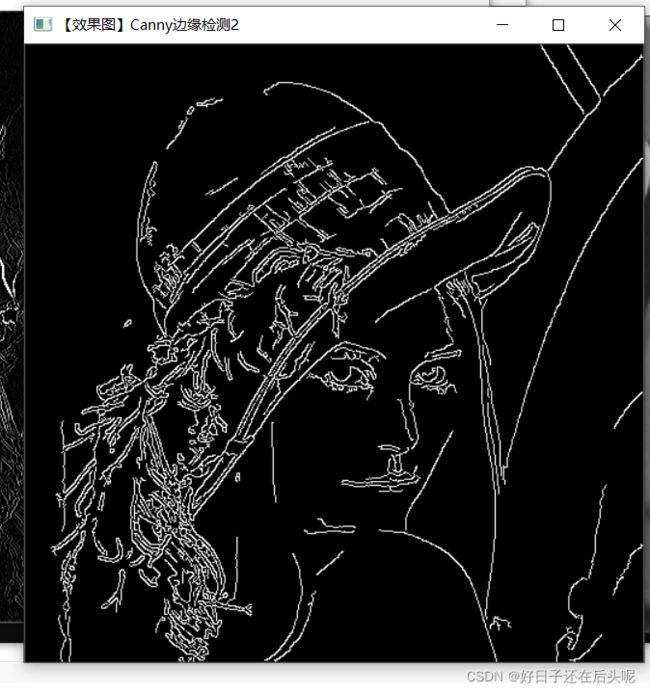
效果还是有差距 ,损失很多信息,不过还是对整个canny的流程了解了很多。
改进部分
哪位大佬看完可以提一下改进意见,看看是哪一步错了,感激不尽!!!