javascriptMVC教程 -- 14.FuncUnit实例:完成jquery焦点图插件的自动化功能测试
FuncUnit相关的知识我在之前的博文已有简单介绍,大家可以自行阅读《javascriptMVC入门 -- 12.FuncUnit》。他提供了很多api方法,我的文章中没有涉及,大家可以去官网查看,地址:http://www.javascriptmvc.com/。
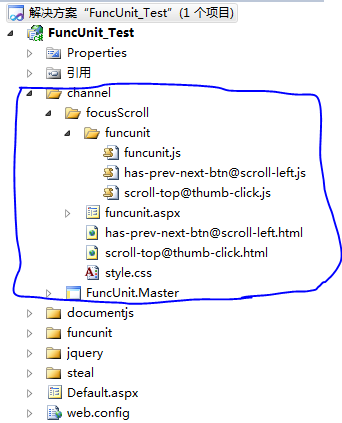
今天我们将通过一个简单的例子,介绍如何把FuncUnit引入项目中,对无法执行单元测试的js文件进行自动化的功能测试。我例子是对jquery焦点图插件进行测试,先来看一下项目结构:
蓝框选中的就是测试文件。根目录下面的documentjs、funcunit、jquery、steal四个文件夹对应于javascriptMVC框架源代码文件夹。
channel/focusScroll/funcunit下面的js文件是测试脚本。funcunit.js是入口文件,has-prev-next-btn@scroll-left.js和scroll-top@thumb-click.js测试脚本分别对应的测试页面是has-prev-next-btn@scroll-left.html和scroll-top@thumb-click.html。
FuncUnit.Master母版页里面包含QUnit相关内容:
<head runat="server">
    <title>
        <%=this.Page.Title %> FuncUnit Test</title>
    <link rel="stylesheet" type="text/css" href="/funcunit/qunit/qunit.css" />
    <asp:ContentPlaceHolder ID="head" runat="server">
    </asp:ContentPlaceHolder>
</head>
<body>
    <h1 id="qunit-header">
        <%=this.Page.Title %> Test Suite</h1>
    <h2 id="qunit-banner">
    </h2>
    <div id="qunit-testrunner-toolbar">
    </div>
    <h2 id="qunit-userAgent">
    </h2>
    <ol id="qunit-tests">
    </ol>
</body>
funcunit.aspx是FuncUnit.Master的子页面,用来加载funcunit/funcunit.js。
<asp:Content ID="head" ContentPlaceHolderID="head" runat="server">
    <script type='text/javascript' src='/steal/steal.js?channel/focusScroll/funcunit'></script>
</asp:Content>
funcunit/funcunit.js加载测试js脚本,运行测试。
steal("funcunit", "jquery")
    .then('./has-prev-next-btn@scroll-left.js')
    .then('./scroll-top@thumb-click.js')
我们来看has-prev-next-btn@scroll-left.js都做了什么事情。
说句题外话,大家文件命名的时候最好能体现出代码功能,一眼就知道他是干什么的。就像‘has-prev-next-btn@scroll-left.js’,一看我就知道他主要的测试关注点是:prev和next按钮是否工作正常,图片切换是左右切换。除文件命名外,还可以通过注释来描述测试的功能点包括哪些,这样方便日常维护。我们来看代码:
/*
主要测试点:
1.页面包含prev-next按钮,测试相关功能是否正常
2.图片切换方式为左右切换,测试图片测试时候正常
3.测试导航图片class属性是否正确
4.鼠标经过导航图片时(hover效果),大图是否正确切换
*/

steal("jquery", function () {
    module("test", {
        setup: function () {
            S.open("//channel/focusScroll/has-prev-next-btn@scroll-left.html");
        }
    });

    //设置导航图片功能
    test("thumb hover works", function () {
        S("#myTab_btns li:nth-child(1)").move("#myTab_btns li:nth-child(2)");
        S("#myTab_btns li:nth-child(2)").move("#myTab_btns li:nth-child(3)");

        S("#main li:nth-child(3)").offset({ top: 0, left: 0 }).then(function () {
            ok(S("#main li:nth-child(2)").offset().left === -755);
            ok(S("#main li:nth-child(4)").offset().left === 755);

            equal(S("#myTab_btns li:nth-child(2)").hasClass('hot'), false);
            equal(S("#myTab_btns li:nth-child(3)").hasClass('hot'), true);
        });

    });

    //测试‘prev’按钮
    test("prev btn works", function () {
        S("#btnPrev").click();

        S("#main li:nth-child(4)").offset({ top: 0, left: 0 }).then(function () {
            ok(S("#main li:nth-child(1)").offset().left === -755*3);

            equal(S("#myTab_btns li:nth-child(4)").hasClass('hot'), true);
            equal(S("#myTab_btns li:nth-child(1)").hasClass('hot'), false);
        });
    });

    //测试‘next’按钮
    test("next btn works", function () {
        S("#btnNext").click();

        S("#main li:nth-child(2)").offset({ top: 0, left: 0 }).then(function () {
            ok(S("#main li:nth-child(1)").offset().left === -755);
            ok(S("#main li:nth-child(3)").offset().left === 755);

            equal(S("#myTab_btns li:nth-child(1)").hasClass('hot'), false);
            equal(S("#myTab_btns li:nth-child(2)").hasClass('hot'), true);
        });
    })
})
下面我来对代码中一些关键点做简单说明。
1. module的setup会在每次运行test方法之前运行,S.open用来打开一个窗口。
2. S("#myTab_btns li:nth-child(1)").move("#myTab_btns li:nth-child(2)");实现的功能是,从导航图1移动到导航图2,会触发鼠标移入移出的事件。
3. S("#main li:nth-child(3)").offset({ top: 0, left: 0 }).then(function () {...}); 等待第三章大图的offset变为{ top: 0, left: 0 }后,执行then里面的方法。在编码的过程中我在这里碰到了钉子,看官网api,他说offset()是一个wait类型的函数。那么就应该支持 .offset({ top: 0, left: 0 }, function () {...}) 的写法,但是代码运行错误。我去官网发帖求助也没有得到任何帮忙。之后通过看源代码才发现有then()方法,随后问题得以解决。
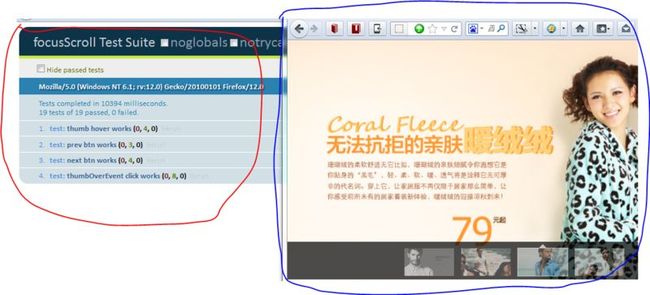
我们来看项目运行之后的结果,红框选中的是QUnit显示的测试报告(FuncUnit基于QUnit),蓝框选中的是FuncUnit运行时打开的测试页面(has-prev-next-btn@scroll-left.html 和 scroll-top@thumb-click.html)。
demo项目无法直接运行,因为javascriptMVC源代码有30M,博客园提供的上传文件空间有限,所以我只上传了测试相关代码。需要首先下载javascriptMVC源代码,替换到demo中的funcunit、steal和jquery文件夹,才能运行项目。
demo下载地址:FuncUnit_Test.zip

