使用PyTorch搭建ResNet50网络
ResNet18的搭建请移步:使用PyTorch搭建ResNet18网络并使用CIFAR10数据集训练测试
ResNet34的搭建请移步:使用PyTorch搭建ResNet34网络
ResNet101、ResNet152的搭建请移步:使用PyTorch搭建ResNet101、ResNet152网络
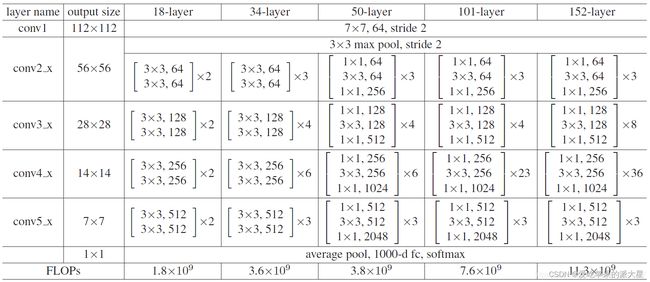
看过我之前ResNet18和ResNet34搭建的朋友可能想着可不可以把搭建18和34层的方法直接用在50层以上的ResNet的搭建中,我也尝试过。但是ResNet50以上的网络搭建不像是18到34层只要简单修改卷积单元数目就可以完成,ResNet50以上的三种网络都是一个样子,只是层数不同,所以完全可以将34到50层作为一个搭建分水岭。
加上我初学PyTorch和深度神经网络,对于采用BasicBlock和BottleNeck的高效率构建还不是很懂,所以这里给出了类似前两种ResNet的简单暴力堆叠网络层的构建方法
ResNet50网络结构
这里给出了我认为比较详细的ResNet50网络具体参数和执行流程图:
直接上代码
model.py模型部分:
import torch
import torch.nn as nn
from torch.nn import functional as F

"""
这里的ResNet50的搭建是暴力形式,直接累加完成搭建,没采用BasicBlock和BottleNeck
第一个DownSample类,用于定义shortcut的模型函数,完成两个layer之间虚线的shortcut,负责layer1虚线的升4倍channel以及其他layer虚线的升2倍channel
观察每一个layer的虚线处升channel仅仅是升channel前后的数量不同以及stride不同,对于kernel_size和padding都分别是1和0,不作为DownSample网络类的模型参数
参数in_channel即是升之前的通道数, out_channel即是升之后的通道数, stride即是每一次升channel不同的stride步长,对于layer1升通道的stride=1,其他layer升通道的stride=2,注意不同
"""
"""
运行时一定要注意:
本网络中的ResNet50类中forward函数里面:layer1_shortcut1.to('cuda:0');layer2_shortcut1.to('cuda:0')等语句,是将实例化的DownSample
网络模型放到train.py训练脚本中定义的GPU同一环境下,不加此句一般会如下报错:
Input type (torch.cuda.FloatTensor) and weight type (torch.FloatTensor) should be the same
"""


class DownSample(nn.Module):

    def __init__(self, in_channel, out_channel, stride):            # 传入下采样的前后channel数以及stride步长
        super(DownSample, self).__init__()                          # 继承父类
        self.down = nn.Sequential(                                  # 定义一个模型容器down
            nn.Conv2d(in_channel, out_channel, kernel_size=1, stride=stride, padding=0, bias=False),    # 负责虚线shortcut的唯一且重要的一次卷积
            nn.BatchNorm2d(out_channel),                            # 在卷积和ReLU非线性激活之间,添加BatchNormalization
            nn.ReLU(inplace=True)                                   # shortcut最后加入一个激活函数,置inplace=True原地操作,节省内存
        )

    def forward(self, x):
        out = self.down(x)                                          # 前向传播函数仅仅完成down这个容器的操作
        return out


"""
第一个ResNet50类,不使用BottleNeck单元完成ResNet50层以上的搭建,直接使用forward再加上前面的DownSample模型类函数,指定ResNet50所有参数构建模型
"""


class ResNet50(nn.Module):

    def __init__(self, classes_num):                                # ResNet50仅传一个分类数目,将涉及的所有数据写死,具体数据可以参考下面的图片
        super(ResNet50, self).__init__()
        # 在进入layer1234之间先进行预处理,主要是一次卷积一次池化,从[batch, 3, 224, 224] => [batch, 64, 56, 56]
        self.pre = nn.Sequential(
            # 卷积channel从原始数据的3通道,采用64个卷积核,升到64个channel,卷积核大小、步长、padding均固定
            nn.Conv2d(3, 64, kernel_size=7, stride=2, padding=3, bias=False),
            nn.BatchNorm2d(64),                                     # 卷积后紧接一次BatchNormalization
            nn.ReLU(inplace=True),
            nn.MaxPool2d(kernel_size=3, stride=2, padding=1)        # 预处理最后的一次最大池化操作,数据固定
        )
        """
        每一个layer的操作分为使用一次的first,和使用多次的next组成,first负责每个layer的第一个单元(有虚线)的三次卷积,next负责剩下单元(直连)的三次卷积
        """
        # --------------------------------------------------------------
        self.layer1_first = nn.Sequential(
            nn.Conv2d(64, 64, kernel_size=1, stride=1, padding=0, bias=False),      # layer1_first第一次卷积保持channel不变,和其他layer的first区别
            nn.BatchNorm2d(64),
            nn.ReLU(inplace=True),
            nn.Conv2d(64, 64, kernel_size=3, stride=1, padding=1, bias=False),      # layer1_first第二次卷积stride和其他layer_first的stride不同
            nn.BatchNorm2d(64),
            nn.ReLU(inplace=True),
            nn.Conv2d(64, 256, kernel_size=1, stride=1, padding=0, bias=False),     # layer1_first第三次卷积和其他layer一样,channel升4倍
            nn.BatchNorm2d(256)                                         # 注意最后一次卷积结束不加ReLU激活函数
        )
        self.layer1_next = nn.Sequential(
            nn.Conv2d(256, 64, kernel_size=1, stride=1, padding=0, bias=False),     # layer1_next的第一次卷积负责将channel减少,减少训练参数量
            nn.BatchNorm2d(64),
            nn.ReLU(inplace=True),
            nn.Conv2d(64, 64, kernel_size=3, stride=1, padding=1, bias=False),
            nn.BatchNorm2d(64),
            nn.ReLU(inplace=True),
            nn.Conv2d(64, 256, kernel_size=1, stride=1, padding=0, bias=False),     # layer1_next的最后一次卷积负责将channel增加至可以与shortcut相加
            nn.BatchNorm2d(256)
        )
        # --------------------------------------------------------------    # layer234操作基本相同,这里仅介绍layer2
        self.layer2_first = nn.Sequential(
            nn.Conv2d(256, 128, kernel_size=1, stride=1, padding=0, bias=False),    # 与layer1_first第一次卷积不同,需要降channel至1/2
            nn.BatchNorm2d(128),
            nn.ReLU(inplace=True),
            nn.Conv2d(128, 128, kernel_size=3, stride=2, padding=1, bias=False),    # 注意这里的stride=2与layer34相同,与layer1区别
            nn.BatchNorm2d(128),
            nn.ReLU(inplace=True),
            nn.Conv2d(128, 512, kernel_size=1, stride=1, padding=0, bias=False),    # 再次升channel
            nn.BatchNorm2d(512)
        )
        self.layer2_next = nn.Sequential(
            nn.Conv2d(512, 128, kernel_size=1, stride=1, padding=0, bias=False),    # 负责循环普通的操作
            nn.BatchNorm2d(128),
            nn.ReLU(inplace=True),
            nn.Conv2d(128, 128, kernel_size=3, stride=1, padding=1, bias=False),
            nn.BatchNorm2d(128),
            nn.ReLU(inplace=True),
            nn.Conv2d(128, 512, kernel_size=1, stride=1, padding=0, bias=False),
            nn.BatchNorm2d(512)
        )
        # --------------------------------------------------------------
        self.layer3_first = nn.Sequential(
            nn.Conv2d(512, 256, kernel_size=1, stride=1, padding=0, bias=False),
            nn.BatchNorm2d(256),
            nn.ReLU(inplace=True),
            nn.Conv2d(256, 256, kernel_size=3, stride=2, padding=1, bias=False),
            nn.BatchNorm2d(256),
            nn.ReLU(inplace=True),
            nn.Conv2d(256, 1024, kernel_size=1, stride=1, padding=0, bias=False),
            nn.BatchNorm2d(1024)
        )
        self.layer3_next = nn.Sequential(
            nn.Conv2d(1024, 256, kernel_size=1, stride=1, padding=0, bias=False),
            nn.BatchNorm2d(256),
            nn.ReLU(inplace=True),
            nn.Conv2d(256, 256, kernel_size=3, stride=1, padding=1, bias=False),
            nn.BatchNorm2d(256),
            nn.ReLU(inplace=True),
            nn.Conv2d(256, 1024, kernel_size=1, stride=1, padding=0, bias=False),
            nn.BatchNorm2d(1024)
        )
        # --------------------------------------------------------------
        self.layer4_first = nn.Sequential(
            nn.Conv2d(1024, 512, kernel_size=1, stride=1, padding=0, bias=False),
            nn.BatchNorm2d(512),
            nn.ReLU(inplace=True),
            nn.Conv2d(512, 512, kernel_size=3, stride=2, padding=1, bias=False),
            nn.BatchNorm2d(512),
            nn.ReLU(inplace=True),
            nn.Conv2d(512, 2048, kernel_size=1, stride=1, padding=0, bias=False),
            nn.BatchNorm2d(2048)
        )
        self.layer4_next = nn.Sequential(
            nn.Conv2d(2048, 512, kernel_size=1, stride=1, padding=0, bias=False),
            nn.BatchNorm2d(512),
            nn.ReLU(inplace=True),
            nn.Conv2d(512, 512, kernel_size=3, stride=1, padding=1, bias=False),
            nn.BatchNorm2d(512),
            nn.ReLU(inplace=True),
            nn.Conv2d(512, 2048, kernel_size=1, stride=1, padding=0, bias=False),
            nn.BatchNorm2d(2048)
        )
        self.avg_pool = nn.AdaptiveAvgPool2d((1, 1))     # 经过最后的自适应均值池化为[batch, 2048, 1, 1]
        # 定义最后的全连接层
        self.fc = nn.Sequential(
            nn.Dropout(p=0.5),                  # 以0.5的概率失活神经元
            nn.Linear(2048 * 1 * 1, 1024),      # 第一个全连接层
            nn.ReLU(inplace=True),
            nn.Dropout(p=0.5),
            nn.Linear(1024, classes_num)        # 第二个全连接层,输出类结果
        )

    """
    forward()前向传播函数负责将ResNet类中定义的网络层复用,再与上面的DownSample类完美组合
    """
    def forward(self, x):
        out = self.pre(x)                                       # 对输入预处理,输出out = [batch, 64, 56, 56]
        """
        每一层layer操作由两个部分组成,第一个是带有虚线的卷积单元,其他的是循环完成普通的shortcut为直连的卷积单元
        """
        layer1_shortcut1 = DownSample(64, 256, 1)               # 使用DownSample实例化一个网络模型layer1_shortcut1,参数即是虚线处升channel数据,注意stride=1
        layer1_shortcut1.to('cuda:0')
        layer1_identity1 = layer1_shortcut1(out)                # 调用layer1_shortcut1对卷积单元输入out计算虚线处的identity,用于后面与卷积单元输出相加
        out = self.layer1_first(out)                            # 调用layer1_first完成layer1的第一个特殊的卷积单元
        out = F.relu(out + layer1_identity1, inplace=True)      # 将identity与卷积单元输出相加,经过relu激活函数

        for i in range(2):                                      # 使用循环完成后面几个相同输入输出相同操作的卷积单元
            layer_identity = out                                # 直接直连identity等于输入
            out = self.layer1_next(out)                         # 输入经过普通卷积单元
            out = F.relu(out + layer_identity, inplace=True)    # 两路结果相加,再经过激活函数
        # --------------------------------------------------------------后面layer234都是类似的,这里仅介绍layer2

        layer2_shortcut1 = DownSample(256, 512, 2)              # 注意后面layer234输入输出channel不同,stride=2都是如此
        layer2_shortcut1.to('cuda:0')
        layer2_identity1 = layer2_shortcut1(out)
        out = self.layer2_first(out)
        out = F.relu(out + layer2_identity1, inplace=True)      # 完成layer2的第一个卷积单元

        for i in range(3):                                      # 循环执行layer2剩下的其他卷积单元
            layer_identity = out
            out = self.layer2_next(out)
            out = F.relu(out + layer_identity, inplace=True)
        # --------------------------------------------------------------

        layer3_shortcut1 = DownSample(512, 1024, 2)
        layer3_shortcut1.to('cuda:0')
        layer3_identity1 = layer3_shortcut1(out)
        out = self.layer3_first(out)
        out = F.relu(out + layer3_identity1, inplace=True)

        for i in range(5):
            layer_identity = out
            out = self.layer3_next(out)
            out = F.relu(out + layer_identity, inplace=True)
        # --------------------------------------------------------------

        layer4_shortcut1 = DownSample(1024, 2048, 2)
        layer4_shortcut1.to('cuda:0')
        layer4_identity1 = layer4_shortcut1(out)
        out = self.layer4_first(out)
        out = F.relu(out + layer4_identity1, inplace=True)

        for i in range(2):
            layer_identity = out
            out = self.layer4_next(out)
            out = F.relu(out + layer_identity, inplace=True)
        # 最后一个全连接层
        out = self.avg_pool(out)                # 经过最后的自适应均值池化为[batch, 2048, 1, 1]
        out = out.reshape(out.size(0), -1)      # 将卷积输入[batch, 2048, 1, 1]展平为[batch, 2048*1*1]
        out = self.fc(out)                  # 经过最后一个全连接单元,输出分类out

        return out
ResNet50的训练可以参照我的ResNet18搭建中的训练和测试部分:
使用PyTorch搭建ResNet18网络并使用CIFAR10数据集训练测试
经过手写ResNet50网络模型的暴力搭建,我认识到了要想把ResNet及其其他复杂网络的搭建,前提必须要把模型整个流程环节全部弄清楚
例如,ResNet50里面每一次的shortcut里面的升维操作的in_channel,out_channel,kernel_size,stride,padding的参数大小变化
每一个卷积单元具体参数都是什么样的,如何才能最大化简化代码;
还有就是搭建复杂的网络模型中,一定要做到步步为营,一步步搭建并检验,每一步都要理解有理有据,最后才能将整个网络搭建起来
还有一个意外收获就是在训练过程中,发现了这样的报错:
Input type (torch.cuda.FloatTensor) and weight type (torch.FloatTensor) should be the same
原来是因为输入的数据类型为torch.cuda.FloatTensor,说明输入数据在GPU中。模型参数的数据类型为torch.FloatTensor,说明模型还在CPU
故在ResNet50的forward()函数中对实例化的DownSample网络添加到和train.py对ResNet50实例化的网络模型的同一个GPU下,解决了错误
