一、Node架构
1. Native modules
Native层处于Node架构的顶层,由JS实现,主要提供应用程序可直接调用库,例如fs、http模块等。
2. Buildin modules(C/C++ Bindings)
该层充当了胶水层,由于JavaScript不能直接操作底层硬件设置,因此想要与底层进行通信就要用到该层与底层进行交互。
3. 底层(V8, libuv, c-ares(DNS), http parser, zlib(compression) ... )
- V8: 执行JS代码,提供桥梁接口
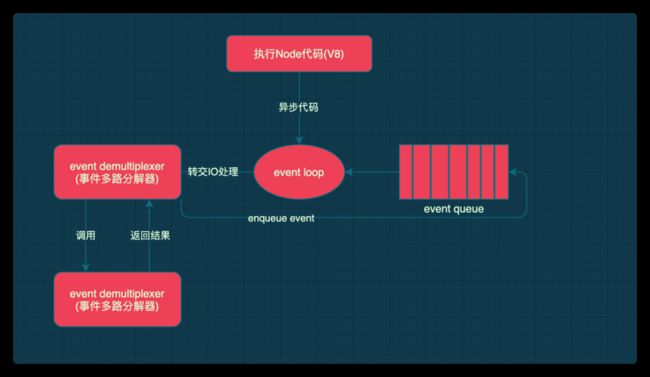
- Libuv:事件循环、事件队列、异步IO
- 第三方模块
二、异步IO
1. Node的IO方式
IO是应用程序的瓶颈所在,Node单线程配合事件驱动架构及libuv实现了异步非阻塞的IO,无需原地等待结果返回,性能较高,可以胜任IO密集型高并发请求。
2. 事件驱动架构
事件驱动架构类似于发布订阅模式,即发布者广播消息,订阅者订阅指定的消息,并执行订阅到消息后的代码。
const EventEmitter = require('events');
const myEvent = new EventEmitter();

// 订阅者
myEvent.on('event1', () => console.log(event1 executed));

// 发布者
myEvent.emit('event1');
// 订阅到后打印:
// event1 executed
3. 单线程(主线程V8)
Node执行代码的线程也就是V8为单线程,单线程执行代码有时会出现阻塞的情况。
创建一个函数,参数为time, 当当前时间小于传入的时间+函数执行时的时间时,则进入循环中,直到条件不成立时进行函数返回。此时创建的http服务启动被阻塞。
const http = require('http');

function sleepTime(time) {
  const sleep = Date.now() + time * 1000;
  while (Date.now() < sleep) {}
  return
}
// 调用延迟函数
sleepTime(4); // 4s后控制台打印server is running
// 以下代码执行被阻塞
const server = http.createServer((req, res) => res.end('server is starting'));

server.listen(8000, () => console.log('server is running'));
三、全局对象
1. global
与浏览器的全局对象window有所不同,Node使用global作为全局对象,是全局变量的宿主,换句话说全局变量都挂载在全局对象global身上。
常见的全局变量:
__filename: 返回正在执行脚本文件的绝对路径__dirname: 返回正在执行脚本所在目录timer类函数:执行顺序与事件循环间的关系process:提供与当前进程互动的接口require:实现模块的加载module/exports:处理模块的导出
2. process
process可以查看有关进程的信息。
process.memoryUsage(): 返回一个对象,描述Node.js进程的内存使用情况(以字节为单位)。
process.cpuUsage(): process. cpuusage()方法在一个具有user和system属性的对象中返回当前进程的用户和系统CPU时间使用情况,它们的值是微秒值(百万分之一秒)。这些值分别度量在用户和系统代码中花费的时间,如果有多个CPU内核为该进程执行工作,则可能最终大于实际运行时间。
之前调用process.cpuUsage()的结果可以作为参数传递给该函数,以获得差异读取。
process.cwd():进程工作目录,也就是执行node命令时所在的目录。
process.version: node版本
process.versions: node环境版本
process.arch: cpu架构
process.env.NODE_ENV:生产/开发环境
process.env.path: 系统环境变量
process.env.USERPROFILE:当前用户目录(windows, macos为home)
process.platform:运行平台
process.uptime:进程已经运行的时间(秒)
process.on()监听事件:
process.on('exit', (code) => {
  console.log('exit' + code);
})

process.on('beforeExit', (code) => {
  console.log('before exit' + code);
})

console.log('代码执行完毕');

// 代码执行完毕
// before exit 0
// exit 0beforeExit传入的函数可以有异步代码,而exit只能有同步代码,否则异步代码将不会执行。
process.stdin: 标准输入
process.stdout:标准输出
process.stdin.pipe(process.stdout);
// 控制台阻塞,输入111
// 控制台打印111

process.stdin.setEncoding('utf-8');
// 启动输入监听,如果可读执行回调函数
process.stdin.on('readable', () => {
  let chunk = process.stdin.read();
  if (chunk !== null) {
    process.stdout.write('data ', chunk);
  }
})
四、path模块
1. 常用API
path.basename(path, exd): 获取路径中的基本路径(路径的最后一部分),第二个参数为扩展名,如何添加返回值不带扩展名,末尾有分割符则会忽略(/a/b/c.js/ -> c.js)。path.dirname(path):获取路径中的目录名称,末尾的分割符也会忽略(/a/b/c/ -> /a/b)。path.extname(path): 获取路径中扩展名称path.isAbsolute(path):获取路径是否为绝对路径path.join(path1, path2, ...):拼接多个路径片段path.resolve(path1, path2, ...):返回绝对路径,如果非第一个参数出现绝对路径,返回的绝对路径将从该路径开始。path.parse(path): 解析路径,返回一个对象,例如传入一个绝对目录路径'/a/b/c',会返回{ root: '/', dir: '/a/b'}path.format(pathObj): 序列化路径, 接受一个parse方法解析后的路径对象,返回完整路径。path.normalize():规范化路径
五、Buffer
最初的JavaScript服务于浏览器平台,内部主要操作的数据是字符串,随着Nodejs平台的出现使得JavaScript可以实现IO操作,因此就出现了Buffer的存在,为什么IO操作会与Buffer扯上关系,我们先从二进制数据开始说起。
1. 二进制数据
服务器在处理与用户交互的信息时,该信息就是二进制数据,所以IO操作的就是二进制数据。
2. Stream流操作
Stream流操作并非是Nodejs独创,它相当于一种数据类型,也能够用于存储数据,而且最主要的是能够进行分段,当传输数据较大时,便可以使用流操作,因此可以避免由于操作的数据过大而把内存短时间占满的情况,再配合管道技术即可实现数据分段传输。
3. Buffer
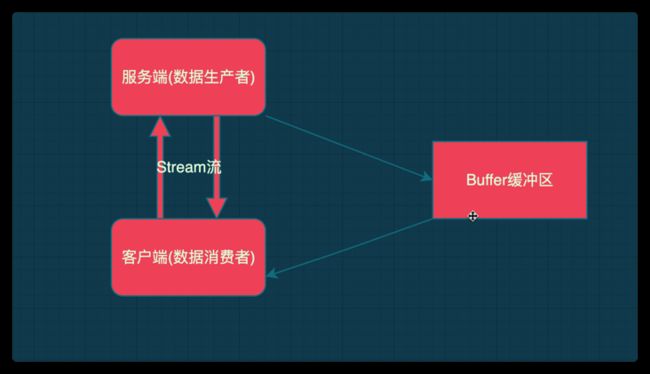
有了上面两点,二进制数据的传输是端到端的,可以理解为有一个数据的生产者(服务端),至少有一个消费者(客户端)。此时会有多种情况产生,比如数据的生产速度可能无法满足数据的消费速度,或者数据的消费速度比生产速度慢一些,那么数据就会出现等待的情况,可能是前者未达到需求的数据在等待,也可能是后者多出的数据在等待,因此这些数据存储在哪就成了一个问题,这就有了Buffer的产生。
Nodejs中的Buffer是一片内存空间,是无需require的一个全局变量,实现了Nodejs平台下的二进制数据操作,且不占据V8堆内存大小的内存空间,由C++层进行直接分配。,一般配合Stream流使用,充当缓冲区。
4. 创建Buffer
alloc:创建指定字节大小的bufferallocUnsafe:创建指定大小的buffer(不安全)from:接受数据,创建buffer
// 创建10字节大小buffer
const b1 = Buffer.alloc(10);
console.log(b1); //  16进制

const b2 = Buffer.allocUnsafe(10);
console.log(b2); //
// 内存当中只要有空闲空间就会被使用

// 默认第二个参数为utf-8编码
const b3 = Buffer.from('1');
console.log(b3); //

// 接收数组
const b4 = Buffer.from([1, 2, 3]);
console.log(b4); //
5. Buffer实例方法
fill:使用数据填充bufferwrite:向buffer中写入数据toString:从buffer中提取数据slice:截取bufferindexOf:在buffer中查找数据copy:拷贝buffer中的数据
const buf = Buffer.alloc(6);

// fill会将buffer填满
buf.fill('123');
console.log(buf.toString()); // 123123
// 后两个参数为填充起始位置与结束位置,且结束位置取不到

// write
const buf1 = Buffer.alloc(6);
buf1.write('123', 1, 4) // value offset length
console.log(buf1.toString()); // 123

// slice与字符串的slice操作类似
const buf2 = Buffer.from('hello');
buf2.slice(-3);
console.log(buf2.toString()); // llo

// indexOf
const buf3 = Buffer.from('he, hello');
console.log(buf3.indexOf('h')) // 0
// 查找的起始位置
console.log(buf3.indexOf('h', 2)); // 6
// 返回的是字节,如果有中文存在,一个中文占3个字节

// copy
const b4 = Buffer.alloc(6);
const b5 = Buffer.from('hello.');
// 将b5的值赋值给b4
b5.copy(b4, 3, 3, 6); //赋值的buf 写入位置 读取位置 读取结束位置(取不到)
6. 静态方法
concat([buf1, buf2, ..], totalLength):将多个buffer拼接成一个新的bufferisBuffer:判断当前数据是否为buffer
7. 自定义方法
// 实现buffer的split方法
ArrayBuffer.prototype.split = function(sep) {
  // 获取分隔符的长度
  const len = Buffer.from(sep).length;
  const ret = [];
  const start = 0;
  const offset = 0;

  while (offset = this.indexOf(sep, start) !== -1) {
        ret.push(this.slice(start, offset));
    start = offset + len;
  }
  // 最后一个字符匹配上
  res.push(this.slice(start))
  return ret;
}
六、File System
fs是Node内置的核心模块,主要是进行文件的读写或拷贝操作。
学过操作系统都知道文件系统中的文件拥有可读、可写以及执行的权限,一般文件的默认权限为可读可写不可执行(r-w-),用8进制表示为0666,转换为十进制为438。
在Node中使用flag表示对文件的操作方法,比如可读可写。
常见的的flag操作符:
- r: 可读
- w: 可写
- s:表示同步
- +:执行相反操作
- x:表示排他操作
- a:表示追加操作
1. 常用的文件操作API
新建一个data.txt文件,内容为:
Hello World// readFile
const fs = require('fs')
const path = require('path');
fs.readFile(path.resovle('data.txt'), 'utf-8', (err, data) => {
console.log(data); // Hello World
console.log(err); // null
});
// writeFile
// mode:执行权限
// flag默认为w+,写入时会清空再写入。使用r+会直接覆盖
fs.writeFile('data.txt', 'abc', { mode: 438, flag: 'r+', encoding: 'utf-8' }, (err) => {
if (!err) fs.readFile('data.txt', 'utf-8', (err, data) => {
console.log(data); // abclo World
})
});
// appendFile在内容后追加内容
fs.qppendFile('data.txt', 'append part', (err) => {
});
// copyFile
fs.copyFile('data.txt', 'test.txt', (err) => {});
// watchFile监听文件 interval:监听间隔
fs.watchFile('data.txt', { interval: 20 }, (current, previous) => {
// 修改之后文件的修改时间与之修改之前的文件修改时间不同说明文件已被修改
if (current.mtime !== previous.mtime) {
console.log('modified');
// 取消监听
fs.unwatchFile('data.txt');
}
})2. 文件打开与关闭
上面使用Nodejs进行文件的读写已经能够实现文件的打开,那么为什么还要提供文件打开的api?由于readFile与writeFile是一次性进行读取或写入,但对于较大体积的文件合理的处理方式是边读取边写入,所以需要将文件的打开、读取、关闭看成独立的环节。
// 打开关闭文件
// fd(file descriptor): 文件描述符
fs.open('data.txt', 'r', (err, fd) => {
    console.log(fd);
    fs.close(fd, (err) => {
        console.log('close');
    });
});
3. 大文件读写
对于大文件需要先打开文件再进行读取然后写入buffer中,再读取buffer中的数据写入到文件中。
const buf = Buffer.alloc(10);

fs.open('data.txt', 'r', (err, rfd) => {
    console.log(rfd);
    // 1:buffer写入位置 4:写入lenth 0读取位置
    fs.read(rfd, buf, 1, 4, 1, (err, readBytes, data) => {
        console.log(readBytes);
        console.log(data.toString());
    });
});

const buf1 = Buffer.from('12345')

// write:读取buffer写入到文件中
fs.open('b.txt', 'w', (err, wfd) => {
    console.log(wfd);
    // 0: buffer读取位置
    fs.write(wfd, buf1, 0, 3, 0, (err, written, data) => {
        console.log(written);
        console.log(data.toString());
    })
})
实现文件的拷贝:
import fs from 'fs';

const buf = Buffer.alloc(10);
let positon = 0;

fs.open('b.txt', 'r', (err, rfd) => {
    fs.open('a.txt', 'w', (err, wfd) => {
    function next() {
      fs.read(rfd, buf, 0, buf.length, positon, (err, bytesRead, buffer) => {
        if (!bytesRead) {
          fs.close(rfd);
          fs.close(wfd);
          console.log('拷贝完成');
          return;
        }
        positon += bytesRead;
        fs.write(wfd, buf, 0, bytesRead, (err, written) => {
          // 递归读写
          next();
        })
      })
    }
    next();
    });
});
4. 目录操作
fs.access():判断文件或目录是否具有操作权限fs.stat(): 获取目录及文件信息fs.mkdir():创建目录,如果想创建多个子目录如a/b/c,需要在第二个参数加上{ recursive: true}fs.rm(): 删除目录或文件,想要删除子目录下时也需加上{ recursive: true }fs.readdir(): 读取目录中内容fs.unlink(): 删除指定文件
七、模块化
1. CommonJS
CommonJS是Nodejs的模块化规范,跟esmodule模块化方案类似。
主要特点为:
任意一个文件就是一模块(module),具有独立作用域
每个模块都会传入一个module对象,该对象有以下属性:
module.id:返回模块标识符,一般是一个绝对路径module.filename: 返回文件模块的绝对路径module.loaded: 返回布尔值,表示模块是否完成加载module.children: 返回数组,存放当前模块调用的其他模块module.exports: 返回当前模块暴露的内容paths:返回数组,存放不同目录下的node_modules位置
在node中导出当前模块的内容还有
exports,那么于module.exports区别是什么?exports指向了module.exports的内存地址,所以不能给exports重新赋值,不然会切断与module.exports的联系。使用
require导入其他模块(同步加载)- 基本功能是读入并且执行一个模块文件:根据传入的模块的后缀进行查找,如果没有后缀会按照.js, .json, .node进行填充查找,然后同步读取文件的内容,将读取的字符串转为函数,然后调用并传入
exports、filename等全局变量。 resolve:返回模块文件绝对路径extensions: 依据不同后缀名执行解析操作main:返回主模块方法
- 基本功能是读入并且执行一个模块文件:根据传入的模块的后缀进行查找,如果没有后缀会按照.js, .json, .node进行填充查找,然后同步读取文件的内容,将读取的字符串转为函数,然后调用并传入
- 将模块ID传入
require实现目标模块定位
2. 实现require函数
const fs = require('fs');
const path = require('path');
const vm = require('vm');

// Module类
function Module(id) {
    this.id = id;
    this.exports = {};
}

// 解析传入文件名称参数
Module._resolveFilename = function (filename) {
    const absPath = path.resolve(__dirname, filename);
  // 如果存在直接返回
    if (fs.existsSync(absPath)) {
        return absPath;
    }
  // 不存在则添加后缀
    const suffix = Object.keys(Module._extensions);

    for (let i = 0; i < suffix.length; i++) {
        const newPath = path.resolve(__dirname, filename + suffix[i]);
        if (fs.existsSync(newPath)) {
            return newPath;
        }
    }
    throw new Error(`${filename} is not exists`);
};

// Module扩展名
Module._extensions = {
    '.js'(module) {
        let content = fs.readFileSync(module.id, 'utf-8');

        content = Module.wrapper[0] + content + Module.wrapper[1];

        // vm
        const compileFn = vm.runInThisContext(content);

        const exports = module.exports;
        const __dirname = path.dirname(module.id);
        const __filename = module.id;

    // 模块this指向exports
        compileFn.call(exports, exports, __dirname, __filename, myRequire, module);
    },
    '.json'(module) {
        let content = fs.readFileSync(module.id, 'utf-8');
    content = JSON.parse(content);
    module.exports = content;
    },
};

Module.wrapper = [
    '(function(exports, __dirname, __filename, require, module){',
    '})',
];

Module._cache = {};

Module.prototype.load = function () {
    const extname = path.extname(this.id);
    Module._extensions[extname](this);
};

function myRequire(filename) {
    // get absolute path
    const mPath = Module._resolveFilename(filename);

    // cache
    const cacheModule = Module._cache[mPath];

    if (cacheModule) return cacheModule.exports;

  // 不存在缓存先创建空实例
    let module = new Module(mPath);
    // 存入缓存
    Module._cache[mPath] = module;
    // 加载模块
    module.load();

    return module.exports;
}

const obj = myRequire('./vm');
console.log(obj);
八、Events模块
1. 常见api
on:添加当事件被触发时调用的回调函数emit:触发事件,按照注册的序同步调用每个函数监听器once: 添加当事件在注册之后首次被触发时调用的回调函数(注册后只触发一次)off:移除特定的监听器
const EventEmitter = require('events');

const ev = new EventEmitter();

ev.on('event1', () => console.log('event1'));
ev.once('event2', () => console.log('event2'));
ev.emit('event1');
ev.emit('event1');
ev.emit('event2');
ev.emit('event2');
// event1
// event1
// event2

const foo = () => console.log('event3');
ev.on('event3', foo);
ev.emit('event3');
ev.off('event3', foo);
ev.emit('event3');
// event3
2. 发布订阅模式
发布订阅模式里发布者发布消息,订阅者订阅消息这一行为并非是主动的,而是通过调度中心进行执行,有利于发布者和订阅者两者之间的解耦。
实现:
class PubSub {
  constructor() {
    this.events = {};
  }
    // 注册事件
  subscribe(event, callback) {
    if (this.events[event]) {
      this.events[event].push(callback);
    } else {
      this.events[event] = [callback];
    }
  }
// 发布事件
  publish(event, ...args) {
    const items = this.events[event];
    if (items?.length) {
      items.forEach(function(callback) {
        callback.call(this, ...args);
      });
    }
  }
}

let ps = new PubSub();
ps.subscribe('event1', () => {
  console.log(1);
})
ps.publish('event1');
ps.publish('event1');
ps.publish('event1');
// 1
// 1
// 1
九、事件循环
1. 浏览器中的事件循环
在浏览器中代码的执行顺序是先执行同步代码,遇到异步任务则放入事件循环队列中,异步任务分为宏任务和微任务,像Promise、Mutation Observer以及Node中的Process.nextTick为微任务,其余则为宏任务。每执行一个宏任务都会顺带清空微任务,所以可以事件循环看作排队,宏任务是主要任务,微任务则是顺带着做的一些事,所以每执行一个宏任务都会立刻检查微任务队列。
setTimeout(() => {
  console.log('s1'); // 2
  Promise.resolve().then(() => {
    console.log('p2'); // 3
  })
  Promise.resolve().then(() => {
    console.log('p3'); // 4
  })
})

Promise.resovle().then(() => {
  console.log('p1'); // 1
  setTimeout(() => {
    console.log('s2');  // 5
  })
  setTimeout(() => {
    console.log('s3'); // 6
  })
})
2. Node中的事件循环
与浏览器中的宏任务、微任务循环队列不同,Node中有6个事件循环队列:
- timers: 执行setTimeout与setInterval回调
- pending callbacks:执行系统操作的回调,例如tcp、udp
- idle,prepare:只在系统内部进行使用
- poll:执行与I/O相关的回调
- check:执行setImmediate中的回调
- close callbacks:执行close中的回调
Node中代码的执行顺序为:
- 执行同步代码,将不同的任务添加至相应的队列中
- 所有同步的代码执行后开始执行满足条件的微任务
- 所有微任务代码执行后会执行timer队列中满足条件的宏任务
- timer队列执行完成后依次切换队列(在完成队列切换前会先清空微任务代码)
setTimeout(() => { // timer 5
  console.log('s1');
})

Promise.resolve().then(() => { // 微任务 4
  console.log('p1');
})

console.log('start'); // 1

process.nextTick(() => { // 微任务 3 优先级高于Promise
  console.log('tick');
})

setImmediate(() => { // check 6
  console.log('setimmediate');
})

console.log('end'); // 2浏览器和Node的主要区别是:浏览器中每执行完一个宏任务就会清空微任务队列,而Node中只有队列任务全部完成在切入下一个队列之前才会清空微任务队列
3. 常见问题
setTimeout(() = {
  console.log('timeout');
}, 0);
setImmediate(() => {
  console.log('immediate');
})
上面这段代码多运行几次会发现输出顺序会发生变化,有时先输出timeout,有时先输出immediate,这是因为setTimeout的延时时间为0时会出现延时不固定的原因。
放入回调函数会解决该问题:
const fs = require('fs');
fs.readFile('./test.txt', () => {
  setTimeout(() = {
  console.log('timeout');
}, 0);
  setImmediate(() => {
    console.log('immediate');
  })
})
// immediate
// timeout此时执行顺序固定,这是因为当readFile函数的回调是在poll队列中,执行完该回调后会向timer中塞入setTimeout,check中塞入setImmediate,然后向下执行check队列的任务最后回到timer中执行其中的任务。
这样就保证了执行顺序的固定。
十、Stream流模块
1. Node中的流
Nodejs中流就是处理流式数据的抽象接口。
Node中流的分类:
Readable:可读流,能够实现数据的读取Writeable:可写流,实现数据的写入Duplex:双工流,即可读又可写Transform:转换流,可读可写,并能实现数据转换
Node中流的特点:
Stream模块实现了四个具体的抽象(类)- 所有的流继承自
EventEmitter
2. 可读流
可读流的作用就是为了生产数据,处于结构的上游,要想实现自己的可读流需要继承Node中Readable类并重写_read方法。
const { Readable } = require('stream');

// 继承Readable
class MyReadable extends Readable {
    constructor(source) {
        super();
        this.source = source;
    }
    _read() {
    // 最后传入null以判断是否读完
        const data = this.source.shift() || null;
        this.push(data);
    }
}

const myReadable = new MyReadable(['I', 'am', 'name6']);

myReadable.on('readable', () => {
  let data = null;
  // 2表示每次读取大小
  while ((data = myReadable.read(2)) !== null) {
    console.log(data.toString()); // Ia mn am e6
  }
})

myReadable.on('data', (chunk) => {
  console.log(chunk.toString()); // I am name6
})
3. 可写流
可写流是用于消费数据的流,处于结构的下游。实现自己的可写流要继承Writeable类并重写_write方法。
const { Writeable } = require('stream');

class MyWriteable {
  constructor() {
    super();
  }
  _write(chunk, en, done) {
    process.stdout.write(chunk.toString());
    process.nextTick(done)
  }
}

const myWriteable = new MyWriteable();
myWriteable.write('...', 'utf-8', () => {
  console.log('end');
})

// ...
// end
4. 双工流与转换流
双工流为可读流与可写流的结合,继承自Duplex类后重写_read与_write方法,可读可写的操作与可读流、可写流操作一样。
转换流比双工流多了数据转换的功能:
const { Transform } = require('stream');

class MyTransform {
  constructor() {
    super();
  }

  _transform(chunk, en, cb) {
    // 进行数据转换
    this.push(chunk.toString().toUpperCase());
    cb(null);
  }
}

const myTransform = new MyTransform();
t.write('a');
t.on('data', (chunk) => {
  console.log(chunk.toString()); // A
})
总结
以上对Node中各个模块进行了归纳总结,除了这些还有一个非常重要的模块:网络模块,将会在下一篇文章进行探讨,感谢您的阅读。


