计算机视觉人脸检测与识别
提示:文章写完后,目录可以自动生成,如何生成可参考右边的帮助文档
文章目录
-
- @[TOC](文章目录) 使用opencv进行人脸检测
- 文件目录
- 二、init文件内容
- shishi文件内容
- coding=utf-8
- 加载训练数据集文件
- 准备识别的图片
- 结果
使用opencv进行人脸检测
文章目录
-
- @[TOC](文章目录) 使用opencv进行人脸检测
- 文件目录
- 二、init文件内容
- shishi文件内容
- coding=utf-8
- 加载训练数据集文件
- 准备识别的图片
- 结果
文件目录
二、init文件内容
import os
import cv2
from PIL import Image
import numpy as np
def getImageAndLabels(path):
# 存储人脸数据
facesSamples = []
# 存储姓名数据
ids = []
# 储存图片信息
path_list = os.listdir(path)
path_list.sort(key=lambda x: int(x.split('.')[0]))

imagePaths = [os.path.join(path, f) for f in path_list]
# 加载分类器
face_detector = cv2.CascadeClassifier(
    'F:/summar software/python language backage/Lib/site-packages/cv2/data/haarcascade_frontalface_default.xml')
# 打印数组imagePaths
print('数据排列:', imagePaths)
# 遍历列表中的图片
for imagePath in imagePaths:
    # 打开图片,黑白化
    PIL_img = Image.open(imagePath).convert('L')
    # 将图像转换为数组,以黑白深浅
    # PIL_img = cv2.resize(PIL_img, dsize=(400, 400))
    img_numpy = np.array(PIL_img, 'uint8')
    # 获取图片人脸特征
    faces = face_detector.detectMultiScale(img_numpy)
    # 获取每张图片的id和姓名
    id = int(os.path.split(imagePath)[1].split('.')[0])
    # 预防无面容照片
    for x, y, w, h in faces:
        ids.append(id)
        facesSamples.append(img_numpy[y:y + h, x:x + w])
    # 打印脸部特征和id
    print('fs:', facesSamples)
    print('id:', id)

return facesSamples, ids
if name == ‘main’:
# 图片路径
path = './picture/'
# 获取图像数组和id标签数组和姓名
faces, ids = getImageAndLabels(path)
# 获取训练对象
recognizer = cv2.face.LBPHFaceRecognizer_create()
# recognizer.train(faces,names)#np.array(ids)
recognizer.train(faces, np.array(ids))
# 保存文件
recognizer.write('trainer/trainer.yml')
shishi文件内容
import cv2
import numpy as np
import os
coding=utf-8
import urllib
import urllib.request
import hashlib
加载训练数据集文件
recogizer = cv2.face.LBPHFaceRecognizer_create()
recogizer.read(’./trainer/trainer.yml’)
names = []
准备识别的图片
def face_detect_demo(img):
gray = cv2.cvtColor(img, cv2.COLOR_BGR2GRAY) # 转换为灰度
face_detector = cv2.CascadeClassifier(
‘F:/summar software/python language backage/Lib/site-packages/cv2/data/haarcascade_frontalface_default.xml’)
face = face_detector.detectMultiScale(gray)
for x, y, w, h in face:
cv2.rectangle(img, (x, y), (x + w, y + h), color=(0, 0, 255), thickness=2)
# cv2.circle(img,center=(x+w//2,y+h//2),radius=w//2,color=(0,255,0),thickness=1)
# 人脸识别
ids, confidence = recogizer.predict(gray[y:y + h, x:x + w])
print(‘标签id:’, ids, ‘置信评分:’, confidence)
if confidence > 80:
cv2.putText(img, ‘unkonw’, (x + 10, y - 10), cv2.FONT_HERSHEY_SIMPLEX, 0.75, (0, 255, 0), 1)
else:
cv2.putText(img, str(names[ids]), (x + 45, y - 10), cv2.FONT_HERSHEY_SIMPLEX, 0.75, (0, 255, 0), 1)
cv2.imshow(‘result’, img)
# print(‘bug:’,ids)
def name():
path = ‘./picture/’
path_list = os.listdir(path)
path_list.sort(key=lambda x: int(x.split(’.’)[0]))
imagePaths = [os.path.join(path, f) for f in path_list]
for imagePath in imagePaths:
name = str(os.path.split(imagePath)[1].split(’.’, 2)[1])
names.append(name)
print(names)
if name == ‘main’:
# 输出训练样本图片的名称
name()
# 打开电脑默认摄像头实时检测
# cap = cv2.VideoCapture(0)
# while True:
# flag,frame = cap.read()
# if not flag:
# break
# face_detect_demo(frame)
# if ord(‘q’) == cv2.waitKey(1):
# break
# 打开一张图片实现检测
cap = cv2.imread('test1.jpg')
face_detect_demo(cap)
while True:
    if ord('q') == cv2.waitKey(0):
        break
# 释放内存
cv2.destroyAllWindows()
# 释放摄像头
cap.release()
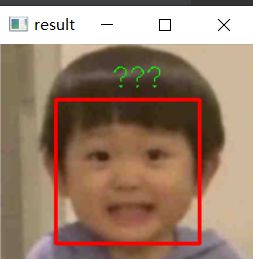
结果
提示:希望对大家有所帮助

