使用PyTorch搭建ResNet18网络并使用CIFAR10数据集训练测试
ResNet34的搭建请移步:使用PyTorch搭建ResNet34网络
ResNet50的搭建请移步:使用PyTorch搭建ResNet50网络
ResNet101、ResNet152的搭建请移步:使用PyTorch搭建ResNet101、ResNet152网络
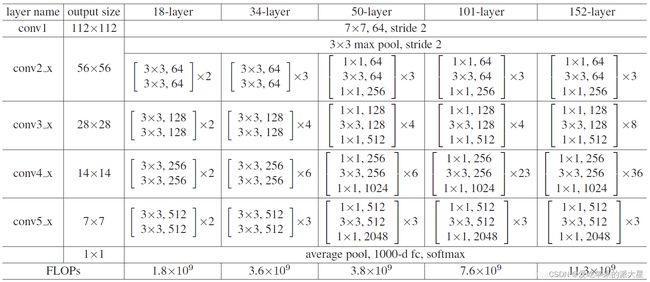
ResNet18网络结构
这里给出了我认为比较详细的ResNet18网络具体参数和执行流程图:
这里并未采用BasicBlock和BottleNeck复现ResNet18
具体ResNet原理细节这里不多做描述,直接上代码
model.py网络模型部分:
import torch
import torch.nn as nn
from torch.nn import functional as F


"""
把ResNet18的残差卷积单元作为一个Block,这里分为两种:一种是CommonBlock,另一种是SpecialBlock,最后由ResNet18统筹调度
其中SpecialBlock负责完成ResNet18中带有虚线(升维channel增加和下采样操作h和w减少)的Block操作
其中CommonBlock负责完成ResNet18中带有实线的直接相连相加的Block操作
注意ResNet18中所有非shortcut部分的卷积kernel_size=3, padding=1,仅仅in_channel, out_channel, stride的不同
注意ResNet18中所有shortcut部分的卷积kernel_size=1, padding=0,仅仅in_channel, out_channel, stride的不同
"""


class CommonBlock(nn.Module):
    def __init__(self, in_channel, out_channel, stride):        # 普通Block简单完成两次卷积操作
        super(CommonBlock, self).__init__()
        self.conv1 = nn.Conv2d(in_channel, out_channel, kernel_size=3, stride=stride, padding=1, bias=False)
        self.bn1 = nn.BatchNorm2d(out_channel)
        self.conv2 = nn.Conv2d(out_channel, out_channel, kernel_size=3, stride=stride, padding=1, bias=False)
        self.bn2 = nn.BatchNorm2d(out_channel)

    def forward(self, x):
        identity = x                                            # 普通Block的shortcut为直连,不需要升维下采样

        x = F.relu(self.bn1(self.conv1(x)), inplace=True)       # 完成一次卷积
        x = self.bn2(self.conv2(x))                             # 第二次卷积不加relu激活函数

        x += identity                                           # 两路相加
        return F.relu(x, inplace=True)                          # 添加激活函数输出


class SpecialBlock(nn.Module):                                  # 特殊Block完成两次卷积操作,以及一次升维下采样
    def __init__(self, in_channel, out_channel, stride):        # 注意这里的stride传入一个数组,shortcut和残差部分stride不同
        super(SpecialBlock, self).__init__()
        self.change_channel = nn.Sequential(                    # 负责升维下采样的卷积网络change_channel
            nn.Conv2d(in_channel, out_channel, kernel_size=1, stride=stride[0], padding=0, bias=False),
            nn.BatchNorm2d(out_channel)
        )
        self.conv1 = nn.Conv2d(in_channel, out_channel, kernel_size=3, stride=stride[0], padding=1, bias=False)
        self.bn1 = nn.BatchNorm2d(out_channel)
        self.conv2 = nn.Conv2d(out_channel, out_channel, kernel_size=3, stride=stride[1], padding=1, bias=False)
        self.bn2 = nn.BatchNorm2d(out_channel)

    def forward(self, x):
        identity = self.change_channel(x)                       # 调用change_channel对输入修改,为后面相加做变换准备

        x = F.relu(self.bn1(self.conv1(x)), inplace=True)
        x = self.bn2(self.conv2(x))                             # 完成残差部分的卷积

        x += identity
        return F.relu(x, inplace=True)                          # 输出卷积单元


class ResNet18(nn.Module):
    def __init__(self, classes_num):
        super(ResNet18, self).__init__()
        self.prepare = nn.Sequential(           # 所有的ResNet共有的预处理==》[batch, 64, 56, 56]
            nn.Conv2d(3, 64, 7, 2, 3),
            nn.BatchNorm2d(64),
            nn.ReLU(inplace=True),
            nn.MaxPool2d(3, 2, 1)
        )
        self.layer1 = nn.Sequential(            # layer1有点特别,由于输入输出的channel均是64,故两个CommonBlock
            CommonBlock(64, 64, 1),
            CommonBlock(64, 64, 1)
        )
        self.layer2 = nn.Sequential(            # layer234类似,由于输入输出的channel不同,故一个SpecialBlock,一个CommonBlock
            SpecialBlock(64, 128, [2, 1]),
            CommonBlock(128, 128, 1)
        )
        self.layer3 = nn.Sequential(
            SpecialBlock(128, 256, [2, 1]),
            CommonBlock(256, 256, 1)
        )
        self.layer4 = nn.Sequential(
            SpecialBlock(256, 512, [2, 1]),
            CommonBlock(512, 512, 1)
        )
        self.pool = nn.AdaptiveAvgPool2d(output_size=(1, 1))    # 卷积结束,通过一个自适应均值池化==》 [batch, 512, 1, 1]
        self.fc = nn.Sequential(                # 最后用于分类的全连接层,根据需要灵活变化
            nn.Dropout(p=0.5),
            nn.Linear(512, 256),
            nn.ReLU(inplace=True),
            nn.Dropout(p=0.5),
            nn.Linear(256, classes_num)         # 这个使用CIFAR10数据集,定为10分类
        )

    def forward(self, x):
        x = self.prepare(x)         # 预处理

        x = self.layer1(x)          # 四个卷积单元
        x = self.layer2(x)
        x = self.layer3(x)
        x = self.layer4(x)

        x = self.pool(x)            # 池化
        x = x.reshape(x.shape[0], -1)   # 将x展平,输入全连接层
        x = self.fc(x)

        return x
train.py训练部分(使用CIFAR10数据集):
import torch
import visdom
from torch.utils.data import DataLoader
from torchvision import datasets, transforms
from PIL import Image
from matplotlib import pyplot as plt
import numpy as np
from ResNet18 import ResNet18
from torch.nn import CrossEntropyLoss
from torch import optim

BATCH_SIZE = 512                        # 超参数batch大小
EPOCH = 30                              # 总共训练轮数
save_path = "./CIFAR10_ResNet18.pth"    # 模型权重参数保存位置
# classes = ('plane', 'car', 'bird', 'cat', 'deer', 'dog', 'frog', 'horse', 'ship', 'truck')    # CIFAR10数据集类别
device = torch.device("cuda:0" if torch.cuda.is_available() else "cpu")                         # 创建GPU运算环境
print(device)

data_transform = {                      # 数据预处理
    "train": transforms.Compose([
        transforms.ToTensor(),
        transforms.Normalize((0.5, 0.5, 0.5), (0.5, 0.5, 0.5))
    ]),
    "val": transforms.Compose([
        transforms.ToTensor(),
        transforms.Normalize((0.5, 0.5, 0.5), (0.5, 0.5, 0.5))
    ])
}
# 加载数据集,指定训练或测试数据,指定于处理方式
train_data = datasets.CIFAR10(root='./CIFAR10/', train=True, transform=data_transform["train"], download=True)
test_data = datasets.CIFAR10(root='./CIFAR10/', train=False, transform=data_transform["val"], download=True)

train_dataloader = torch.utils.data.DataLoader(train_data, BATCH_SIZE, True, num_workers=0)
test_dataloader = torch.utils.data.DataLoader(test_data, BATCH_SIZE, False, num_workers=0)

# # 展示图片
# x = 0
# for images, labels in train_data:
#     plt.subplot(3,3,x+1)
#     plt.tight_layout()
#     images = images.numpy().transpose(1, 2, 0)  # 把channel那一维放到最后
#     plt.title(str(classes[labels]))
#     plt.imshow(images)
#     plt.xticks([])
#     plt.yticks([])
#     x += 1
#     if x == 9:
#         break
# plt.show()

# 创建一个visdom,将训练测试情况可视化
viz = visdom.Visdom()

# 测试函数,传入模型和数据读取接口
def evalute(model, loader):
    # correct为总正确数量,total为总测试数量
    correct = 0
    total = len(loader.dataset)
    # 取测试数据
    for x, y in loader:
        x, y = x.to(device), y.to(device)
        # validation和test过程不需要反向传播
        model.eval()
        with torch.no_grad():
            out = model(x)       # 计算测试数据的输出logits
            # 计算出out在第一维度上最大值对应编号,得模型的预测值
            prediction = out.argmax(dim=1)
        # 预测正确的数量correct
        correct += torch.eq(prediction, y).float().sum().item()
    # 最终返回正确率
    return correct / total


net = ResNet18()
net.to(device)                                      # 实例化网络模型并送入GPU
net.load_state_dict(torch.load(save_path))          # 使用上次训练权重接着训练
optimizer = optim.Adam(net.parameters(), lr=0.001)  # 定义优化器
loss_function = CrossEntropyLoss()                  # 多分类问题使用交叉熵损失函数

best_acc, best_epoch = 0.0, 0                       # 最好准确度,出现的轮数
global_step = 0                                     # 全局的step步数,用于画图
for epoch in range(EPOCH):
    running_loss = 0.0                              # 一次epoch的总损失
    net.train()                                     # 开始训练
    for step, (images, labels) in enumerate(train_dataloader, start=0):
        images, labels = images.to(device), labels.to(device)

        optimizer.zero_grad()
        outputs = net(images)
        loss = loss_function(outputs, labels)
        loss.backward()
        optimizer.step()

        running_loss += loss.item()                 # 将一个epoch的损失累加
        # 打印输出当前训练的进度
        rate = (step + 1) / len(train_dataloader)
        a = "*" * int(rate * 50)
        b = "." * int((1 - rate) * 50)
        print("\repoch: {} train loss: {:^3.0f}%[{}->{}]{:.3f}".format(epoch+1, int(rate * 100), a, b, loss), end="")
        # 记录test的loss
        viz.line([loss.item()], [global_step], win='loss', update='append')
        # 每次记录之后将横轴x的值加一
        global_step += 1

    # 在每一个epoch结束,做一次test
    if epoch % 1 == 0:
        # 使用上面定义的evalute函数,测试正确率,传入测试模型net,测试数据集test_dataloader
        test_acc = evalute(net, test_dataloader)
        print("  epoch{} test acc:{}".format(epoch+1, test_acc))
        # 根据目前epoch计算所得的acc,看看是否需要保存当前状态(即当前的各项参数值)以及迭代周期epoch作为最好情况
        if test_acc > best_acc:
            # 保存最好数据
            best_acc = test_acc
            best_epoch = epoch
            # 保存最好的模型参数值状态
            torch.save(net.state_dict(), save_path)

            # 记录validation的val_acc
            viz.line([test_acc], [global_step], win='test_acc', update='append')
print("Finish !")
训练测试结果
训练损失:

每一个epoch结束之后的测试:

训练时多次修改超参数,最后经过30次epoch之后的测试准确度达到了0.7471,没有在训练下去也没有明显提升,初学深度神经网络,第一次搭建ResNet,我的数据处理等方面处理的有一定欠缺,大家有好的建议也可以提出来
