React-Native使用ART实现水波纹、波浪线动画、声波音频波动效果(附源码)
背景
笔者最近有个RN项目,需要在与设备通话的时候,App侧展示声波纹UI效果,以笔者的尿性又去折腾整理了一番,同样也非常适用想了解react-native art绘图入门基础的同学。
在React Native中有个ART库,它可以绘制各种线(实线、虚线、曲线)、图形(矩形、圆、扇形)组合,让非常酷炫的绘图及动画变成了可能。
至于水波纹、波浪动画、声波音频这些常用的效果,一般都是贝塞尔曲线加持画出来的。

目录
- 背景
- 一、UI效果展示
- 二、源码下载
- 三、知识点梳理
-
- 添加依赖
- 导入ART库
- 基础组件
- 四、DEMO示例
-
- Demo图效
- 直线
- 虚线
- 折线
- 曲线
- 矩形
- 圆
- 文本
- 扇形
- 图层
一、UI效果展示
以下是我是整理和改进UI效果,基本能满足项目需要
水波纹波浪曲线


声音声波曲线


下载速率曲线

二、源码下载
源码有需要的就拿去吧,代码实现就不一一贴出来解析了。然后针对ART这个知识点做一下梳理,做了一个演示DEMO,这样会有一个大概的了解。
=====> React-Native使用ART实现水波纹动画、波浪线、声波音频波动效果(附源码)
三、知识点梳理
添加依赖
Android默认就包含ART库,IOS需要单独添加依赖库。
右键点击项目 -> ‘Add Files to ProjectName -> 选择 node_modules/react-native/React/Libraries/ART/ART.xcodeproj’
将 libART.a 添加到 Linked Frameworks and Libraries
导入ART库
import {
    ART
} from 'react-native';

const {
   Surface, Shape, Path, Group, Text
} = ART;
基础组件
➊ Surface:一个矩形可渲染的区域,是其他元素的容器
width:渲染区域的宽
height:定义渲染区域的高
➋ Group:可容纳多个形状、文本和其他的分组
➌ Shape:形状定义,可填充
d:定义绘制路径
stroke:描边颜色
strokeWidth:描边宽度
strokeDash:定义虚线
fill:填充颜色
➍ Text:文本形状定义
font:字体样式,定义字体、大小、粗细等,如bold 35px Heiti SC
➎ Path:Shape的属性值 表示绘制的路径
moveTo(x,y):移动到坐标(x,y)
lineTo(x,y):连线到坐标(x,y)
line(x,y): 相对于原来的偏移
arc():绘制弧线
close():封闭空间
Path().moveTo(20, 20).lineTo(10, 20) 得到的是一条(20, 20) 到(10, 20) 的线。
Path().moveTo(20, 20).line(10, 20) 得到的是一条(20, 20) 到(30, 40) 的线。
Path().moveTo(150,50).arc(50, 100,50) 绘制一半圆弧(150,50)起点,(50, 100)偏移量(终点) 50 半径。
四、DEMO示例
Demo图效
效果如下,代码不复杂的,聪明如你看看就明白,基本组件的操作下面也举例说明了
基础元素

圆形、圆环、扇形、椭圆
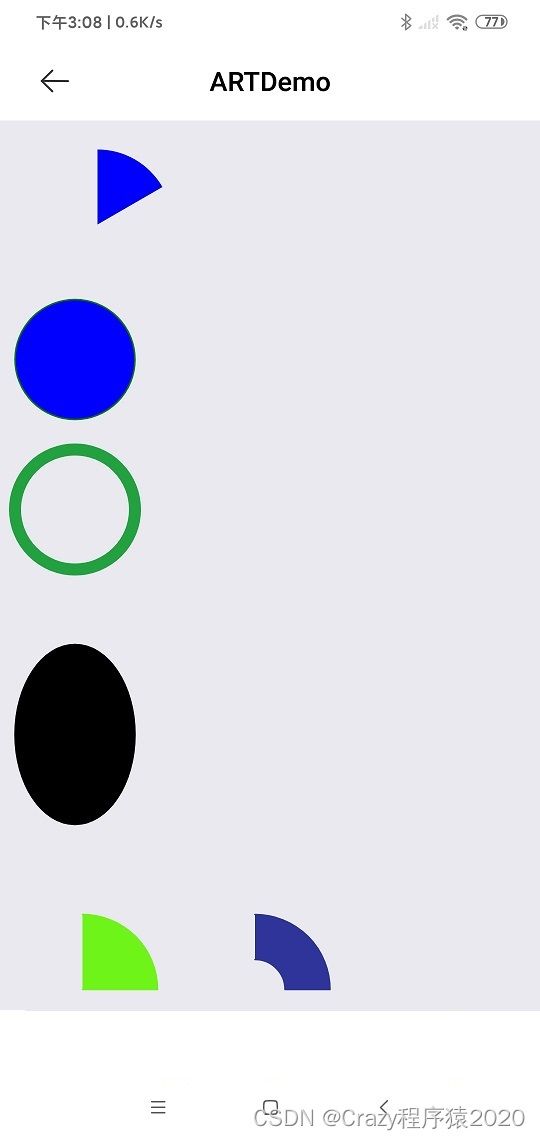
三角形、半圆

多边形

直线
了解Path的moveTo和LineTo的使用
import React from 'react'
import {
    View,
    ART
} from 'react-native'

export default class Line extends React.Component{

    render(){

        const path = ART.Path();
        path.moveTo(1,1); //将起始点移动到(1,1) 默认(0,0)
        path.lineTo(300,1); //连线到目标点(300,1)

        return(
            <View style={this.props.style}>
                <ART.Surface width={300} height={2}>
                    <ART.Shape d={path} stroke="#000000" strokeWidth={1} />
                </ART.Surface>
            </View>
        )
    }
}
虚线
了解strokeDash的参数,
[10,5] : 表示绘10像素实线在绘5像素空白,如此循环
[10,5,20,5] : 表示绘10像素实线在绘制5像素空白在绘20像素实线及5像素空白
import React from 'react'
import {
    View,
    ART
} from 'react-native'

export default class Line extends React.Component{

    render(){

        const path = ART.Path();
        path.moveTo(1,1); //将起始点移动到(1,1) 默认(0,0)
        path.lineTo(300,1); //连线到目标点(300,1)

        return(
            <View style={this.props.style}>
                <ART.Surface width={300} height={2}>
                    <ART.Shape d={path} stroke="#000000" strokeWidth={2} strokeDash={[10,10]} />
                </ART.Surface>
            </View>
        )
    }
}
折线
import React from 'react'
import {
    View,
    ART
} from 'react-native'

const {width,height} = Dimensions.get('window');

export default class Line extends React.Component{

    render(){

        // 构建折线路径
        const brokenLine = Path()
            .move(10,60)
            .line(80, 23)
            .line(60, -43)
            .line(70, 20);

        return(
            <View style={this.props.style}>
                  <Surface width={width} height={100}>
                        <Shape d={brokenLine} stroke="#000000" strokeWidth={2}  />
                   </Surface>
            </View>
        )
    }
}
曲线
了解curve的用法
import React from 'react'
import {
    View,
    ART
} from 'react-native'

const {width,height} = Dimensions.get('window');

export default class Line extends React.Component{

    render(){

        // 构建贝斯路径
        const curveLine = Path()
            .move(10,60)
            .curve(50, 23, 100, -23, 200, 0);

        return(
            <View style={this.props.style}>
                    <Surface width={width} height={100}>
                        <Shape d={curveLine} stroke="#000000" strokeWidth={2} />
                    </Surface>
            </View>
        )
    }
}
矩形
了解close()的使用,close的意思是创建一个密闭的路径。首先通过lineTo绘制三条边,在使用close链接第四条边。fill做颜色填充
import React from 'react'
import {
    View,
    ART
} from 'react-native'

const {Surface, Shape, Path} = ART;

export default class Rect extends React.Component{

    render(){

        const path = new Path()
            .moveTo(1,1)
            .lineTo(1,99)
            .lineTo(99,99)
            .lineTo(99,1)
            .close();

        return(
            <View style={this.props.style}>
                <Surface width={100} height={100}>
                    <Shape d={path} stroke="#000000" fill="#892265" strokeWidth={1} />
                </Surface>
            </View>
        )
    }
}
圆
了解arc(x,y,radius)的使用, 终点坐标距离起点坐标的相对距离
import React from 'react'
import {
    View,
    ART
} from 'react-native'

const {Surface, Shape, Path} = ART;

export default class Circle extends React.Component{

    render(){

        const path = new Path()
            .moveTo(50,1)
            .arc(0,99,25)
            .arc(0,-99,25)
            .close();


        return(
            <View style={this.props.style}>
                <Surface width={100} height={100}>
                    <Shape d={path} stroke="#000000" strokeWidth={1}/>
                </Surface>
            </View>
        )
    }
}
文本
了解font属性的使用,规则是“粗细 字号 字体”
import React from 'react'
import {
    View,
    ART
} from 'react-native'

const {Surface, Text, Path} = ART;

export default class ArtText extends  React.Component{


    render(){

        return(
            <View style={this.props.style}>
                <Surface width={200} height={100}>
                    <Text strokeWidth={1} stroke="#000" font="bold 35px Heiti SC" path={new Path().moveTo(40,40).lineTo(99,10)} >Hello World</Text>
                </Surface>
            </View>
        )
    }

}
扇形
注意这里封装了一个Wedge组件,内部还是使用arc做路径绘制,感兴趣的同学可以阅读一下代码
import React from 'react'
import {
    View,
    ART
} from  'react-native'

const {Surface} = ART;
import Wedge from './Wedge'

export default class Fan extends  React.Component{

    render(){

        return(
            <View style={this.props.style}>
                <Surface width={100} height={100}>
                    <Wedge
                     outerRadius={50}
                     startAngle={0}
                     endAngle={60}
                     originX={50}
                     originY={50}
                     fill="blue"/>

                </Surface>
            </View>
        )
    }
}
图层
了解Group的使用
import React from 'react'
import {
    View,
    ART
} from 'react-native'

const {Surface, Shape,Text, Path,Group} = ART;

export default class GroupTest extends React.Component{

    render(){

        const pathRect = new Path()
            .moveTo(1,1)
            .lineTo(1,99)
            .lineTo(99,99)
            .lineTo(99,1)
            .close();

        const pathCircle = new Path()
            .moveTo(50,1)
            .arc(0,99,25)
            .arc(0,-99,25)
            .close();

        const pathText = new Path()
            .moveTo(40,5)
            .lineTo(40,99);


        return(
            <View>
                <Surface width={100} height={100}>
                    <Group>
                        <Shape d={pathRect} stroke="#000000" fill="#000000" strokeWidth={1}/>
                        <Shape d={pathCircle} stroke="#FFFFFF" fill="#FFFFFF" strokeWidth={1}/>
                        <Text strokeWidth={1} strokeDash={[2,1,2,1]} stroke="#000" font="bold 30px Heiti SC" path={pathText} >Swipe</Text>
                    </Group>
                </Surface>
            </View>
        )
    }
}
以上整理,希望能帮助到有需要的同学,加油共勉!