如何使用GameCenter制作一个简单的多人游戏教程:第二部分
免责申明(必读!):本博客提供的所有教程的翻译原稿均来自于互联网,仅供学习交流之用,切勿进行商业传播。同时,转载时不要移除本申明。如产生任何纠纷,均与本博客所有人、发表该翻译稿之人无任何关系。谢谢合作!
教程截图:
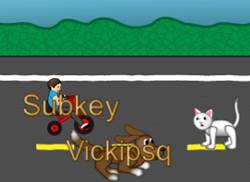
这是本系列教程的第二部分,主要内容是关于如何使用Game Center matchmaking来制作一个简单的联机游戏。
在上篇教程中,你学会了如何为你的app激活Game Center,还有如何使用内置的 GKMatchmakerViewController来查找玩家。
在这篇教程中,你将学会如何查找玩家别名,如何在游戏里面收发数据以及如何支持玩家邀请功能。
在最后,你将会得到一个完整的,但是非常简单的网络游戏,使用的技术就是cocos2d和Game Center。你可以和你的朋友一起玩!
如果你还没有上个教程的工程的话,你可以先在这里下载。
网络代码策略:挑选玩家
在选择玩家之前,让我们先讨论一下我们将要采纳的网络代码相关策略,同时还有如何挑选玩家的策略。
在这个游戏里面,我们有两个玩家:玩家1(狗)和玩家2(小孩)。问题是,我们怎么决定谁充当狗的角色,谁充当小孩的角色?(呵呵,老外这里有点搞笑了,我也照样翻译了)。
策略就是,我们将会在两个玩家游戏启动的时候生成随机数,并且把这个数发给对方。如果哪方的数大,那么就当玩家1,另外一方自然就是玩家2.
但是,极少数情况下面,可能会生成两个一样的随机数,那样的话,我们只好再重试一遍罗。
不管哪一个玩家是palyer1,他都会获得一些“特权”。首先,player1这一方开始游戏的时候,给另一方发送一个消息。同时,player1还负责检查游戏什么时候结束,并且负责发送消息给另一方,告知”游戏结束了“。
换句话说,”player1“将充当服务器的角色。它是整个游戏中拥有最终发言权的那位!
网络代码策略:玩家别名(player alias)
因为我们随机决定哪个玩家是dog,哪个玩家是kid,所以我们需要有一种方式可以知道玩家具体属性哪个游戏角色。
对于这个游戏来说,我们将会在游戏角色的上面显示玩家的别名,这样的话,就可以区别出谁是谁了。
如果你还不知道玩家别名是什么,其实就是你在建立Game Center帐号的时候取的nickname啦。当一个match完成的时候,你并不会自动获得它,你需要手动地调用一个方法,然后Game Center会把名字返回给你。
网络代码策略:游戏状态
编写网络相关代码的一个挑战就是,程序执行的顺序可能会和你预期的不一样。
比如,一方可能已经完成match的初始化工作了,然后开始发送随机数给另一端,但是,这时候,可能另一端并没有完成match的初始化啊!
因此,如果我们不够仔细的话,我们可以会遇到一些与时间相关的很奇怪的问题。一个比较好的解决方法就是,追踪每一端的游戏的当前状态。
下面一张图可以解释Cat Race这个游戏需要有哪些状态:
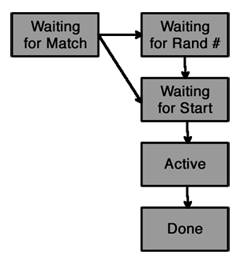
让我们一个状态一个状态来看:
- Waiting for Match: 游戏当前等待一个match被连接,同时查找对象玩家的别名。如果这两个都完成了的话,再检测是否从另一端收到随机数,然后再跳到等待游戏开始状态。
- Waiting for Random #:(#号是number的意思)游戏里面有一个match和玩家别名,但是仍然需要从另一端那里接收到一个随机数。
- Waiting for Start: 游戏等待另一方开始游戏,本例中就是对应等待player2开始游戏。
- Active: 游戏正在进行中---还没有发现任何赢的玩家。每一个时刻,当一个玩家移动的时候,他都会给另一方发送一个消息,告诉他我在移动了。
- Done: 游戏结束 (player 1 给player2发送一个消息说,游戏结束了). 这时,再没有别的消息会发送了,然后两端就重新开始游戏。
好,现在你头脑中有一个概念了,让我们一步步来实现吧!
查找玩家别名
打开GCHelper.h,然后作如下修改:
NSMutableDictionary * playersDict;
// Add after @interface
@property (retain) NSMutableDictionary * playersDict;
这里定义了一个实例变量和相应的属性。我们使用一个字典类,这样可以方便地基于每个玩家的唯一的id来查找 GKPlayer数据(这里面包含了玩家别名信息)。
然后,打开GCHelper.m文件并作如下修改:
@synthesize playersDict;
// Add new method after authenticationChanged
- ( void )lookupPlayers {
NSLog( @" Looking up %d players... " , match.playerIDs.count);
[GKPlayer loadPlayersForIdentifiers:match.playerIDs withCompletionHandler: ^ (NSArray * players, NSError * error) {
if (error != nil) {
NSLog( @" Error retrieving player info: %@ " , error.localizedDescription);
matchStarted = NO;
[ delegate matchEnded];
} else {
// Populate players dict
self.playersDict = [NSMutableDictionary dictionaryWithCapacity:players.count];
for (GKPlayer * player in players) {
NSLog( @" Found player: %@ " , player.alias);
[playersDict setObject:player forKey:player.playerID];
}
// Notify delegate match can begin
matchStarted = YES;
[ delegate matchStarted];
}
}];
}
// Add inside matchmakerViewController:didFindMatch, right after @"Ready to start match!":
[self lookupPlayers];
// Add inside match:playerdidChangeState, right after @"Ready to start match!":
[self lookupPlayers];
主要的查找逻辑都在函数 lookupPlayers里面。这个函数在match准备好之后被调用,它会查找在一个match中的所有玩家的信息(除了本地玩家信息),因为我们可以通过 GKLocalPlayer单例类来查找本地玩家。
Game Center会在一个match中,为每一个玩家返回一个GKPlayer对象。为了使得后面使用更方便,我们把每一个GKPlayer对象放到字典里面,使用player id作为key。
最后,把match标记为已经开始了。然后调用游戏的delegate方法来开始整个游戏。
但是,在我们继续讲下去之前,测试一下!把两个设备都编译并运行一下,这一次,你再看一下控制台输出,你将会看到查找玩家及其别名的过程:
CatRace[ 16918 : 207 ] Player connected !
CatRace[ 16918 : 207 ] Ready to start match !
CatRace[ 16918 : 207 ] Looking up 1 players...
CatRace[ 16918 : 207 ] Found player: Vickipsq
CatRace[ 16918 : 207 ] Match started
添加网络代码
你已经建立好match了,同时还拥有每个玩家的名字,因此,现在你要开始学习这个项目真正有用的东西了---添加网络代码!
你需要做的第一件事情就是,基于我们前面画的图,定义一些新的游戏状态。打开HelloWorldLayer.h,然后修改GameState结构体,具体如下:
kGameStateWaitingForMatch = 0 ,
kGameStateWaitingForRandomNumber,
kGameStateWaitingForStart,
kGameStateActive,
kGameStateDone
} GameState;
你也需要添加一个游戏结束的新的原因---断开连接。因此,修改EndReason枚举类型,如下所示:
kEndReasonWin,
kEndReasonLose,
kEndReasonDisconnect
} EndReason;
接下来,你需要为每个消息定义相应的结构体类型。因此,在HelloWorldLayer.h里面添加下面的代码:
kMessageTypeRandomNumber = 0 ,
kMessageTypeGameBegin,
kMessageTypeMove,
kMessageTypeGameOver
} MessageType;
typedef struct {
MessageType messageType;
} Message;
typedef struct {
Message message;
uint32_t randomNumber;
} MessageRandomNumber;
typedef struct {
Message message;
} MessageGameBegin;
typedef struct {
Message message;
} MessageMove;
typedef struct {
Message message;
BOOL player1Won;
} MessageGameOver;
注意,每一个消息开头都有一个消息类型---这样做的目的就是你可以通过比较相应的字段,来判别消息是什么类型的。
最后,在HelloWorldLayer类中添加一些实例变量:
BOOL receivedRandom;
NSString * otherPlayerID;
这里将追踪我们为每台设备产生的随机数,是否我们已经从另一端接收到了这个随机数,同时,我们还存储了玩家id的引用。
好了,现在,让我们来实现网络代码吧。打开HelloWorldLayer.m,然后修改matchStartd方法,如下所示:
CCLOG( @" Match started " );
if (receivedRandom) {
[self setGameState:kGameStateWaitingForStart];
} else {
[self setGameState:kGameStateWaitingForRandomNumber];
}
[self sendRandomNumber];
[self tryStartGame];
}
因此,当match启动的时候,我们判断一下,是否已经收到另一端的随机数了,然后相应地设置游戏状态。然后我们调用发送随机数函数并开始游戏。
让我们开始实现 sendRandomNumber函数。在HelloWorldLayer.m中作如下修改:
ourRandom = arc4random();
[self setGameState:kGameStateWaitingForMatch];
// Add these new methods to the top of the file
- ( void )sendData:(NSData * )data {
NSError * error;
BOOL success = [[GCHelper sharedInstance].match sendDataToAllPlayers:data withDataMode:GKMatchSendDataReliable error: & error];
if ( ! success) {
CCLOG( @" Error sending init packet " );
[self matchEnded];
}
}
- ( void )sendRandomNumber {
MessageRandomNumber message;
message.message.messageType = kMessageTypeRandomNumber;
message.randomNumber = ourRandom;
NSData * data = [NSData dataWithBytes: & message length: sizeof (MessageRandomNumber)];
[self sendData:data];
}
sendRandomNumber创建一个新的 MessageRandomNumber结构体,设置结构体的 randomNumber域,然后把此结构体转换成DSData并发送给另一端。
sendData调用GCHelper的 sendDataToAllPlayers方法来给match对象里的所有玩家发送消息。
接下来,我们实现 tryStartGame方法。在HelloWorldLayer.m作如下修改:
- ( void )sendGameBegin {
MessageGameBegin message;
message.message.messageType = kMessageTypeGameBegin;
NSData * data = [NSData dataWithBytes: & message length: sizeof (MessageGameBegin)];
[self sendData:data];
}
// Add right after update method
- ( void )tryStartGame {
if (isPlayer1 && gameState == kGameStateWaitingForStart) {
[self setGameState:kGameStateActive];
[self sendGameBegin];
}
}
这个也非常简单---如果玩家1(就是有特权并且充当服务器的一端)和游戏都准备好了,那么就设置游戏状态为active,并且发送一个 MessageGameBegin消息给另一方。
好,现在让我们编写一些代码来处理这些接收到的消息。修改 match:didReceiveData:fromPlayer方法,如下所示:
// Store away other player ID for later
if (otherPlayerID == nil) {
otherPlayerID = [playerID retain];
}
Message * message = (Message * ) [data bytes];
if (message -> messageType == kMessageTypeRandomNumber) {
MessageRandomNumber * messageInit = (MessageRandomNumber * ) [data bytes];
CCLOG( @" Received random number: %ud, ours %ud " , messageInit -> randomNumber, ourRandom);
bool tie = false ;
if (messageInit -> randomNumber == ourRandom) {
CCLOG( @" TIE! " );
tie = true ;
ourRandom = arc4random();
[self sendRandomNumber];
} else if (ourRandom > messageInit -> randomNumber) {
CCLOG( @" We are player 1 " );
isPlayer1 = YES;
} else {
CCLOG( @" We are player 2 " );
isPlayer1 = NO;
}
if ( ! tie) {
receivedRandom = YES;
if (gameState == kGameStateWaitingForRandomNumber) {
[self setGameState:kGameStateWaitingForStart];
}
[self tryStartGame];
}
} else if (message -> messageType == kMessageTypeGameBegin) {
[self setGameState:kGameStateActive];
} else if (message -> messageType == kMessageTypeMove) {
CCLOG( @" Received move " );
if (isPlayer1) {
[player2 moveForward];
} else {
[player1 moveForward];
}
} else if (message -> messageType == kMessageTypeGameOver) {
MessageGameOver * messageGameOver = (MessageGameOver * ) [data bytes];
CCLOG( @" Received game over with player 1 won: %d " , messageGameOver -> player1Won);
if (messageGameOver -> player1Won) {
[self endScene:kEndReasonLose];
} else {
[self endScene:kEndReasonWin];
}
}
}
这个方法把接收到的消息转换为我们定义的Message类型,然后我们就可以根据Message结构中的类型来作相应的处理了。
- 对于 MessageRandomNumber 这种消息,我们主要基于两个玩家所产生的随机数来进行比较,决定谁是1,谁是2,进而决定谁充当服务器的角色。同时,还有相应的状态改变。
- 对于 MessageGameBegin 这种消息,它仅仅是把游戏状态切换到active,这意味着玩家1将会发送一个消息给玩家2.
- 对于 MessageMove 这种消息, 它会使另一方向前移动一点点。
- 对于 MessageGameOver 这种消息, 它会基于游戏结束时的状态,以一种合适地方式来结束游戏。
好了,现在你差不多完成了大部分游戏逻辑了,只是,还有一些细节部分没有完成。接下来,我们在HelloWorldLayer.m中作如下修改:
// Adds debug labels for extra states
- ( void )setGameState:(GameState)state {
gameState = state;
if (gameState == kGameStateWaitingForMatch) {
[debugLabel setString: @" Waiting for match " ];
} else if (gameState == kGameStateWaitingForRandomNumber) {
[debugLabel setString: @" Waiting for rand # " ];
} else if (gameState == kGameStateWaitingForStart) {
[debugLabel setString: @" Waiting for start " ];
} else if (gameState == kGameStateActive) {
[debugLabel setString: @" Active " ];
} else if (gameState == kGameStateDone) {
[debugLabel setString: @" Done " ];
}
}
// Add new methods after sendGameBegin
// Adds methods to send move and game over messages
- ( void )sendMove {
MessageMove message;
message.message.messageType = kMessageTypeMove;
NSData * data = [NSData dataWithBytes: & message length: sizeof (MessageMove)];
[self sendData:data];
}
- ( void )sendGameOver:(BOOL)player1Won {
MessageGameOver message;
message.message.messageType = kMessageTypeGameOver;
message.player1Won = player1Won;
NSData * data = [NSData dataWithBytes: & message length: sizeof (MessageGameOver)];
[self sendData:data];
}
// Add to beginning of ccTouchesBegan:withEvent
// Sends move message to other side when user taps, but only if game is active
if (gameState != kGameStateActive) return ;
[self sendMove];
// Add to end of endScene:
// If the game ends and it's player 1, sends a message to the other side
if (isPlayer1) {
if (endReason == kEndReasonWin) {
[self sendGameOver: true ];
} else if (endReason == kEndReasonLose) {
[self sendGameOver: false ];
}
}
// Add to beginning of update:
// Makes it so only player 1 checks for game over conditions
if ( ! isPlayer1) return ;
// Add at bottom of matchEnded
// Disconnects match and ends level
[[GCHelper sharedInstance].match disconnect];
[GCHelper sharedInstance].match = nil;
[self endScene:kEndReasonDisconnect];
// Add inside dealloc
// Releases variable initialized earlier
[otherPlayerID release];
otherPlayerID = nil;
上面的代码其实非常简单(你仔细阅读一下注释就知道它完成了哪些功能),所以,我们在这里就不在啰嗦了。
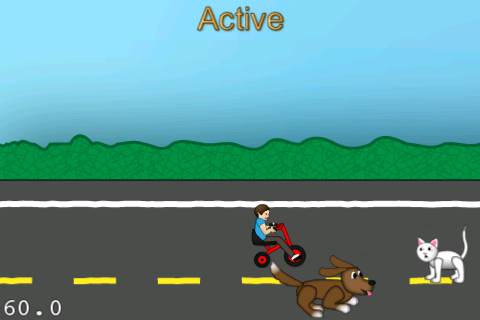
恩,写了好多代码了,不过可以跑起来!呵呵,编译并运行,两台设备都要,这时你有一个完整的赛跑游戏啦!
显示玩家的名字
目前为止,你已经有一个可以玩的游戏了,但是,你并不能分辨游戏里的角色身份,因为他们是随机决定的。
因此,让我们为每一个游戏角色定义玩家别名,这样子就可以区分开来了。打开HelloWorldLayer.h,添加下面的代码:
CCLabelBMFont * player2Label;
然后,打开HelloWorldLayer.m,然后在 tryStartGame方法后面添加一个新的方法,具体如下:
if (isPlayer1) {
player1Label = [CCLabelBMFont labelWithString:[GKLocalPlayer localPlayer].alias fntFile: @" Arial.fnt " ];
[self addChild:player1Label];
GKPlayer * player = [[GCHelper sharedInstance].playersDict objectForKey:playerID];
player2Label = [CCLabelBMFont labelWithString:player.alias fntFile: @" Arial.fnt " ];
[self addChild:player2Label];
} else {
player2Label = [CCLabelBMFont labelWithString:[GKLocalPlayer localPlayer].alias fntFile: @" Arial.fnt " ];
[self addChild:player2Label];
GKPlayer * player = [[GCHelper sharedInstance].playersDict objectForKey:playerID];
player1Label = [CCLabelBMFont labelWithString:player.alias fntFile: @" Arial.fnt " ];
[self addChild:player1Label];
}
}
这里创建了两个 CCLabelBMFonts,每个游戏角色一个label。然后获得本地玩家的别名,我们可以使用 GKLocalPlayer来获取。对于另外一个玩家,我们需要查找GCHelper的字典里的GKPlayer对象。
接下来,在HelloWorldLayer.m作如下修改:
[self setupStringsWithOtherPlayerId:otherPlayerID];
// Inside if statement for match:didReceiveData, kMessageTypeGameBegin case
[self setupStringsWithOtherPlayerId:otherPlayerID];
// At beginning of update method
player1Label.position = player1.position;
player2Label.position = player2.position;
基本上,当游戏切找到Active状态的时候,我们肯定已经接收到玩家的名字了,而这时游戏已经快开始了,是时候初始化label了。
在update方法中,每一帧,我们根据玩家的位置来更新label的位置。
你可能会觉得这样实现有一点点奇怪--为什么不把label当作一个精灵的孩子呢?好吧,我们实际上不能这样做,因为,我们的精灵是加到一个batchNode里面的,而batchNode里面添加的孩子只能是ccsprite的子类,并且这个子类的孩子也要是ccsprite的子类)。因此,我们才这样实现的。
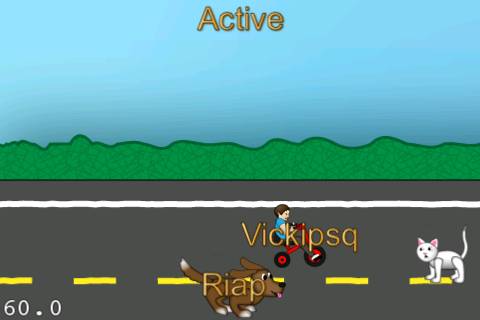
在两台设备上编译并运行代码,现在,你可以在每个游戏角色的上面看到玩家的别名了。
支持邀请功能
我们已经有一个非常好的,可以跑的游戏了,但是,让我们再添加一些更酷、更好玩的功能吧--支持邀请功能!
你可能已经注意到了,当matchmaker视图控制器出现的时候,它有一个选项,可以让你邀请你的朋友一起来玩。但是,目前为止,这个功能还不能用。因为我们还没有写任何代码,但是,实际上这个功能是非常容易实现的。
打开GCHelper.h,然后作如下修改:(代码添加位置,请注意看注释!)
- ( void )inviteReceived;
// Add inside @interface
GKInvite * pendingInvite;
NSArray * pendingPlayersToInvite;
// Add after @interface
@property (retain) GKInvite * pendingInvite;
@property (retain) NSArray * pendingPlayersToInvite;
这里创建了一些实例变量,并定义了相应的属性。同时往 GCHelperDelegate 协议里面添加了一个新的方法,可以在邀请被接收到的时候被通告。
接下来,回到GCHelper.m,然后作如下修改:
@synthesize pendingInvite;
@synthesize pendingPlayersToInvite;
// In authenticationChanged callback, right after userAuthenticated = TRUE
[GKMatchmaker sharedMatchmaker].inviteHandler = ^ (GKInvite * acceptedInvite, NSArray * playersToInvite) {
NSLog( @" Received invite " );
self.pendingInvite = acceptedInvite;
self.pendingPlayersToInvite = playersToInvite;
[ delegate inviteReceived];
};
在Game Center里面,想让邀请功能跑起来的话,你需要提供一个回调函数,当invite被接收到的时候来回调之。你也应该尽可能的在你的游戏启动起来的时候就注册这样一个block函数---推荐的时机,是刚好在用户被认证之后。
对于这个游戏,这个回调函数会保存邀请信息,然后通知delegate对象。而delegate对象会重新切回cocos2d场景,然后通过调用 findMatchWithMinPlayers方法来查找一个match。---我们将会修改这个函数,并且把任何将到到达的邀请信息考虑进去。
因此,修改 findMatchWithMinPlayers方法,具体如下所示:
if ( ! gameCenterAvailable) return ;
matchStarted = NO;
self.match = nil;
self.presentingViewController = viewController;
delegate = theDelegate;
if (pendingInvite != nil) {
[presentingViewController dismissModalViewControllerAnimated:NO];
GKMatchmakerViewController * mmvc = [[[GKMatchmakerViewController alloc] initWithInvite:pendingInvite] autorelease];
mmvc.matchmakerDelegate = self;
[presentingViewController presentModalViewController:mmvc animated:YES];
self.pendingInvite = nil;
self.pendingPlayersToInvite = nil;
} else {
[presentingViewController dismissModalViewControllerAnimated:NO];
GKMatchRequest * request = [[[GKMatchRequest alloc] init] autorelease];
request.minPlayers = minPlayers;
request.maxPlayers = maxPlayers;
request.playersToInvite = pendingPlayersToInvite;
GKMatchmakerViewController * mmvc = [[[GKMatchmakerViewController alloc] initWithMatchRequest:request] autorelease];
mmvc.matchmakerDelegate = self;
[presentingViewController presentModalViewController:mmvc animated:YES];
self.pendingInvite = nil;
self.pendingPlayersToInvite = nil;
}
}
当创建 GKMatchmakerViewController的时候,这里和之前的做法非常之类似,除了这里使用 pendingInvite和 pendingPlayersToInvite值。
最后,回到HelloWorldLayer.m并实现 inviteReceived方法,如下所示:
[self restartTapped:nil];
}
大功告成!在两台设备上编译并运行工程,当一个设备跑起来后,使用 GKMatchmakerViewController发送一个邀请给另一方。这时另一方将会收到邀请通知,这个通知看起来应该如下图所示:
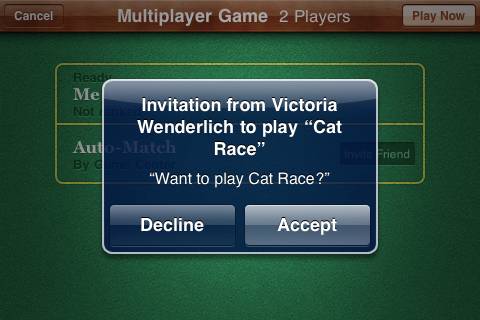
点击”Accept“,然后在原来的设备上点“Play now”,这时,你又可以和之前一样玩这个游戏了。但是,这次,你的对手是你邀请的朋友呀!:)
何去何从?
这里有本教程的完整源代码。
如果你正想往你的游戏中添加Game Center的功能,你可能想使用Leaderboards和Achievements。如果你对此感兴趣的话,可以买我的书。
译者的话:本人水平有限,翻译不准的地方请不吝提出,谢谢!
著作权声明:本文由http://www.cnblogs.com/andyque翻译,欢迎转载分享。请尊重作者劳动,转载时保留该声明和作者博客链接,谢谢!