Transformer 优秀开源工作:timm 库 vision transformer 代码解读
timm库(PyTorchImageModels,简称timm)是一个巨大的PyTorch代码集合,已经被官方使用了。
参考:timm 视觉库中的 create_model 函数详解
p r e t r a i n e d \color{red}{pretrained} pretrained
如果我们传入 pretrained=True,那么 timm 会从对应的 URL 下载模型权重参数并载入模型,只有当第一次(即本地还没有对应模型参数时)会去下载,之后会直接从本地加载模型权重参数。
model = timm.create_model('resnet34', pretrained=True)
输出:
Downloading: "https://github.com/rwightman/pytorch-image-models/releases/download/v0.1-weights/resnet34-43635321.pth" to /home/song/.cache/torch/hub/checkpoints/resnet34-43635321.pth
查 看 安 装 的 t i m m 库 中 可 以 使 用 哪 些 模 型 : \color{red}{查看安装的timm库中可以使用哪些模型:} 查看安装的timm库中可以使用哪些模型:
参考:Pytorch视觉模型库–timm
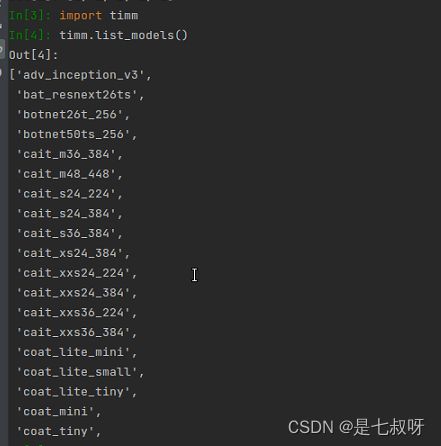
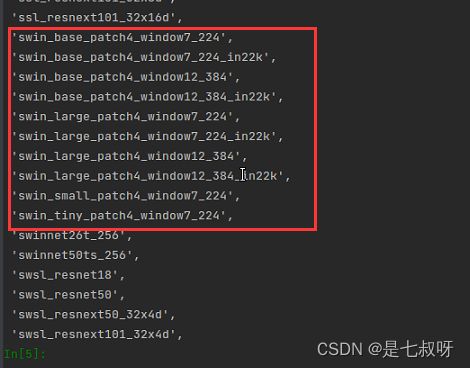
找到swin transformer的模型:
 'swin_base_patch4_window7_224',
 'swin_base_patch4_window7_224_in22k',
 'swin_base_patch4_window12_384',
 'swin_base_patch4_window12_384_in22k',
 'swin_large_patch4_window7_224',
 'swin_large_patch4_window7_224_in22k',
 'swin_large_patch4_window12_384',
 'swin_large_patch4_window12_384_in22k',
 'swin_small_patch4_window7_224',
 'swin_tiny_patch4_window7_224',
一、修改num_classes提取分类前和后的特征
我们使用模型:vit_tiny_patch16_224
1.1 修改为num_classes=0提取classify之前的特征192:
self.transformer_model = creat('vit_tiny_patch16_224', pretrained=True, num_classes=0)
打印模型结构可以发现:先经过PatchEmbed然后经历vit_tiny_patch16_224的 6 \color{red}{6} 6个Block,然后得到的是classifier 之前的特征
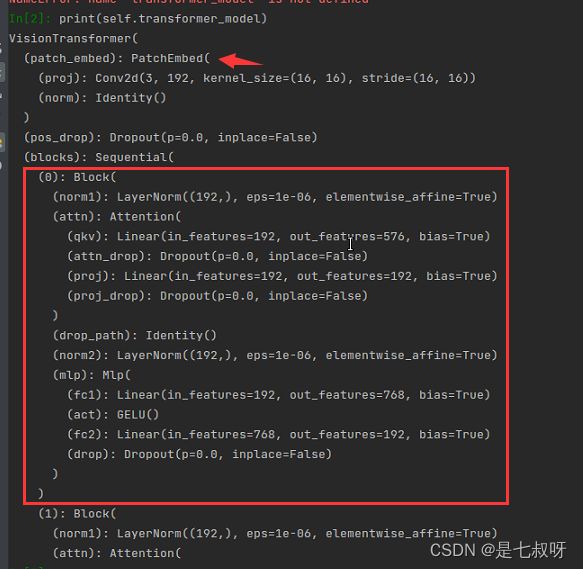
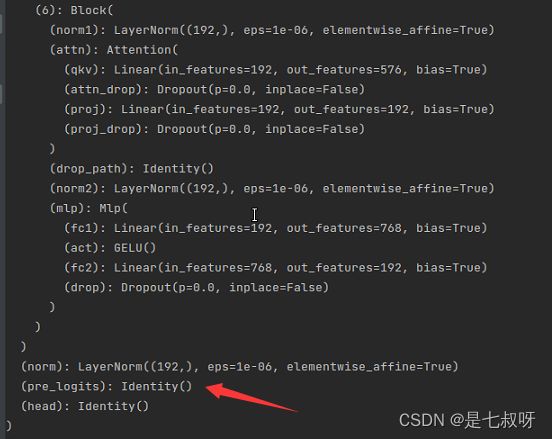
这里输入特征维度【b, 3, 224, 224】,输出特征维度【b,192】:


1.2 得到网络分类器之前的输出t_q_feature = self.transformer_model.forward_features(t_q_x)
示例:
print("如果设置num_classes,表示重设全连接层,该操作通常用于迁移学习")
m = timm.create_model('resnet50', pretrained=True,num_classes=10)
m.eval()
o = m(torch.randn(2, 3, 224, 224))
print(f'Classification layer shape: {o.shape}')
#输出flatten层或者global_pool层的前一层的数据(flatten层和global_pool层通常接分类层)
o = m.forward_features(torch.randn(2, 3, 224, 224))
print(f'Feature shape: {o.shape}')
代码执行输出如下所示:
如果设置num_classes,表示重设全连接层,该操作通常用于迁移学习
Classification layer shape: torch.Size([2, 10])
Feature shape: torch.Size([2, 2048, 7, 7])
1.3 正常修改head的类别
打印模型结构,前面的到normal都一样,最后的head Linear层发生变化(head): Linear(in_features=192, out_features=3600, bias=True)
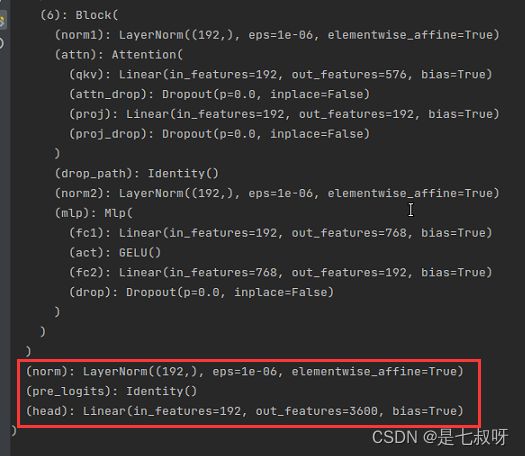
这里输入特征维度【b, 3, 224, 224】,输出特征维度【b,3600】3600是我们修改的最后一层输出:

PS:直接修改num_classes=3600,就可以不用添加一层self.transformer_model.head了,是一样的模型结构和结果:


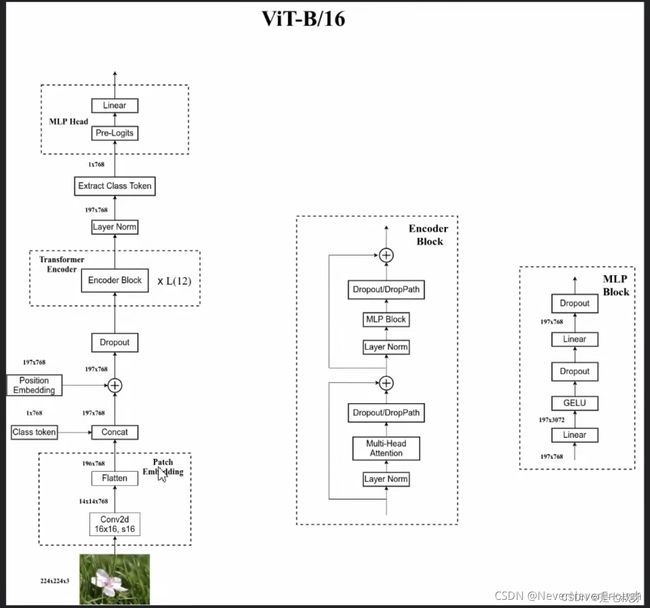
1.3 VIT模型结构
参考:【超详细】初学者包会的Vision Transformer(ViT)的PyTorch实现代码学习
可以看到一张图片
- 经过Encoder Block,再经过MLP Block全连接层变为197*768的特征图。
- 接着下一个块层标准化…最后堆叠完块之后。
- 堆叠完Block,出来经过一个层标准化变为197* 768、提取类别Token变为1* 768、经过MLP Head最后输出了1*class的特征向量。
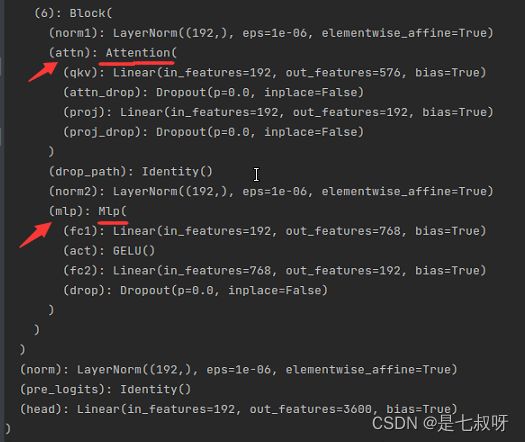
timm库中的features_only=True不适用于vision transformer模型,会报错:RuntimeError: features_only not implemented for Vision Transformer models.
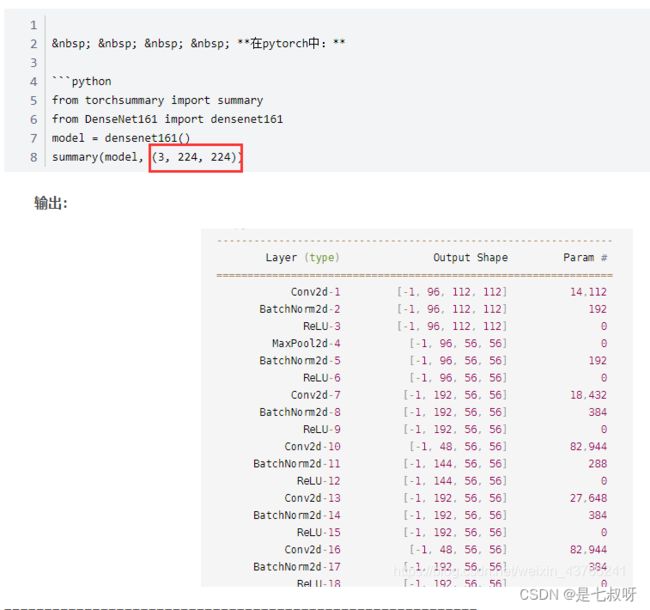
使用summary(self.transformer_model, (3, 224, 224))打印网络结构
PS:torchsummary能够查看模型的输入和输出的形状,可以更加清楚地输出模型的结构。
参考:pytorch 中的torchsummary
- 第一个参数是model:pytorch 模型,必须继承自 nn.Module
- 第二个参数是输入的尺寸,input_size:模型输入 size,形状为 C,H ,W,不包括batchsize
- device:“cuda"或者"cpu”
使用时需要注意,默认device=‘cuda’,如果是在‘cpu’,那么就需要更改。不匹配就会出现下面的错误:
RuntimeError: Input type (torch.cuda.FloatTensor) and weight type (torch.FloatTensor) should be the same
二、ViT操作流程
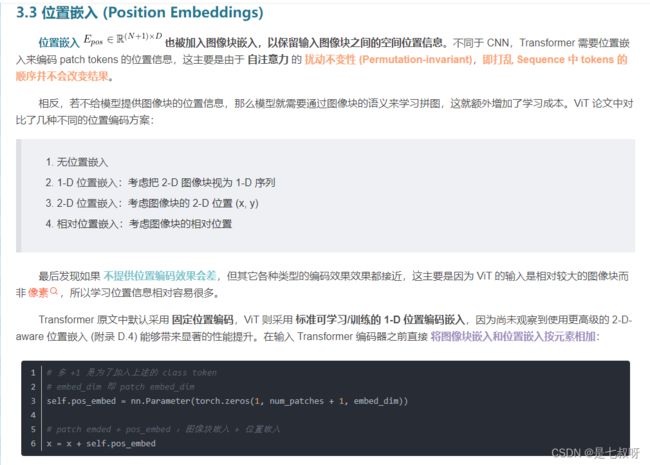
关于位置编码等详细信息参考:【机器学习】详解 Vision Transformer (ViT)
ViT 中的位置编码没有采用原版 Transformer 中的 s i n c o s sincos sincos 编码,而是直接设置为可学习的 Positional Encoding。对训练好的 Positional Encoding 进行可视化,如下图所示。我们可以看到,位置越接近,往往具有更相似的位置编码。此外,出现了行列结构,同一行/列中的 patch 具有相似的位置编码。
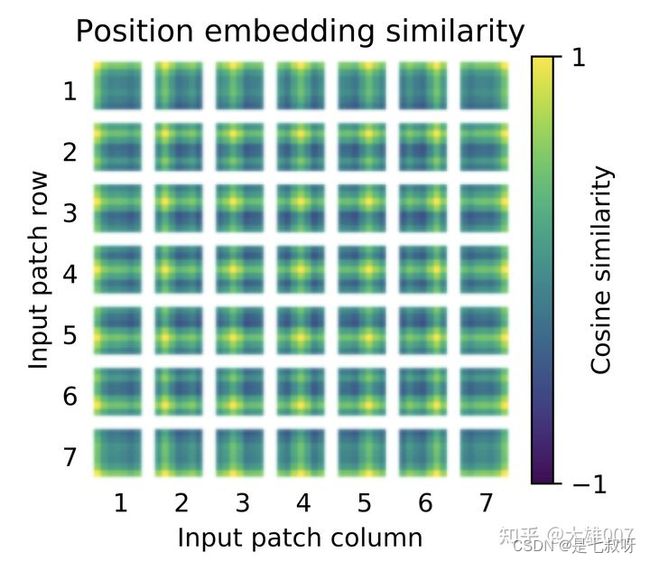
论文中也对学习到的位置编码进行了可视化,发现相近的图像块的位置编码较相似,且同行或列的位置编码也相近: 
(https://blog.csdn.net/qq_39478403/article/details/118704747)
vit论文地址:Attention Is All You Need 2016
中文讲解 李宏毅老师的视频:(强推)李宏毅2021/2022春机器学习课程、YouTube
参考:Vision Transformer(ViT)PyTorch代码全解析(附图解)
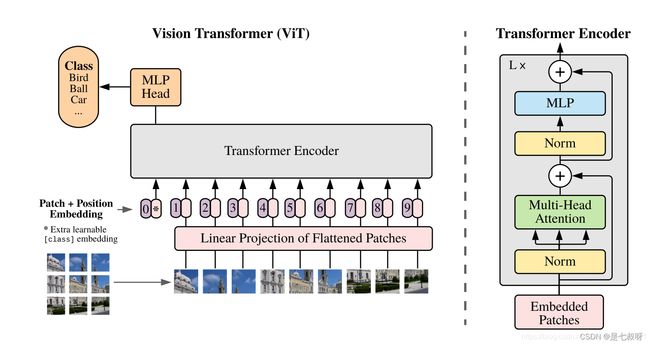
2.1 下图是ViT的整体框架图,我们在解析代码时会参照此图:
ViT的各个结构都写在了__init__()里,不再细讲,通过forward()来看ViT的整个前向传播过程(操作流程)。
class ViT(nn.Module):
    def __init__(self, *, image_size, patch_size, num_classes, dim, depth, heads, mlp_dim, pool = 'cls', channels = 3, dim_head = 64, dropout = 0., emb_dropout = 0.):
        super().__init__()
        image_height, image_width = pair(image_size)
        patch_height, patch_width = pair(patch_size)
        assert image_height % patch_height == 0 and image_width % patch_width == 0, 'Image dimensions must be divisible by the patch size.'
        num_patches = (image_height // patch_height) * (image_width // patch_width)
        patch_dim = channels * patch_height * patch_width
        assert pool in {'cls', 'mean'}, 'pool type must be either cls (cls token) or mean (mean pooling)'
        self.to_patch_embedding = nn.Sequential(
            Rearrange('b c (h p1) (w p2) -> b (h w) (p1 p2 c)', p1 = patch_height, p2 = patch_width),
            nn.Linear(patch_dim, dim),
        )
        self.pos_embedding = nn.Parameter(torch.randn(1, num_patches + 1, dim))  # (1,65,1024)
        self.cls_token = nn.Parameter(torch.randn(1, 1, dim))
        self.dropout = nn.Dropout(emb_dropout)
        self.transformer = Transformer(dim, depth, heads, dim_head, mlp_dim, dropout)
        self.pool = pool
        self.to_latent = nn.Identity()
        self.mlp_head = nn.Sequential(
            nn.LayerNorm(dim),
            nn.Linear(dim, num_classes)
        )

    def forward(self, img):   # img: (1, 3, 256, 256)
        x = self.to_patch_embedding(img)     # (1, 64, 1024)
        b, n, _ = x.shape
        cls_tokens = repeat(self.cls_token, '() n d -> b n d', b = b)    # (1, 1, 1024)
        x = torch.cat((cls_tokens, x), dim=1)  # (1, 65, 1024)
        x += self.pos_embedding[:, :(n + 1)]   # (1, 65, 1024)
        x = self.dropout(x)                    # (1, 65, 1024)
        x = self.transformer(x)                # (1, 65, 1024)
        x = x.mean(dim = 1) if self.pool == 'mean' else x[:, 0]      # (1, 1024)
        x = self.to_latent(x)
        return self.mlp_head(x)
整体流程:
- 首先对输入进来的img(256256大小),划分为3232大小的patch,共有8*8个。并将patch转换成embedding。(对应第26行代码)
- 生成cls_tokens (对应第28行代码)
- 将cls_tokens沿dim=1维与x进行拼接 (对应第29行代码)
- 生成随机的position embedding,每个embedding都是1024维 (对应代码14行和30行)
- 对输入经过Transformer进行编码(对应代码第32行)
- 如果是分类任务的话,截取第一个可学习的class embedding
- 最后过一个MLP Head用于分类。
2.2 vit张量维度变化
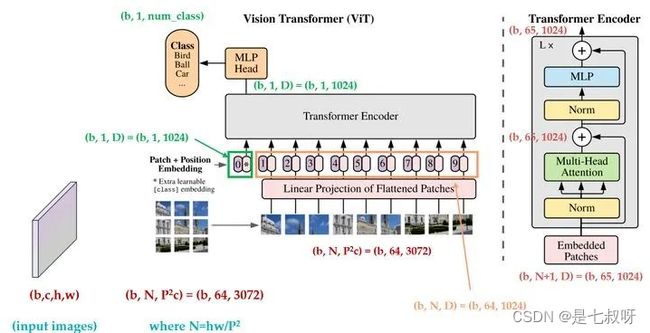
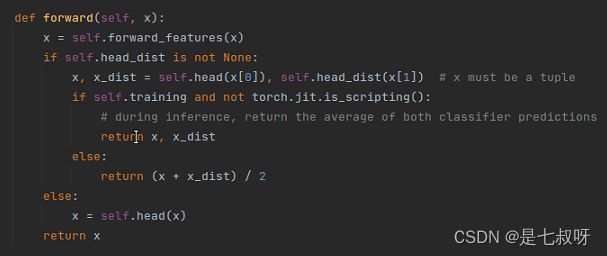
!!!注意,经过Transformer Encoder块的输入和输出都为(b,65,1024),只不过timm中是将经过特征提取后的[:,0]出来(维度为b,1,1024)用于后续mlp head的输入。
PS:timm中将cls_token拼接在前,所以提取[:,0]
三、timm库中VisionTransformer代码解读
PS:torch.nn.Identity()
今天看源码时,遇到的这个恒等函数,就如同名字那样
占位符,并没有实际操作
主要使用场景:
不区分参数的占位符标识运算符
if 某个操作 else Identity()
在增减网络过程中,可以使得整个网络层数据不变,便于迁移权重数据。
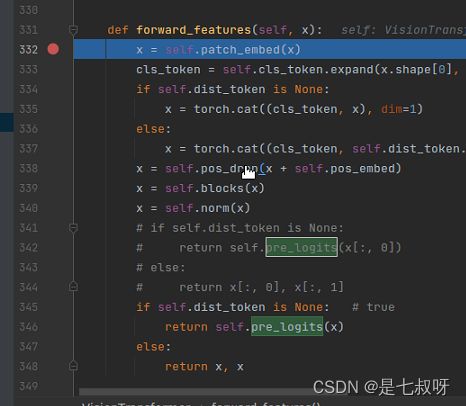
3.1 forward_features函数(一)输入进vit的x维度为,首先经过x = self.patch_embed(x):
首先经过x = self.patch_embed(x)内的forward函数:
- 输入x维度(b,3,224,224),经过
x = self.proj(x)后变为(b,192,14,14) - 经过
x = x.flatten(2).transpose(1, 2) # BCHW -> BNC【用到了flatten(2)将BCHW -> BNC,之后变为196(1414)768(16 16 3通道)】,14*14合并为192,这个出来后变为(16,196,192) - 最后经过
x = self.norm(x)后return

经过 p a t c h e m b e d \color{red}{patch_embed} patchembed后维度变为:
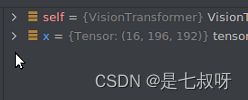
PS:python:flatten()参数详解【此处用来将4维变为3维—>降维】
参考:python:flatten()参数详解
- flatten()是对多维数据的降维函数。
- flatten(),默认缺省参数为0,也就是说flatten()和flatte(0)效果一样。
- python里的flatten(dim)表示,从第dim个维度开始展开,将后面的维度转化为一维.也就是说,只保留dim之前的维度,其他维度的数据全都挤在dim这一维。
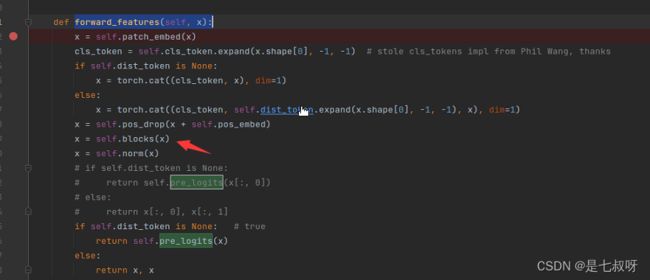
3.2 forward_features函数(二)vit特征提取`forward_features(self, x):
- 经过提取cls_token
- 拼接token后变为(b,197,192)
- 加入位置嵌入
x = self.pos_drop(x + self.pos_embed) - 进入堆叠的block后输出为(b,197,92)不变
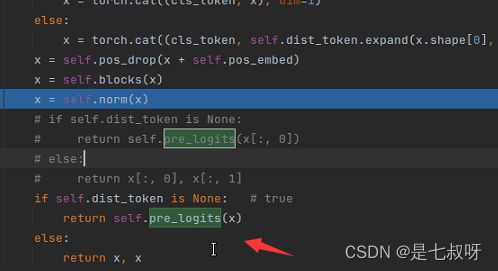
- 标准化x = self.norm(x)—>
self.norm = norm_layer(embed_dim) return x[:, 0],即返回下标0的可学习的cls_token用于后续的mlp head分类
提取cls_token
通过nn.Parameter(torch.zeros(1, 1, embed_dim))将一个不可训练的类型Tensor转换成可以训练的类型parameter并将这个parameter绑定到这个module里面(net.parameter()中就有这个绑定的parameter。详解参考:PyTorch中的torch.nn.Parameter() 详解

注意blocks中堆叠块是使用nn.Sequential(*配合下面list的用法,重复depth个Block:
[1 for i in range(5)]
Out[2]: [1, 1, 1, 1, 1]
PS:list变量前加一个星号*,目的是将该list变量拆解开多个独立的参数,传入函数中
参考:Python中的list(列表)和dict(字典)变量前面加星号*的作用
例如:
list1 = [1, 2, 3]
print(*list1)
输出:
1 2 3
