【pytorch实战学习】第六篇:CIFAR-10分类实现
往期相关文章列表:
- 【pytorch学习实战】第一篇:线性回归
- 【pytorch学习实战】第二篇:多项式回归
- 【pytorch学习实战】第三篇:逻辑回归
- 【pytorch学习实战】第四篇:MNIST数据集的读取、显示以及全连接实现数字识别
- 【pytorch学习实战】第五篇:卷积神经网络实现MNIST手写数字识别
- 【pytorch实战学习】第六篇:CIFAR-10分类实现
- 【pytorch实战学习】第七篇:tensorboard可视化介绍
文章目录
- 1. 数据集简介
- 2. 相关理论介绍
-
- (1)卷积层
- (2)输出维度计算
- 2. 数据集下载与显示
- 3. 自定义CNN模型
- 4. 损失函数与优化器
- 5. 训练网络
- 6. 保存模型
- 7. 加载、测试模型
本文是基于 pytorch官网教程,然后在此基础上,写了一些自己的理解和修改。
1. 数据集简介
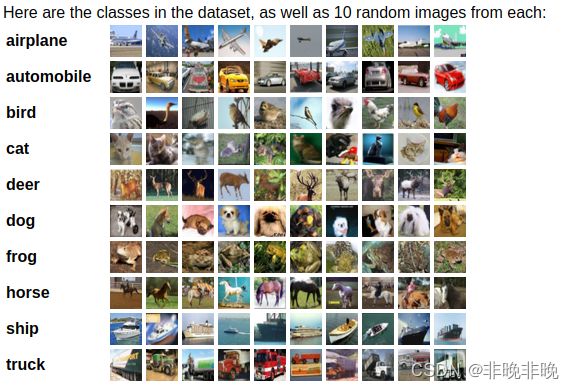
CIFAR-10数据集共有60000张彩色图像,这些图像是32*32,分为10个类,每类6000张图。需要说明的是,这10类都是各自独立的,不会出现重叠。
题外话,MNIST数据集是只有1个通道的灰度图,尺寸大小为28*28。
- CIFAR-10的官网链接为:http://www.cs.toronto.edu/~kriz/cifar.html
- python数据集下载链接:http://www.cs.toronto.edu/~kriz/cifar-10-python.tar.gz
- matlab数据集下载链接:http://www.cs.toronto.edu/~kriz/cifar-10-matlab.tar.gz
- binary数据集下载链接:http://www.cs.toronto.edu/~kriz/cifar-10-binary.tar.gz
2. 相关理论介绍
(1)卷积层
nn.Conv2d(3,16,3,padding=1)
卷积操作在上一篇文章中也有介绍,只不过这里省略了in_channels, out_channels, kernel_size,下面是它的参数:
输入通道:3,也就是RGB图像输出通道:16,所以这里用到了16个不同的卷积核。卷积核:kernel_size为 3×3,正方形kernel可以只写其中一个。- padding = 1
(2)输出维度计算
- 卷积后的维度计算
输出维度 = 输入维度 + 2*padding - kernel_size +1
拿nn.Conv2d(3,16,3,padding=1)举例(原始为3通道,RGB),如果输入图像是32*32,那么输出也是32*32。也就是说输入为:3*32*32,输出为:16*32*32。
- pooling维度计算
nn.MaxPool2d(2, 2),表示该最大池化层在 2x2 空间里向下采样,步长stride=2。如果它的输入维度是:32*32,那么它的输出为:16*16。
- BN层和激活层的维度保持不变。
2. 数据集下载与显示
- 数据下载
torchvision格式的数据集的范围为[0,1],我们这里使用transforms方法将它归一化为[-1,1]的张量。
transform = transforms.Compose(
    [transforms.ToTensor(),
     transforms.Normalize((0.5, 0.5, 0.5), (0.5, 0.5, 0.5))])

batch_size = 4

trainset = torchvision.datasets.CIFAR10(root='./data', train=True,
                                        download=True, transform=transform)
trainloader = torch.utils.data.DataLoader(trainset, batch_size=batch_size,
                                          shuffle=True, num_workers=2)

testset = torchvision.datasets.CIFAR10(root='./data', train=False,
                                       download=True, transform=transform)
testloader = torch.utils.data.DataLoader(testset, batch_size=batch_size,
                                         shuffle=False, num_workers=2)

classes = ('plane', 'car', 'bird', 'cat',
           'deer', 'dog', 'frog', 'horse', 'ship', 'truck')
- 数据显示
使用torchvision.utils.make_grid将多个图片拼接成一张图片显示。
import matplotlib.pyplot as plt
import numpy as np

def imshow(img):
    img = img / 2 + 0.5     # unnormalize
    npimg = img.numpy()
    plt.imshow(np.transpose(npimg, (1, 2, 0)))
    plt.show()

#随机选取图片,因为trainloader是随机的
dataiter = iter(trainloader)
images, labels = dataiter.next()

#显示图片
imshow(torchvision.utils.make_grid(images)) #make_grid的作用是将若干幅图像拼成一幅图像。

#打印labels
print(' '.join(f'{classes[labels[j]]:5s}' for j in range(batch_size)))
输出:
dog deer car truck
3. 自定义CNN模型
这里没有使用官方的CNN自定义的模型,而是使用自己定义的一个模型,代码如下:
import torch.nn as nn
import torch.nn.functional as F

class Net(nn.Module):
    def __init__(self):
        super().__init__()
        self.conv1 = nn.Conv2d(3, 6, 5) #3*32*32 ==》6*28*28(32 + 2P - kernel + 1)
        self.pool = nn.MaxPool2d(2, 2) #6*28*28 ==> 6*14*14
        self.conv2 = nn.Conv2d(6, 16, 5) # 6*14*14 ==> 16 * 10 * 10
        self.fc1 = nn.Linear(16 * 5 * 5, 120) # 还要一个pooling 所以输入是16 * 5 * 5 ==> 120
        self.fc2 = nn.Linear(120, 84) # 120 ==> 84
        self.fc3 = nn.Linear(84, 10) # 84 ==> 10

    def forward(self, x):
        x = self.pool(F.relu(self.conv1(x)))
        x = self.pool(F.relu(self.conv2(x)))
        x = torch.flatten(x, 1) # flatten all dimensions except batch
        x = F.relu(self.fc1(x))
        x = F.relu(self.fc2(x))
        x = self.fc3(x)
        return x

net = Net()
if torch.cuda.is_available():
    net = net.cuda()
使用print(net)打印网络结构如下:
Net(
  (conv1): Conv2d(3, 6, kernel_size=(5, 5), stride=(1, 1))
  (pool): MaxPool2d(kernel_size=2, stride=2, padding=0, dilation=1, ceil_mode=False)
  (conv2): Conv2d(6, 16, kernel_size=(5, 5), stride=(1, 1))
  (fc1): Linear(in_features=400, out_features=120, bias=True)
  (fc2): Linear(in_features=120, out_features=84, bias=True)
  (fc3): Linear(in_features=84, out_features=10, bias=True)
)
4. 损失函数与优化器
由于是分类器,选用交叉熵损失,优化器选用SGD或者Adam等都可以。
import torch.optim as optim

criterion = nn.CrossEntropyLoss()
optimizer = optim.SGD(net.parameters(), lr=0.001, momentum=0.9)
5. 训练网络
这部分和官方唯一的区别是,是否选用cuda进行加速,被注释掉的部分为每个epoch打印一次信息,这里使用和官方一致的信息输出模式。
print('---------- Train Start ----------')
epochs = 3
test_iter = 0
for epoch in range(epochs):
    running_loss = 0.0
    for i, data in enumerate(trainloader, 0):
        # get the inputs; data is a list of [inputs, labels]
        inputs, labels = data
        if torch.cuda.is_available():
            inputs = inputs.cuda()
            labels = labels.cuda()

        # zero the parameter gradients
        optimizer.zero_grad()
        # forward + backward + optimize
        outputs = net(inputs)

        loss = criterion(outputs, labels)
        loss.backward()
        optimizer.step()

        # print statistics
        running_loss += loss.item()
        if i % 2000 == 1999:    #没2000个小批次打印一次
            print(f'[{epoch + 1}, {i + 1:5d}] loss: {running_loss / 2000:.3f}')
            running_loss = 0.0
       # test_iter = i * labels.data[0].item()

    # 每个epoch计算一次损失
    # print(f'[{epoch + 1}, {i + 1:5d}] loss: {running_loss / test_iter:.3f}')
    # running_loss = 0.0
    # test_iter = 0

print('----------Finished Training----------')
输出如下:
---------- Train Start ----------
[1,  2000] loss: 2.162
[1,  4000] loss: 1.846
[1,  6000] loss: 1.673
[1,  8000] loss: 1.561
[1, 10000] loss: 1.497
[1, 12000] loss: 1.469
[2,  2000] loss: 1.428
[2,  4000] loss: 1.389
[2,  6000] loss: 1.361
[2,  8000] loss: 1.342
[2, 10000] loss: 1.308
[2, 12000] loss: 1.326
[3,  2000] loss: 1.255
[3,  4000] loss: 1.237
[3,  6000] loss: 1.244
[3,  8000] loss: 1.212
[3, 10000] loss: 1.208
[3, 12000] loss: 1.231
----------Finished Training----------
6. 保存模型
pytorch提供了便捷的保存模型方法,如下所示:
PATH = './cifar_net.pth'
torch.save(net.state_dict(), PATH)
7. 加载、测试模型
其实在这里保存和加载模型是没有必要的,只是告诉大家怎么去保存和加载而已。
#显示测试gt
dataiter = iter(testloader)
images, labels = dataiter.next()

# print images
imshow(torchvision.utils.make_grid(images))
print('GroundTruth: ', ' '.join(f'{classes[labels[j]]:5s}' for j in range(4)))

#加载模型
net = Net()
net.load_state_dict(torch.load(PATH))
outputs = net(images)

_, predicted = torch.max(outputs, 1)

print('Predicted: ', ' '.join(f'{classes[predicted[j]]:5s}'
                              for j in range(4)))

#准确度分析
correct = 0
total = 0
# since we're not training, we don't need to calculate the gradients for our outputs
with torch.no_grad():
    for data in testloader:
        images, labels = data
        # calculate outputs by running images through the network
        outputs = net(images)
        # the class with the highest energy is what we choose as prediction
        _, predicted = torch.max(outputs.data, 1)
        total += labels.size(0)
        correct += (predicted == labels).sum().item()

print(f'Accuracy of the network on the 10000 test images: {100 * correct // total} %')
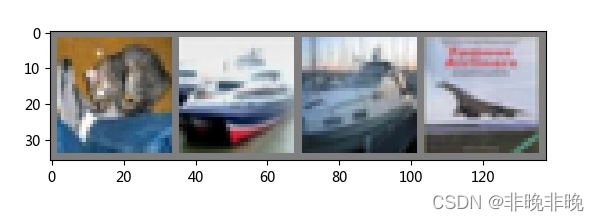
GroundTruth:  cat   ship  ship  plane
Predicted:  cat   ship  car   plane
Accuracy of the network on the 10000 test images: 56 %
看起来准确度还不够好,让我们把epochs加大到20,再看看输出结果。
GroundTruth:  cat   ship  ship  plane
Predicted:  dog   ship  truck plane
Accuracy of the network on the 10000 test images: 59 %
测试结果有所提升,但不是很明显,待修炼之后再来补功课,提升一下指标!
参考链接:https://pytorch.org/tutorials/beginner/blitz/cifar10_tutorial.html#sphx-glr-beginner-blitz-cifar10-tutorial-py


