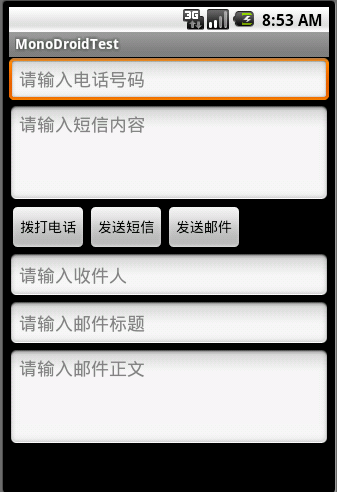
这次我们来探讨一下MonoDroid中对AndroidManifest.xml文件的使用,这里以手机中较为常用的打电话,发短信及发邮件作为范例来进行说明。界面将如下所示:
布局文件如下:
- <?xml version="1.0" encoding="utf-8"?>
- <RelativeLayout xmlns:android="http://schemas.android.com/apk/res/android"
- android:layout_width="fill_parent"
- android:layout_height="fill_parent">
- <EditText android:id="@+id/txtPhoneNo"
- android:layout_width="fill_parent"
- android:phoneNumber="true"
- android:hint="请输入电话号码"
- android:layout_height="wrap_content"
- android:layout_marginTop="5px"
- android:layout_marginLeft="5px"/>
- <EditText android:id="@+id/txtSMS"
- android:layout_width="fill_parent"
- android:layout_height="100dip"
- android:singleLine="false"
- android:gravity="top"
- android:hint="请输入短信内容"
- android:layout_below="@id/txtPhoneNo"/>
- <Button android:id="@+id/btnDial"
- android:text="拨打电话"
- android:layout_width="wrap_content"
- android:layout_height="wrap_content"
- android:layout_below="@id/txtSMS"/>
- <Button android:id="@+id/btnSendSMS"
- android:text="发送短信"
- android:layout_width="wrap_content"
- android:layout_height="wrap_content"
- android:layout_below="@id/txtSMS"
- android:layout_toRightOf="@id/btnDial"/>
- <Button android:id="@+id/btnSendEMail"
- android:text="发送邮件"
- android:layout_width="wrap_content"
- android:layout_height="wrap_content"
- android:layout_below="@id/txtSMS"
- android:layout_toRightOf="@id/btnSendSMS"/>
- <EditText android:id="@+id/txtReceiver"
- android:layout_width="fill_parent"
- android:layout_height="wrap_content"
- android:hint="请输入收件人"
- android:layout_below="@id/btnDial"/>
- <EditText android:id="@+id/txtTitle"
- android:layout_width="fill_parent"
- android:layout_height="wrap_content"
- android:hint="请输入邮件标题"
- android:layout_below="@id/txtReceiver"/>
- <EditText android:id="@+id/txtEMail"
- android:layout_width="fill_parent"
- android:layout_height="100dip"
- android:gravity="top"
- android:hint="请输入邮件正文"
- android:layout_below="@id/txtTitle"/>
- </RelativeLayout>
“打电话”是每个手机必备的功能,虽然在Android平台上可以通过程序,进行各种让人目眩神迷的应用,但拨打电话这项最基本的功能,依然是每个Android工程师的必修课程。
拨打电话的关键有两个方面:首先要在AndroidManifest.xml中添加uses-permission,并声明android:name="android.permission.CALL_PHONE"使用权限。由于拨打电话输入手机底层的服务,与用户隐私及通话费用等信息息息相关,因此程序必须取得相关权限。其次,通过自定义Intent对象,带入“ACTION_CALL"这个关键(ACTION),以及通过Uri.Parse()方法将用户输入的电话号码(Data)带入,最后以StartActivity()方法(将自定义的Intent传入),即可完成通过程序直接拨打电话的工作了。
为了检查用户输入是否正确的电话格式,Activity1中增加了一个方法IsPhoneNoValid。
- protected override void OnCreate(Bundle bundle)
- {
- base.OnCreate(bundle);
- SetContentView(Resource.Layout.Main);
- EditText txtPhoneNo = FindViewById<EditText>(Resource.Id.txtPhoneNo);
- Button btnDial = FindViewById<Button>(Resource.Id.btnDial);
- btnDial.Click += (sender, e) =>
- {
- try
- {
- string input = txtPhoneNo.Text;
- if (IsPhoneNoValid(input))
- {
- Intent myIntentDial = new Intent("android.intent.action.CALL", Android.Net.Uri.Parse("tel:" + input));
- StartActivity(myIntentDial);
- txtPhoneNo.Text = "";
- }
- else
- {
- Toast.MakeText(this, "输入的电话格式不正确", ToastLength.Long).Show();
- }
- }
- catch (System.Exception ex)
- {
- MessageBox.ShowErrorMessage(this, ex);
- }
- };
- }
- bool IsPhoneNoValid(string phoneNo)
- {
- return Regex.IsMatch(phoneNo, "^//(?(//d{3})//)?[- ]?(//d{3})[- ]?(//d{5})$") || Regex.IsMatch(phoneNo, "^//(?(//d{3})//)?[- ]?(//d{4})[- ]?(//d{4})$");
- }
接下来就是关键了,刚才已经跟大家说过,要拨打电话,必须要在AndroidManifest.xml中添加uses-permission,那么这个AndroidManifest.xml是个什么东西?如果我们是在Eclipse里用Java来开发Android项目的话,AndroidManifest.xml是必不可少的,它里头包含这个Android应用程序具有哪些Activity,Service或者Receiver,你可以将它理解为我们.net里winform的app.config,asp.net里的web.config,它是应用程序的一个配置文件。MonoDroid为了简化我们手动修改AndroidManifest.xml文件的工作,将一些常用的xml元素封装成了.net里的Attribute类,在部署程序时,一个叫做mandroid.exe的工具会自动生成AndroidManifest.xml,并将这些Attribute生成相应的xml元素。例如,我们的Activity1类的上部不是有个[Activity(Label = "MonoDroidTest", MainLauncher = true)]标签吗?只要打上了这个标签,那么在部署程序时,mandroid.exe就会在AndroidManifest.xml中生成如下节点:
- <activity android:name=".Activity1" android:label="MonoDroidTest">
- <intent-filter>
- <action android:name="android.intent.action.MAIN" />
- <category android:name="android:intent.category.LAUNCHER" />
- </intent-filter>
- </activity>
因此,一些常用的xml元素,例如Activity,Application,Service等都可以通过在你的Activity中加上相应的Attribute来实现。但是像这次的uses-permission,MonoDroid并没有提供相应的Attribute,我们只能通过手动添加AndroidManifest.xml文件并自己加上这些元素了。
点击vs2010的菜单”项目“,选择最后一项,即你的项目的属性,在项目属性窗口中点击Android Manifest,如果你没有手动添加过AndroidManifest.xml文件,那么应该如下图所示:
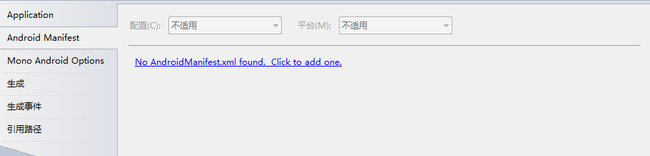
它会提示你没有找到AndroidManifest.xml,点击以新增。我们就点击一下这个链接,就会显示如下界面,并会在Properties目录下增加了一个AndroidManifest.xml文件。
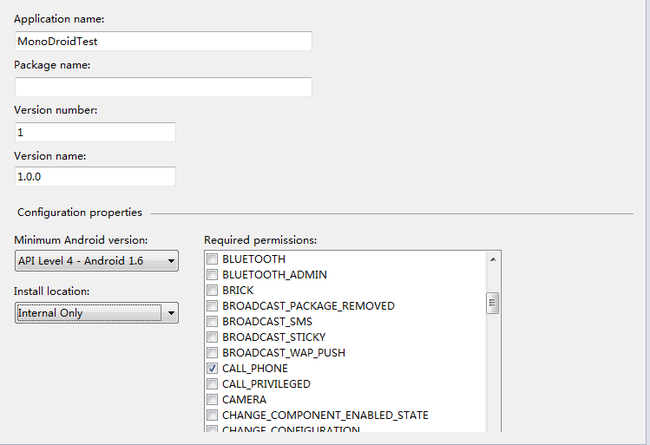
Application name是你的程序名称,Package name是安装包名称,可以不填,Version number是程序的版本号,必须填数字, Version name是版本的名称,Minimum Android version代表程序支持的最低Android版本,我这里选择的1.6,Install location不知道干吗用的,但就是这个东西造成我部署程序时产生了签名的错误。Required permissions里选择CALL_PHONE表示需要打电话的权限,由于我们接下来还要发短信,所以可以把SEND_SMS也勾选上。
我们来打开AndroidManifest.xml,里面已经为我们添加了一些东西,就是我们刚才在属性窗口里填的东西,但这样还是不完整的,因为只要我们手动添加了AndroidManifest.xml文件,mandroid.exe就不会为我们自动生成该文件,也就是说我们在Activity中加的一切Attribute将变为无效,需要我们来补充完整:
- <?xml version="1.0" encoding="utf-8"?>
- <manifest xmlns:android="http://schemas.android.com/apk/res/android" android:versionCode="1" android:versionName="1.0.0">
- <application android:label="MonoDroidTest" android:icon="@drawable/icon">
- <activity android:name=".Activity1" android:label="MonoDroidTest">
- <intent-filter>
- <action android:name="android.intent.action.MAIN" />
- <category android:name="android:intent.category.LAUNCHER" />
- </intent-filter>
- </activity>
- </application>
- <uses-sdk android:minSdkVersion="4" />
- <uses-permission android:name="android.permission.CALL_PHONE" />
- <uses-permission android:name="android.permission.SEND_SMS" />
- </manifest>
注意如果你和我一样Minimum Android version里选的是1.6,那么在AndroidManifest.xml文件里一定要把android:installLocation="internalOnly"这个属性给去掉,我就是没去掉所以每次部署的时候才会出错,经与官网的技术人员讨论,应该是他们的一个bug。
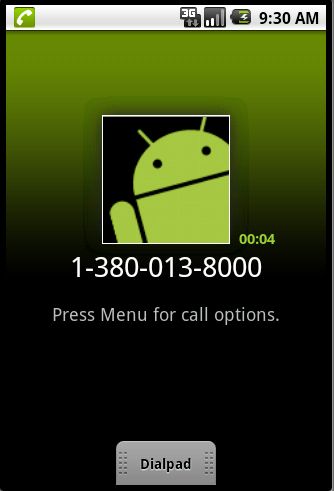
好了,生成并部署程序,然后在第一个输入框里输入电话号码,点击,按钮,我们可以通过程序来进行打电话了~~~
大家也可以使用”Android.Action.Dialer”的方式,调用虚拟键盘来拨打电话,只要在自定义Intent时将Action.CALL改为Action.DIAL即可。
除了打电话,另一个常用的功能就是发短信了。发短信的使用与打电话基本类似,关键是要使用Android.Telephony.SmsManager类来实现。如果刚才没有在AndroidManifest.xml中添加发短信的权限的话,这里记得添加上。程序代码如下:
- Button btnSendSMS = FindViewById<Button>(Resource.Id.btnSendSMS);
- btnSendSMS.Click += (sender, e) =>
- {
- EditText txtSMS = FindViewById<EditText>(Resource.Id.txtSMS);
- if (!IsPhoneNoValid(txtPhoneNo.Text))
- {
- Toast.MakeText(this, "输入的电话格式不正确", ToastLength.Long).Show();
- return;
- }
- else if (System.Text.Encoding.UTF8.GetByteCount(txtSMS.Text) > 140)
- {
- Toast.MakeText(this, "短信正文超出范围", ToastLength.Long).Show();
- return;
- }
- try
- {
- Android.Telephony.SmsManager sm = Android.Telephony.SmsManager.Default;
- PendingIntent pi = PendingIntent.GetBroadcast(this, 0, new Intent(), PendingIntentFlags.NoCreate);
- sm.SendTextMessage(txtPhoneNo.Text, null, txtSMS.Text, pi, null);
- }
- catch (System.Exception ex)
- {
- MessageBox.ShowErrorMessage(this, ex);
- }
- Toast.MakeText(this, "短信发送成功", ToastLength.Short).Show();
- };
这里使用到了PendingIntent对象,它具有下列特性:当接收到PendingIntent对象时,会进行Broadcast动作,就如同使用Context.SendBroadcast()方法一样,这样就是为什么在SmsManager.SendTextMessage()方法中需要传入PendingIntent作为传送服务的参数之一。
下面我们来通过自定义Intent,并使用Android.Content.Intent.ActionSend参数来实现通过手机发送电子邮件。实际上,收发EMail的过程是通过Android内置的Gmail程序,而非直接使用SMTP的协议。由于目前的模拟器并未内置Gmail Client端程序,也因此,发送EMail的程序在送出数据后,模拟器上会发生“No application can perform this action",这是正常的。我在我的手机上运行,是可以正常发送的。
- Button btnSendEMail = FindViewById<Button>(Resource.Id.btnSendEMail);
- btnSendEMail.Click += (sender, e) =>
- {
- EditText txtReceiver = FindViewById<EditText>(Resource.Id.txtReceiver);
- if (!Regex.IsMatch(txtReceiver.Text, "^//w+((-//w+)|(//.//w+))*//@[A-Za-z0-9]+((//.|-)[A-Za-z0-9]+)*//.[A-Za-z0-9]+$"))
- {
- Toast.MakeText(this, "输入的Email地址格式不正确", ToastLength.Long).Show();
- return;
- }
- EditText txtTitle = FindViewById<EditText>(Resource.Id.txtTitle);
- EditText txtEMail = FindViewById<EditText>(Resource.Id.txtEMail);
- try
- {
- Intent emailIntent = new Intent(Android.Content.Intent.ActionSend);
- emailIntent.SetType("plain/text");
- emailIntent.PutExtra(Intent.ExtraEmail, new string[] { txtReceiver.Text });
- emailIntent.PutExtra(Intent.ExtraSubject, txtTitle.Text);
- emailIntent.PutExtra(Intent.ExtraText, txtEMail.Text);
- StartActivity(Intent.CreateChooser(emailIntent, "ojlovecd"));
- }
- catch (System.Exception ex)
- {
- MessageBox.ShowErrorMessage(this, ex);
- }
- };
事实上,发短信和发邮件并不局限于以上方式,大家可以根据API文档试验一下其它的方式,我在这里就不详细说明了。
转载http://blog.csdn.net/ojlovecd/article/details/6329531