【深度学习】VGG16网络结构复现 | pytorch |
文章目录
- 前言
- 一、VGG16介绍
- 二、VGG16网络复现——pytorch
前言
这篇文章按道理来说应该是很简单的,但是因为一个很小的bug,让我难受了一晚上,直到现在我也没找出原因。后面我会提到这个bug。
今天这篇文章主要用来手动搭建vgg16这个网路,以前都是直接调用的。VGG16网络是非常重要,尤其是后面U-net这种网络,是基于VGG-16
一、VGG16介绍
VGG16论文地址:https://arxiv.org/pdf/1409.1556.pdf

主要介绍(翻译一下摘要吧):
本文研究了在大规模图像识别环境中,卷积网络深度对卷积网络精度的影响。我们的主要贡献是使用一个非常小(3 × 3)卷积滤波器的架构对增加深度的网络进行彻底的评估,这表明通过将深度推到16-19个权重层,可以实现对现有技术配置的显著改进。这些发现是我们的 ImageNet 挑战2014提交的基础,我们的团队在本地化和分类轨道上分别获得了第一和第二名。我们还表明,我们的表示很好地推广到其他数据集,在那里他们实现了最先进的结果。我们已经公开了我们的两个性能最好的 ConverNet 模型,以促进深度视觉表示在计算机视觉中的应用的进一步研究。

这些网络结构中,D用的最多,今天我们也重点对D进行复现。
二、VGG16网络复现——pytorch
import torch.nn as nn
import torch
class VGG16(nn.Module):
    def __init__(self):
        super(VGG16,self).__init__()
        self.conv1=nn.Sequential(
            nn.Conv2d(3,64,3,1,1),
            nn.BatchNorm2d(64),
            nn.ReLU(inplace=True),
            nn.Conv2d(64,64,3,1,1),
            nn.BatchNorm2d(64),
            nn.ReLU(inplace=True),
            nn.MaxPool2d(2,2)
        )
        self.conv2 = nn.Sequential(
            nn.Conv2d(64, 128, 3, 1, 1),
            nn.BatchNorm2d(128),
            nn.ReLU(inplace=True),
            nn.Conv2d(128, 128, 3, 1, 1),
            nn.BatchNorm2d(128),
            nn.ReLU(inplace=True),
            nn.MaxPool2d(2, 2)
        )
        self.conv3 = nn.Sequential(
            nn.Conv2d(128, 256, 3, 1, 1),
            nn.BatchNorm2d(256),
            nn.ReLU(inplace=True),
            nn.Conv2d(256, 256, 3, 1, 1),
            nn.BatchNorm2d(256),
            nn.ReLU(inplace=True),
            nn.Conv2d(256, 256, 3, 1, 1),
            nn.BatchNorm2d(256),
            nn.ReLU(inplace=True),
            nn.MaxPool2d(2, 2)
        )
        self.conv4 = nn.Sequential(
            nn.Conv2d(256, 512, 3, 1, 1),
            nn.BatchNorm2d(512),
            nn.ReLU(inplace=True),
            nn.Conv2d(512, 512, 3, 1, 1),
            nn.BatchNorm2d(512),
            nn.ReLU(inplace=True),
            nn.Conv2d(512, 512, 3, 1, 1),
            nn.BatchNorm2d(512),
            nn.ReLU(inplace=True),
            nn.MaxPool2d(2, 2)
        )
        self.conv5 = nn.Sequential(
            nn.Conv2d(512, 512, 3, 1, 1),
            nn.BatchNorm2d(512),
            nn.ReLU(inplace=True),
            nn.Conv2d(512, 512, 3, 1, 1),
            nn.BatchNorm2d(512),
            nn.ReLU(inplace=True),
            nn.Conv2d(512, 512, 3, 1, 1),
            nn.BatchNorm2d(512),
            nn.ReLU(inplace=True),
            nn.MaxPool2d(2, 2)
        )
        self.feature=nn.Sequential(
            self.conv1,
            self.conv2,
            self.conv3,
            self.conv4,
            self.conv5
        )
        self.fc=nn.Sequential(
            nn.Linear(512 * 7 * 7, 4096),
            nn.ReLU(inplace=True),
            nn.Linear(4096, 4096),
            nn.ReLU(inplace=True),
            nn.Linear(4096, 1000)
        )
    def forward(self,x):
        x=self.feature(x)
        x = x.view(x.size(0), -1)
        x = self.fc(x)
        return x
vgg = VGG16()
print(vgg)
x=torch.rand(1,3,224,224)
y=vgg(x)
print(y.shape)
最后rand随机生成一个张量进行测试:x=torch.rand(1,3,224,224)一个3通道的224X224图
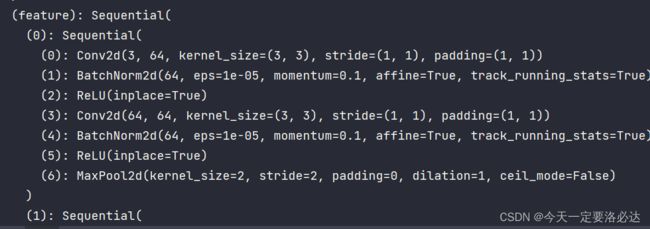
打印的网络结果图如下:(中间省略一部分)

最后输出的y的shape为:

符合预期结果