NNDL 实验五 前馈神经网络(2)自动梯度计算&优化问题
NNDL 实验五 前馈神经网络(2)自动梯度计算&优化问题
- 4.3 自动梯度计算
-
- 4.3.1使用pytorch的预定义算子来重新实现二分类任务
- 4.3.2. 增加一个3个神经元的隐藏层,再次实现二分类,并与4.3.1做对比
- 4.3.3.自定义隐藏层层数和每个隐藏层中的神经元个数,尝试找到最优超参数完成二分类。可以适当修改数据集,便于探索超参数。
- 思考题
- 4.4 优化问题
-
- 4.4.1 参数初始化
- 4.4.2 梯度消失问题
-
- 4.4.2.1 模型构建
- 4.4.2.2 使用Sigmoid型函数进行训练
- 4.4.2.3 使用ReLU函数进行模型训练
- 4.4.3 死亡 ReLU 问题
-
- 4.4.3.1 使用ReLU进行模型训练
- 4.4.3.2 使用Leaky ReLU进行模型训练
- 总结
- 参考文献
- 参考博客
4.3 自动梯度计算
虽然我们能够通过模块化的方式比较好地对神经网络进行组装,但是每个模块的梯度计算过程仍然十分繁琐且容易出错。在深度学习框架中,已经封装了自动梯度计算的功能,我们只需要聚焦模型架构,不再需要耗费精力进行计算梯度。
pytorch中的相应内容如下:
一、代码层面
1.torch.nn.Module类介绍:
首先在pycharm中进入nn.Module的源码(ctrl+鼠标左击):
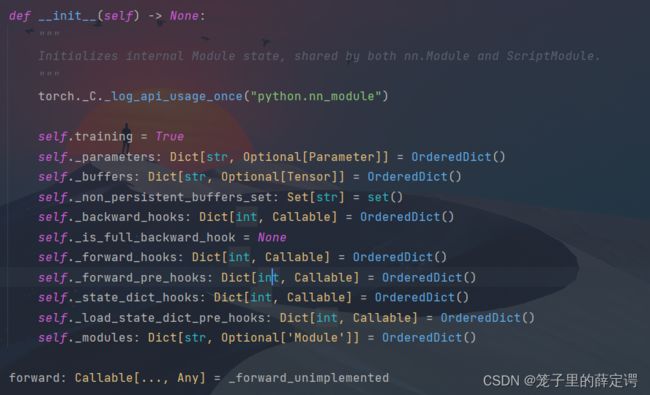
Module初始化后就相当于8个有序字典,因此,当实例化你定义的Net(nn.Module的子类)时,要确保父类的构造函数首先被调用,这样才能确保上述8个OrderedDict被create。在torch.nn.module这个父类中包含了大量的成员方法,在这里我只介绍和本节内容相关的自动梯度求导成员方法,其余请自行了解。
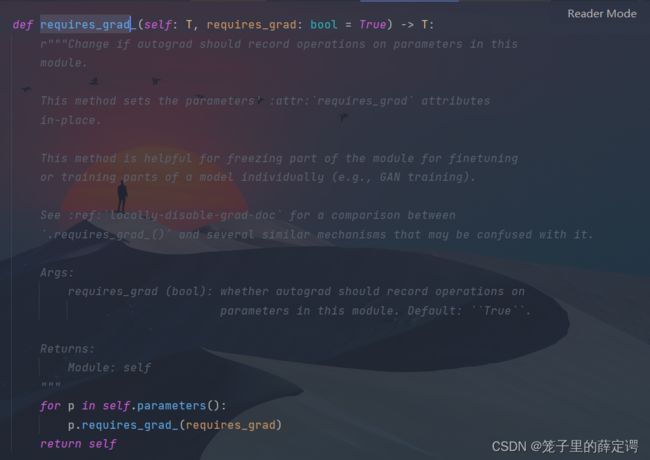
当你在使用 Pytorch 的 nn.Module 建立网络时,其内部的参数都自动的设置为了requires_grad=True ,故可以直接取梯度。而我们使用反向传播时,其实根据全连接层的偏导数计算公式,可知链式求导和 w , b 的梯度无关,而与其中一个连接层的输出梯度有关,这也是为什么冻结了网络的参数,还是可以输出对输入求导。
同时若你想对自定义函数,例如自定义损失函数实现自动求梯度功能,可以使torch.autograd.grad(),PyTorch提供的autograd包能够根据输入和前向传播过程自动构建计算图,并执行反向传播。
官方文档传送门:
torch.nn.module
torch.nn.Module.requires_grad_
类成员方法大全:
torch.nn.Module类成员方法大全附带解释,结合官方文档食用极佳!
nn.Module.requires_grad_民间解释
2.torch.nn.Sequential类介绍
nn.Sequential里面的模块按照顺序进行排列的,是一个序列容器,所以必须确保前一个模块的输出大小和下一个模块的输入大小是一致的。
官方文档解释:
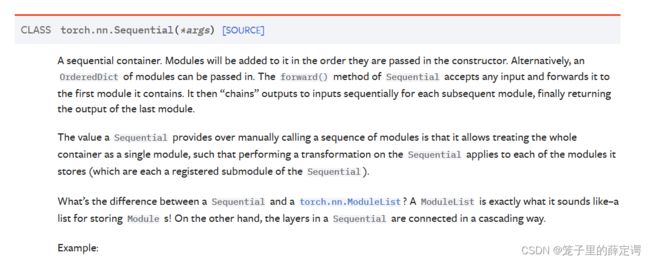 pytorch中其实一般没有特别明显的Layer和Module的区别,不管是自定义层、自定义块、自定义模型,都是通过继承Module类完成的,这一点很重要。其实Sequential类也是继承自Module类的。
主要有三个实现方式:
# 写法一
net = nn.Sequential(
    nn.Linear(num_inputs, 1)
    # 此处还可以传入其他层
    )

# 写法二
net = nn.Sequential()
net.add_module('linear', nn.Linear(num_inputs, 1))
# net.add_module ......

# 写法三
from collections import OrderedDict
net = nn.Sequential(OrderedDict([
          ('linear', nn.Linear(num_inputs, 1))
          # ......
        ]))
方式一:
这是一个有顺序的容器,将特定神经网络模块按照在传入构造器的顺序依次被添加到计算图中执行。
方式二:
也可以利用add_module函数将特定的神经网络模块插入到计算图中。add_module函数是神经网络模块的基础类(torch.nn.Module)中的方法,如下描述所示用于将子模块添加到现有模块中。
方式三:
也可以将以特定神经网络模块为元素的有序字典(OrderedDict)为参数传入。
因为他本身是继承module类的,所以关于自动梯度求导方面可以参考Module父类,在模型简单时可以尝试使用nn.Sequential()搭建网络,快捷高效.
官方文档传送门:
torch.nn.Sequential
4.3.1使用pytorch的预定义算子来重新实现二分类任务
import torch.nn as nn
import torch.nn.functional as F
import os
import torch
from abc import abstractmethod
import math
import numpy as np


n_samples = 1000
X, y = make_moons(n_samples=n_samples, shuffle=True, noise=0.15)

num_train = 640
num_dev = 160
num_test = 200

X_train, y_train = X[:num_train], y[:num_train]
X_dev, y_dev = X[num_train:num_train + num_dev], y[num_train:num_train + num_dev]
X_test, y_test = X[num_train + num_dev:], y[num_train + num_dev:]

y_train = y_train.reshape([-1,1])
y_dev = y_dev.reshape([-1,1])
y_test = y_test.reshape([-1,1])

class Model_MLP_L2_V4(torch.nn.Module):
    def __init__(self, input_size, hidden_size, output_size):
        super(Model_MLP_L2_V4, self).__init__()
        self.fc1 = nn.Linear(input_size, hidden_size)
        w=torch.normal(0,0.1,size=(hidden_size,input_size),requires_grad=True)
        self.fc1.weight = nn.Parameter(w)

        self.fc2 = nn.Linear(hidden_size, output_size)
        w = torch.normal(0, 0.1, size=(output_size, hidden_size), requires_grad=True)
        self.fc2.weight = nn.Parameter(w)

        # 使用'torch.nn.functional.sigmoid'定义 Logistic 激活函数
        self.act_fn = torch.sigmoid

    # 前向计算
    def forward(self, inputs):
        z1 = self.fc1(inputs.to(torch.float32))
        a1 = self.act_fn(z1)
        z2 = self.fc2(a1)
        a2 = self.act_fn(z2)
        return a2


# def print_weights(runner):
#     print('The weights of the Layers:')
#
#     for item in runner.model.sublayers():
#         print(item.full_name()
#         for param in item.parameters():
#             print(param.numpy())


class RunnerV2_2(object):
    def __init__(self, model, optimizer, metric, loss_fn, **kwargs):
        self.model = model
        self.optimizer = optimizer
        self.loss_fn = loss_fn
        self.metric = metric

        # 记录训练过程中的评估指标变化情况
        self.train_scores = []
        self.dev_scores = []

        # 记录训练过程中的评价指标变化情况
        self.train_loss = []
        self.dev_loss = []

    def train(self, train_set, dev_set, **kwargs):
        # 将模型切换为训练模式
        self.model.train()

        # 传入训练轮数,如果没有传入值则默认为0
        num_epochs = kwargs.get("num_epochs", 0)
        # 传入log打印频率,如果没有传入值则默认为100
        log_epochs = kwargs.get("log_epochs", 100)
        # 传入模型保存路径,如果没有传入值则默认为"best_model.pdparams"
        save_path = kwargs.get("save_path", "best_model.pdparams")

        # log打印函数,如果没有传入则默认为"None"
        custom_print_log = kwargs.get("custom_print_log", None)

        # 记录全局最优指标
        best_score = 0
        # 进行num_epochs轮训练
        for epoch in range(num_epochs):
            X, y = train_set

            # 获取模型预测
            logits = self.model(X.to(torch.float32))
            # 计算交叉熵损失
            trn_loss = self.loss_fn(logits, y)
            self.train_loss.append(trn_loss.item())
            # 计算评估指标
            trn_score = self.metric(logits, y).item()
            self.train_scores.append(trn_score)

            # 自动计算参数梯度
            trn_loss.backward()
            if custom_print_log is not None:
                # 打印每一层的梯度
                custom_print_log(self)

            # 参数更新
            self.optimizer.step()
            # 清空梯度
            self.optimizer.zero_grad()   # reset gradient

            dev_score, dev_loss = self.evaluate(dev_set)
            # 如果当前指标为最优指标,保存该模型
            if dev_score > best_score:
                self.save_model(save_path)
                print(f"[Evaluate] best accuracy performence has been updated: {best_score:.5f} --> {dev_score:.5f}")
                best_score = dev_score

            if log_epochs and epoch % log_epochs == 0:
                print(f"[Train] epoch: {epoch}/{num_epochs}, loss: {trn_loss.item()}")
    @torch.no_grad()
    def evaluate(self, data_set):
        # 将模型切换为评估模式
        self.model.eval()

        X, y = data_set
        # 计算模型输出
        logits = self.model(X)
        # 计算损失函数
        loss = self.loss_fn(logits, y).item()
        self.dev_loss.append(loss)
        # 计算评估指标
        score = self.metric(logits, y).item()
        self.dev_scores.append(score)
        return score, loss

    # 模型测试阶段,使用'torch.no_grad()'控制不计算和存储梯度
    @torch.no_grad()
    def predict(self, X):
        # 将模型切换为评估模式
        self.model.eval()
        return self.model(X)

    # 使用'model.state_dict()'获取模型参数,并进行保存
    def save_model(self, saved_path):
        torch.save(self.model.state_dict(), saved_path)

    # 使用'model.set_state_dict'加载模型参数
    def load_model(self, model_path):
        state_dict = torch.load(model_path)
        self.model.load_state_dict(state_dict)


# 设置模型
input_size = 2
hidden_size = 5
output_size = 1
model = Model_MLP_L2_V4(input_size=input_size, hidden_size=hidden_size, output_size=output_size)

# 设置损失函数
loss_fn = F.binary_cross_entropy

# 设置优化器
learning_rate = 0.2 #5e-2
optimizer = torch.optim.SGD(model.parameters(),lr=learning_rate)

# 设置评价指标
metric = accuracy

# 其他参数
epoch = 2000
saved_path = 'best_model.pdparams'

# 实例化RunnerV2类,并传入训练配置
runner = RunnerV2_2(model, optimizer, metric, loss_fn)

runner.train([X_train, y_train], [X_dev, y_dev], num_epochs = epoch, log_epochs=50, save_path="best_model.pdparams")

plot(runner, 'fw-acc.pdf')

#模型评价
runner.load_model("best_model.pdparams")
score, loss = runner.evaluate([X_test, y_test])
print("[Test] score/loss: {:.4f}/{:.4f}".format(score, loss))
make_moons函数代码:
import torch
# 新增make_moons函数
def make_moons(n_samples=1000, shuffle=True, noise=None):
    n_samples_out = n_samples // 2
    n_samples_in = n_samples - n_samples_out
    outer_circ_x = torch.cos(torch.linspace(0, math.pi, n_samples_out))
    outer_circ_y = torch.sin(torch.linspace(0, math.pi, n_samples_out))
    inner_circ_x = 1 - torch.cos(torch.linspace(0, math.pi, n_samples_in))
    inner_circ_y = 0.5 - torch.sin(torch.linspace(0, math.pi, n_samples_in))
    X = torch.stack(
        [torch.cat([outer_circ_x, inner_circ_x]),
         torch.cat([outer_circ_y, inner_circ_y])],
         axis=1
    )
    y = torch.cat(
        [torch.zeros([n_samples_out]), torch.ones([n_samples_in])]
    )
    if shuffle:
        idx = torch.randperm(X.shape[0])
        X = X[idx]
        y = y[idx]
    if noise is not None:
        X += np.random.normal(0.0, noise, X.shape)

    return X, y
accuracy函数代码:
def accuracy(preds, labels):
    # 判断是二分类任务还是多分类任务,preds.shape[1]=1时为二分类任务,preds.shape[1]>1时为多分类任务
    if preds.shape[1] == 1:
        preds=(preds>=0.5).to(torch.float32)

    else:
        preds = torch.argmax(preds,dim=1).int()

    return torch.mean((preds == labels).float())
plot函数代码:
import matplotlib.pyplot as plt
def plot(runner, fig_name):
    plt.figure(figsize=(10, 5))
    epochs = [i for i in range(len(runner.train_scores))]

    plt.subplot(1, 2, 1)
    plt.plot(epochs, runner.train_loss, color='#e4007f', label="Train loss")
    plt.plot(epochs, runner.dev_loss, color='#f19ec2', linestyle='--', label="Dev loss")
    # 绘制坐标轴和图例
    plt.ylabel("loss", fontsize='large')
    plt.xlabel("epoch", fontsize='large')
    plt.legend(loc='upper right', fontsize='x-large')

    plt.subplot(1, 2, 2)
    plt.plot(epochs, runner.train_scores, color='#e4007f', label="Train accuracy")
    plt.plot(epochs, runner.dev_scores, color='#f19ec2', linestyle='--', label="Dev accuracy")
    # 绘制坐标轴和图例
    plt.ylabel("score", fontsize='large')
    plt.xlabel("epoch", fontsize='large')
    plt.legend(loc='lower right', fontsize='x-large')
    plt.savefig(fig_name)
    plt.show()
4.3.2. 增加一个3个神经元的隐藏层,再次实现二分类,并与4.3.1做对比
做的具体改动如下:
模型初始化上:
# 设置模型
input_size = 2
hidden_size = 5
hidden_size2 = 3
output_size = 1
model = Model_MLP_L2_V4(input_size=input_size, hidden_size=hidden_size,hidden_size2=hidden_size2, output_size=output_size)
模型设置上:
class Model_MLP_L2_V4(torch.nn.Module):
    def __init__(self, input_size, hidden_size, hidden_size2, output_size):
        super(Model_MLP_L2_V4, self).__init__()
        self.fc1 = nn.Linear(input_size, hidden_size)
        w1=torch.normal(0,0.1,size=(hidden_size,input_size),requires_grad=True)
        self.fc1.weight = nn.Parameter(w1)

        self.fc2 = nn.Linear(hidden_size, hidden_size2)
        w2 = torch.normal(0, 0.1, size=(hidden_size2, hidden_size), requires_grad=True)
        self.fc2.weight = nn.Parameter(w2)

        self.fc3 = nn.Linear(hidden_size2, output_size)
        w3 = torch.normal(0, 0.1, size=(output_size, hidden_size2), requires_grad=True)
        self.fc3.weight = nn.Parameter(w3)

        # 使用'torch.nn.functional.sigmoid'定义 Logistic 激活函数
        self.act_fn = torch.sigmoid

    # 前向计算
    def forward(self, inputs):
        z1 = self.fc1(inputs.to(torch.float32))
        a1 = self.act_fn(z1)
        z2 = self.fc2(a1)
        a2 = self.act_fn(z2)
        z3 = self.fc3(a2)
        a3 = self.act_fn(z3)
        return a3
import math
import matplotlib.pyplot as plt
# 均匀生成40000个数据点
x1, x2 = torch.meshgrid(torch.linspace(-math.pi, math.pi, 200), torch.linspace(-math.pi, math.pi, 200))

x = torch.stack([torch.flatten(x1), torch.flatten(x2)], axis=1)

# 预测对应类别
y = runner.predict(x)
# y = torch.squeeze(torch.as_tensor(torch.can_cast((y>=0.5).dtype,torch.float32)))

# 绘制类别区域
plt.ylabel('x2')
plt.xlabel('x1')
plt.scatter(x[:,0].tolist(), x[:,1].tolist(), c=y.tolist(), cmap=plt.cm.Spectral)

plt.scatter(X_train[:, 0].tolist(), X_train[:, 1].tolist(), marker='*', c=torch.squeeze(y_train,axis=-1).tolist())
plt.scatter(X_dev[:, 0].tolist(), X_dev[:, 1].tolist(), marker='*', c=torch.squeeze(y_dev,axis=-1).tolist())
plt.scatter(X_test[:, 0].tolist(), X_test[:, 1].tolist(), marker='*', c=torch.squeeze(y_test,axis=-1).tolist())

plt.show()
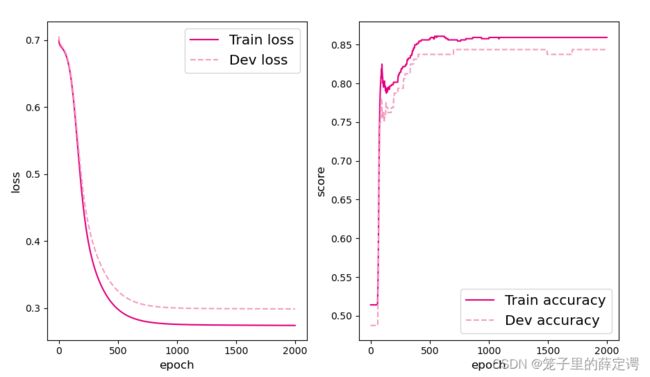
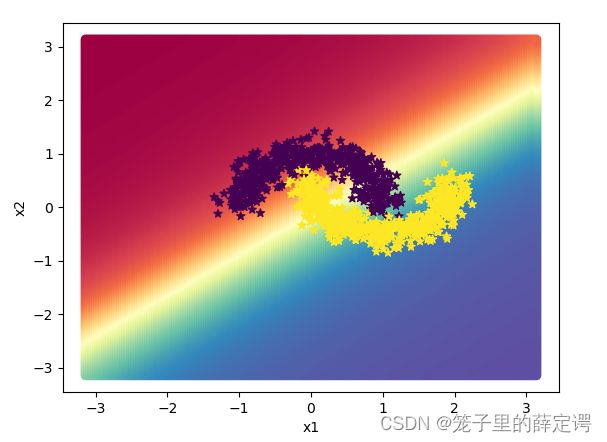
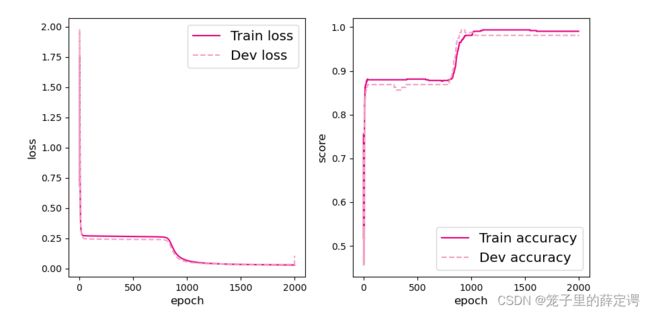
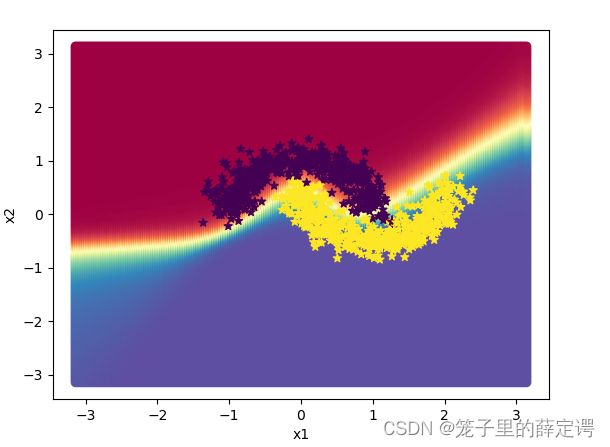
lr=5情况下的性能,从运行结果和可视化都可以看出来是比较理想的一个超参数。
4.3.3.自定义隐藏层层数和每个隐藏层中的神经元个数,尝试找到最优超参数完成二分类。可以适当修改数据集,便于探索超参数。
注:如果想直接获得合适层数,说明对人工神经网络的理解很表面,具体可参考周志华老师《机器学习》P105页倒数第二段,如下:

就是简单的试错,遇到欠拟合可以加深层数、加多神经元个数;遇到过拟合可以使用早停+正则化的策略。
同时也查阅了一下参考文献:
Heaton Research: The Number of Hidden Layers
文献中给出了这样的一个对比表格:
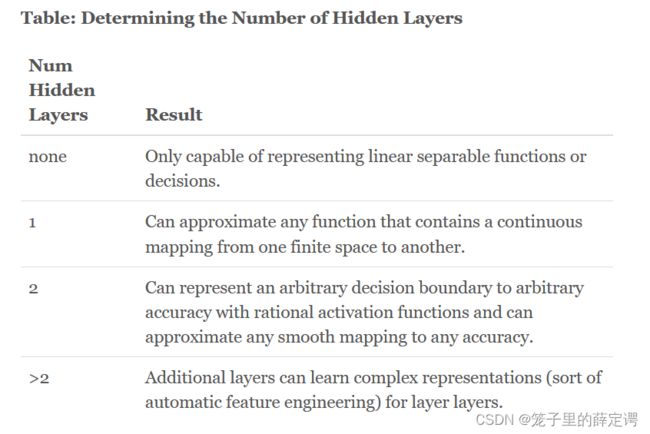
大致意思就是:
- 没有隐藏层(none):仅能够表示线性可分函数或决策
- 隐藏层数=1:可以拟合任何“包含从一个有限空间到另一个有限空间的连续映射”的函数
- 隐藏层数=2:搭配适当的激活函数可以表示任意精度的任意决策边界,并且可以拟合任何精度的任何平滑映射
- 隐藏层数>2:多出来的隐藏层可以学习复杂的描述(某种自动特征工程)
注:对于本次实验,参考上述描述,我觉得隐藏层数=1或2然后调节超参数即可,切忌无脑堆砌多层神经网络,可以尝试迁移和微调已有的预训练模型。
关于隐藏层神经元的个数,在论文中也给出了这样的公式:
 大致意思就是:
- 隐藏神经元的数量应在输入层的大小和输出层的大小之间。
- 隐藏神经元的数量应为输入层大小的2/3加上输出层大小的2/3。
- 隐藏神经元的数量应小于输入层大小的两倍。
对于本次实验,输入层神经元个数为2、输出层神经元个数为1,隐藏神经元数量要满足上述定理显然不适合,与数据集简单有很大关系。
首先我放上之前通过通过修改lr得到的拟合效果和测试效果较好的一组实验结果作为参照。
lr=5,epoch=2000

然后在本节实验中,我试图通过试错法结合上述定理及经验公式来找寻最优的超参数(神经网络层数、神经元个数)组合以达到同样效果。
lr=0.02,epoch=2000
隐藏层数目=1,隐藏层神经元个数=2

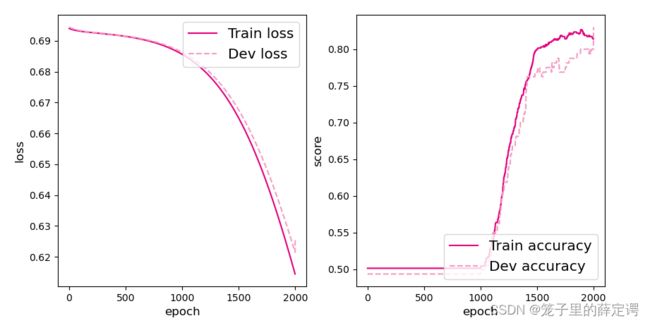
隐藏层数目=1,隐藏层神经元个数=5(根据论文定理直接调到5,然后缩小超参数搜索范围)
隐藏层数目=1,隐藏层神经元个数=10

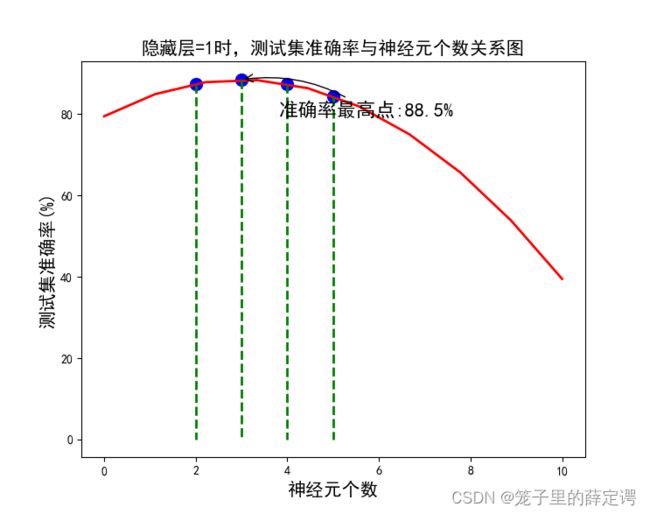
 所以对于该数据集来说,隐藏层数=1,神经元个数与性能变化基本如下:
接下来,针对隐藏层数=2,进行如下实验:
隐藏层数目=2,隐藏层1神经元个数=5,隐藏层2神经元个数=3

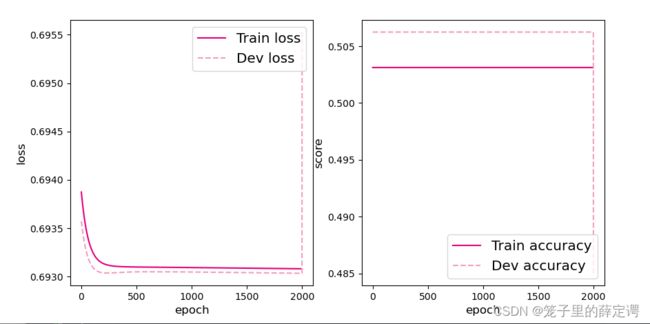
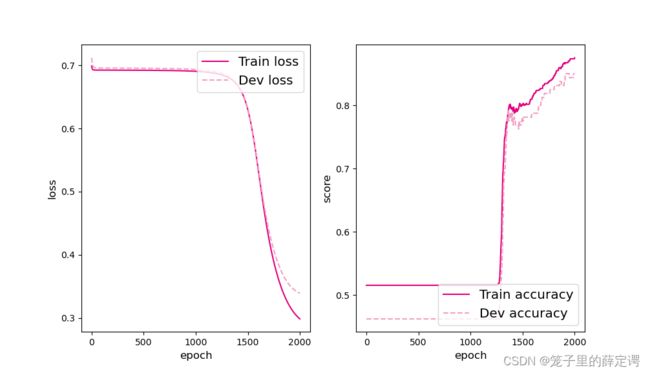
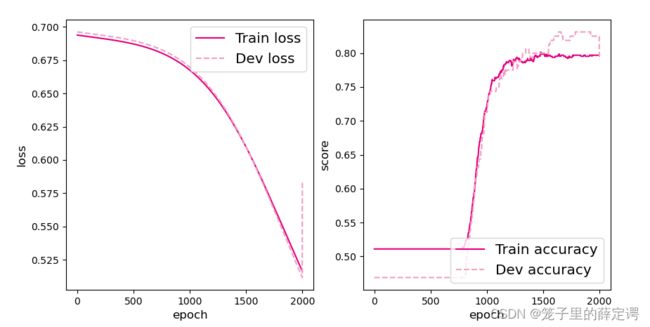
在做隐藏层2的时候,明显觉得不对劲了起来,lr=0.02时候,要是微调隐藏2神经元个数,性能根本就不行,都在0.5左右徘徊,只有当隐藏层1神经元个数拉到2000后,测试集准确率才能勉强上0.8,但是运行时间超长。
对于相同的参数,当lr提升一个级数到0.2,
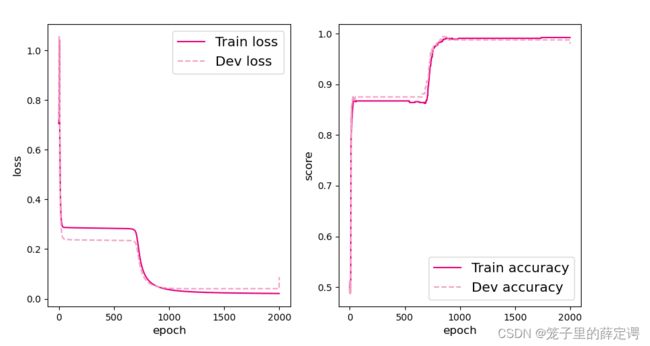
 可以注意到性能迅速就上去了,再提升lr到5,
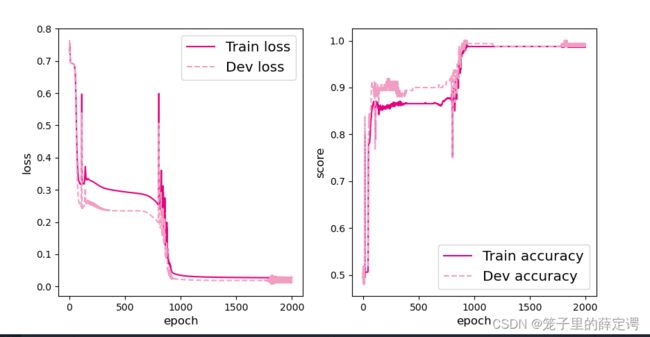

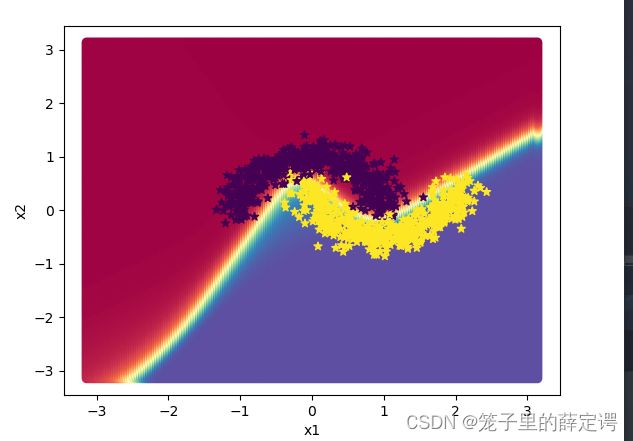
测试集准确率高达99.5%,完美拟合,并且达到预期效果,挺离谱的。
综上所述,我得到的结论是,对于lr=0.02,epochs=2000的超参数组合:隐藏层数=1时,神经元个数设置为3就是天花板准确率;隐藏层数=2时,小神经元个数根本就不能满足要求,基本准确率都是0.5左右,在神经元个数为300时会有一次骤增到0.8,神经元个数达到2000时,测试集准确率会逼近0.85~0.9,但是运行时间很长。但是这都没有lr来得实在,当你把lr设置为5,神经元个数在很大范围内,都是0.99甚至更高的准确率,函数跳到全局极小点,所以最佳的超参数组合为:隐藏层个数=1时,lr=5, 神经元个数为(3-60);隐藏层个数=2时,lr=5,两个隐藏神经元个数为(3-20),epoch只有微弱影响
注:至于神经元个数下限为什么是3而不是2,你可以自己试试效果。
思考题
自定义梯度计算和自动梯度计算:从计算性能、计算结果等多方面比较,谈谈自己的看法。
首先介绍一下pytorch的自动梯度计算:
PyTorch提供的autograd包能够根据输入和前向传播过程自动构建计算图,并执行反向传播。基本原理为所有的数值计算分解为基本操作(即将复杂的计算分割成简单的局部计算), 包含+, −, ×, / 和 exp, log, sin, cos 等, 然后利用链式法则来自动计算复合函数的梯度。
拿蒲公英书上的例题举例:
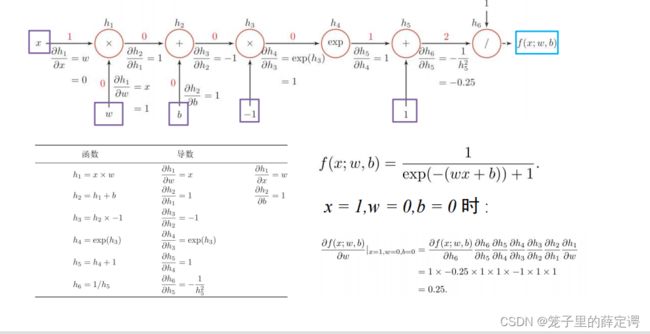
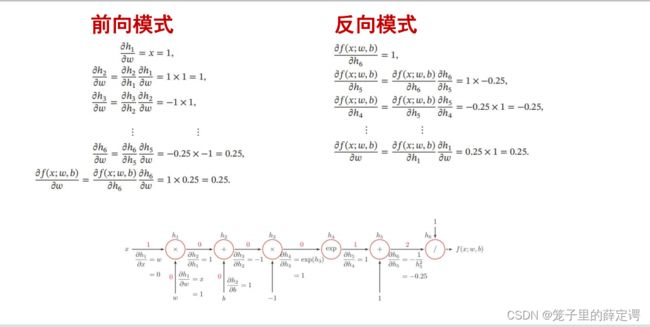
对于相同的超参数组合(lr=0.02,隐藏层全部为1,隐藏层神经元个数为5个,epochs=10000),
自定义梯度计算:
使用前面实验Model_MLP_L2类,其中的自定义梯度计算如下:
激活函数:

使用pytorch自动梯度计算:
使用本次实验的Model_MLP_L2_V4类,其中的自定义梯度计算如下:

pytorch自动梯度计算运行时间:
 可以看出pytorch的自动梯度计算在计算性能上还是要优于自定义梯度计算.
pytorch自动梯度计算运行结果:
![]() 自定义梯度计算运行结果:
自定义梯度计算运行结果:![]() 可以看出自定义梯度计算的准确率要小于自动梯度计算的准确率(但这不一定就是梯度运算造成的,也可能是优化器,因为在本节实验中使用的是pytorch包装好的优化器torch.optim.SGD)。
可以看出自定义梯度计算的准确率要小于自动梯度计算的准确率(但这不一定就是梯度运算造成的,也可能是优化器,因为在本节实验中使用的是pytorch包装好的优化器torch.optim.SGD)。
注:本来打算的是通过Debug查看两个模型的梯度比较一下精度,结果根本就比不了,因为使用的是高斯分布来初始化梯度,然后就利用下行代码
self.fc1.weight = torch.nn.init.constant_(self.fc2.weight, val=1.0)
self.fc2.weight = nn.init.constant_(self.fc2.weight, val=1.0)
将两个模型的线性权重全部控制为1,然后通过Debug查看梯度:
pytorch自动梯度计算运行结果:

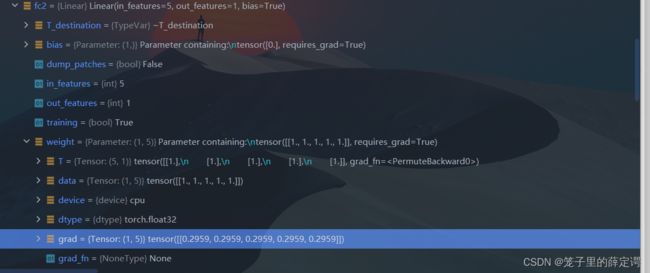
自定义梯度计算运行结果: 对比了一下,发现二者更新的结果还是有很大出入的,不仅仅体现在测试集准确率上,这权重梯度也很不一样。
比较的很笼统,等同班佬比较后再回来修正。
4.4 优化问题
实现一个神经网络前,需要先初始化模型参数。如果对每一层的权重和偏置都用0初始化,那么通过第一遍前向计算,所有隐藏层神经元的激活值都相同;在反向传播时,所有权重的更新也都相同,这样会导致隐藏层神经元没有差异性,出现对称权重现象。
接下来,将模型参数全都初始化为0,看实验结果。
4.4.1 参数初始化
# import torch
import torch.nn as nn
import torch.nn.functional as F
# 定义多层前馈神经网络
class Model_MLP_L2_V4(torch.nn.Module):
    def __init__(self, input_size, hidden_size,output_size):
        super(Model_MLP_L2_V4, self).__init__()
        self.fc1 = nn.Linear(input_size, hidden_size)
        # w1=torch.normal(0,0.1,size=(hidden_size,input_size),requires_grad=True)
        # self.fc1.weight = nn.Parameter(w1)
        self.fc1.weight=nn.init.constant_(self.fc1.weight,val=0.0)
        # self.fc1.bias = nn.init.constant_(self.fc1.bias, val=1.0)
        self.fc1.bias = nn.init.constant_(self.fc1.bias, val=0.0)
        self.fc2 = nn.Linear(hidden_size, output_size)
        # w2 = torch.normal(0, 0.1, size=(output_size, hidden_size), requires_grad=True)
        # self.fc2.weight = nn.Parameter(w2)
        self.fc2.weight = nn.init.constant_(self.fc2.weight, val=0.0)
        self.fc2.bias = nn.init.constant_(self.fc2.bias, val=0.0)
        # 使用'torch.nn.functional.sigmoid'定义 Logistic 激活函数
        self.act_fn = torch.sigmoid

    # 前向计算
    def forward(self, inputs):
        z1 = self.fc1(inputs.to(torch.float32))
        a1 = self.act_fn(z1)
        z2 = self.fc2(a1)
        a2 = self.act_fn(z2)
        return a2
利用Runner类训练模型:
# 设置模型
input_size = 2
hidden_size = 5
output_size = 1
model = Model_MLP_L2_V4(input_size=input_size, hidden_size=hidden_size, output_size=output_size)

# 设置损失函数
loss_fn = F.binary_cross_entropy

# 设置优化器
learning_rate = 0.02 #5e-2
optimizer = torch.optim.SGD(model.parameters(),lr=learning_rate)

# 设置评价指标
metric = accuracy

# 其他参数
epoch = 2000
saved_path = 'best_model.pdparams'

# 实例化RunnerV2类,并传入训练配置
runner = RunnerV2_2(model, optimizer, metric, loss_fn)

runner.train([X_train, y_train], [X_dev, y_dev], num_epochs = epoch, log_epochs=50, save_path="best_model.pdparams")
打印权重:
for _,param in enumerate(runner.model.named_parameters()):
  print(param)
  print('---------------------------------')
注:其他代码和第一问相同。
运行结果:
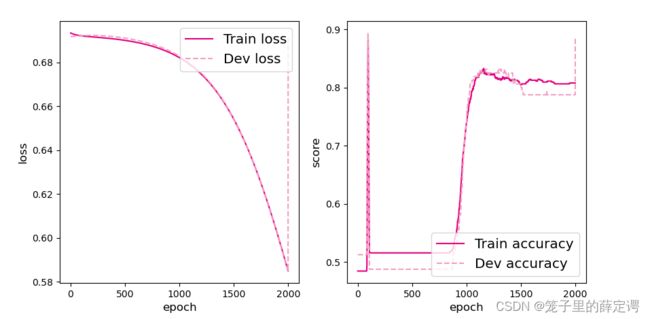
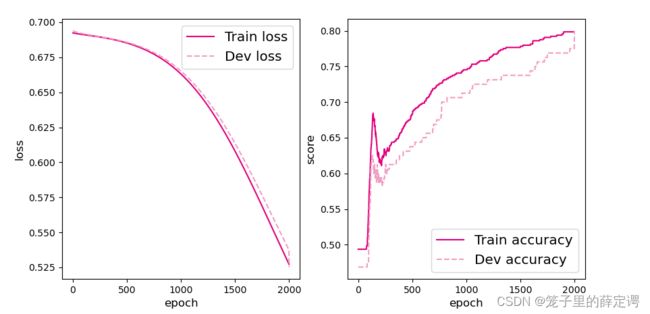
 可视化训练和验证集上的主准确率和loss变化:
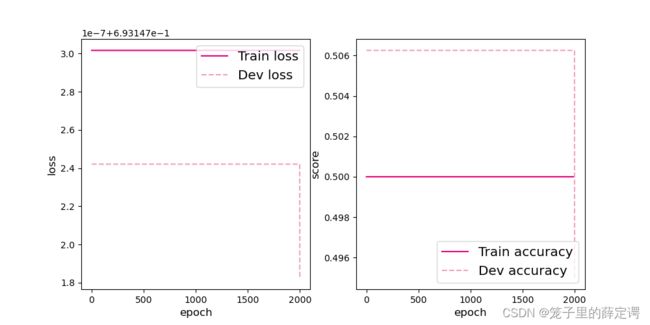 从输出结果看,二分类准确率为50%左右,说明模型没有学到任何内容。训练和验证loss几乎没有怎么下降。
为了避免对称权重现象,可以使用高斯分布或均匀分布初始化神经网络的参数,4.3节及下文均使用高斯分布初始化。
4.4.2 梯度消失问题
在神经网络的构建过程中,随着网络层数的增加,理论上网络的拟合能力也应该是越来越好的。但是随着网络变深,参数学习更加困难,容易出现梯度消失问题。
由于Sigmoid型函数的饱和性,饱和区的导数更接近于0,误差经过每一层传递都会不断衰减。当网络层数很深时,梯度就会不停衰减,甚至消失,使得整个网络很难训练,这就是所谓的梯度消失问题。
在深度神经网络中,减轻梯度消失问题的方法有很多种,一种简单有效的方式就是使用导数比较大的激活函数,如:ReLU。
下面通过一个简单的实验观察前馈神经网络的梯度消失现象和改进方法。
4.4.2.1 模型构建
定义一个前馈神经网络,包含4个隐藏层和1个输出层,通过传入的参数指定激活函数。代码实现如下:
# 定义多层前馈神经网络
class Model_MLP_L5(torch.nn.Module):
    def __init__(self, input_size, output_size, act='relu'):
        super(Model_MLP_L5, self).__init__()
        self.fc1 = torch.nn.Linear(input_size, 3)
        w_ = torch.normal(0, 0.01, size=(3, input_size), requires_grad=True)
        self.fc1.weight = nn.Parameter(w_)
        self.fc1.bias = nn.init.constant_(self.fc1.bias, val=1.0)
        w= torch.normal(0, 0.01, size=(3, 3), requires_grad=True)

        self.fc2 = torch.nn.Linear(3, 3)
        self.fc2.weight = nn.Parameter(w)
        self.fc2.bias = nn.init.constant_(self.fc2.bias, val=1.0)
        self.fc3 = torch.nn.Linear(3, 3)
        self.fc3.weight = nn.Parameter(w)
        self.fc3.bias = nn.init.constant_(self.fc3.bias, val=1.0)
        self.fc4 = torch.nn.Linear(3, 3)
        self.fc4.weight = nn.Parameter(w)
        self.fc4.bias = nn.init.constant_(self.fc4.bias, val=1.0)
        self.fc5 = torch.nn.Linear(3, output_size)
        w1 = torch.normal(0, 0.01, size=(output_size, 3), requires_grad=True)
        self.fc5.weight = nn.Parameter(w1)
        self.fc5.bias = nn.init.constant_(self.fc5.bias, val=1.0)
        # 定义网络使用的激活函数
        if act == 'sigmoid':
            self.act = F.sigmoid
        elif act == 'relu':
            self.act = F.relu
        elif act == 'lrelu':
            self.act = F.leaky_relu
        else:
            raise ValueError("Please enter sigmoid relu or lrelu!")


    def forward(self, inputs):
        outputs = self.fc1(inputs.to(torch.float32))
        outputs = self.act(outputs)
        outputs = self.fc2(outputs)
        outputs = self.act(outputs)
        outputs = self.fc3(outputs)
        outputs = self.act(outputs)
        outputs = self.fc4(outputs)
        outputs = self.act(outputs)
        outputs = self.fc5(outputs)
        outputs = F.sigmoid(outputs)
        return outputs
4.4.2.2 使用Sigmoid型函数进行训练
使用Sigmoid型函数作为激活函数,为了便于观察梯度消失现象,只进行一轮网络优化。代码实现如下:
# 学习率大小
lr = 0.01

# 定义网络,激活函数使用sigmoid
model = Model_MLP_L5(input_size=2, output_size=1, act='sigmoid')

# 定义优化器
optimizer = torch.optim.SGD(model.parameters(),lr=lr)

# 定义损失函数,使用交叉熵损失函数
loss_fn = F.binary_cross_entropy

# 定义评价指标
metric = accuracy
实例化RunnerV2_2类,并传入训练配置。代码实现如下:
# 实例化Runner类
runner = RunnerV2_2(model, optimizer, metric, loss_fn)
然后通过Debug查看模型各个子层的梯度:
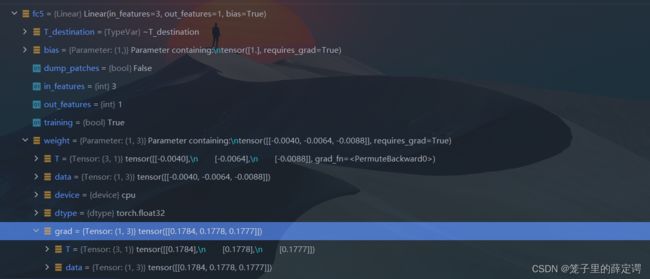
 观察fc5、fc3与fc1:
fc5:
 fc3:
fc3:

fc1:
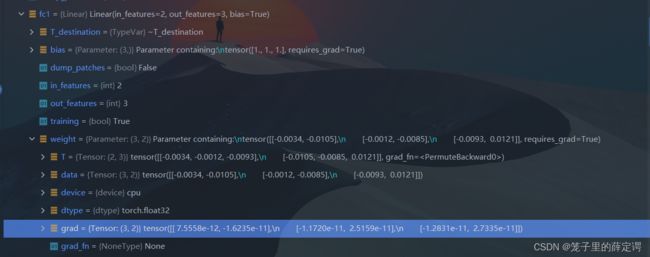 观察实验结果可以发现,梯度经过每一个神经层的传递都会不断衰减,最终传递到第一个神经层时,梯度几乎完全消失。
4.4.2.3 使用ReLU函数进行模型训练
只需要把代码中的定义网络部分激活函数修改为relu就行:
model = Model_MLP_L5(input_size=2, output_size=1, act='relu')
观察fc5、fc3与fc1:
fc5
 fc3
fc3
 fc1
fc1
 可以看到梯度经过每一个神经层的传递仍会不断衰减,但梯度消失现象得到了缓解。
4.4.3 死亡 ReLU 问题
ReLU激活函数可以一定程度上改善梯度消失问题,但是ReLU函数在某些情况下容易出现死亡 ReLU问题,使得网络难以训练。这是由于当x<0时,ReLU函数的输出恒为0。在训练过程中,如果参数在一次不恰当的更新后,某个ReLU神经元在所有训练数据上都不能被激活(即输出为0),那么这个神经元自身参数的梯度永远都会是0,在以后的训练过程中永远都不能被激活。而一种简单有效的优化方式就是将激活函数更换为Leaky ReLU、ELU等ReLU的变种。
4.4.3.1 使用ReLU进行模型训练
使用第4.4.2节中定义的多层全连接前馈网络进行实验,使用ReLU作为激活函数,观察死亡ReLU现象和优化方法。当神经层的偏置被初始化为一个相对于权重较大的负值时,可以想像,输入经过神经层的处理,最终的输出会为负值,从而导致死亡ReLU现象。
只需要修改网络定义层的偏置,其余代码不变:
# 定义多层前馈神经网络
class Model_MLP_L5(torch.nn.Module):
    def __init__(self, input_size, output_size, act='relu'):
        super(Model_MLP_L5, self).__init__()
        self.fc1 = torch.nn.Linear(input_size, 3)
        w_ = torch.normal(0, 0.01, size=(3, input_size), requires_grad=True)
        self.fc1.weight = nn.Parameter(w_)
        # self.fc1.bias = nn.init.constant_(self.fc1.bias, val=1.0)
        self.fc1.bias = nn.init.constant_(self.fc1.bias, val=-8.0)
        w= torch.normal(0, 0.01, size=(3, 3), requires_grad=True)

        self.fc2 = torch.nn.Linear(3, 3)
        self.fc2.weight = nn.Parameter(w)
        # self.fc2.bias = nn.init.constant_(self.fc2.bias, val=1.0)
        self.fc1.bias = nn.init.constant_(self.fc1.bias, val=-8.0)
        self.fc3 = torch.nn.Linear(3, 3)
        self.fc3.weight = nn.Parameter(w)
        # self.fc3.bias = nn.init.constant_(self.fc2.bias, val=1.0)
        self.fc3.bias = nn.init.constant_(self.fc3.bias, val=-8.0)
        self.fc4 = torch.nn.Linear(3, 3)
        self.fc4.weight = nn.Parameter(w)
        # self.fc4.bias = nn.init.constant_(self.fc2.bias, val=1.0)
        self.fc4.bias = nn.init.constant_(self.fc4.bias, val=-8.0)
        self.fc5 = torch.nn.Linear(3, output_size)
        w1 = torch.normal(0, 0.01, size=(output_size, 3), requires_grad=True)
        self.fc5.weight = nn.Parameter(w1)
        # self.fc5.bias = nn.init.constant_(self.fc2.bias, val=1.0)
        self.fc5.bias = nn.init.constant_(self.fc5.bias, val=-8.0)
        # 定义网络使用的激活函数
        if act == 'sigmoid':
            self.act = F.sigmoid
        elif act == 'relu':
            self.act = F.relu
        elif act == 'lrelu':
            self.act = F.leaky_relu
        else:
            raise ValueError("Please enter sigmoid relu or lrelu!")


    def forward(self, inputs):
        outputs = self.fc1(inputs.to(torch.float32))
        outputs = self.act(outputs)
        outputs = self.fc2(outputs)
        outputs = self.act(outputs)
        outputs = self.fc3(outputs)
        outputs = self.act(outputs)
        outputs = self.fc4(outputs)
        outputs = self.act(outputs)
        outputs = self.fc5(outputs)
        outputs = F.sigmoid(outputs)
        return outputs
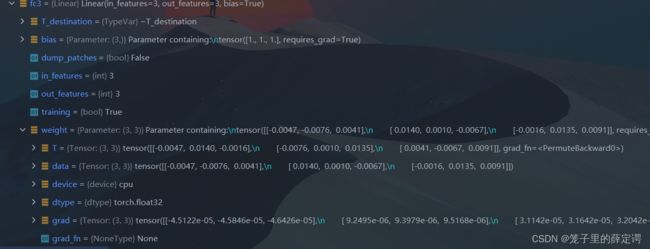
Debug查看fc5、fc3与fc1的梯度:
fc5:
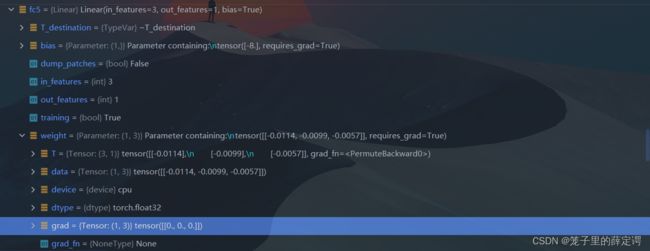 fc3:
fc3:
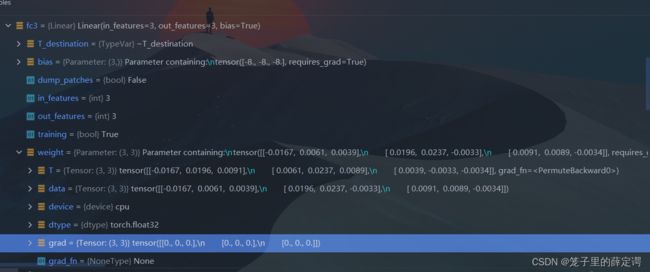
fc1:
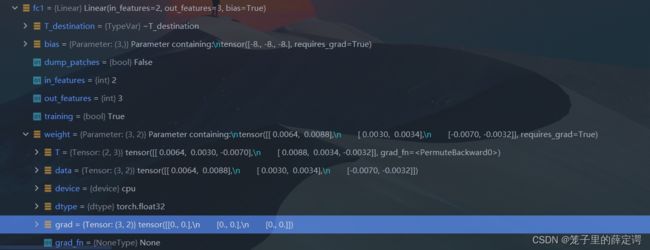 从输出结果可以发现,使用 ReLU 作为激活函数,当满足条件时,会发生死亡ReLU问题,网络训练过程中 ReLU 神经元的梯度始终为0,参数无法更新。
针对死亡ReLU问题,一种简单有效的优化方式就是将激活函数更换为Leaky ReLU、ELU等ReLU 的变种。接下来,观察将激活函数更换为 Leaky ReLU时的梯度情况。
4.4.3.2 使用Leaky ReLU进行模型训练
只需要修改初始化网络定义层那一行代码,其余代码不变:
# 定义网络,激活函数使用sigmoid
model = Model_MLP_L5(input_size=2, output_size=1, act='lrelu')
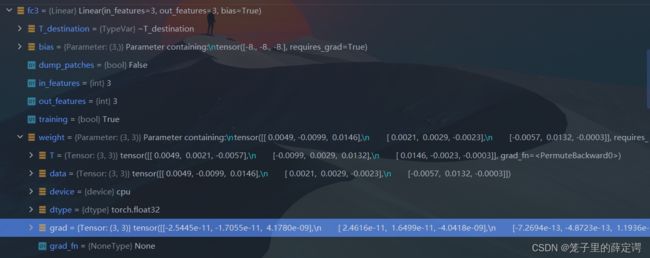
Debug查看fc5、fc3与fc1的权重与梯度:
fc5:
 fc3:
fc3:
 fc1:
fc1:
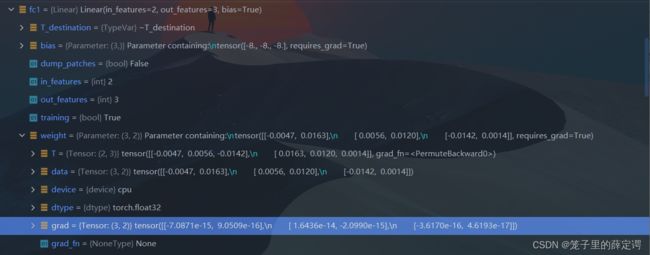 从输出结果可以看到,将激活函数更换为Leaky ReLU后,死亡ReLU问题得到了改善,梯度恢复正常,参数也可以正常更新。但是由于 Leaky ReLU 中,x<0 时的斜率默认只有0.01,所以反向传播时,随着网络层数的加深,梯度值越来越小。如果想要改善这一现象,将 Leaky ReLU 中,x<0 时的斜率调大即可。
总结
1.因为有上一个实验的铺垫,所以比较起来自定义梯度和pytorch自动计算梯度比较轻松,更加体会到pytorch框架的方便,同时也回顾了torch.nn.Module和torch.nn.Sequential。
2.在4.3.3选择合适得超参数组合耗费时间比较长,因为一开始不知道lr对本次实验数据集影响这么大,一直试图修改神经元和隐藏层数来逼近最佳的拟合效果,最终也只逼近到了0.9得准确率,和修改lr便达到0.99得准确率还差很多。
3.本次实验得一个细节就是使用了torch.load_state_dict和torch.save(模型state_dict)的方法,和以往实验不同,本次实验使用的这个保存和加载模型方法更加常用些,若要查看具体区别,请看如下视频:
B站小土堆的网络模型的保存与读取
参考文献
1.Heaton Research: The Number of Hidden Layers
2.Ahmed Gad, Beginners Ask “How Many Hidden Layers/Neurons to Use in Artificial Neural Networks?"
3.Jason Brownlee, How to Configure the Number of Layers and Nodes in a Neural Network
4.邱锡鹏.《神经网络与深度学习》[J].中文信息学报,2020,34(07):4.
5.周志华.机器学习[M].北京:清华大学出版社,2016.01:第105页
参考博客
权重初始化
torch.nn.Linear解析(数学角度)
关于PyTorch反向传播前手动梯度清0
PyTorch使用state_dict来保存和加载模型
如何确定神经网络的层数和隐藏层神经元数量
torch.nn.Module所有方法总结及其使用举例
PyTorch关于requires_grad_(True)的理解


