语义分割开源工具箱MMSegmentation安装及使用示例
MMSegmentation是一个基于PyTorch的语义分割开源工具箱,是OpenMMLab项目的一部分,源码在https://github.com/open-mmlab/mmsegmentation,最新发布版本为v0.27.0,License为Apache-2.0。它支持在Windows、Linux和Mac上运行。
1.安装:使用conda安装
(1).创建openmmlab虚拟环境:
conda create -n openmmlab python=3.8
conda activate openmmlab
(2).安装PyTorch:这里PyTorch使用1.11.0版本,CUDA使用10.2版本,此CUDA版本对PyTorch各版本都支持
conda install pytorch==1.11.0 torchvision==0.12.0 torchaudio==0.11.0 cudatoolkit=10.2 -c pytorch (3).安装MMCV:MMCV有两个版本,这里安装带CUDA的mmcv-full
1).mmcv-full: 完整版,包含所有的特性以及丰富的开箱即用的CUDA算子,安装此版本需要较长时间。
2).mmcv:精简版,不包含CUDA算子但包含其余所有特性和功能,类似MMCV 1.0之前的版本。
不要在同一个环境中安装两个版本,否则可能会遇到类似ModuleNotFound的错误。在安装一个版本之前,需要先卸载另一个:
pip uninstall mmcv-full
pip uninstall mmcv
注意:这里mmcv-full使用1.5.3版本。CUDA版本和PyTorch版本与安装PyTorch时保持一致
pip install mmcv-full==1.5.3 -f https://download.openmmlab.com/mmcv/dist/cu102/torch1.11.0/index.html(4).安装MMSegmentation:没有通过源码安装
pip install mmsegmentation==0.27.0 2.测试:论文:《Pyramid Scene Parsing Network》
Cityscapes数据集:专注于对城市街道场景的语义理解,group包括:flat(road, sidewalk, parking. rail track)、human(person, rider)、vehicle(car, truck, bus, on rails, motorcycle, bicycle, caravan, trailer)、construction(building, wall, fence, guard rail, bridge, tunnel)、object(pole, pole group, traffic sign, traffic light)、nature(vegetation, terrain)、sky,cityscapes_labels中给出了label对应的id值。
(1).下载模型(checkpoint):
def download_checkpoint(path, name, url):
	if os.path.isfile(path+name) == False:
		print("checkpoint(model) file does not exist, now download ...")
		subprocess.run(["wget", "-P", path, url])

path = "../../data/model/"
checkpoint = "pspnet_r50-d8_512x1024_40k_cityscapes_20200605_003338-2966598c.pth"
url = "https://download.openmmlab.com/mmsegmentation/v0.5/pspnet/pspnet_r50-d8_512x1024_40k_cityscapes/pspnet_r50-d8_512x1024_40k_cityscapes_20200605_003338-2966598c.pth"
download_checkpoint(path, checkpoint, url)
(2).根据配置文件和checkpoint文件构建模型:
config = "../../src/mmsegmentation/configs/pspnet/pspnet_r50-d8_512x1024_40k_cityscapes.py"
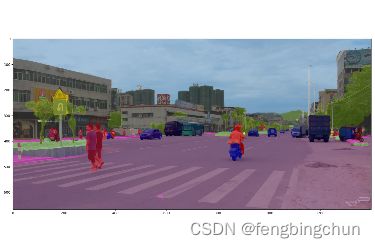
model = init_segmentor(config, path+checkpoint, device)(3).准备测试图像:原始图像来自网络
image_path = "../../data/image/"
image_name = "12.png"
(4).进行推理:
result = inference_segmentor(model, image)
print(f"result shape: {result[0].shape}, max value: {np.max(result[0])}, data type: {result[0].dtype}") # result shape: (667, 1400), max value: 18, data type: int64

show_result_pyplot(model, image, result)
调用mmseg的接口show_result_pyplot,结果如下图所示:
(5).显示灰度图结果及保存图像:
dst = result[0].astype(np.uint8) * int(255/np.max(result[0]))
print(f"type: {dst.dtype}, max value: {np.max(dst)}")
cv2.imwrite("../../data/result_segmentor_pspnet.png", dst)
cv2.imshow("show", dst)
cv2.waitKey(0)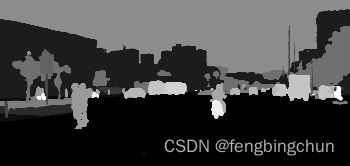
GitHub:https://github.com/fengbingchun/PyTorch_Test