YOLOV5-网络结构和组件(部分代码解析)
一些内容参考(https://blog.csdn.net/XiaoGShou/article/details/117351971)
一、Conv结构

这里其实是有点问题的,在Yolov5s6.0版本中,这里的激活函数采用的是SiLu, 实际上就是swish函数,而实际上使用的是swish函数的改进版本Hardswish。
class Conv(nn.Module):
    # Standard convolution 标准卷积:conv+BN+hardswish
    def __init__(self, c1, c2, k=1, s=1, p=None, g=1, act=True):  # ch_in, ch_out, kernel, stride, padding, groups
        super(Conv, self).__init__()
        self.conv = nn.Conv2d(c1, c2, k, s, autopad(k, p), groups=g, bias=False)
        self.bn = nn.BatchNorm2d(c2)
        self.act = nn.Hardswish() if act else nn.Identity()

    def forward(self, x):  # 网络的执行顺序是根据 forward 函数来决定的
        return self.act(self.bn(self.conv(x)))

    def fuseforward(self, x):
        return self.act(self.conv(x))
c1:输入数据的通道数,例RGB图片的通道数为3
c2:输出数据的通道数,这个根据模型调整
k:卷积核大小,若k=2,则卷积核大小为2x2
s: 步长
p: 零填充
groups: 从输入通道到输出通道阻塞连接数,通道分组的参数,输入通道数,输出通道数必须同时满足被groups整除
bias:如果为True,则向输出添加可学习的偏置
二、Focus结构

先经过4个slice切片,再经过Concat拼接,最后经过一个Conv层。
把输入x分别从(0,0)、(1,0)、(0,1)、(1,1)开始,按步长为2取值,然后进行一次卷积
将输入(b,c,w,h)的shape变成了输出(b, 4c, w/2, h/2)
他将特征层的长和宽都缩减为原来的一半,然后通道数变成原来的4倍,也可以理解成将一个图片等分切成4个,然后将这四个小的上下堆叠起来,最后在经过一个conv输出。
class Focus(nn.Module):
    # Focus wh information into c-space
    def __init__(self, c1, c2, k=1, s=1, p=None, g=1, act=True):  # ch_in, ch_out, kernel, stride, padding, groups
        super(Focus, self).__init__()
        self.conv = Conv(c1 * 4, c2, k, s, p, g, act)

    def forward(self, x):  # x(b,c,w,h) -> y(b,4c,w/2,h/2)
        return self.conv(torch.cat([x[..., ::2, ::2], x[..., 1::2, ::2], x[..., ::2, 1::2], x[..., 1::2, 1::2]], 1))
三、Res unit结构

Res unit就是残差单元。可以通过控制参数确定是否进行shortcut。这里值得注意的是,这两个CBL层的卷积核的大小是不一样的,先经过1x1可以减少参数量,再通过3x3恢复原本大小。
class Bottleneck(nn.Module):
    # Standard bottleneck
    def __init__(self, c1, c2, shortcut=True, g=1, e=0.5):  # ch_in, ch_out, shortcut, groups, expansion
        super(Bottleneck, self).__init__()
        c_ = int(c2 * e)  # hidden channels
        self.cv1 = Conv(c1, c_, 1, 1)
        self.cv2 = Conv(c_, c2, 3, 1, g=g)
        self.add = shortcut and c1 == c2

    def forward(self, x):
        # 根据self.add的值确定是否有shortcut
        return x + self.cv2(self.cv1(x)) if self.add else self.cv2(self.cv1(x))
e:expansion:bottleneck结构中的瓶颈部分的通道膨胀率,使用0.5即变为输入的1/2,这个e有点类似于一种控制瓶颈的参数,e越小瓶颈越窄。
瓶颈指的是:首先经过一个Conv将通道数缩小,然后在通过一个Conv变成原来的通道数,而e就是控制这个窄度的有实验表明,这种瓶颈结构可以很好的减少训练参数。
详解:
这里的瓶颈层,瓶颈主要体现在通道数channel上面!一般11卷积具有很强的灵活性,这里用于降低通道数,如上面的膨胀率为0.5,若输入通道为640,那么经过11的卷积层之后变为320;经过33之后变为输出的通道数,这样参数量会大量减少这里的shortcut即为图中的红色虚线,在实际中,shortcut(捷径)不一定是上面都不操作,也有可能有卷积处理,但此时,另一只一般是多个ReNet模块串联而成。而这里的shortcut也成为了identity分支,可以理解为恒等映射,另一个分支被称为残差分支(Residual分支我们经常使用的残差分支实际上是11+33+11结构。

实际上这里的残差模块,是瓶颈残差模块不是普通残差模块。
四、CSP1结构

这里都比较好理解,主要是分为两个支路。核心是要考虑好每个的输出通道数,保证能拼贴在一起。
class BottleneckCSP(nn.Module):
    # CSP Bottleneck https://github.com/WongKinYiu/CrossStagePartialNetworks
    def __init__(self, c1, c2, n=1, shortcut=True, g=1, e=0.5):  # ch_in, ch_out, number, shortcut, groups, expansion
        super(BottleneckCSP, self).__init__()
        c_ = int(c2 * e)  # hidden channels
        self.cv1 = Conv(c1, c_, 1, 1)
        self.cv2 = nn.Conv2d(c1, c_, 1, 1, bias=False)
        self.cv3 = nn.Conv2d(c_, c_, 1, 1, bias=False)
        self.cv4 = Conv(2 * c_, c2, 1, 1)
        self.bn = nn.BatchNorm2d(2 * c_)  # applied to cat(cv2, cv3)
        self.act = nn.LeakyReLU(0.1, inplace=True)
        # *操作符可以把一个list拆开成一个个独立的元素
        self.m = nn.Sequential(*[Bottleneck(c_, c_, shortcut, g, e=1.0) for _ in range(n)])

    def forward(self, x):
        y1 = self.cv3(self.m(self.cv1(x)))
        y2 = self.cv2(x)
        return self.cv4(self.act(self.bn(torch.cat((y1, y2), dim=1))))
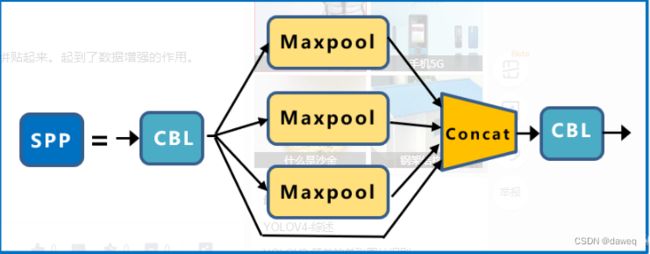
五、SPP结构
此部分SPP最主要的作用就是融合了局部与全局特征。
class SPP(nn.Module):
    # Spatial pyramid pooling layer used in YOLOv3-SPP
    def __init__(self, c1, c2, k=(5, 9, 13)):
        super(SPP, self).__init__()
        c_ = c1 // 2  # hidden channels
        self.cv1 = Conv(c1, c_, 1, 1)
        self.cv2 = Conv(c_ * (len(k) + 1), c2, 1, 1)
        self.m = nn.ModuleList([nn.MaxPool2d(kernel_size=x, stride=1, padding=x // 2) for x in k])

    def forward(self, x):
        x = self.cv1(x)
        return self.cv2(torch.cat([x] + [m(x) for m in self.m], 1))
六、其他模块
以上的模块都是构成主干网络的基础核心,在后续的代码中,会根据Yolov5把这几个模块根据网络组合起来。但是在网络结构中,还有一些组件去处理其他问题。
(1)自动步长填充autopad
def autopad(k, p=None):  # kernel, padding
    # Pad to 'same'
    if p is None:
        p = k // 2 if isinstance(k, int) else [x // 2 for x in k]  # auto-pad
    return p
这里是因为在Yolov5中卷积的时候使用的是Same卷积,所以需要有函数去计算padding。
(2)极大值抑制NMS
class NMS(nn.Module):
    # Non-Maximum Suppression (NMS) module
    conf = 0.25  # confidence threshold
    iou = 0.45  # IoU threshold
    classes = None  # (optional list) filter by class

    def __init__(self):
        super(NMS, self).__init__()

    def forward(self, x):
        return non_max_suppression(x[0], conf_thres=self.conf, iou_thres=self.iou, classes=self.classes)
(3)连接张量
class Concat(nn.Module):
    # Concatenate a list of tensors along dimension
    def __init__(self, dimension=1):
        super(Concat, self).__init__()
        self.d = dimension # the dimension over which the tensors are concatenated

    def forward(self, x):
        return torch.cat(x, self.d)
(4)自动调整shape
autoshape模块在train中不会被调用,当模型训练结束后,会通过这个模块对图片进行重塑,来方便模型的预测
自动调整shape,我们输入的图像可能不一样,可能来自cv2/np/PIL/torch 对输入进行预处理 调整其shape,调整shape在datasets.py文件中,这个实在预测阶段使用的,model.eval(),模型就已经无法训练进入预测模式了
class autoShape(nn.Module):
    # input-robust model wrapper for passing cv2/np/PIL/torch inputs. Includes preprocessing, inference and NMS
    img_size = 640  # inference size (pixels)
    conf = 0.25  # NMS confidence threshold
    iou = 0.45  # NMS IoU threshold
    classes = None  # (optional list) filter by class

    def __init__(self, model):
        super(autoShape, self).__init__()
        self.model = model

    def forward(self, x, size=640, augment=False, profile=False):
        # supports inference from various sources. For height=720, width=1280, RGB images example inputs are:
        #   opencv:     x = cv2.imread('image.jpg')[:,:,::-1]  # HWC BGR to RGB x(720,1280,3)
        #   PIL:        x = Image.open('image.jpg')  # HWC x(720,1280,3)
        #   numpy:      x = np.zeros((720,1280,3))  # HWC
        #   torch:      x = torch.zeros(16,3,720,1280)  # BCHW
        #   multiple:   x = [Image.open('image1.jpg'), Image.open('image2.jpg'), ...]  # list of images

        p = next(self.model.parameters())  # for device and type
        if isinstance(x, torch.Tensor):  # torch
            return self.model(x.to(p.device).type_as(p), augment, profile)  # inference

        # Pre-process
        if not isinstance(x, list):
            x = [x]
        shape0, shape1 = [], []  # image and inference shapes
        batch = range(len(x))  # batch size
        for i in batch:
            x[i] = np.array(x[i])[:, :, :3]  # up to 3 channels if png
            s = x[i].shape[:2]  # HWC
            shape0.append(s)  # image shape
            g = (size / max(s))  # gain
            shape1.append([y * g for y in s])
        shape1 = [make_divisible(x, int(self.stride.max())) for x in np.stack(shape1, 0).max(0)]  # inference shape
        x = [letterbox(x[i], new_shape=shape1, auto=False)[0] for i in batch]  # pad
        x = np.stack(x, 0) if batch[-1] else x[0][None]  # stack
        x = np.ascontiguousarray(x.transpose((0, 3, 1, 2)))  # BHWC to BCHW
        x = torch.from_numpy(x).to(p.device).type_as(p) / 255.  # uint8 to fp16/32

        # Inference
        x = self.model(x, augment, profile)  # forward
        x = non_max_suppression(x[0], conf_thres=self.conf, iou_thres=self.iou, classes=self.classes) # NMS

        # Post-process
        for i in batch:
            if x[i] is not None:
                x[i][:, :4] = scale_coords(shape1, x[i][:, :4], shape0[i])
        return x
(5)展平张量
class Flatten(nn.Module):
    # Use after nn.AdaptiveAvgPool2d(1) to remove last 2 dimensions
    @staticmethod
    def forward(x):
        return x.view(x.size(0), -1)
(6)再分类
用于第二级分类 比如做车牌的识别 先识别出车牌 如果想对车牌上的字进行识别 就需要二级分类的方法
class Classify(nn.Module):
    # Classification head, i.e. x(b,c1,20,20) to x(b,c2)
    def __init__(self, c1, c2, k=1, s=1, p=None, g=1):  # ch_in, ch_out, kernel, stride, padding, groups
        super(Classify, self).__init__()
        self.aap = nn.AdaptiveAvgPool2d(1)  # to x(b,c1,1,1)
        self.conv = nn.Conv2d(c1, c2, k, s, autopad(k, p), groups=g, bias=False)  # to x(b,c2,1,1)
        self.flat = Flatten()

    def forward(self, x):
        z = torch.cat([self.aap(y) for y in (x if isinstance(x, list) else [x])], 1)  # cat if list
        return self.flat(self.conv(z))  # flatten to x(b,c2)
随着版本的更新,目前最新的是Yolov5 6.2版本,还有很多其他方法没有写,以后学了再写。
