动手学深度学习--softmax回归和MLP的pytorch实现
目录
softmax从零开始实现
导包
导入数据
初始化模型参数
定义softmax操作
定义模型
损失函数
优化函数
分类精度
训练函数
训练
预测
softmax简洁实现
初始化模型参数
Softmax的实现
优化算法
训练
多层感知机的从零开始实现
初始化模型参数
激活函数
模型
训练评估
多层感知机的简洁实现
不难,但是一些实现方法比较有特色
softmax从零开始实现
导包
import torch
from torch import nn
import numpy as np
from IPython import display
import torchvision.transforms as transforms
import torchvision
from torch.utils import data
import sys
导入数据
def load_data_fashion_mnist(batch_size, resize=None):
    """Download the Fashion-MNIST dataset and then load it into memory.

    Defined in :numref:`sec_fashion_mnist`"""
    trans = [transforms.ToTensor()]
    if resize:
        trans.insert(0, transforms.Resize(resize))
    trans = transforms.Compose(trans)
    mnist_train = torchvision.datasets.FashionMNIST(
        root="../data", train=True, transform=trans, download=True)
    mnist_test = torchvision.datasets.FashionMNIST(
        root="../data", train=False, transform=trans, download=True)
    return (data.DataLoader(mnist_train, batch_size, shuffle=True,
                            num_workers=get_dataloader_workers()),
            data.DataLoader(mnist_test, batch_size, shuffle=False,
                            num_workers=get_dataloader_workers()))


def get_dataloader_workers():
    """Use 4 or 0 processes to read the data.
    """
    return 0 if sys.platform.startswith('win') else 4


batch_size = 256
train_iter, test_iter = load_data_fashion_mnist(batch_size)
初始化模型参数
展平每个图像,把它们看作长度为784的向量
num_inputs = 784
num_outputs = 10

W = torch.normal(0, 0.01, size=(num_inputs, num_outputs), requires_grad=True)
b = torch.zeros(num_outputs, requires_grad=True)
定义softmax操作
def softmax(X):
    # X_max = X.max(axis=1)[0].reshape(-1, 1)
    X_max = torch.max(X, axis=1)[0].reshape(-1, 1)
    X -= X_max
    X_exp = torch.exp(X)
    partition = X_exp.sum(1, keepdim=True)
    return X_exp / partition  # 这里应用了广播机制
定义模型
w形状:特征数 * 目标类别数
def net(X):
    return softmax(torch.matmul(X.reshape((-1, W.shape[0])), W) + b)
损失函数
交叉熵采用真实标签的预测概率的负对数似然。y不是one-hot编码方式,而是标签序号
def cross_entropy(y_hat, y):
    return - torch.log(y_hat[range(len(y_hat)), y])
优化函数
lr = 0.1

def updater(batch_size):
    return sgd([W, b], lr, batch_size)

def sgd(params, lr, batch_size):
    """Minibatch stochastic gradient descent.
    """
    with torch.no_grad():
        for param in params:
            param -= lr * param.grad / batch_size  # 为什么要除以batch_size?
            param.grad.zero_()
分类精度
由于等式运算符“==”对数据类型很敏感, 因此我们将y_hat的数据类型转换为与y的数据类型一致。 结果是一个包含0(错)和1(对)的张量。 最后,我们求和会得到正确预测的数量。注意这里的输出不是精确度(百分比),而是正确预测的数量
def accuracy(y_hat, y):  #@save
    """计算预测正确的数量"""
    if len(y_hat.shape) > 1 and y_hat.shape[1] > 1:
        y_hat = y_hat.argmax(axis=1)
    cmp = y_hat.type(y.dtype) == y
    return float(cmp.type(y.dtype).sum())
评估精度
def evaluate_accuracy(net, data_iter):  #@save
    """计算在指定数据集上模型的精度"""
    if isinstance(net, torch.nn.Module):
        net.eval()  # 将模型设置为评估模式
    metric = Accumulator(2)  # 正确预测数、预测总数
    with torch.no_grad():
        for X, y in data_iter:
            metric.add(accuracy(net(X), y), y.numel())
return metric[0] / metric[1]这里定义一个实用程序类Accumulator,用于对多个变量进行累加。 在上面的evaluate_accuracy函数中, 我们在Accumulator实例中创建了2个变量, 分别用于存储正确预测的数量和预测的总数量。 当我们遍历数据集时,通过add方法,两者都将随着时间的推移而累加。
其实len(data_iter.dataset)就是数据总量,不用Accumulator来求,似乎还能快一点
class Accumulator:  #@save
    """在n个变量上累加"""
    def __init__(self, n):
        self.data = [0.0] * n

    def add(self, *args):
        self.data = [a + float(b) for a, b in zip(self.data, args)]

    def reset(self):
        self.data = [0.0] * len(self.data)

    def __getitem__(self, idx):
        return self.data[idx]
训练函数
def train_epoch_ch3(net, train_iter, loss, updater):  #@save
    """训练模型一个迭代周期(定义见第3章)"""
    # 将模型设置为训练模式
    if isinstance(net, torch.nn.Module):
        net.train()
    # 训练损失总和、训练准确度总和、样本数
    metric = Accumulator(3)
    for X, y in train_iter:
        # 计算梯度并更新参数
        y_hat = net(X)
        l = loss(y_hat, y)
        if isinstance(updater, torch.optim.Optimizer):
            # 使用PyTorch内置的优化器和损失函数
            updater.zero_grad()
            l.mean().backward()  # loss在定义的时候会采用reduction='none'
            updater.step()
        else:
            # 使用定制的优化器和损失函数
            l.sum().backward()
            updater(X.shape[0])
        metric.add(float(l.sum()), accuracy(y_hat, y), y.numel())
    # 返回训练损失和训练精度
return metric[0] / metric[2], metric[1] / metric[2]定义一个在动画中绘制数据的实用程序类Animator
from d2l import torch as d2l
from matplotlib_inline import backend_inline

class Animator:
    """在动画中绘制数据"""
    def __init__(self, xlabel=None, ylabel=None, legend=None, xlim=None,
                 ylim=None, xscale='linear', yscale='linear',
                 fmts=('-', 'm--', 'g-.', 'r:'), nrows=1, ncols=1,
                 figsize=(3.5, 2.5)):
        # 增量地绘制多条线
        if legend is None:
            legend = []
        use_svg_display()
        self.fig, self.axes = d2l.plt.subplots(nrows, ncols, figsize=figsize)
        if nrows * ncols == 1:
            self.axes = [self.axes, ]
        # 使用lambda函数捕获参数
        self.config_axes = lambda: d2l.set_axes(
            self.axes[0], xlabel, ylabel, xlim, ylim, xscale, yscale, legend)
        self.X, self.Y, self.fmts = None, None, fmts

    def add(self, x, y):
        # 向图表中添加多个数据点
        if not hasattr(y, "__len__"):
            y = [y]
        n = len(y)
        if not hasattr(x, "__len__"):
            x = [x] * n
        if not self.X:
            self.X = [[] for _ in range(n)]
        if not self.Y:
            self.Y = [[] for _ in range(n)]
        for i, (a, b) in enumerate(zip(x, y)):
            if a is not None and b is not None:
                self.X[i].append(a)
                self.Y[i].append(b)
        self.axes[0].cla()
        for x, y, fmt in zip(self.X, self.Y, self.fmts):
            self.axes[0].plot(x, y, fmt)
        self.config_axes()
        display.display(self.fig)
        display.clear_output(wait=True)

def use_svg_display():
    """Use the svg format to display a plot in Jupyter.

    """
    backend_inline.set_matplotlib_formats('svg')
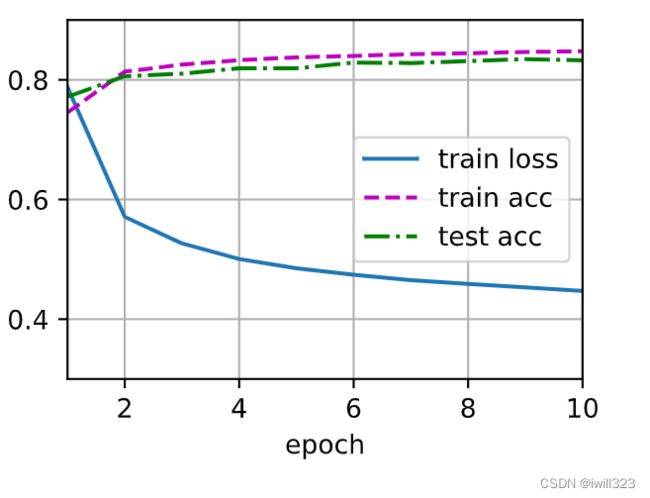
实现一个训练函数, 它会在train_iter访问到的训练数据集上训练一个模型net。 该训练函数将会运行多个迭代周期(由num_epochs指定)。 在每个迭代周期结束时,利用test_iter访问到的测试数据集对模型进行评估。 我们将利用Animator类来可视化训练进度
def train_ch3(net, train_iter, test_iter, loss, num_epochs, updater):  #@save
    """训练模型(定义见第3章)"""
    animator = Animator(xlabel='epoch', xlim=[1, num_epochs], ylim=[0.3, 0.9],
                        legend=['train loss', 'train acc', 'test acc'])
    for epoch in range(num_epochs):
        train_metrics = train_epoch_ch3(net, train_iter, loss, updater)
        test_acc = evaluate_accuracy(net, test_iter)
        animator.add(epoch + 1, train_metrics + (test_acc,))
    train_loss, train_acc = train_metrics
    assert train_loss < 0.5, train_loss
    assert train_acc <= 1 and train_acc > 0.7, train_acc
    assert test_acc <= 1 and test_acc > 0.7, test_acc
训练
训练模型10个迭代周期
num_epochs = 10
train_ch3(net, train_iter, test_iter, cross_entropy, num_epochs, updater)
预测
def predict_ch3(net, test_iter, n=6):  #@save
    """预测标签(定义见第3章)"""
    for X, y in test_iter:
        break
    trues = d2l.get_fashion_mnist_labels(y)
    preds = d2l.get_fashion_mnist_labels(net(X).argmax(axis=1))
    titles = [true +'\n' + pred for true, pred in zip(trues, preds)]
    d2l.show_images(
        X[0:n].reshape((n, 28, 28)), 1, n, titles=titles[0:n])

predict_ch3(net, test_iter)
softmax简洁实现
初始化模型参数
# PyTorch不会隐式地调整输入的形状。因此,
# 我们在线性层前定义了展平层(flatten),来调整网络输入的形状
net = nn.Sequential(nn.Flatten(), nn.Linear(784, 10))

def init_weights(m):
    if type(m) == nn.Linear:
        nn.init.normal_(m.weight, std=0.01)

net.apply(init_weights);
Softmax的实现
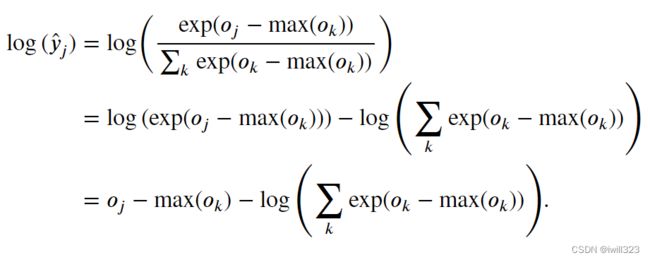
在继续softmax计算之前,先从所有中减去max(),可能有些−max()具有较大的负值。 由于精度受限,exp(−max())将有接近零的值,即下溢(underflow)。 这些值可能会四舍五入为零,使̂ 为零, 并且使得log(̂ )的值为-inf。 反向传播几步后,我们可能会发现自己面对一屏幕可怕的nan结果。
避免计算exp(−max()), 而可以直接使用−max(),因为log(exp(⋅))被抵消了
需要额外注意的是,计算loss过程中采取reduction='none',这样就不会对loss计算结果进行降维。这么做是因为accuracy的相关函数中对loss进行了累加处理
loss = nn.CrossEntropyLoss(reduction='none')优化算法
trainer = torch.optim.SGD(net.parameters(), lr=0.1)训练
num_epochs = 10
train_ch3(net, train_iter, test_iter, loss, num_epochs, trainer)
多层感知机的从零开始实现
初始化模型参数
num_inputs, num_outputs, num_hiddens = 784, 10, 256

W1 = nn.Parameter(torch.randn(
    num_inputs, num_hiddens, requires_grad=True) * 0.01)
b1 = nn.Parameter(torch.zeros(num_hiddens, requires_grad=True))
W2 = nn.Parameter(torch.randn(
    num_hiddens, num_outputs, requires_grad=True) * 0.01)
b2 = nn.Parameter(torch.zeros(num_outputs, requires_grad=True))

params = [W1, b1, W2, b2]
激活函数
def relu(X):
    a = torch.zeros_like(X)
    return torch.max(X, a)
模型
def net(X):
    X = X.reshape((-1, num_inputs))
    H = relu(X@W1 + b1)  # 这里“@”代表矩阵乘法
    return (H@W2 + b2)


loss = nn.CrossEntropyLoss(reduction='none')
updater = torch.optim.SGD(params, lr=lr)
训练评估
num_epochs, lr = 10, 0.1
train_ch3(net, train_iter, test_iter, loss, num_epochs, updater)

predict_ch3(net, test_iter)
多层感知机的简洁实现
net = nn.Sequential(nn.Flatten(),
                    nn.Linear(784, 256),
                    nn.ReLU(),
                    nn.Linear(256, 10))

def init_weights(m):
    if type(m) == nn.Linear:
        nn.init.normal_(m.weight, std=0.01)

net.apply(init_weights)

batch_size, lr, num_epochs = 256, 0.1, 10
loss = nn.CrossEntropyLoss(reduction='none')
trainer = torch.optim.SGD(net.parameters(), lr=lr)

train_iter, test_iter = load_data_fashion_mnist(batch_size)
train_ch3(net, train_iter, test_iter, loss, num_epochs, trainer)

