使用Resnet网络对人脸图像分类识别出男女性别(包含数据集制作+训练+测试)
文章目录
- 前言
- 一、数据预处理
-
- 1.分类数据存放
- 2.生成train.txt与val.txt
- 二、更改配置文件
-
- 1.自定义修改
- 三、定义resnet网络
- 四、train.py训练
- 五、预测predict.py实现
- 六、预测结果
- 七、完整项目代码+数据集(大于1500张)
- 总结
前言
本打算昨天写这篇博客的,推迟到今天晚上。实际上,上午我已经把模型训练完了,迭代100次,最后准确率可达到95%,考虑到用的台式机没有装显卡,所以使用的数据集一共只有340张。分布情况如下。
【训练集】女性:150张; 男性:150张
【验证集】女性:20张; 男性:20张
数据集预览

女性数据

男性数据
提示:以下是本篇文章正文内容,下面案例可供参考
一、数据预处理
1.分类数据存放
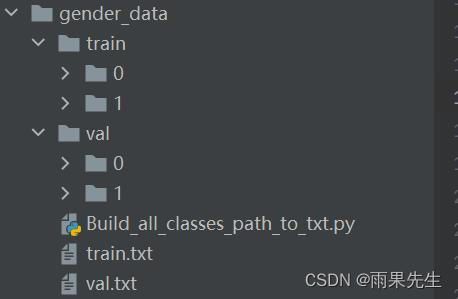
分类数据是不需要像目标检测数据样,每张图片去打标签,我们唯一需要做的就是把同类照片放到一个文件夹。如我们新建一个名字为“0”的文件夹,用于存放所有用于训练的150张女性图片,新建一个名字为“1”的文件夹,用于存放所有用于训练的150张男性图片。同理,验证集也如此排布。如下图所示,为我的数据排布情况,数据集存放在gender_data文件夹里。
2.生成train.txt与val.txt
图片数据排布完后,还需要做的就是使用脚本工具,分别生成训练集和验证集的存储路径及对应标签(0或者1)。这一步至关重要,必不可少。因为训练时,就是通过读取这两个txt文件里的路径,来读取训练集和验证集的图片,并输送给网络,同时给对应的标签类别。
脚本命名Build_all_classes_path_to_txt.py
**注意:**需要分两次执行,分别创建train.txt与val.txt,记得更改路径
import os
import os.path

def listfiles(rootDir, txtfile, foldnam =''):
    ftxtfile = open(txtfile, 'a')
    list_dirs = os.walk(rootDir)
    #foldnam = FolderName[0]
    #print(foldnam)
    count = 0
    dircount = 0
    for root,dirs,files in list_dirs:
       for d in dirs:
           #print(os.path.join(root, d))
           dircount += 1
       for f in files:
           #print(os.path.join(root, f))
           ftxtfile.write(os.path.join(root, f) + ' ' + foldnam + '\n')
           count += 1
       #print(rootDir + ' has ' + str(count) + ' files')


#获取路径下所有文件夹的完整路径,用于读取文件用
def GetFileFromThisRootDir(dir):
    allfolder = []
    folder_name = ''

    for root,dirs,files in os.walk(dir):
        allfolder.append(root)
        """
        for filespath in files:
            filepath = os.path.join(root, filespath)
            #print(filepath)
            extension = os.path.splitext(filepath)[1][1:]

            if needExtFilter and extension in ext:
                allfiles.append(filepath)
            elif not needExtFilter:
                allfiles.append(filepath)
        """
    All_folder = allfolder
    #print(All_folder)

    for folder_num in All_folder[1:]:
        #print(folder_num)
        folder_name = folder_num.split('/')[:]
        print (folder_name)
        listfiles(folder_num, txtfile_path, folder_name[-1])
    return

#def Generate_path_to_txt(FolderPath=[]):
#    print(FolderPath)


if __name__=='__main__':

	folder_path = 'F:/Study_code/classification-pytorch/Classification-MaleFemale-pytorch/gender_data/val/'              #val and train folder
	txtfile_path = 'F:/Study_code/classification-pytorch/Classification-MaleFemale-pytorch/gender_data/val.txt'

	folder_path = GetFileFromThisRootDir(folder_path)
生成的.txt文件内容如下

二、更改配置文件
1.自定义修改
实际上很多可以修改,如loss选择、梯度下降方法、学习率、衰减率等等。

代码如下(示例):
class Config(object):
    num_classes = 2
    loss = 'softmax' #focal_loss

    test_root = 'gender_data/'
    test_list = 'gender_data/val.txt'

    train_batch_size = 16      # batch size
    train_root = 'gender_data/'
    train_list = 'gender_data/train.txt'


    finetune = False
    load_model_path  = 'checkpoints/model-epoch-1.pth'

    save_interval = 1
    input_shape = (3, 112, 112)

    optimizer = 'sgd'            # optimizer should be sgd, adam
    num_workers = 4              # how many workers for loading data
    print_freq = 10             # print info every N batch
    milestones = [60, 100]  # adjust lr

    lr = 0.1         # initial learning rate
    max_epoch = 100   # max epoch
    lr_decay = 0.95  # when val_loss increase, lr = lr*lr_decay
    weight_decay = 5e-4
三、定义resnet网络
实际上resnet网络pytorch内部经典网络中已存在,但作者还是参考开源代码自己构建了一个resnet网络的py文件resnet.py。这个可直接拿来使用。本次训练使用的是resnet18.
代码如下(示例):
"""resnet in pytorch


[1] Kaiming He, Xiangyu Zhang, Shaoqing Ren, Jian Sun.

    Deep Residual Learning for Image Recognition
    https://arxiv.org/abs/1512.03385v1
"""

import torch
import torch.nn as nn

class Flatten(nn.Module):
    def forward(self, input):
        #print(input.view(input.size(0), -1).shape)
        return input.view(input.size(0), -1)

class BasicBlock(nn.Module):
    """Basic Block for resnet 18 and resnet 34

    """
    expansion = 1
    def __init__(self, in_channels, out_channels, stride=1):
        super().__init__()
        #residual function
        self.residual_function = nn.Sequential(
            nn.Conv2d(in_channels, out_channels, kernel_size=3, stride=stride, padding=1, bias=False),
            nn.BatchNorm2d(out_channels),
            nn.ReLU(inplace=True),
            nn.Conv2d(out_channels, out_channels * BasicBlock.expansion, kernel_size=3, padding=1, bias=False),
            nn.BatchNorm2d(out_channels * BasicBlock.expansion)
        )
        #shortcut
        self.shortcut = nn.Sequential()
        #the shortcut output dimension is not the same with residual function
        #use 1*1 convolution to match the dimension
        if stride != 1 or in_channels != BasicBlock.expansion * out_channels:
            self.shortcut = nn.Sequential(
                nn.Conv2d(in_channels, out_channels * BasicBlock.expansion, kernel_size=1, stride=stride, bias=False),
                nn.BatchNorm2d(out_channels * BasicBlock.expansion)
            )

    def forward(self, x):
        return nn.ReLU(inplace=True)(self.residual_function(x) + self.shortcut(x))

class BottleNeck(nn.Module):
    """Residual block for resnet over 50 layers

    """
    expansion = 4
    def __init__(self, in_channels, out_channels, stride=1):
        super().__init__()
        self.residual_function = nn.Sequential(
            nn.Conv2d(in_channels, out_channels, kernel_size=1, bias=False),
            nn.BatchNorm2d(out_channels),
            nn.ReLU(inplace=True),
            nn.Conv2d(out_channels, out_channels, stride=stride, kernel_size=3, padding=1, bias=False),
            nn.BatchNorm2d(out_channels),
            nn.ReLU(inplace=True),
            nn.Conv2d(out_channels, out_channels * BottleNeck.expansion, kernel_size=1, bias=False),
            nn.BatchNorm2d(out_channels * BottleNeck.expansion),
        )
        self.shortcut = nn.Sequential()

        if stride != 1 or in_channels != out_channels * BottleNeck.expansion:
            self.shortcut = nn.Sequential(
                nn.Conv2d(in_channels, out_channels * BottleNeck.expansion, stride=stride, kernel_size=1, bias=False),
                nn.BatchNorm2d(out_channels * BottleNeck.expansion)
            )

    def forward(self, x):
        return nn.ReLU(inplace=True)(self.residual_function(x) + self.shortcut(x))

class ResNet(nn.Module):
    def __init__(self, block, num_block, scale=0.25, num_classes=2):
        super().__init__()
        self.in_channels = int(64 * scale)
        self.conv1 = nn.Sequential(
            nn.Conv2d(3, int(64 * scale), kernel_size=3, padding=1, bias=False),
            nn.BatchNorm2d(int(64 * scale)),
            nn.ReLU(inplace=True))
        #we use a different inputsize than the original paper
        #so conv2_x's stride is 1
        self.conv2_x = self._make_layer(block, int( 64 * scale), num_block[0], 2)
        self.conv3_x = self._make_layer(block, int(128 * scale), num_block[1], 2)
        self.conv4_x = self._make_layer(block, int(256 * scale), num_block[2], 2)
        self.conv5_x = self._make_layer(block, int(512 * scale), num_block[3], 2)
        self.output = nn.Sequential(
            nn.Conv2d(int(512*scale), int(512*scale), kernel_size=(7, 7), stride=1, groups=int(512*scale), bias=False),
            nn.BatchNorm2d(int(512*scale)),
            Flatten(),
            #nn.Linear(int(32768 * scale), num_classes)
            nn.Linear(int(512 * scale), num_classes)
        )

    def _make_layer(self, block, out_channels, num_blocks, stride):
        """make resnet layers(by layer i didnt mean this 'layer' was the
        same as a neuron netowork layer, ex. conv layer), one layer may
        contain more than one residual block

        Args:
            block: block type, basic block or bottle neck block
            out_channels: output depth channel number of this layer
            num_blocks: how many blocks per layer
            stride: the stride of the first block of this layer

        Return:
            return a resnet layer
        """

        # we have num_block blocks per layer, the first block
        # could be 1 or 2, other blocks would always be 1
        strides = [stride] + [1] * (num_blocks - 1)
        layers = []
        for stride in strides:
            layers.append(block(self.in_channels, out_channels, stride))
            self.in_channels = out_channels * block.expansion

        return nn.Sequential(*layers)

    def forward(self, x):
        output = self.conv1(x)
        output = self.conv2_x(output)
        output = self.conv3_x(output)
        output = self.conv4_x(output)
        output = self.conv5_x(output)
        output = self.output(output)
        return output

def resnet18():
    """ return a ResNet 18 object
    """
    return ResNet(BasicBlock, [2, 2, 2, 2])

def resnet34():
    """ return a ResNet 34 object
    """
    return ResNet(BasicBlock, [3, 4, 6, 3])

def resnet50():
    """ return a ResNet 50 object
    """
    return ResNet(BottleNeck, [3, 4, 6, 3])

def resnet101():
    """ return a ResNet 101 object
    """
    return ResNet(BottleNeck, [3, 4, 23, 3])

def resnet152():
    """ return a ResNet 152 object
    """
    return ResNet(BottleNeck, [3, 8, 36, 3])


from thop import profile
from thop import clever_format
if __name__=='__main__':
    input = torch.Tensor(1, 3, 112, 112)
    model = resnet18()
    #print(model)
    flops, params = profile(model, inputs=(input, ))
    flops, params = clever_format([flops, params], "%.3f")
    #print(model)
    print('VoVNet Flops:', flops, ',Params:' ,params)
四、train.py训练
训练代码及书写逻辑也是个常规操作,很好理解,关键点在于如何去加载数据,并做预处理变换。
代码如下(示例),仅供参考:
import torch
from torch.utils import data
import os
import time
import numpy as np
from models.resnet import *   #resnet34
from models.mobilenetv2 import mobilenetv2
#from models.mobilenetv3 import *
#from models.repvgg import *
from data.dataset import Dataset
from config.config import Config
from loss.focal_loss import FocalLoss
from utils.cosine_lr_scheduler import CosineDecayLR
#from torch.autograd import Variable
def train(model, criterion, optimizer, scheduler, trainloader, epoch):
	model.train()
	for ii, data in enumerate(trainloader):
		start = time.time()
		iters = epoch * len(trainloader) + ii
		scheduler.step(iters + 1)
		data_input, label = data
		#print(data_input, label)
		#data_input, label = Variable(data_input), Variable(label)-1
		data_input = data_input.to(device)
		label = label.to(device).long()
		output = model(data_input)
		#print(output)
		#print(label)
		loss = criterion(output, label)
		optimizer.zero_grad()
		loss.backward()
		optimizer.step()
		if iters % opt.print_freq == 0:
			output = output.data.cpu().numpy()
			output = np.argmax(output, axis=1)
			label = label.data.cpu().numpy()
			acc = np.mean((output == label).astype(int))
			speed = opt.print_freq / (time.time() - start)
			time_str = time.asctime(time.localtime(time.time()))
			print(time_str, 'epoch', epoch, 'iters', iters, 'speed', speed, 'lr',optimizer.param_groups[0]['lr'], 'loss', loss.cpu().detach().numpy(), 'acc', acc)

def eval_train(model, criterion, testloader):
	model.eval()
	test_loss = 0.0 # cost function error
	correct = 0.0
	with torch.no_grad():
		for (datas, labels) in testloader:
			datas = datas.to(device)
			labels = labels.to(device).long()
			outputs = model(datas)
			loss = criterion(outputs, labels)
			test_loss += loss.item()
			_, preds = outputs.max(1)
			correct += preds.eq(labels).sum()
	print('Test set: Average loss: {:.4f}, Accuracy: {:.4f}'.format(
				test_loss / len(testloader),
				correct.float() / len(testloader)
			))

if __name__ == '__main__':
	opt = Config()
	#os.environ['CUDA_VISIBLE_DEVICES'] = '0'
	#device = torch.device("cuda" if torch.cuda.is_available() else "cpu")
	device = torch.device("cpu")

	test_dataset = Dataset(opt.test_root, opt.test_list, phase='test', input_shape=opt.input_shape)
	testloader = data.DataLoader(test_dataset,
	                              shuffle=False,
	                              pin_memory=True,
	                              num_workers=opt.num_workers)

	train_dataset = Dataset(opt.train_root, opt.train_list, phase='train', input_shape=opt.input_shape)
	trainloader = data.DataLoader(train_dataset,
	                              batch_size=opt.train_batch_size,
	                              shuffle=True,
	                              pin_memory=True,
	                              num_workers=opt.num_workers)

	if opt.loss == 'focal_loss':
		criterion = FocalLoss(gamma=2)
	else:
		criterion = torch.nn.CrossEntropyLoss()

	model = resnet18()
	#model = get_RepVGG_func_by_name('RepVGG-B0')
	#model = mobilenetv2()
	if opt.finetune == True:
		model.load_state_dict(torch.load(opt.load_model_path))
	model = torch.nn.DataParallel(model)
	model.to(device)

	total_batch = len(trainloader)
	NUM_BATCH_WARM_UP = total_batch * 5
	optimizer = torch.optim.SGD(model.parameters(), lr=opt.lr, weight_decay=opt.weight_decay)
	scheduler = CosineDecayLR(optimizer,  opt.max_epoch * total_batch, opt.lr, 1e-6, NUM_BATCH_WARM_UP)

	print('{} train iters per epoch in dataset'.format(len(trainloader)))
	for epoch in range(0, opt.max_epoch):
		train(model, criterion, optimizer, scheduler, trainloader, epoch)
		if epoch % opt.save_interval == 0 or epoch == (opt.max_epoch - 1):
			torch.save(model.module.state_dict(), 'checkpoints/model-epoch-'+str(epoch) + '.pth')
			eval_train(model, criterion, testloader)

训练过程日志打印如下,最后的预测准确率还不错:

五、预测predict.py实现
代码如下(示例),仅供参考:
from torch.autograd import Variable
from torchvision import datasets, models, transforms
import matplotlib.pyplot as plt # plt 用于显示图片
from PIL import Image, ImageDraw, ImageFont
import cv2
import numpy as np
from models.resnet import *
from config.config import Config
from models.mobilenetv2 import *

def show_infer_result(result):

    font = ImageFont.truetype('data/font/HuaWenXinWei-1.ttf', 50)
    plt.rcParams['font.sans-serif'] = ['SimHei']  # 中文乱码
    plt.subplot(121)
    plt.imshow(image)
    plt.title('测试图片')
    #不显示坐标轴
    plt.axis('off')

    #子图2
    plt.subplot(122)
    img2_2 = cv2.imread('./test2.jpg')
    cv2img = cv2.cvtColor(img2_2, cv2.COLOR_BGR2RGB)
    img_PIL = Image.fromarray(cv2img)
    draw = ImageDraw.Draw(img_PIL)

    label = ''
    if result == 0:
        label = '女性'
    else:
        label = '男性'

    draw.text((170, 150), label, fill=(255, 0, 255), font=font, align='center')
    cheng = cv2.cvtColor(np.array(img_PIL), cv2.COLOR_RGB2BGR)
    plt.imshow(cheng)
    plt.title('预测结果')
    plt.axis('off')

    # #设置子图默认的间距
    plt.tight_layout()
    #显示图像
    plt.show()

def model_infer(img, model_path):
    data_transforms = transforms.Compose([
        transforms.Resize([112, 112]),
        transforms.ToTensor(),
        transforms.Normalize([0.5, 0.5, 0.5], [0.5, 0.5, 0.5])])

    # net = resnet18().cuda().eval()            # 实例化自己的模型;
    net = resnet18().eval()  # resnet模型
    net.load_state_dict((torch.load(model_path)), False)

    imgblob = data_transforms(img).unsqueeze(0).type(torch.FloatTensor).cpu()
    #print(imgblob)
    imgblob = Variable(imgblob)

    torch.no_grad()
    output = net(imgblob)
    _, pred = output.max(1)
    # print("output ---> ",output)
    predict_result = pred.numpy()

    show_infer_result(predict_result)
    return predict_result

if __name__ == "__main__":
    imagepath = './gender_data/val/1/14901.png'
    image = Image.open(imagepath)
    model_path = "./checkpoints/model-epoch-99.pth"
    model_infer(image, model_path)
    print("====infer over!")
六、预测结果
女性图片测试

男性图片测试

七、完整项目代码+数据集(大于1500张)
准备做与其他几个网络的对比实验,如mobilenetv2 、mobilenetv3、repvgg,做完后,再一并贴上。
觉得有用的,感谢先点赞+收藏+关注吧,
如何快速搭建神经网络并训练,请参考另外博客:五步教你使用Pytorch搭建神经网络并训练
总结
本文属于使用resnet网络+pytorch深度学习框架,实现男女性别识别分类模型的训练+预测,当然还包括了分类数据集制作,公开了项目部分代码仅供参考学习,后续会补上多组对比实验和代码模型。敬请关注!