利用LabelImg软件制作自己的Yolov4训练数据
文章目录
- 前言
- 一、下载和安装LabelImg
-
- 1. 下载LabelImg
- 2. 安装LabelImg
- 二、标注数据
-
- 1. 添加自定义类
- 2.使用labelImg进行图像标注
- 三、生成可训练的数据
-
- 1.标记的数据转换成YOLOv4的数据
- 2. 利用脚本进行数据转换
- 总结
前言
利用LabelImg软件制作自己的Yolov4训练数据
一、下载和安装LabelImg
1. 下载LabelImg
网址: https://github.com/tzutalin/labelImg,在这个网址可以下载到LabelImg。

下载后得到文件labelImg-master.zip,解压:D:\labelImg-master

2. 安装LabelImg
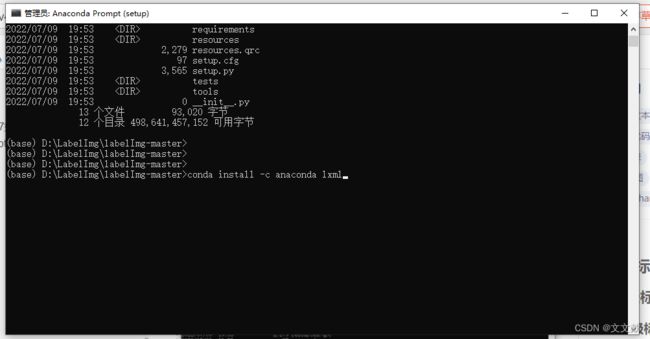
这里安装需要首先你安装了Anaconda3.7,Anaconda3.7如何安装,这里就不说了,网上可以查到一系列的安装说明。打开Anaconda Prompt(setup),进入到到labelImg-master目录下,执行三个安装命令:
conda install pyqt=5
conda install -c anaconda lxml
pyrcc5 -o libs/resources.py resources.qrc
必须要分别执行:


每一条语句都安装相应的库,直接选择y就可以了,这样LabelImg就安装好了。
二、标注数据
1. 添加自定义类
修改文件labelImg-master\data\predefined_classes.txt,这里你有多少个类就添加多少个类,我这里只标注basketball一个物体,所以这里只添加了一个basketball。


2.使用labelImg进行图像标注
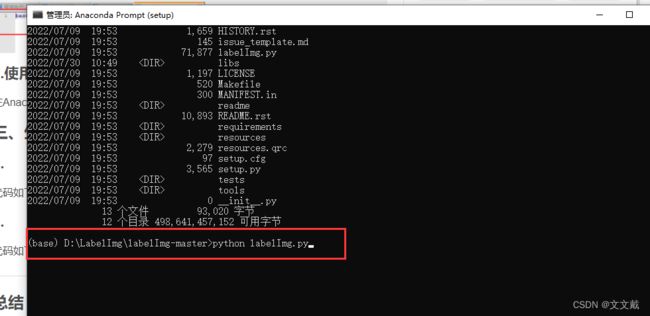
在Anaconda Prompt(setup),执行:python labelImg.py命令。

会弹出标注界面:

选择打开自己要训练的图片目录即可。

选择另存为,可以保存得到的xml文件。

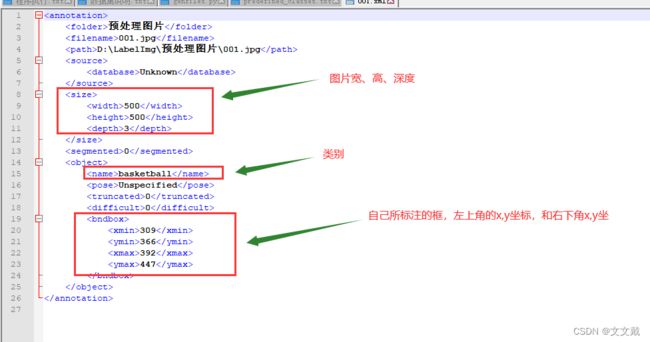
打开xml文件,可以看到关键信息:

三、生成可训练的数据
1.标记的数据转换成YOLOv4的数据
由xml文件格式也可以直接生成YOLO格式的txt标记文件如下:
class_id, x, y, w, h
0 0.7010000000000001 0.8130000000000001 0.166 0.162
x = x_center/width = 295/1000 = 0.2950
y = y_center/height = 324/654 = 0.4954
w = (xmax - xmin)/width = 216/1000 = 0.2160
h = (ymax - ymin)/height = 606/654 = 0.9266
class_id: 类别的id编号
x: 目标的中心点x坐标(横向)/图片总宽度
y: 目标的中心的y坐标(纵向)/图片总高度
w: 目标框的宽带/图片总宽度
h: 目标框的高度/图片总高度
2. 利用脚本进行数据转换
编写了脚本:genfiles.py
import xml.etree.ElementTree as ET
import pickle
import os
from os import listdir, getcwd
from os.path import join
import random

# classes=["ball","messi"]
classes=["basketball"]  # 这里一定改成自己的训练数据的类别

def clear_hidden_files(path):
    dir_list = os.listdir(path)
    for i in dir_list:
        abspath = os.path.join(os.path.abspath(path), i)
        if os.path.isfile(abspath):
            if i.startswith("._"):
                os.remove(abspath)
        else:
            clear_hidden_files(abspath)

def convert(size, box):
    dw = 1./size[0]
    dh = 1./size[1]
    x = (box[0] + box[1])/2.0
    y = (box[2] + box[3])/2.0
    w = box[1] - box[0]
    h = box[3] - box[2]
    x = x*dw
    w = w*dw
    y = y*dh
    h = h*dh
    return (x,y,w,h)

def convert_annotation(image_id):
    in_file = open('VOCdevkit\VOC2007\Annotations\%s.xml' %image_id, encoding='UTF-8')
    out_file = open('VOCdevkit\VOC2007\labels\%s.txt' %image_id, 'w')
    tree=ET.parse(in_file)
    root = tree.getroot()
    size = root.find('size')
    w = int(size.find('width').text)
    h = int(size.find('height').text)

    for obj in root.iter('object'):
        difficult = obj.find('difficult').text
        cls = obj.find('name').text
        if cls not in classes or int(difficult) == 1:
            continue
        cls_id = classes.index(cls)
        xmlbox = obj.find('bndbox')
        b = (float(xmlbox.find('xmin').text), float(xmlbox.find('xmax').text), float(xmlbox.find('ymin').text), float(xmlbox.find('ymax').text))
        bb = convert((w,h), b)
        out_file.write(str(cls_id) + " " + " ".join([str(a) for a in bb]) + '\n')
    in_file.close()
    out_file.close()

wd = os.getcwd()
wd = os.getcwd()
work_sapce_dir = os.path.join(wd, "VOCdevkit\\")
if not os.path.isdir(work_sapce_dir):
    os.mkdir(work_sapce_dir)
work_sapce_dir = os.path.join(work_sapce_dir, "VOC2007\\")
if not os.path.isdir(work_sapce_dir):
    os.mkdir(work_sapce_dir)
annotation_dir = os.path.join(work_sapce_dir, "Annotations\\")
if not os.path.isdir(annotation_dir):
        os.mkdir(annotation_dir)
clear_hidden_files(annotation_dir)
image_dir = os.path.join(work_sapce_dir, "JPEGImages\\")
if not os.path.isdir(image_dir):
        os.mkdir(image_dir)
clear_hidden_files(image_dir)
VOC_file_dir = os.path.join(work_sapce_dir, "ImageSets\\")
if not os.path.isdir(VOC_file_dir):
        os.mkdir(VOC_file_dir)
VOC_file_dir = os.path.join(VOC_file_dir, "Main\\")
if not os.path.isdir(VOC_file_dir):
        os.mkdir(VOC_file_dir)

train_file = open(os.path.join(wd, "2007_train.txt"), 'w')
test_file = open(os.path.join(wd, "2007_test.txt"), 'w')
train_file.close()
test_file.close()
VOC_train_file = open(os.path.join(work_sapce_dir, "ImageSets\\Main\\train.txt"), 'w')
VOC_test_file = open(os.path.join(work_sapce_dir, "ImageSets\\Main\\test.txt"), 'w')
VOC_train_file.close()
VOC_test_file.close()
if not os.path.exists('VOCdevkit\\VOC2007\\labels'):
    os.makedirs('VOCdevkit\\VOC2007\\labels')
train_file = open(os.path.join(wd, "2007_train.txt"), 'a')
test_file = open(os.path.join(wd, "2007_test.txt"), 'a')
VOC_train_file = open(os.path.join(work_sapce_dir, "ImageSets\\Main\\train.txt"), 'a')
VOC_test_file = open(os.path.join(work_sapce_dir, "ImageSets\\Main\\test.txt"), 'a')
list = os.listdir(image_dir) # list image files
probo = random.randint(1, 100)
print("Probobility: %d" % probo)
for i in range(0,len(list)):
    path = os.path.join(image_dir,list[i])
    if os.path.isfile(path):
        image_path = image_dir + list[i]
        voc_path = list[i]
        (nameWithoutExtention, extention) = os.path.splitext(os.path.basename(image_path))
        (voc_nameWithoutExtention, voc_extention) = os.path.splitext(os.path.basename(voc_path))
        annotation_name = nameWithoutExtention + '.xml'
        annotation_path = os.path.join(annotation_dir, annotation_name)
    probo = random.randint(1, 100)
    print("Probobility: %d" % probo)
    if(probo < 75):
        if os.path.exists(annotation_path):
            train_file.write(image_path + '\n')
            VOC_train_file.write(voc_nameWithoutExtention + '\n')
            convert_annotation(nameWithoutExtention)
    else:
        if os.path.exists(annotation_path):
            test_file.write(image_path + '\n')
            VOC_test_file.write(voc_nameWithoutExtention + '\n')
            convert_annotation(nameWithoutExtention)
train_file.close()
test_file.close()
VOC_train_file.close()
VOC_test_file.close()
以下是编排文件的说明:
采用的是PASCAL VOC数据集的目录结构
VOC2007下面建立两个文件夹:Annotations和JPEGImages
JPEGImages放所有的训练和验证图片;Annotations放所有的xml标记文件
VOCdevkit/VOC2007/Annotations: xml文件夹
VOCdevkit/VOC2007/ImageSets/Main: 空文件夹
VOCdevkit/VOC2007/JPEGImages: 真正的图片文件夹
要训练的话,需要一个文件夹,两个文件
VOCdevkit:文件夹
2007_test.txt:文件1
2007_train.txt:文件2
这样最后就得到了YOLOv4所需要的训练数据
总结
LabelImg软件十分好用,使用以上方法,就可以制作自己的Yolov4训练数据了。
